# Introduction
Nuxt is a free and [open-source framework](https://github.com/nuxt/nuxt){rel="nofollow"} with an intuitive and extendable way to create type-safe, performant and production-grade full-stack web applications and websites with [Vue.js](https://vuejs.org){rel="nofollow"}.
We made everything so you can start writing `.vue` files from the beginning while enjoying hot module replacement in development and a performant application in production with server-side rendering by default.
Nuxt has no vendor lock-in, allowing you to deploy your application [**everywhere, even on the edge**](https://nuxt.com/blog/nuxt-on-the-edge).
::tip
If you want to play around with Nuxt in your browser, you can [try it out in one of our online sandboxes](https://nuxt.com/docs/getting-started/installation#play-online).
::
## Automation and Conventions
Nuxt uses conventions and an opinionated directory structure to automate repetitive tasks and allow developers to focus on pushing features. The configuration file can still customize and override its default behaviors.
- **File-based routing:** define routes based on the structure of your [`pages/` directory](https://nuxt.com/docs/guide/directory-structure/pages). This can make it easier to organize your application and avoid the need for manual route configuration.
- **Code splitting:** Nuxt automatically splits your code into smaller chunks, which can help reduce the initial load time of your application.
- **Server-side rendering out of the box:** Nuxt comes with built-in SSR capabilities, so you don't have to set up a separate server yourself.
- **Auto-imports:** write Vue composables and components in their respective directories and use them without having to import them with the benefits of tree-shaking and optimized JS bundles.
- **Data-fetching utilities:** Nuxt provides composables to handle SSR-compatible data fetching as well as different strategies.
- **Zero-config TypeScript support:** write type-safe code without having to learn TypeScript with our auto-generated types and `tsconfig.json`
- **Configured build tools:** we use [Vite](https://vite.dev){rel="nofollow"} by default to support hot module replacement (HMR) in development and bundling your code for production with best-practices baked-in.
Nuxt takes care of these and provides both frontend and backend functionality so you can focus on what matters: **creating your web application**.
## Server-Side Rendering
Nuxt comes with built-in server-side rendering (SSR) capabilities by default, without having to configure a server yourself, which has many benefits for web applications:
- **Faster initial page load time:** Nuxt sends a fully rendered HTML page to the browser, which can be displayed immediately. This can provide a faster perceived page load time and a better user experience (UX), especially on slower networks or devices.
- **Improved SEO:** search engines can better index SSR pages because the HTML content is available immediately, rather than requiring JavaScript to render the content on the client-side.
- **Better performance on low-powered devices:** it reduces the amount of JavaScript that needs to be downloaded and executed on the client-side, which can be beneficial for low-powered devices that may struggle with processing heavy JavaScript applications.
- **Better accessibility:** the content is immediately available on the initial page load, improving accessibility for users who rely on screen readers or other assistive technologies.
- **Easier caching:** pages can be cached on the server-side, which can further improve performance by reducing the amount of time it takes to generate and send the content to the client.
Overall, server-side rendering can provide a faster and more efficient user experience, as well as improve search engine optimization and accessibility.
As Nuxt is a versatile framework, it gives you the possibility to statically render your whole application to a static hosting with `nuxt generate`,
disable SSR globally with the `ssr: false` option or leverage hybrid rendering by setting up the `routeRules` option.
::read-more
---
title: Nuxt rendering modes
to: https://nuxt.com/docs/guide/concepts/rendering
---
::
### Server engine
The Nuxt server engine [Nitro](https://nitro.unjs.io){rel="nofollow"} unlocks new full-stack capabilities.
In development, it uses Rollup and Node.js workers for your server code and context isolation. It also generates your server API by reading files in `server/api/` and server middleware from `server/middleware/`.
In production, Nitro builds your app and server into one universal `.output` directory. This output is light: minified and removed from any Node.js modules (except polyfills). You can deploy this output on any system supporting JavaScript, from Node.js, Serverless, Workers, Edge-side rendering or purely static.
::read-more
---
title: Nuxt server engine
to: https://nuxt.com/docs/guide/concepts/server-engine
---
::
### Production-ready
A Nuxt application can be deployed on a Node or Deno server, pre-rendered to be hosted in static environments, or deployed to serverless and edge providers.
::read-more
---
title: Deployment section
to: https://nuxt.com/docs/getting-started/deployment
---
::
### Modular
A module system allows to extend Nuxt with custom features and integrations with third-party services.
::read-more
---
title: Nuxt Modules Concept
to: https://nuxt.com/docs/guide/concepts/modules
---
::
### Architecture
Nuxt is composed of different [core packages](https://github.com/nuxt/nuxt/tree/main/packages){rel="nofollow"}:
- Core Engine: [nuxt](https://github.com/nuxt/nuxt/tree/main/packages/nuxt){rel="nofollow"}
- Bundlers: [@nuxt/vite-builder](https://github.com/nuxt/nuxt/tree/main/packages/vite){rel="nofollow"} and [@nuxt/webpack-builder](https://github.com/nuxt/nuxt/tree/main/packages/webpack){rel="nofollow"}
- Command line interface: [nuxi](https://github.com/nuxt/nuxt/tree/main/packages/nuxi){rel="nofollow"}
- Server engine: [nitro](https://github.com/nitrojs/nitro){rel="nofollow"}
- Development kit: [@nuxt/kit](https://github.com/nuxt/nuxt/tree/main/packages/kit){rel="nofollow"}
We recommend reading each concept to have a full vision of Nuxt capabilities and the scope of each package.
# Installation
## Play Online
If you just want to play around with Nuxt in your browser without setting up a project, you can use one of our online sandboxes:
::card-group
:::card
---
icon: i-simple-icons-stackblitz
target: _blank
title: Open on StackBlitz
to: https://nuxt.new/s/v3
---
:::
:::card
---
icon: i-simple-icons-codesandbox
target: _blank
title: Open on CodeSandbox
to: https://nuxt.new/c/v3
---
:::
::
Or follow the steps below to set up a new Nuxt project on your computer.
## New Project
#### Prerequisites
- **Node.js** - [`18.x`](https://nodejs.org/en){rel="nofollow"} or newer (but we recommend the [active LTS release](https://github.com/nodejs/release#release-schedule){rel="nofollow"})
- **Text editor** - There is no IDE requirement, but we recommend [Visual Studio Code](https://code.visualstudio.com/){rel="nofollow"} with the [official Vue extension](https://marketplace.visualstudio.com/items?itemName=Vue.volar){rel="nofollow"} (previously known as Volar) or [WebStorm](https://www.jetbrains.com/webstorm/){rel="nofollow"}, which, along with [other JetBrains IDEs](https://www.jetbrains.com/ides/){rel="nofollow"}, offers great Nuxt support right out-of-the-box.
- **Terminal** - In order to run Nuxt commands
::note
Additional notes for an optimal setup:
- **Node.js**: Make sure to use an even numbered version (18, 20, etc)
- **Nuxtr**: Install the community-developed [Nuxtr extension](https://marketplace.visualstudio.com/items?itemName=Nuxtr.nuxtr-vscode){rel="nofollow"}
- **WSL**: If you are using Windows and experience slow HMR, you may want to try using [WSL (Windows Subsystem for Linux)](https://docs.microsoft.com/en-us/windows/wsl/install){rel="nofollow"} which may solve some performance issues.
::
Open a terminal (if you're using [Visual Studio Code](https://code.visualstudio.com){rel="nofollow"}, you can open an [integrated terminal](https://code.visualstudio.com/docs/editor/integrated-terminal){rel="nofollow"}) and use the following command to create a new starter project:
::code-group{sync="pm"}
```bash [npm]
npm create nuxt <project-name>
```
```bash [yarn]
yarn create nuxt <project-name>
```
```bash [pnpm]
pnpm create nuxt <project-name>
```
```bash [bun]
bun create nuxt <project-name>
```
::
::tip
Alternatively, you can find other starters or themes by opening [nuxt.new](https://nuxt.new){rel="nofollow"} and following the instructions there.
::
Open your project folder in Visual Studio Code:
```bash [Terminal]
code <project-name>
```
Or change directory into your new project from your terminal:
```bash
cd <project-name>
```
## Development Server
Now you'll be able to start your Nuxt app in development mode:
::code-group{sync="pm"}
```bash [npm]
npm run dev -- -o
```
```bash [yarn]
yarn dev --open
```
```bash [pnpm]
pnpm dev -o
```
```bash [bun]
bun run dev -o
# To use the Bun runtime during development
# bun --bun run dev -o
```
::
::tip{icon="i-lucide-circle-check"}
Well done! A browser window should automatically open for <http://localhost:3000>{rel="nofollow"}.
::
## Next Steps
Now that you've created your Nuxt project, you are ready to start building your application.
::read-more{title="Nuxt Concepts" to="https://nuxt.com/docs/guide/concepts"}
::
# Configuration
By default, Nuxt is configured to cover most use cases. The [`nuxt.config.ts`](https://nuxt.com/docs/guide/directory-structure/nuxt-config) file can override or extend this default configuration.
## Nuxt Configuration
The [`nuxt.config.ts`](https://nuxt.com/docs/guide/directory-structure/nuxt-config) file is located at the root of a Nuxt project and can override or extend the application's behavior.
A minimal configuration file exports the `defineNuxtConfig` function containing an object with your configuration. The `defineNuxtConfig` helper is globally available without import.
```ts [nuxt.config.ts] twoslash
export default defineNuxtConfig({
// My Nuxt config
})
```
This file will often be mentioned in the documentation, for example to add custom scripts, register modules or change rendering modes.
::read-more{to="https://nuxt.com/docs/api/configuration/nuxt-config"}
Every option is described in the **Configuration Reference**.
::
::note
You don't have to use TypeScript to build an application with Nuxt. However, it is strongly recommended to use the `.ts` extension for the `nuxt.config` file. This way you can benefit from hints in your IDE to avoid typos and mistakes while editing your configuration.
::
### Environment Overrides
You can configure fully typed, per-environment overrides in your nuxt.config
```ts [nuxt.config.ts] twoslash
export default defineNuxtConfig({
$production: {
routeRules: {
'/**': { isr: true }
}
},
$development: {
//
},
$env: {
staging: {
//
}
},
})
```
To select an environment when running a Nuxt CLI command, simply pass the name to the `--envName` flag, like so: `nuxi build --envName staging`.
To learn more about the mechanism behind these overrides, please refer to the `c12` documentation on [environment-specific configuration](https://github.com/unjs/c12?tab=readme-ov-file#environment-specific-configuration){rel="nofollow"}.
::video-accordion
---
title: Watch a video from Alexander Lichter about the env-aware nuxt.config.ts
video-id: DFZI2iVCrNc
---
::
::note
If you're authoring layers, you can also use the `$meta` key to provide metadata that you or the consumers of your layer might use.
::
### Environment Variables and Private Tokens
The `runtimeConfig` API exposes values like environment variables to the rest of your application. By default, these keys are only available server-side. The keys within `runtimeConfig.public` and `runtimeConfig.app` (which is used by Nuxt internally) are also available client-side.
Those values should be defined in `nuxt.config` and can be overridden using environment variables.
::code-group
```ts [nuxt.config.ts] twoslash
export default defineNuxtConfig({
runtimeConfig: {
// The private keys which are only available server-side
apiSecret: '123',
// Keys within public are also exposed client-side
public: {
apiBase: '/api'
}
}
})
```
```ini [.env]
# This will override the value of apiSecret
NUXT_API_SECRET=api_secret_token
```
::
These variables are exposed to the rest of your application using the [`useRuntimeConfig()`](https://nuxt.com/docs/api/composables/use-runtime-config) composable.
```vue [pages/index.vue]
<script setup lang="ts">
const runtimeConfig = useRuntimeConfig()
</script>
```
::read-more{to="https://nuxt.com/docs/guide/going-further/runtime-config"}
::
## App Configuration
The `app.config.ts` file, located in the source directory (by default the root of the project), is used to expose public variables that can be determined at build time. Contrary to the `runtimeConfig` option, these can not be overridden using environment variables.
A minimal configuration file exports the `defineAppConfig` function containing an object with your configuration. The `defineAppConfig` helper is globally available without import.
```ts [app.config.ts]
export default defineAppConfig({
title: 'Hello Nuxt',
theme: {
dark: true,
colors: {
primary: '#ff0000'
}
}
})
```
These variables are exposed to the rest of your application using the [`useAppConfig`](https://nuxt.com/docs/api/composables/use-app-config) composable.
```vue [pages/index.vue]
<script setup lang="ts">
const appConfig = useAppConfig()
</script>
```
::read-more{to="https://nuxt.com/docs/guide/directory-structure/app-config"}
::
## `runtimeConfig` vs. `app.config`
As stated above, `runtimeConfig` and `app.config` are both used to expose variables to the rest of your application. To determine whether you should use one or the other, here are some guidelines:
- `runtimeConfig`: Private or public tokens that need to be specified after build using environment variables.
- `app.config`: Public tokens that are determined at build time, website configuration such as theme variant, title and any project config that are not sensitive.
| Feature | `runtimeConfig` | `app.config` |
| ------------------------- | --------------- | ------------ |
| Client Side | Hydrated | Bundled |
| Environment Variables | ✅ Yes | ❌ No |
| Reactive | ✅ Yes | ✅ Yes |
| Types support | ✅ Partial | ✅ Yes |
| Configuration per Request | ❌ No | ✅ Yes |
| Hot Module Replacement | ❌ No | ✅ Yes |
| Non primitive JS types | ❌ No | ✅ Yes |
## External Configuration Files
Nuxt uses [`nuxt.config.ts`](https://nuxt.com/docs/guide/directory-structure/nuxt-config) file as the single source of truth for configurations and skips reading external configuration files. During the course of building your project, you may have a need to configure those. The following table highlights common configurations and, where applicable, how they can be configured with Nuxt.
| Name | Config File | How To Configure |
| ------------------------------------------------- | ----------------------- | ------------------------------------------------------------------------------------- |
| [Nitro](https://nitro.unjs.io){rel="nofollow"} | ~~`nitro.config.ts`~~ | Use [`nitro`](https://nuxt.com/docs/api/nuxt-config#nitro) key in `nuxt.config` |
| [PostCSS](https://postcss.org){rel="nofollow"} | ~~`postcss.config.js`~~ | Use [`postcss`](https://nuxt.com/docs/api/nuxt-config#postcss) key in `nuxt.config` |
| [Vite](https://vite.dev){rel="nofollow"} | ~~`vite.config.ts`~~ | Use [`vite`](https://nuxt.com/docs/api/nuxt-config#vite) key in `nuxt.config` |
| [webpack](https://webpack.js.org){rel="nofollow"} | ~~`webpack.config.ts`~~ | Use [`webpack`](https://nuxt.com/docs/api/nuxt-config#webpack-1) key in `nuxt.config` |
Here is a list of other common config files:
| Name | Config File | How To Configure |
| ------------------------------------------------------------ | --------------------- | --------------------------------------------------------------------------------------------- |
| [TypeScript](https://www.typescriptlang.org){rel="nofollow"} | `tsconfig.json` | [More Info](https://nuxt.com/docs/guide/concepts/typescript#nuxttsconfigjson) |
| [ESLint](https://eslint.org){rel="nofollow"} | `eslint.config.js` | [More Info](https://eslint.org/docs/latest/use/configure/configuration-files){rel="nofollow"} |
| [Prettier](https://prettier.io){rel="nofollow"} | `prettier.config.js` | [More Info](https://prettier.io/docs/en/configuration.html){rel="nofollow"} |
| [Stylelint](https://stylelint.io){rel="nofollow"} | `stylelint.config.js` | [More Info](https://stylelint.io/user-guide/configure){rel="nofollow"} |
| [TailwindCSS](https://tailwindcss.com){rel="nofollow"} | `tailwind.config.js` | [More Info](https://tailwindcss.nuxtjs.org/tailwindcss/configuration){rel="nofollow"} |
| [Vitest](https://vitest.dev){rel="nofollow"} | `vitest.config.ts` | [More Info](https://vitest.dev/config/){rel="nofollow"} |
## Vue Configuration
### With Vite
If you need to pass options to `@vitejs/plugin-vue` or `@vitejs/plugin-vue-jsx`, you can do this in your `nuxt.config` file.
- `vite.vue` for `@vitejs/plugin-vue`. Check available options [here](https://github.com/vitejs/vite-plugin-vue/tree/main/packages/plugin-vue){rel="nofollow"}.
- `vite.vueJsx` for `@vitejs/plugin-vue-jsx`. Check available options [here](https://github.com/vitejs/vite-plugin-vue/tree/main/packages/plugin-vue-jsx){rel="nofollow"}.
```ts [nuxt.config.ts] twoslash
export default defineNuxtConfig({
vite: {
vue: {
customElement: true
},
vueJsx: {
mergeProps: true
}
}
})
```
::read-more{to="https://nuxt.com/docs/api/configuration/nuxt-config#vue"}
::
### With webpack
If you use webpack and need to configure `vue-loader`, you can do this using `webpack.loaders.vue` key inside your `nuxt.config` file. The available options are [defined here](https://github.com/vuejs/vue-loader/blob/main/src/index.ts#L32-L62){rel="nofollow"}.
```ts [nuxt.config.ts] twoslash
export default defineNuxtConfig({
webpack: {
loaders: {
vue: {
hotReload: true,
}
}
}
})
```
::read-more{to="https://nuxt.com/docs/api/configuration/nuxt-config#loaders"}
::
### Enabling Experimental Vue Features
You may need to enable experimental features in Vue, such as `propsDestructure`. Nuxt provides an easy way to do that in `nuxt.config.ts`, no matter which builder you are using:
```ts [nuxt.config.ts] twoslash
export default defineNuxtConfig({
vue: {
propsDestructure: true
}
})
```
#### experimental `reactivityTransform` migration from Vue 3.4 and Nuxt 3.9
Since Nuxt 3.9 and Vue 3.4, `reactivityTransform` has been moved from Vue to Vue Macros which has a [Nuxt integration](https://vue-macros.dev/guide/nuxt-integration.html){rel="nofollow"}.
::read-more{to="https://nuxt.com/docs/api/configuration/nuxt-config#vue-1"}
::
# Views
## `app.vue`

By default, Nuxt will treat this file as the **entrypoint** and render its content for every route of the application.
```vue [app.vue]
<template>
<div>
<h1>Welcome to the homepage</h1>
</div>
</template>
```
::tip
If you are familiar with Vue, you might wonder where `main.js` is (the file that normally creates a Vue app). Nuxt does this behind the scene.
::
## Components

Most components are reusable pieces of the user interface, like buttons and menus. In Nuxt, you can create these components in the [`components/`](https://nuxt.com/docs/guide/directory-structure/components) directory, and they will be automatically available across your application without having to explicitly import them.
::code-group
```vue [app.vue]
<template>
<div>
<h1>Welcome to the homepage</h1>
<AppAlert>
This is an auto-imported component.
</AppAlert>
</div>
</template>
```
```vue [components/AppAlert.vue]
<template>
<span>
<slot />
</span>
</template>
```
::
## Pages

Pages represent views for each specific route pattern. Every file in the [`pages/`](https://nuxt.com/docs/guide/directory-structure/pages) directory represents a different route displaying its content.
To use pages, create `pages/index.vue` file and add `<NuxtPage />` component to the [`app.vue`](https://nuxt.com/docs/guide/directory-structure/app) (or remove `app.vue` for default entry). You can now create more pages and their corresponding routes by adding new files in the [`pages/`](https://nuxt.com/docs/guide/directory-structure/pages) directory.
::code-group
```vue [pages/index.vue]
<template>
<div>
<h1>Welcome to the homepage</h1>
<AppAlert>
This is an auto-imported component
</AppAlert>
</div>
</template>
```
```vue [pages/about.vue]
<template>
<section>
<p>This page will be displayed at the /about route.</p>
</section>
</template>
```
::
::read-more
---
title: Routing Section
to: https://nuxt.com/docs/getting-started/routing
---
::
## Layouts

Layouts are wrappers around pages that contain a common User Interface for several pages, such as a header and footer display. Layouts are Vue files using `<slot />` components to display the **page** content. The `layouts/default.vue` file will be used by default. Custom layouts can be set as part of your page metadata.
::note
If you only have a single layout in your application, we recommend using [`app.vue`](https://nuxt.com/docs/guide/directory-structure/app) with [`<NuxtPage />`](https://nuxt.com/docs/api/components/nuxt-page) instead.
::
::code-group
```vue [app.vue]
<template>
<div>
<NuxtLayout>
<NuxtPage />
</NuxtLayout>
</div>
</template>
```
```vue [layouts/default.vue]
<template>
<div>
<AppHeader />
<slot />
<AppFooter />
</div>
</template>
```
```vue [pages/index.vue]
<template>
<div>
<h1>Welcome to the homepage</h1>
<AppAlert>
This is an auto-imported component
</AppAlert>
</div>
</template>
```
```vue [pages/about.vue]
<template>
<section>
<p>This page will be displayed at the /about route.</p>
</section>
</template>
```
::
If you want to create more layouts and learn how to use them in your pages, find more information in the [Layouts section](https://nuxt.com/docs/guide/directory-structure/layouts).
## Advanced: Extending the HTML Template
::note
If you only need to modify the `<head>`, you can refer to the [SEO and meta section](https://nuxt.com/docs/getting-started/seo-meta).
::
You can have full control over the HTML template by adding a Nitro plugin that registers a hook.
The callback function of the `render:html` hook allows you to mutate the HTML before it is sent to the client.
```ts [server/plugins/extend-html.ts] twoslash
export default defineNitroPlugin((nitroApp) => {
nitroApp.hooks.hook('render:html', (html, { event }) => {
// This will be an object representation of the html template.
console.log(html)
html.head.push(`<meta name="description" content="My custom description" />`)
})
// You can also intercept the response here.
nitroApp.hooks.hook('render:response', (response, { event }) => { console.log(response) })
})
```
::read-more{to="https://nuxt.com/docs/guide/going-further/hooks"}
::
# Assets
Nuxt uses two directories to handle assets like stylesheets, fonts or images.
- The [`public/`](https://nuxt.com/docs/guide/directory-structure/public) directory content is served at the server root as-is.
- The [`assets/`](https://nuxt.com/docs/guide/directory-structure/assets) directory contains by convention every asset that you want the build tool (Vite or webpack) to process.
## Public Directory
The [`public/`](https://nuxt.com/docs/guide/directory-structure/public) directory is used as a public server for static assets publicly available at a defined URL of your application.
You can get a file in the [`public/`](https://nuxt.com/docs/guide/directory-structure/public) directory from your application's code or from a browser by the root URL `/`.
### Example
For example, referencing an image file in the `public/img/` directory, available at the static URL `/img/nuxt.png`:
```vue [app.vue]
<template>
<img src="/img/nuxt.png" alt="Discover Nuxt" />
</template>
```
## Assets Directory
Nuxt uses [Vite](https://vite.dev/guide/assets.html){rel="nofollow"} (default) or [webpack](https://webpack.js.org/guides/asset-management){rel="nofollow"} to build and bundle your application. The main function of these build tools is to process JavaScript files, but they can be extended through [plugins](https://vite.dev/plugins){rel="nofollow"} (for Vite) or [loaders](https://webpack.js.org/loaders){rel="nofollow"} (for webpack) to process other kind of assets, like stylesheets, fonts or SVG. This step transforms the original file mainly for performance or caching purposes (such as stylesheets minification or browser cache invalidation).
By convention, Nuxt uses the [`assets/`](https://nuxt.com/docs/guide/directory-structure/assets) directory to store these files but there is no auto-scan functionality for this directory, and you can use any other name for it.
In your application's code, you can reference a file located in the [`assets/`](https://nuxt.com/docs/guide/directory-structure/assets) directory by using the `~/assets/` path.
### Example
For example, referencing an image file that will be processed if a build tool is configured to handle this file extension:
```vue [app.vue]
<template>
<img src="~/assets/img/nuxt.png" alt="Discover Nuxt" />
</template>
```
::note
Nuxt won't serve files in the [`assets/`](https://nuxt.com/docs/guide/directory-structure/assets) directory at a static URL like `/assets/my-file.png`. If you need a static URL, use the [`public/`](https://nuxt.com/#public-directory) directory.
::
# Styling
Nuxt is highly flexible when it comes to styling. Write your own styles, or reference local and external stylesheets.
You can use CSS preprocessors, CSS frameworks, UI libraries and Nuxt modules to style your application.
## Local Stylesheets
If you're writing local stylesheets, the natural place to put them is the [`assets/` directory](https://nuxt.com/docs/guide/directory-structure/assets).
### Importing Within Components
You can import stylesheets in your pages, layouts and components directly.
You can use a javascript import, or a css [`@import` statement](https://developer.mozilla.org/en-US/docs/Web/CSS/@import){rel="nofollow"}.
```vue [pages/index.vue]
<script>
// Use a static import for server-side compatibility
import '~/assets/css/first.css'
// Caution: Dynamic imports are not server-side compatible
import('~/assets/css/first.css')
</script>
<style>
@import url("~/assets/css/second.css");
</style>
```
::tip
The stylesheets will be inlined in the HTML rendered by Nuxt.
::
### The CSS Property
You can also use the `css` property in the Nuxt configuration.
The natural place for your stylesheets is the [`assets/` directory](https://nuxt.com/docs/guide/directory-structure/assets). You can then reference its path and Nuxt will include it to all the pages of your application.
```ts [nuxt.config.ts]
export default defineNuxtConfig({
css: ['~/assets/css/main.css']
})
```
::tip
The stylesheets will be inlined in the HTML rendered by Nuxt, injected globally and present in all pages.
::
### Working With Fonts
Place your local fonts files in your `~/public/` directory, for example in `~/public/fonts`. You can then reference them in your stylesheets using `url()`.
```css [assets/css/main.css]
@font-face {
font-family: 'FarAwayGalaxy';
src: url('/fonts/FarAwayGalaxy.woff') format('woff');
font-weight: normal;
font-style: normal;
font-display: swap;
}
```
Then reference your fonts by name in your stylesheets, pages or components:
```vue
<style>
h1 {
font-family: 'FarAwayGalaxy', sans-serif;
}
</style>
```
### Stylesheets Distributed Through NPM
You can also reference stylesheets that are distributed through npm. Let's use the popular `animate.css` library as an example.
::code-group{sync="pm"}
```bash [npm]
npm install animate.css
```
```bash [yarn]
yarn add animate.css
```
```bash [pnpm]
pnpm install animate.css
```
```bash [bun]
bun install animate.css
```
::
Then you can reference it directly in your pages, layouts and components:
```vue [app.vue]
<script>
import 'animate.css'
</script>
<style>
@import url("animate.css");
</style>
```
The package can also be referenced as a string in the css property of your Nuxt configuration.
```ts [nuxt.config.ts]
export default defineNuxtConfig({
css: ['animate.css']
})
```
## External Stylesheets
You can include external stylesheets in your application by adding a link element in the head section of your nuxt.config file. You can achieve this result using different methods. Note that local stylesheets can also be included like this.
You can manipulate the head with the [`app.head`](https://nuxt.com/docs/api/nuxt-config#head) property of your Nuxt configuration:
```ts [nuxt.config.ts] twoslash
export default defineNuxtConfig({
app: {
head: {
link: [{ rel: 'stylesheet', href: 'https://cdnjs.cloudflare.com/ajax/libs/animate.css/4.1.1/animate.min.css' }]
}
}
})
```
### Dynamically Adding Stylesheets
You can use the useHead composable to dynamically set a value in your head in your code.
::read-more{to="https://nuxt.com/docs/api/composables/use-head"}
::
```ts twoslash
useHead({
link: [{ rel: 'stylesheet', href: 'https://cdnjs.cloudflare.com/ajax/libs/animate.css/4.1.1/animate.min.css' }]
})
```
Nuxt uses `unhead` under the hood, and you can refer to its full documentation [here](https://unhead.unjs.io){rel="nofollow"}.
### Modifying The Rendered Head With A Nitro Plugin
If you need more advanced control, you can intercept the rendered html with a hook and modify the head programmatically.
Create a plugin in `~/server/plugins/my-plugin.ts` like this:
```ts [server/plugins/my-plugin.ts] twoslash
export default defineNitroPlugin((nitro) => {
nitro.hooks.hook('render:html', (html) => {
html.head.push('<link rel="stylesheet" href="https://cdnjs.cloudflare.com/ajax/libs/animate.css/4.1.1/animate.min.css">')
})
})
```
External stylesheets are render-blocking resources: they must be loaded and processed before the browser renders the page. Web pages that contain unnecessarily large styles take longer to render. You can read more about it on [web.dev](https://web.dev/defer-non-critical-css){rel="nofollow"}.
## Using Preprocessors
To use a preprocessor like SCSS, Sass, Less or Stylus, install it first.
::code-group
```bash [Sass & SCSS]
npm install -D sass
```
```bash [Less]
npm install -D less
```
```bash [Stylus]
npm install -D stylus
```
::
The natural place to write your stylesheets is the `assets` directory.
You can then import your source files in your `app.vue` (or layouts files) using your preprocessor's syntax.
```vue [pages/app.vue]
<style lang="scss">
@use "~/assets/scss/main.scss";
</style>
```
Alternatively, you can use the `css` property of your Nuxt configuration.
```ts [nuxt.config.ts] twoslash
export default defineNuxtConfig({
css: ['~/assets/scss/main.scss']
})
```
::tip
In both cases, the compiled stylesheets will be inlined in the HTML rendered by Nuxt.
::
If you need to inject code in pre-processed files, like a [sass partial](https://sass-lang.com/documentation/at-rules/use#partials){rel="nofollow"} with color variables, you can do so with the vite [preprocessors options](https://vite.dev/config/shared-options.html#css-preprocessoroptions){rel="nofollow"}.
Create some partials in your `assets` directory:
::code-group{sync="preprocessor"}
```scss [assets/_colors.scss]
$primary: #49240F;
$secondary: #E4A79D;
```
```sass [assets/_colors.sass]
$primary: #49240F
$secondary: #E4A79D
```
::
Then in your `nuxt.config` :
::code-group
```ts [SCSS] twoslash
export default defineNuxtConfig({
vite: {
css: {
preprocessorOptions: {
scss: {
additionalData: '@use "~/assets/_colors.scss" as *;'
}
}
}
}
})
```
```ts [SASS] twoslash
export default defineNuxtConfig({
vite: {
css: {
preprocessorOptions: {
sass: {
additionalData: '@use "~/assets/_colors.sass" as *\n'
}
}
}
}
})
```
::
Nuxt uses Vite by default. If you wish to use webpack instead, refer to each preprocessor loader [documentation](https://webpack.js.org/loaders/sass-loader){rel="nofollow"}.
### Preprocessor Workers (Experimental)
Vite has made available an [experimental option](https://vite.dev/config/shared-options.html#css-preprocessormaxworkers){rel="nofollow"} which can speed up using preprocessors.
You can enable this in your `nuxt.config`:
```ts
export default defineNuxtConfig({
vite: {
css: {
preprocessorMaxWorkers: true // number of CPUs minus 1
}
}
})
```
::note
This is an experimental option and you should refer to the Vite documentation and [provide feedback](https://github.com/vitejs/vite/discussions/15835){rel="nofollow"}.
::
## Single File Components (SFC) Styling
One of the best things about Vue and SFC is how great it is at naturally dealing with styling. You can directly write CSS or preprocessor code in the style block of your components file, therefore you will have fantastic developer experience without having to use something like CSS-in-JS. However if you wish to use CSS-in-JS, you can find 3rd party libraries and modules that support it, such as [pinceau](https://github.com/Tahul/pinceau){rel="nofollow"}.
You can refer to the [Vue docs](https://vuejs.org/api/sfc-css-features.html){rel="nofollow"} for a comprehensive reference about styling components in SFC.
### Class And Style Bindings
You can leverage Vue SFC features to style your components with class and style attributes.
::code-group
```vue [Ref and Reactive]
<script setup lang="ts">
const isActive = ref(true)
const hasError = ref(false)
const classObject = reactive({
active: true,
'text-danger': false
})
</script>
<template>
<div class="static" :class="{ active: isActive, 'text-danger': hasError }"></div>
<div :class="classObject"></div>
</template>
```
```vue [Computed]
<script setup lang="ts">
const isActive = ref(true)
const error = ref(null)
const classObject = computed(() => ({
active: isActive.value && !error.value,
'text-danger': error.value && error.value.type === 'fatal'
}))
</script>
<template>
<div :class="classObject"></div>
</template>
```
```vue [Array]
<script setup lang="ts">
const isActive = ref(true)
const errorClass = ref('text-danger')
</script>
<template>
<div :class="[{ active: isActive }, errorClass]"></div>
</template>
```
```vue [Style]
<script setup lang="ts">
const activeColor = ref('red')
const fontSize = ref(30)
const styleObject = reactive({ color: 'red', fontSize: '13px' })
</script>
<template>
<div :style="{ color: activeColor, fontSize: fontSize + 'px' }"></div>
<div :style="[baseStyles, overridingStyles]"></div>
<div :style="styleObject"></div>
</template>
```
::
Refer to the [Vue docs](https://vuejs.org/guide/essentials/class-and-style.html){rel="nofollow"} for more information.
### Dynamic Styles With `v-bind`
You can reference JavaScript variable and expression within your style blocks with the v-bind function.
The binding will be dynamic, meaning that if the variable value changes, the style will be updated.
```vue
<script setup lang="ts">
const color = ref("red")
</script>
<template>
<div class="text">hello</div>
</template>
<style>
.text {
color: v-bind(color);
}
</style>
```
### Scoped Styles
The scoped attribute allows you to style components in isolation. The styles declared with this attribute will only apply to this component.
```vue
<template>
<div class="example">hi</div>
</template>
<style scoped>
.example {
color: red;
}
</style>
```
### CSS Modules
You can use [CSS Modules](https://github.com/css-modules/css-modules){rel="nofollow"} with the module attribute. Access it with the injected `$style` variable.
```vue
<template>
<p :class="$style.red">This should be red</p>
</template>
<style module>
.red {
color: red;
}
</style>
```
### Preprocessors Support
SFC style blocks support preprocessors syntax. Vite come with built-in support for .scss, .sass, .less, .styl and .stylus files without configuration. You just need to install them first, and they will be available directly in SFC with the lang attribute.
::code-group
```vue [SCSS]
<style lang="scss">
/* Write scss here */
</style>
```
```vue [Sass]
<style lang="sass">
/* Write sass here */
</style>
```
```vue [LESS]
<style lang="less">
/* Write less here */
</style>
```
```vue [Stylus]
<style lang="stylus">
/* Write stylus here */
</style>
```
::
You can refer to the [Vite CSS docs](https://vite.dev/guide/features.html#css){rel="nofollow"} and the [@vitejs/plugin-vue docs](https://github.com/vitejs/vite-plugin-vue/tree/main/packages/plugin-vue){rel="nofollow"}.
For webpack users, refer to the [vue loader docs](https://vue-loader.vuejs.org){rel="nofollow"}.
## Using PostCSS
Nuxt comes with postcss built-in. You can configure it in your `nuxt.config` file.
```ts [nuxt.config.ts]
export default defineNuxtConfig({
postcss: {
plugins: {
'postcss-nested': {},
'postcss-custom-media': {}
}
}
})
```
For proper syntax highlighting in SFC, you can use the postcss lang attribute.
```vue
<style lang="postcss">
/* Write postcss here */
</style>
```
By default, Nuxt comes with the following plugins already pre-configured:
- [postcss-import](https://github.com/postcss/postcss-import){rel="nofollow"}: Improves the `@import` rule
- [postcss-url](https://github.com/postcss/postcss-url){rel="nofollow"}: Transforms `url()` statements
- [autoprefixer](https://github.com/postcss/autoprefixer){rel="nofollow"}: Automatically adds vendor prefixes
- [cssnano](https://cssnano.github.io/cssnano){rel="nofollow"}: Minification and purge
## Leveraging Layouts For Multiple Styles
If you need to style different parts of your application completely differently, you can use layouts.
Use different styles for different layouts.
```vue
<template>
<div class="default-layout">
<h1>Default Layout</h1>
<slot />
</div>
</template>
<style>
.default-layout {
color: red;
}
</style>
```
::read-more{to="https://nuxt.com/docs/guide/directory-structure/layouts"}
::
## Third Party Libraries And Modules
Nuxt isn't opinionated when it comes to styling and provides you with a wide variety of options. You can use any styling tool that you want, such as popular libraries like [UnoCSS](https://unocss.dev){rel="nofollow"} or [Tailwind CSS](https://tailwindcss.com){rel="nofollow"}.
The community and the Nuxt team have developed plenty of Nuxt modules to make the integration easier.
You can discover them on the [modules section](https://nuxt.com/modules) of the website.
Here are a few modules to help you get started:
- [UnoCSS](https://nuxt.com/modules/unocss): Instant on-demand atomic CSS engine
- [Tailwind CSS](https://nuxt.com/modules/tailwindcss): Utility-first CSS framework
- [Fontaine](https://github.com/nuxt-modules/fontaine){rel="nofollow"}: Font metric fallback
- [Pinceau](https://github.com/Tahul/pinceau){rel="nofollow"}: Adaptable styling framework
- [Nuxt UI](https://ui.nuxt.com){rel="nofollow"}: A UI Library for Modern Web Apps
- [Panda CSS](https://panda-css.com/docs/installation/nuxt){rel="nofollow"}: CSS-in-JS engine that generates atomic CSS at build time
Nuxt modules provide you with a good developer experience out of the box, but remember that if your favorite tool doesn't have a module, it doesn't mean that you can't use it with Nuxt! You can configure it yourself for your own project. Depending on the tool, you might need to use a [Nuxt plugin](https://nuxt.com/docs/guide/directory-structure/plugins) and/or [make your own module](https://nuxt.com/docs/guide/going-further/modules). Share them with the [community](https://nuxt.com/modules) if you do!
### Easily Load Webfonts
You can use [the Nuxt Google Fonts module](https://github.com/nuxt-modules/google-fonts){rel="nofollow"} to load Google Fonts.
If you are using [UnoCSS](https://unocss.dev/integrations/nuxt){rel="nofollow"}, note that it comes with a [web fonts presets](https://unocss.dev/presets/web-fonts){rel="nofollow"} to conveniently load fonts from common providers, including Google Fonts and more.
## Advanced
### Transitions
Nuxt comes with the same `<Transition>` element that Vue has, and also has support for the experimental [View Transitions API](https://nuxt.com/docs/getting-started/transitions#view-transitions-api-experimental).
::read-more{to="https://nuxt.com/docs/getting-started/transitions"}
::
### Font Advanced Optimization
We would recommend using [Fontaine](https://github.com/nuxt-modules/fontaine){rel="nofollow"} to reduce your [CLS](https://web.dev/cls){rel="nofollow"}. If you need something more advanced, consider creating a Nuxt module to extend the build process or the Nuxt runtime.
::tip
Always remember to take advantage of the various tools and techniques available in the Web ecosystem at large to make styling your application easier and more efficient. Whether you're using native CSS, a preprocessor, postcss, a UI library or a module, Nuxt has got you covered. Happy styling!
::
### LCP Advanced Optimizations
You can do the following to speed-up the download of your global CSS files:
- Use a CDN so the files are physically closer to your users
- Compress your assets, ideally using Brotli
- Use HTTP2/HTTP3 for delivery
- Host your assets on the same domain (do not use a different subdomain)
Most of these things should be done for you automatically if you're using modern platforms like Cloudflare, Netlify or Vercel.
You can find an LCP optimization guide on [web.dev](https://web.dev/optimize-lcp){rel="nofollow"}.
If all of your CSS is inlined by Nuxt, you can (experimentally) completely stop external CSS files from being referenced in your rendered HTML.
You can achieve that with a hook, that you can place in a module, or in your Nuxt configuration file.
```ts [nuxt.config.ts]
export default defineNuxtConfig({
hooks: {
'build:manifest': (manifest) => {
// find the app entry, css list
const css = Object.values(manifest).find(options => options.isEntry)?.css
if (css) {
// start from the end of the array and go to the beginning
for (let i = css.length - 1; i >= 0; i--) {
// if it starts with 'entry', remove it from the list
if (css[i].startsWith('entry')) css.splice(i, 1)
}
}
},
},
})
```
# Routing
One core feature of Nuxt is the file system router. Every Vue file inside the [`pages/`](https://nuxt.com/docs/guide/directory-structure/pages) directory creates a corresponding URL (or route) that displays the contents of the file. By using dynamic imports for each page, Nuxt leverages code-splitting to ship the minimum amount of JavaScript for the requested route.
## Pages
Nuxt routing is based on [vue-router](https://router.vuejs.org){rel="nofollow"} and generates the routes from every component created in the [`pages/` directory](https://nuxt.com/docs/guide/directory-structure/pages), based on their filename.
This file system routing uses naming conventions to create dynamic and nested routes:
::code-group
```bash [Directory Structure]
-| pages/
---| about.vue
---| index.vue
---| posts/
-----| [id].vue
```
```json [Generated Router File]
{
"routes": [
{
"path": "/about",
"component": "pages/about.vue"
},
{
"path": "/",
"component": "pages/index.vue"
},
{
"path": "/posts/:id",
"component": "pages/posts/[id].vue"
}
]
}
```
::
::read-more{to="https://nuxt.com/docs/guide/directory-structure/pages"}
::
## Navigation
The [`<NuxtLink>`](https://nuxt.com/docs/api/components/nuxt-link) component links pages between them. It renders an `<a>` tag with the `href` attribute set to the route of the page. Once the application is hydrated, page transitions are performed in JavaScript by updating the browser URL. This prevents full-page refreshes and allows for animated transitions.
When a [`<NuxtLink>`](https://nuxt.com/docs/api/components/nuxt-link) enters the viewport on the client side, Nuxt will automatically prefetch components and payload (generated pages) of the linked pages ahead of time, resulting in faster navigation.
```vue [pages/app.vue]
<template>
<header>
<nav>
<ul>
<li><NuxtLink to="/about">About</NuxtLink></li>
<li><NuxtLink to="/posts/1">Post 1</NuxtLink></li>
<li><NuxtLink to="/posts/2">Post 2</NuxtLink></li>
</ul>
</nav>
</header>
</template>
```
::read-more{to="https://nuxt.com/docs/api/components/nuxt-link"}
::
## Route Parameters
The [`useRoute()`](https://nuxt.com/docs/api/composables/use-route) composable can be used in a `<script setup>` block or a `setup()` method of a Vue component to access the current route details.
```vue [pages/posts/[id\\].vue] twoslash
<script setup lang="ts">
const route = useRoute()
// When accessing /posts/1, route.params.id will be 1
console.log(route.params.id)
</script>
```
::read-more{to="https://nuxt.com/docs/api/composables/use-route"}
::
## Route Middleware
Nuxt provides a customizable route middleware framework you can use throughout your application, ideal for extracting code that you want to run before navigating to a particular route.
::note
Route middleware runs within the Vue part of your Nuxt app. Despite the similar name, they are completely different from server middleware, which are run in the Nitro server part of your app.
::
There are three kinds of route middleware:
1. Anonymous (or inline) route middleware, which are defined directly in the pages where they are used.
2. Named route middleware, which are placed in the [`middleware/`](https://nuxt.com/docs/guide/directory-structure/middleware) directory and will be automatically loaded via asynchronous import when used on a page. (**Note**: The route middleware name is normalized to kebab-case, so `someMiddleware` becomes `some-middleware`.)
3. Global route middleware, which are placed in the [`middleware/` directory](https://nuxt.com/docs/guide/directory-structure/middleware) (with a `.global` suffix) and will be automatically run on every route change.
Example of an `auth` middleware protecting the `/dashboard` page:
::code-group
```ts [middleware/auth.ts] twoslash
function isAuthenticated(): boolean { return false }
// ---cut---
export default defineNuxtRouteMiddleware((to, from) => {
// isAuthenticated() is an example method verifying if a user is authenticated
if (isAuthenticated() === false) {
return navigateTo('/login')
}
})
```
```vue [pages/dashboard.vue] twoslash
<script setup lang="ts">
definePageMeta({
middleware: 'auth'
})
</script>
<template>
<h1>Welcome to your dashboard</h1>
</template>
```
::
::read-more{to="https://nuxt.com/docs/guide/directory-structure/middleware"}
::
## Route Validation
Nuxt offers route validation via the `validate` property in [`definePageMeta()`](https://nuxt.com/docs/api/utils/define-page-meta) in each page you wish to validate.
The `validate` property accepts the `route` as an argument. You can return a boolean value to determine whether or not this is a valid route to be rendered with this page. If you return `false`, and another match can't be found, this will cause a 404 error. You can also directly return an object with `statusCode`/`statusMessage` to respond immediately with an error (other matches will not be checked).
If you have a more complex use case, then you can use anonymous route middleware instead.
```vue [pages/posts/[id\\].vue] twoslash
<script setup lang="ts">
definePageMeta({
validate: async (route) => {
// Check if the id is made up of digits
return typeof route.params.id === 'string' && /^\d+$/.test(route.params.id)
}
})
</script>
```
::read-more{to="https://nuxt.com/docs/api/utils/define-page-meta"}
::
# SEO and Meta
Nuxt head tag management is powered by [Unhead](https://unhead.unjs.io){rel="nofollow"}. It provides sensible defaults, several powerful composables
and numerous configuration options to manage your app's head and SEO meta tags.
## Nuxt Config
Providing an [`app.head`](https://nuxt.com/docs/api/nuxt-config#head) property in your [`nuxt.config.ts`](https://nuxt.com/docs/guide/directory-structure/nuxt-config) allows you to statically customize the head for your entire app.
::important
This method does not allow you to provide reactive data. We recommend to use `useHead()` in `app.vue`.
::
It's good practice to set tags here that won't change such as your site title default, language and favicon.
```ts [nuxt.config.ts] twoslash
export default defineNuxtConfig({
app: {
head: {
title: 'Nuxt', // default fallback title
htmlAttrs: {
lang: 'en',
},
link: [
{ rel: 'icon', type: 'image/x-icon', href: '/favicon.ico' },
]
}
}
})
```
You can also provide any of the keys listed below in [Types](https://nuxt.com/#types).
### Defaults Tags
Some tags are provided by Nuxt by default to ensure your website works well out of the box.
- `viewport`: `width=device-width, initial-scale=1`
- `charset`: `utf-8`
While most sites won't need to override these defaults, you can update them using the keyed shortcuts.
```ts [nuxt.config.ts] twoslash
export default defineNuxtConfig({
app: {
head: {
// update Nuxt defaults
charset: 'utf-16',
viewport: 'width=device-width, initial-scale=1, maximum-scale=1',
}
}
})
```
## `useHead`
The [`useHead`](https://nuxt.com/docs/api/composables/use-head) composable function supports reactive input, allowing you to manage your head tags programmatically.
```vue [app.vue] twoslash
<script setup lang="ts">
useHead({
title: 'My App',
meta: [
{ name: 'description', content: 'My amazing site.' }
],
bodyAttrs: {
class: 'test'
},
script: [ { innerHTML: 'console.log(\'Hello world\')' } ]
})
</script>
```
We recommend to take a look at the [`useHead`](https://nuxt.com/docs/api/composables/use-head) and [`useHeadSafe`](https://nuxt.com/docs/api/composables/use-head-safe) composables.
## `useSeoMeta`
The [`useSeoMeta`](https://nuxt.com/docs/api/composables/use-seo-meta) composable lets you define your site's SEO meta tags as an object with full type safety.
This helps you avoid typos and common mistakes, such as using `name` instead of `property`.
```vue [app.vue] twoslash
<script setup lang="ts">
useSeoMeta({
title: 'My Amazing Site',
ogTitle: 'My Amazing Site',
description: 'This is my amazing site, let me tell you all about it.',
ogDescription: 'This is my amazing site, let me tell you all about it.',
ogImage: 'https://example.com/image.png',
twitterCard: 'summary_large_image',
})
</script>
```
::read-more{to="https://nuxt.com/docs/api/composables/use-seo-meta"}
::
## Components
While using [`useHead`](https://nuxt.com/docs/api/composables/use-head) is recommended in all cases, you may have a personal preference for defining your head tags in your template using components.
Nuxt provides the following components for this purpose: `<Title>`, `<Base>`, `<NoScript>`, `<Style>`, `<Meta>`, `<Link>`, `<Body>`, `<Html>` and `<Head>`. Note
the capitalization of these components ensuring we don't use invalid native HTML tags.
`<Head>` and `<Body>` can accept nested meta tags (for aesthetic reasons) but this does not affect *where* the nested meta tags are rendered in the final HTML.
```vue [app.vue]
<script setup lang="ts">
const title = ref('Hello World')
</script>
<template>
<div>
<Head>
<Title>{{ title }}</Title>
<Meta name="description" :content="title" />
<Style>
body { background-color: green; }
</Style>
</Head>
<h1>{{ title }}</h1>
</div>
</template>
```
It's suggested to wrap your components in either a `<Head>` or `<Html>` components as tags will be deduped more intuitively.
## Types
Below are the non-reactive types used for [`useHead`](https://nuxt.com/docs/api/composables/use-head), [`app.head`](https://nuxt.com/docs/api/nuxt-config#head) and components.
```ts
interface MetaObject {
title?: string
titleTemplate?: string | ((title?: string) => string)
templateParams?: Record<string, string | Record<string, string>>
base?: Base
link?: Link[]
meta?: Meta[]
style?: Style[]
script?: Script[]
noscript?: Noscript[];
htmlAttrs?: HtmlAttributes;
bodyAttrs?: BodyAttributes;
}
```
See [@unhead/vue](https://github.com/unjs/unhead/blob/main/packages/vue/src/types/schema.ts){rel="nofollow"} for more detailed types.
## Features
### Reactivity
Reactivity is supported on all properties, by providing a computed value, a getter, or a reactive object.
::code-group
```vue [useHead] twoslash
<script setup lang="ts">
const description = ref('My amazing site.')
useHead({
meta: [
{ name: 'description', content: description }
],
})
</script>
```
```vue [useSeoMeta] twoslash
<script setup lang="ts">
const description = ref('My amazing site.')
useSeoMeta({
description
})
</script>
```
```vue [Components]
<script setup lang="ts">
const description = ref('My amazing site.')
</script>
<template>
<div>
<Meta name="description" :content="description" />
</div>
</template>
```
::
### Title Template
You can use the `titleTemplate` option to provide a dynamic template for customizing the title of your site. For example, you could add the name of your site to the title of every page.
The `titleTemplate` can either be a string, where `%s` is replaced with the title, or a function.
If you want to use a function (for full control), then this cannot be set in your `nuxt.config`. It is recommended instead to set it within your `app.vue` file where it will apply to all pages on your site:
::code-group
```vue [useHead] twoslash
<script setup lang="ts">
useHead({
titleTemplate: (titleChunk) => {
return titleChunk ? `${titleChunk} - Site Title` : 'Site Title';
}
})
</script>
```
::
Now, if you set the title to `My Page` with [`useHead`](https://nuxt.com/docs/api/composables/use-head) on another page of your site, the title would appear as 'My Page - Site Title' in the browser tab. You could also pass `null` to default to 'Site Title'.
### Template Params
You can use `templateParams` to provide additional placeholders in your `titleTemplate` besides the default `%s`. This allows for more dynamic title generation.
::code-group
```vue [useHead] twoslash
<script setup lang="ts">
useHead({
titleTemplate: (titleChunk) => {
return titleChunk ? `${titleChunk} %separator %siteName` : '%siteName';
},
templateParams: {
siteName: 'Site Title',
separator: '-'
}
})
</script>
```
::
### Body Tags
You can use the `tagPosition: 'bodyClose'` option on applicable tags to append them to the end of the `<body>` tag.
For example:
```vue twoslash
<script setup lang="ts">
useHead({
script: [
{
src: 'https://third-party-script.com',
// valid options are: 'head' | 'bodyClose' | 'bodyOpen'
tagPosition: 'bodyClose'
}
]
})
</script>
```
## Examples
### With `definePageMeta`
Within your [`pages/` directory](https://nuxt.com/docs/guide/directory-structure/pages), you can use `definePageMeta` along with [`useHead`](https://nuxt.com/docs/api/composables/use-head) to set metadata based on the current route.
For example, you can first set the current page title (this is extracted at build time via a macro, so it can't be set dynamically):
```vue [pages/some-page.vue] twoslash
<script setup lang="ts">
definePageMeta({
title: 'Some Page'
})
</script>
```
And then in your layout file, you might use the route's metadata you have previously set:
```vue [layouts/default.vue] twoslash
<script setup lang="ts">
const route = useRoute()
useHead({
meta: [{ property: 'og:title', content: `App Name - ${route.meta.title}` }]
})
</script>
```
::link-example{to="https://nuxt.com/docs/examples/features/meta-tags"}
::
::read-more
---
to: https://nuxt.com/docs/guide/directory-structure/pages/#page-metadata
---
::
### Dynamic Title
In the example below, `titleTemplate` is set either as a string with the `%s` placeholder or as a `function`, which allows greater flexibility in setting the page title dynamically for each route of your Nuxt app:
```vue [app.vue] twoslash
<script setup lang="ts">
useHead({
// as a string,
// where `%s` is replaced with the title
titleTemplate: '%s - Site Title',
})
</script>
```
```vue [app.vue] twoslash
<script setup lang="ts">
useHead({
// or as a function
titleTemplate: (productCategory) => {
return productCategory
? `${productCategory} - Site Title`
: 'Site Title'
}
})
</script>
```
`nuxt.config` is also used as an alternative way of setting the page title. However, `nuxt.config` does not allow the page title to be dynamic. Therefore, it is recommended to use `titleTemplate` in the `app.vue` file to add a dynamic title, which is then applied to all routes of your Nuxt app.
### External CSS
The example below shows how you might enable Google Fonts using either the `link` property of the [`useHead`](https://nuxt.com/docs/api/composables/use-head) composable or using the `<Link>` component:
::code-group
```vue [useHead] twoslash
<script setup lang="ts">
useHead({
link: [
{
rel: 'preconnect',
href: 'https://fonts.googleapis.com'
},
{
rel: 'stylesheet',
href: 'https://fonts.googleapis.com/css2?family=Roboto&display=swap',
crossorigin: ''
}
]
})
</script>
```
```vue [Components]
<template>
<div>
<Link rel="preconnect" href="https://fonts.googleapis.com" />
<Link rel="stylesheet" href="https://fonts.googleapis.com/css2?family=Roboto&display=swap" crossorigin="" />
</div>
</template>
```
::
# Transitions
::note
Nuxt leverages Vue's [`<Transition>`](https://vuejs.org/guide/built-ins/transition.html#the-transition-component){rel="nofollow"} component to apply transitions between pages and layouts.
::
## Page Transitions
You can enable page transitions to apply an automatic transition for all your [pages](https://nuxt.com/docs/guide/directory-structure/pages).
```ts [nuxt.config.ts] twoslash
export default defineNuxtConfig({
app: {
pageTransition: { name: 'page', mode: 'out-in' }
},
})
```
::note
If you are changing layouts as well as page, the page transition you set here will not run. Instead, you should set a [layout transition](https://nuxt.com/docs/getting-started/transitions#layout-transitions).
::
To start adding transition between your pages, add the following CSS to your [`app.vue`](https://nuxt.com/docs/guide/directory-structure/app):
::code-group
```vue [app.vue]
<template>
<NuxtPage />
</template>
<style>
.page-enter-active,
.page-leave-active {
transition: all 0.4s;
}
.page-enter-from,
.page-leave-to {
opacity: 0;
filter: blur(1rem);
}
</style>
```
```vue [pages/index.vue]
<template>
<div>
<h1>Home page</h1>
<NuxtLink to="/about">About page</NuxtLink>
</div>
</template>
```
```vue [pages/about.vue]
<template>
<div>
<h1>About page</h1>
<NuxtLink to="/">Home page</NuxtLink>
</div>
</template>
```
::
This produces the following result when navigating between pages:
:video{className="rounded" controls="true" poster="https://res.cloudinary.com/nuxt/video/upload/v1665061349/nuxt3/nuxt3-page-transitions_umwvmh.jpg"}
To set a different transition for a page, set the `pageTransition` key in [`definePageMeta`](https://nuxt.com/docs/api/utils/define-page-meta) of the page:
::code-group
```vue [pages/about.vue] twoslash
<script setup lang="ts">
definePageMeta({
pageTransition: {
name: 'rotate'
}
})
</script>
```
```vue [app.vue]
<template>
<NuxtPage />
</template>
<style>
/* ... */
.rotate-enter-active,
.rotate-leave-active {
transition: all 0.4s;
}
.rotate-enter-from,
.rotate-leave-to {
opacity: 0;
transform: rotate3d(1, 1, 1, 15deg);
}
</style>
```
::
Moving to the about page will add the 3d rotation effect:
:video{className="rounded" controls="true" poster="https://res.cloudinary.com/nuxt/video/upload/v1665063233/nuxt3/nuxt3-page-transitions-cutom.jpg"}
## Layout Transitions
You can enable layout transitions to apply an automatic transition for all your [layouts](https://nuxt.com/docs/guide/directory-structure/layouts).
```ts [nuxt.config.ts] twoslash
export default defineNuxtConfig({
app: {
layoutTransition: { name: 'layout', mode: 'out-in' }
},
})
```
To start adding transition between your pages and layouts, add the following CSS to your [`app.vue`](https://nuxt.com/docs/guide/directory-structure/app):
::code-group
```vue [app.vue]
<template>
<NuxtLayout>
<NuxtPage />
</NuxtLayout>
</template>
<style>
.layout-enter-active,
.layout-leave-active {
transition: all 0.4s;
}
.layout-enter-from,
.layout-leave-to {
filter: grayscale(1);
}
</style>
```
```vue [layouts/default.vue]
<template>
<div>
<pre>default layout</pre>
<slot />
</div>
</template>
<style scoped>
div {
background-color: lightgreen;
}
</style>
```
```vue [layouts/orange.vue]
<template>
<div>
<pre>orange layout</pre>
<slot />
</div>
</template>
<style scoped>
div {
background-color: #eebb90;
padding: 20px;
height: 100vh;
}
</style>
```
```vue [pages/index.vue]
<template>
<div>
<h1>Home page</h1>
<NuxtLink to="/about">About page</NuxtLink>
</div>
</template>
```
```vue [pages/about.vue]
<script setup lang="ts">
definePageMeta({
layout: 'orange'
})
</script>
<template>
<div>
<h1>About page</h1>
<NuxtLink to="/">Home page</NuxtLink>
</div>
</template>
```
::
This produces the following result when navigating between pages:
:video{className="rounded" controls="true" poster="https://res.cloudinary.com/nuxt/video/upload/v1665065289/nuxt3/nuxt3-layouts-transitions_c9hwlx.jpg"}
Similar to `pageTransition`, you can apply a custom `layoutTransition` to the page component using `definePageMeta`:
```vue [pages/about.vue] twoslash
<script setup lang="ts">
definePageMeta({
layout: 'orange',
layoutTransition: {
name: 'slide-in'
}
})
</script>
```
## Global Settings
You can customize these default transition names globally using `nuxt.config`.
Both `pageTransition` and `layoutTransition` keys accept [`TransitionProps`](https://vuejs.org/api/built-in-components.html#transition){rel="nofollow"} as JSON serializable values where you can pass the `name`, `mode` and other valid transition-props of the custom CSS transition.
```ts [nuxt.config.ts] twoslash
export default defineNuxtConfig({
app: {
pageTransition: {
name: 'fade',
mode: 'out-in' // default
},
layoutTransition: {
name: 'slide',
mode: 'out-in' // default
}
}
})
```
::warning
If you change the `name` property, you also have to rename the CSS classes accordingly.
::
To override the global transition property, use the `definePageMeta` to define page or layout transitions for a single Nuxt page and override any page or layout transitions that are defined globally in `nuxt.config` file.
```vue [pages/some-page.vue] twoslash
<script setup lang="ts">
definePageMeta({
pageTransition: {
name: 'bounce',
mode: 'out-in' // default
}
})
</script>
```
## Disable Transitions
`pageTransition` and `layoutTransition` can be disabled for a specific route:
```vue [pages/some-page.vue] twoslash
<script setup lang="ts">
definePageMeta({
pageTransition: false,
layoutTransition: false
})
</script>
```
Or globally in the `nuxt.config`:
```ts [nuxt.config.ts] twoslash
export default defineNuxtConfig({
app: {
pageTransition: false,
layoutTransition: false
}
})
```
## JavaScript Hooks
For advanced use-cases, you can use JavaScript hooks to create highly dynamic and custom transitions for your Nuxt pages.
This way presents perfect use-cases for JavaScript animation libraries such as [GSAP](https://gsap.com){rel="nofollow"}.
```vue [pages/some-page.vue] twoslash
<script setup lang="ts">
definePageMeta({
pageTransition: {
name: 'custom-flip',
mode: 'out-in',
onBeforeEnter: (el) => {
console.log('Before enter...')
},
onEnter: (el, done) => {},
onAfterEnter: (el) => {}
}
})
</script>
```
::tip
Learn more about additional [JavaScript hooks](https://vuejs.org/guide/built-ins/transition.html#javascript-hooks){rel="nofollow"} available in the `Transition` component.
::
## Dynamic Transitions
To apply dynamic transitions using conditional logic, you can leverage inline [middleware](https://nuxt.com/docs/guide/directory-structure/middleware) to assign a different transition name to `to.meta.pageTransition`.
::code-group
```vue [pages/[id\\].vue] twoslash
<script setup lang="ts">
definePageMeta({
pageTransition: {
name: 'slide-right',
mode: 'out-in'
},
middleware (to, from) {
if (to.meta.pageTransition && typeof to.meta.pageTransition !== 'boolean')
to.meta.pageTransition.name = +to.params.id! > +from.params.id! ? 'slide-left' : 'slide-right'
}
})
</script>
<template>
<h1>#{{ $route.params.id }}</h1>
</template>
<style>
.slide-left-enter-active,
.slide-left-leave-active,
.slide-right-enter-active,
.slide-right-leave-active {
transition: all 0.2s;
}
.slide-left-enter-from {
opacity: 0;
transform: translate(50px, 0);
}
.slide-left-leave-to {
opacity: 0;
transform: translate(-50px, 0);
}
.slide-right-enter-from {
opacity: 0;
transform: translate(-50px, 0);
}
.slide-right-leave-to {
opacity: 0;
transform: translate(50px, 0);
}
</style>
```
```vue [layouts/default.vue]
<script setup lang="ts">
const route = useRoute()
const id = computed(() => Number(route.params.id || 1))
const prev = computed(() => '/' + (id.value - 1))
const next = computed(() => '/' + (id.value + 1))
</script>
<template>
<div>
<slot />
<div v-if="$route.params.id">
<NuxtLink :to="prev">⬅️</NuxtLink> |
<NuxtLink :to="next">➡️</NuxtLink>
</div>
</div>
</template>
```
::
The page now applies the `slide-left` transition when going to the next id and `slide-right` for the previous:
:video{className="rounded" controls="true" poster="https://res.cloudinary.com/nuxt/video/upload/v1665069410/nuxt3/nuxt-dynamic-page-transitions.jpg"}
## Transition with NuxtPage
When `<NuxtPage />` is used in `app.vue`, transitions can be configured with the `transition` prop to activate transitions globally.
```vue [app.vue]
<template>
<div>
<NuxtLayout>
<NuxtPage :transition="{
name: 'bounce',
mode: 'out-in'
}" />
</NuxtLayout>
</div>
</template>
```
::note
Remember, this page transition cannot be overridden with `definePageMeta` on individual pages.
::
## View Transitions API (experimental)
Nuxt ships with an experimental implementation of the [**View Transitions API**](https://developer.chrome.com/docs/web-platform/view-transitions){rel="nofollow"} (see [MDN](https://developer.mozilla.org/en-US/docs/Web/API/View_Transitions_API){rel="nofollow"}). This is an exciting new way to implement native browser transitions which (among other things) have the ability to transition between unrelated elements on different pages.
You can check a demo on <https://nuxt-view-transitions.surge.sh>{rel="nofollow"} and the [source on StackBlitz](https://stackblitz.com/edit/nuxt-view-transitions){rel="nofollow"}.
The Nuxt integration is under active development, but can be enabled with the `experimental.viewTransition` option in your configuration file:
```ts [nuxt.config.ts] twoslash
export default defineNuxtConfig({
experimental: {
viewTransition: true
}
})
```
The possible values are: `false`, `true`, or `'always'`.
If set to true, Nuxt will not apply transitions if the user's browser matches `prefers-reduced-motion: reduce` (recommended). If set to `always`, Nuxt will always apply the transition and it is up to you to respect the user's preference.
By default, view transitions are enabled for all [pages](https://nuxt.com/docs/guide/directory-structure/pages), but you can set a different global default.
```ts [nuxt.config.ts] twoslash
export default defineNuxtConfig({
app: {
// Disable view transitions globally, and opt-in on a per page basis
viewTransition: false
},
})
```
It is possible to override the default `viewTransition` value for a page by setting the `viewTransition` key in [`definePageMeta`](https://nuxt.com/docs/api/utils/define-page-meta) of the page:
```vue [pages/about.vue] twoslash
<script setup lang="ts">
definePageMeta({
viewTransition: false
})
</script>
```
::warning
Overriding view transitions on a per-page basis will only have an effect if you have enabled the `experimental.viewTransition` option.
::
If you are also using Vue transitions like `pageTransition` and `layoutTransition` (see above) to achieve the same result as the new View Transitions API, then you may wish to *disable* Vue transitions if the user's browser supports the newer, native web API. You can do this by creating `~/middleware/disable-vue-transitions.global.ts` with the following contents:
```ts
export default defineNuxtRouteMiddleware(to => {
if (import.meta.server || !document.startViewTransition) { return }
// Disable built-in Vue transitions
to.meta.pageTransition = false
to.meta.layoutTransition = false
})
```
### Known Issues
- If you perform data fetching within your page setup functions, that you may wish to reconsider using this feature for the moment. (By design, View Transitions completely freeze DOM updates whilst they are taking place.) We're looking at restrict the View Transition to the final moments before `<Suspense>` resolves, but in the interim you may want to consider carefully whether to adopt this feature if this describes you.
# Data Fetching
Nuxt comes with two composables and a built-in library to perform data-fetching in browser or server environments: `useFetch`, [`useAsyncData`](https://nuxt.com/docs/api/composables/use-async-data) and `$fetch`.
In a nutshell:
- [`$fetch`](https://nuxt.com/docs/api/utils/dollarfetch) is the simplest way to make a network request.
- [`useFetch`](https://nuxt.com/docs/api/composables/use-fetch) is wrapper around `$fetch` that fetches data only once in [universal rendering](https://nuxt.com/docs/guide/concepts/rendering#universal-rendering).
- [`useAsyncData`](https://nuxt.com/docs/api/composables/use-async-data) is similar to `useFetch` but offers more fine-grained control.
Both `useFetch` and `useAsyncData` share a common set of options and patterns that we will detail in the last sections.
## The need for `useFetch` and `useAsyncData`
Nuxt is a framework which can run isomorphic (or universal) code in both server and client environments. If the [`$fetch` function](https://nuxt.com/docs/api/utils/dollarfetch) is used to perform data fetching in the setup function of a Vue component, this may cause data to be fetched twice, once on the server (to render the HTML) and once again on the client (when the HTML is hydrated). This can cause hydration issues, increase the time to interactivity and cause unpredictable behavior.
The [`useFetch`](https://nuxt.com/docs/api/composables/use-fetch) and [`useAsyncData`](https://nuxt.com/docs/api/composables/use-async-data) composables solve this problem by ensuring that if an API call is made on the server, the data is forwarded to the client in the payload.
The payload is a JavaScript object accessible through [`useNuxtApp().payload`](https://nuxt.com/docs/api/composables/use-nuxt-app#payload). It is used on the client to avoid refetching the same data when the code is executed in the browser [during hydration](https://nuxt.com/docs/guide/concepts/rendering#universal-rendering).
::tip
Use the [Nuxt DevTools](https://devtools.nuxt.com){rel="nofollow"} to inspect this data in the **Payload tab**.
::
```vue [app.vue]
<script setup lang="ts">
const { data } = await useFetch('/api/data')
async function handleFormSubmit() {
const res = await $fetch('/api/submit', {
method: 'POST',
body: {
// My form data
}
})
}
</script>
<template>
<div v-if="data == null">
No data
</div>
<div v-else>
<form @submit="handleFormSubmit">
<!-- form input tags -->
</form>
</div>
</template>
```
In the example above, `useFetch` would make sure that the request would occur in the server and is properly forwarded to the browser. `$fetch` has no such mechanism and is a better option to use when the request is solely made from the browser.
### Suspense
Nuxt uses Vue's [`<Suspense>`](https://vuejs.org/guide/built-ins/suspense){rel="nofollow"} component under the hood to prevent navigation before every async data is available to the view. The data fetching composables can help you leverage this feature and use what suits best on a per-call basis.
::note
You can add the [`<NuxtLoadingIndicator>`](https://nuxt.com/docs/api/components/nuxt-loading-indicator) to add a progress bar between page navigations.
::
## `$fetch`
Nuxt includes the [ofetch](https://github.com/unjs/ofetch){rel="nofollow"} library, and is auto-imported as the `$fetch` alias globally across your application.
```vue [pages/todos.vue] twoslash
<script setup lang="ts">
async function addTodo() {
const todo = await $fetch('/api/todos', {
method: 'POST',
body: {
// My todo data
}
})
}
</script>
```
::warning
Beware that using only `$fetch` will not provide [network calls de-duplication and navigation prevention](https://nuxt.com/#the-need-for-usefetch-and-useasyncdata). :br
It is recommended to use `$fetch` for client-side interactions (event based) or combined with [`useAsyncData`](https://nuxt.com/#useasyncdata) when fetching the initial component data.
::
::read-more{to="https://nuxt.com/docs/api/utils/dollarfetch"}
Read more about `$fetch`.
::
### Pass Client Headers to the API
When calling `useFetch` on the server, Nuxt will use [`useRequestFetch`](https://nuxt.com/docs/api/composables/use-request-fetch) to proxy client headers and cookies (with the exception of headers not meant to be forwarded, like `host`).
```vue
<script setup lang="ts">
const { data } = await useFetch('/api/echo');
</script>
```
```ts
// /api/echo.ts
export default defineEventHandler(event => parseCookies(event))
```
Alternatively, the example below shows how to use [`useRequestHeaders`](https://nuxt.com/docs/api/composables/use-request-headers) to access and send cookies to the API from a server-side request (originating on the client). Using an isomorphic `$fetch` call, we ensure that the API endpoint has access to the same `cookie` header originally sent by the user's browser. This is only necessary if you aren't using `useFetch`.
```vue
<script setup lang="ts">
const headers = useRequestHeaders(['cookie'])
async function getCurrentUser() {
return await $fetch('/api/me', { headers })
}
</script>
```
::tip
You can also use [`useRequestFetch`](https://nuxt.com/docs/api/composables/use-request-fetch) to proxy headers to the call automatically.
::
::caution
Be very careful before proxying headers to an external API and just include headers that you need. Not all headers are safe to be bypassed and might introduce unwanted behavior. Here is a list of common headers that are NOT to be proxied:
- `host`, `accept`
- `content-length`, `content-md5`, `content-type`
- `x-forwarded-host`, `x-forwarded-port`, `x-forwarded-proto`
- `cf-connecting-ip`, `cf-ray`
::
## `useFetch`
The [`useFetch`](https://nuxt.com/docs/api/composables/use-fetch) composable uses `$fetch` under-the-hood to make SSR-safe network calls in the setup function.
```vue [app.vue] twoslash
<script setup lang="ts">
const { data: count } = await useFetch('/api/count')
</script>
<template>
<p>Page visits: {{ count }}</p>
</template>
```
This composable is a wrapper around the [`useAsyncData`](https://nuxt.com/docs/api/composables/use-async-data) composable and `$fetch` utility.
::video-accordion
---
title: Watch a video from Alexander Lichter to avoid using useFetch the wrong way
video-id: njsGVmcWviY
---
::
::read-more{to="https://nuxt.com/docs/api/composables/use-fetch"}
::
::link-example{to="https://nuxt.com/docs/examples/features/data-fetching"}
::
## `useAsyncData`
The `useAsyncData` composable is responsible for wrapping async logic and returning the result once it is resolved.
::tip
`useFetch(url)` is nearly equivalent to `useAsyncData(url, () => event.$fetch(url))`. :br
It's developer experience sugar for the most common use case. (You can find out more about `event.fetch` at [`useRequestFetch`](https://nuxt.com/docs/api/composables/use-request-fetch).)
::
::video-accordion
---
title: Watch a video from Alexander Lichter to dig deeper into the difference
between useFetch and useAsyncData
video-id: 0X-aOpSGabA
---
::
There are some cases when using the [`useFetch`](https://nuxt.com/docs/api/composables/use-fetch) composable is not appropriate, for example when a CMS or a third-party provide their own query layer. In this case, you can use [`useAsyncData`](https://nuxt.com/docs/api/composables/use-async-data) to wrap your calls and still keep the benefits provided by the composable.
```vue [pages/users.vue]
<script setup lang="ts">
const { data, error } = await useAsyncData('users', () => myGetFunction('users'))
// This is also possible:
const { data, error } = await useAsyncData(() => myGetFunction('users'))
</script>
```
::note
The first argument of [`useAsyncData`](https://nuxt.com/docs/api/composables/use-async-data) is a unique key used to cache the response of the second argument, the querying function. This key can be ignored by directly passing the querying function, the key will be auto-generated.
:br :br
Since the autogenerated key only takes into account the file and line where `useAsyncData` is invoked, it is recommended to always create your own key to avoid unwanted behavior, like when you are creating your own custom composable wrapping `useAsyncData`.
:br :br
Setting a key can be useful to share the same data between components using [`useNuxtData`](https://nuxt.com/docs/api/composables/use-nuxt-data) or to [refresh specific data](https://nuxt.com/docs/api/utils/refresh-nuxt-data#refresh-specific-data).
::
```vue [pages/users/[id\\].vue]
<script setup lang="ts">
const { id } = useRoute().params
const { data, error } = await useAsyncData(`user:${id}`, () => {
return myGetFunction('users', { id })
})
</script>
```
The `useAsyncData` composable is a great way to wrap and wait for multiple `$fetch` requests to be completed, and then process the results.
```vue
<script setup lang="ts">
const { data: discounts, status } = await useAsyncData('cart-discount', async () => {
const [coupons, offers] = await Promise.all([
$fetch('/cart/coupons'),
$fetch('/cart/offers')
])
return { coupons, offers }
})
// discounts.value.coupons
// discounts.value.offers
</script>
```
::note
`useAsyncData` is for fetching and caching data, not triggering side effects like calling Pinia actions, as this can cause unintended behavior such as repeated executions with nullish values. If you need to trigger side effects, use the [`callOnce`](https://nuxt.com/docs/api/utils/call-once) utility to do so.
```vue
<script setup lang="ts">
const offersStore = useOffersStore()
// you can't do this
await useAsyncData(() => offersStore.getOffer(route.params.slug))
</script>
```
::
::read-more{to="https://nuxt.com/docs/api/composables/use-async-data"}
Read more about `useAsyncData`.
::
## Return Values
`useFetch` and `useAsyncData` have the same return values listed below.
- `data`: the result of the asynchronous function that is passed in.
- `refresh`/`execute`: a function that can be used to refresh the data returned by the `handler` function.
- `clear`: a function that can be used to set `data` to `undefined`, set `error` to `null`, set `status` to `idle`, and mark any currently pending requests as cancelled.
- `error`: an error object if the data fetching failed.
- `status`: a string indicating the status of the data request (`"idle"`, `"pending"`, `"success"`, `"error"`).
::note
`data`, `error` and `status` are Vue refs accessible with `.value` in `<script setup>`
::
By default, Nuxt waits until a `refresh` is finished before it can be executed again.
::note
If you have not fetched data on the server (for example, with `server: false`), then the data *will not* be fetched until hydration completes. This means even if you await `useFetch` on client-side, `data` will remain null within `<script setup>`.
::
## Options
[`useAsyncData`](https://nuxt.com/docs/api/composables/use-async-data) and [`useFetch`](https://nuxt.com/docs/api/composables/use-fetch) return the same object type and accept a common set of options as their last argument. They can help you control the composables behavior, such as navigation blocking, caching or execution.
### Lazy
By default, data fetching composables will wait for the resolution of their asynchronous function before navigating to a new page by using Vue's Suspense. This feature can be ignored on client-side navigation with the `lazy` option. In that case, you will have to manually handle loading state using the `status` value.
```vue [app.vue] twoslash
<script setup lang="ts">
const { status, data: posts } = useFetch('/api/posts', {
lazy: true
})
</script>
<template>
<!-- you will need to handle a loading state -->
<div v-if="status === 'pending'">
Loading ...
</div>
<div v-else>
<div v-for="post in posts">
<!-- do something -->
</div>
</div>
</template>
```
You can alternatively use [`useLazyFetch`](https://nuxt.com/docs/api/composables/use-lazy-fetch) and `useLazyAsyncData` as convenient methods to perform the same.
```vue twoslash
<script setup lang="ts">
const { status, data: posts } = useLazyFetch('/api/posts')
</script>
```
::read-more{to="https://nuxt.com/docs/api/composables/use-lazy-fetch"}
Read more about `useLazyFetch`.
::
::read-more{to="https://nuxt.com/docs/api/composables/use-lazy-async-data"}
Read more about `useLazyAsyncData`.
::
::video-accordion
---
platform: vimeo
title: Watch a video from Vue School on blocking vs. non-blocking (lazy) requests
video-id: "1022000555"
---
::
### Client-only fetching
By default, data fetching composables will perform their asynchronous function on both client and server environments. Set the `server` option to `false` to only perform the call on the client-side. On initial load, the data will not be fetched before hydration is complete so you have to handle a pending state, though on subsequent client-side navigation the data will be awaited before loading the page.
Combined with the `lazy` option, this can be useful for data that is not needed on the first render (for example, non-SEO sensitive data).
```ts twoslash
/* This call is performed before hydration */
const articles = await useFetch('/api/article')
/* This call will only be performed on the client */
const { status, data: comments } = useFetch('/api/comments', {
lazy: true,
server: false
})
```
The `useFetch` composable is meant to be invoked in setup method or called directly at the top level of a function in lifecycle hooks, otherwise you should use [`$fetch` method](https://nuxt.com/#fetch).
### Minimize payload size
The `pick` option helps you to minimize the payload size stored in your HTML document by only selecting the fields that you want returned from the composables.
```vue
<script setup lang="ts">
/* only pick the fields used in your template */
const { data: mountain } = await useFetch('/api/mountains/everest', {
pick: ['title', 'description']
})
</script>
<template>
<h1>{{ mountain.title }}</h1>
<p>{{ mountain.description }}</p>
</template>
```
If you need more control or map over several objects, you can use the `transform` function to alter the result of the query.
```ts
const { data: mountains } = await useFetch('/api/mountains', {
transform: (mountains) => {
return mountains.map(mountain => ({ title: mountain.title, description: mountain.description }))
}
})
```
::note
Both `pick` and `transform` don't prevent the unwanted data from being fetched initially. But they will prevent unwanted data from being added to the payload transferred from server to client.
::
::video-accordion
---
platform: vimeo
title: Watch a video from Vue School on minimizing payload size
video-id: "1026410430"
---
::
### Caching and refetching
#### Keys
[`useFetch`](https://nuxt.com/docs/api/composables/use-fetch) and [`useAsyncData`](https://nuxt.com/docs/api/composables/use-async-data) use keys to prevent refetching the same data.
- [`useFetch`](https://nuxt.com/docs/api/composables/use-fetch) uses the provided URL as a key. Alternatively, a `key` value can be provided in the `options` object passed as a last argument.
- [`useAsyncData`](https://nuxt.com/docs/api/composables/use-async-data) uses its first argument as a key if it is a string. If the first argument is the handler function that performs the query, then a key that is unique to the file name and line number of the instance of `useAsyncData` will be generated for you.
::tip
To get the cached data by key, you can use [`useNuxtData`](https://nuxt.com/docs/api/composables/use-nuxt-data)
::
::video-accordion
---
platform: vimeo
title: Watch a video from Vue School on caching data with the key option
video-id: "1026410044"
---
::
#### Shared State and Option Consistency
When multiple components use the same key with `useAsyncData` or `useFetch`, they will share the same `data`, `error` and `status` refs. This ensures consistency across components but requires some options to be consistent.
The following options **must be consistent** across all calls with the same key:
- `handler` function
- `deep` option
- `transform` function
- `pick` array
- `getCachedData` function
- `default` value
```ts
// ❌ This will trigger a development warning
const { data: users1 } = useAsyncData('users', () => $fetch('/api/users'), { deep: false })
const { data: users2 } = useAsyncData('users', () => $fetch('/api/users'), { deep: true })
```
The following options **can safely differ** without triggering warnings:
- `server`
- `lazy`
- `immediate`
- `dedupe`
- `watch`
```ts
// ✅ This is allowed
const { data: users1 } = useAsyncData('users', () => $fetch('/api/users'), { immediate: true })
const { data: users2 } = useAsyncData('users', () => $fetch('/api/users'), { immediate: false })
```
If you need independent instances, use different keys:
```ts
// These are completely independent instances
const { data: users1 } = useAsyncData('users-1', () => $fetch('/api/users'))
const { data: users2 } = useAsyncData('users-2', () => $fetch('/api/users'))
```
#### Reactive Keys
You can use computed refs, plain refs or getter functions as keys, allowing for dynamic data fetching that automatically updates when dependencies change:
```ts
// Using a computed property as a key
const userId = ref('123')
const { data: user } = useAsyncData(
computed(() => `user-${userId.value}`),
() => fetchUser(userId.value)
)
// When userId changes, the data will be automatically refetched
// and the old data will be cleaned up if no other components use it
userId.value = '456'
```
#### Refresh and execute
If you want to fetch or refresh data manually, use the `execute` or `refresh` function provided by the composables.
```vue twoslash
<script setup lang="ts">
const { data, error, execute, refresh } = await useFetch('/api/users')
</script>
<template>
<div>
<p>{{ data }}</p>
<button @click="() => refresh()">Refresh data</button>
</div>
</template>
```
The `execute` function is an alias for `refresh` that works in exactly the same way but is more semantic for cases when the fetch is [not immediate](https://nuxt.com/#not-immediate).
::tip
To globally refetch or invalidate cached data, see [`clearNuxtData`](https://nuxt.com/docs/api/utils/clear-nuxt-data) and [`refreshNuxtData`](https://nuxt.com/docs/api/utils/refresh-nuxt-data).
::
#### Clear
If you want to clear the data provided, for whatever reason, without needing to know the specific key to pass to `clearNuxtData`, you can use the `clear` function provided by the composables.
```vue twoslash
<script setup lang="ts">
const { data, clear } = await useFetch('/api/users')
const route = useRoute()
watch(() => route.path, (path) => {
if (path === '/') clear()
})
</script>
```
#### Watch
To re-run your fetching function each time other reactive values in your application change, use the `watch` option. You can use it for one or multiple *watchable* elements.
```vue twoslash
<script setup lang="ts">
const id = ref(1)
const { data, error, refresh } = await useFetch('/api/users', {
/* Changing the id will trigger a refetch */
watch: [id]
})
</script>
```
Note that **watching a reactive value won't change the URL fetched**. For example, this will keep fetching the same initial ID of the user because the URL is constructed at the moment the function is invoked.
```vue
<script setup lang="ts">
const id = ref(1)
const { data, error, refresh } = await useFetch(`/api/users/${id.value}`, {
watch: [id]
})
</script>
```
If you need to change the URL based on a reactive value, you may want to use a [computed URL](https://nuxt.com/#computed-url) instead.
#### Computed URL
Sometimes you may need to compute an URL from reactive values, and refresh the data each time these change. Instead of juggling your way around, you can attach each param as a reactive value. Nuxt will automatically use the reactive value and re-fetch each time it changes.
```vue
<script setup lang="ts">
const id = ref(null)
const { data, status } = useLazyFetch('/api/user', {
query: {
user_id: id
}
})
</script>
```
In the case of more complex URL construction, you may use a callback as a [computed getter](https://vuejs.org/guide/essentials/computed.html){rel="nofollow"} that returns the URL string.
Every time a dependency changes, the data will be fetched using the newly constructed URL. Combine this with [not-immediate](https://nuxt.com/#not-immediate), and you can wait until the reactive element changes before fetching.
```vue
<script setup lang="ts">
const id = ref(null)
const { data, status } = useLazyFetch(() => `/api/users/${id.value}`, {
immediate: false
})
const pending = computed(() => status.value === 'pending');
</script>
<template>
<div>
<!-- disable the input while fetching -->
<input v-model="id" type="number" :disabled="pending"/>
<div v-if="status === 'idle'">
Type an user ID
</div>
<div v-else-if="pending">
Loading ...
</div>
<div v-else>
{{ data }}
</div>
</div>
</template>
```
If you need to force a refresh when other reactive values change, you can also [watch other values](https://nuxt.com/#watch).
### Not immediate
The `useFetch` composable will start fetching data the moment is invoked. You may prevent this by setting `immediate: false`, for example, to wait for user interaction.
With that, you will need both the `status` to handle the fetch lifecycle, and `execute` to start the data fetch.
```vue
<script setup lang="ts">
const { data, error, execute, status } = await useLazyFetch('/api/comments', {
immediate: false
})
</script>
<template>
<div v-if="status === 'idle'">
<button @click="execute">Get data</button>
</div>
<div v-else-if="status === 'pending'">
Loading comments...
</div>
<div v-else>
{{ data }}
</div>
</template>
```
For finer control, the `status` variable can be:
- `idle` when the fetch hasn't started
- `pending` when a fetch has started but not yet completed
- `error` when the fetch fails
- `success` when the fetch is completed successfully
## Passing Headers and Cookies
When we call `$fetch` in the browser, user headers like `cookie` will be directly sent to the API.
Normally, during server-side-rendering, due to security considerations, the `$fetch` wouldn't include the user's browser cookies, nor pass on cookies from the fetch response.
However, when calling `useFetch` with a relative URL on the server, Nuxt will use [`useRequestFetch`](https://nuxt.com/docs/api/composables/use-request-fetch) to proxy headers and cookies (with the exception of headers not meant to be forwarded, like `host`).
### Pass Cookies From Server-side API Calls on SSR Response
If you want to pass on/proxy cookies in the other direction, from an internal request back to the client, you will need to handle this yourself.
```ts [composables/fetch.ts]
import { appendResponseHeader } from 'h3'
import type { H3Event } from 'h3'
export const fetchWithCookie = async (event: H3Event, url: string) => {
/* Get the response from the server endpoint */
const res = await $fetch.raw(url)
/* Get the cookies from the response */
const cookies = res.headers.getSetCookie()
/* Attach each cookie to our incoming Request */
for (const cookie of cookies) {
appendResponseHeader(event, 'set-cookie', cookie)
}
/* Return the data of the response */
return res._data
}
```
```vue
<script setup lang="ts">
// This composable will automatically pass cookies to the client
const event = useRequestEvent()
const { data: result } = await useAsyncData(() => fetchWithCookie(event!, '/api/with-cookie'))
onMounted(() => console.log(document.cookie))
</script>
```
## Options API support
Nuxt provides a way to perform `asyncData` fetching within the Options API. You must wrap your component definition within `defineNuxtComponent` for this to work.
```vue
<script>
export default defineNuxtComponent({
/* Use the fetchKey option to provide a unique key */
fetchKey: 'hello',
async asyncData () {
return {
hello: await $fetch('/api/hello')
}
}
})
</script>
```
::note
Using `<script setup>` or `<script setup lang="ts">` are the recommended way of declaring Vue components in Nuxt.
::
::read-more{to="https://nuxt.com/docs/api/utils/define-nuxt-component"}
::
## Serializing Data From Server to Client
When using `useAsyncData` and `useLazyAsyncData` to transfer data fetched on server to the client (as well as anything else that utilizes [the Nuxt payload](https://nuxt.com/docs/api/composables/use-nuxt-app#payload)), the payload is serialized with [`devalue`](https://github.com/Rich-Harris/devalue){rel="nofollow"}. This allows us to transfer not just basic JSON but also to serialize and revive/deserialize more advanced kinds of data, such as regular expressions, Dates, Map and Set, `ref`, `reactive`, `shallowRef`, `shallowReactive` and `NuxtError` - and more.
It is also possible to define your own serializer/deserializer for types that are not supported by Nuxt. You can read more in the [`useNuxtApp`](https://nuxt.com/docs/api/composables/use-nuxt-app#payload) docs.
::note
Note that this *does not apply* to data passed from your server routes when fetched with `$fetch` or `useFetch` - see the next section for more information.
::
## Serializing Data From API Routes
When fetching data from the `server` directory, the response is serialized using `JSON.stringify`. However, since serialization is limited to only JavaScript primitive types, Nuxt does its best to convert the return type of `$fetch` and [`useFetch`](https://nuxt.com/docs/api/composables/use-fetch) to match the actual value.
::read-more
---
icon: i-simple-icons-mdnwebdocs
target: _blank
to: https://developer.mozilla.org/en-US/docs/Web/JavaScript/Reference/Global_Objects/JSON/stringify#description
---
Learn more about `JSON.stringify` limitations.
::
### Example
```ts [server/api/foo.ts]
export default defineEventHandler(() => {
return new Date()
})
```
```vue [app.vue]
<script setup lang="ts">
// Type of `data` is inferred as string even though we returned a Date object
const { data } = await useFetch('/api/foo')
</script>
```
### Custom serializer function
To customize the serialization behavior, you can define a `toJSON` function on your returned object. If you define a `toJSON` method, Nuxt will respect the return type of the function and will not try to convert the types.
```ts [server/api/bar.ts]
export default defineEventHandler(() => {
const data = {
createdAt: new Date(),
toJSON() {
return {
createdAt: {
year: this.createdAt.getFullYear(),
month: this.createdAt.getMonth(),
day: this.createdAt.getDate(),
},
}
},
}
return data
})
```
```vue [app.vue]
<script setup lang="ts">
// Type of `data` is inferred as
// {
// createdAt: {
// year: number
// month: number
// day: number
// }
// }
const { data } = await useFetch('/api/bar')
</script>
```
### Using an alternative serializer
Nuxt does not currently support an alternative serializer to `JSON.stringify`. However, you can return your payload as a normal string and utilize the `toJSON` method to maintain type safety.
In the example below, we use [superjson](https://github.com/blitz-js/superjson){rel="nofollow"} as our serializer.
```ts [server/api/superjson.ts]
import superjson from 'superjson'
export default defineEventHandler(() => {
const data = {
createdAt: new Date(),
// Workaround the type conversion
toJSON() {
return this
}
}
// Serialize the output to string, using superjson
return superjson.stringify(data) as unknown as typeof data
})
```
```vue [app.vue]
<script setup lang="ts">
import superjson from 'superjson'
// `date` is inferred as { createdAt: Date } and you can safely use the Date object methods
const { data } = await useFetch('/api/superjson', {
transform: (value) => {
return superjson.parse(value as unknown as string)
},
})
</script>
```
## Recipes
### Consuming SSE (Server Sent Events) via POST request
::tip
If you're consuming SSE via GET request, you can use [`EventSource`](https://developer.mozilla.org/en-US/docs/Web/API/EventSource){rel="nofollow"} or VueUse composable [`useEventSource`](https://vueuse.org/core/useEventSource/){rel="nofollow"}.
::
When consuming SSE via POST request, you need to handle the connection manually. Here's how you can do it:
```ts
// Make a POST request to the SSE endpoint
const response = await $fetch<ReadableStream>('/chats/ask-ai', {
method: 'POST',
body: {
query: "Hello AI, how are you?",
},
responseType: 'stream',
})
// Create a new ReadableStream from the response with TextDecoderStream to get the data as text
const reader = response.pipeThrough(new TextDecoderStream()).getReader()
// Read the chunk of data as we get it
while (true) {
const { value, done } = await reader.read()
if (done)
break
console.log('Received:', value)
}
```
### Making parallel requests
When requests don't rely on each other, you can make them in parallel with `Promise.all()` to boost performance.
```ts
const { data } = await useAsyncData(() => {
return Promise.all([
$fetch("/api/comments/"),
$fetch("/api/author/12")
]);
});
const comments = computed(() => data.value?.[0]);
const author = computed(() => data.value?.[1]);
```
::video-accordion
---
platform: vimeo
title: Watch a video from Vue School on parallel data fetching
video-id: "1024262536"
---
::
# State Management
Nuxt provides the [`useState`](https://nuxt.com/docs/api/composables/use-state) composable to create a reactive and SSR-friendly shared state across components.
[`useState`](https://nuxt.com/docs/api/composables/use-state) is an SSR-friendly [`ref`](https://vuejs.org/api/reactivity-core.html#ref){rel="nofollow"} replacement. Its value will be preserved after server-side rendering (during client-side hydration) and shared across all components using a unique key.
::video-accordion
---
title: Watch a video from Alexander Lichter about why and when to use useState
video-id: mv0WcBABcIk
---
::
::important
Because the data inside [`useState`](https://nuxt.com/docs/api/composables/use-state) will be serialized to JSON, it is important that it does not contain anything that cannot be serialized, such as classes, functions or symbols.
::
::read-more{to="https://nuxt.com/docs/api/composables/use-state"}
Read more about `useState` composable.
::
## Best Practices
::warning
Never define `const state = ref()` outside of `<script setup>` or `setup()` function.:br
For example, doing `export myState = ref({})` would result in state shared across requests on the server and can lead to memory leaks.
::
::tip{icon="i-lucide-circle-check"}
Instead use `const useX = () => useState('x')`
::
## Examples
### Basic Usage
In this example, we use a component-local counter state. Any other component that uses `useState('counter')` shares the same reactive state.
```vue [app.vue] twoslash
<script setup lang="ts">
const counter = useState('counter', () => Math.round(Math.random() * 1000))
</script>
<template>
<div>
Counter: {{ counter }}
<button @click="counter++">
+
</button>
<button @click="counter--">
-
</button>
</div>
</template>
```
::link-example{to="https://nuxt.com/docs/examples/features/state-management"}
::
::note
To globally invalidate cached state, see [`clearNuxtState`](https://nuxt.com/docs/api/utils/clear-nuxt-state) util.
::
### Initializing State
Most of the time, you will want to initialize your state with data that resolves asynchronously. You can use the [`app.vue`](https://nuxt.com/docs/guide/directory-structure/app) component with the [`callOnce`](https://nuxt.com/docs/api/utils/call-once) util to do so.
```vue [app.vue] twoslash
<script setup lang="ts">
const websiteConfig = useState('config')
await callOnce(async () => {
websiteConfig.value = await $fetch('https://my-cms.com/api/website-config')
})
</script>
```
::tip
This is similar to the [`nuxtServerInit` action](https://v2.nuxt.com/docs/directory-structure/store/#the-nuxtserverinit-action){rel="nofollow"} in Nuxt 2, which allows filling the initial state of your store server-side before rendering the page.
::
::read-more{to="https://nuxt.com/docs/api/utils/call-once"}
::
### Usage with Pinia
In this example, we leverage the [Pinia module](https://nuxt.com/modules/pinia) to create a global store and use it across the app.
::important
Make sure to install the Pinia module with `npx nuxi@latest module add pinia` or follow the [module's installation steps](https://pinia.vuejs.org/ssr/nuxt.html#Installation){rel="nofollow"}.
::
::code-group
```ts [stores/website.ts]
export const useWebsiteStore = defineStore('websiteStore', {
state: () => ({
name: '',
description: ''
}),
actions: {
async fetch() {
const infos = await $fetch('https://api.nuxt.com/modules/pinia')
this.name = infos.name
this.description = infos.description
}
}
})
```
```vue [app.vue]
<script setup lang="ts">
const website = useWebsiteStore()
await callOnce(website.fetch)
</script>
<template>
<main>
<h1>{{ website.name }}</h1>
<p>{{ website.description }}</p>
</main>
</template>
```
::
## Advanced Usage
::code-group
```ts [composables/locale.ts]
import type { Ref } from 'vue'
export const useLocale = () => {
return useState<string>('locale', () => useDefaultLocale().value)
}
export const useDefaultLocale = (fallback = 'en-US') => {
const locale = ref(fallback)
if (import.meta.server) {
const reqLocale = useRequestHeaders()['accept-language']?.split(',')[0]
if (reqLocale) {
locale.value = reqLocale
}
} else if (import.meta.client) {
const navLang = navigator.language
if (navLang) {
locale.value = navLang
}
}
return locale
}
export const useLocales = () => {
const locale = useLocale()
const locales = ref([
'en-US',
'en-GB',
...
'ja-JP-u-ca-japanese'
])
if (!locales.value.includes(locale.value)) {
locales.value.unshift(locale.value)
}
return locales
}
export const useLocaleDate = (date: Ref<Date> | Date, locale = useLocale()) => {
return computed(() => new Intl.DateTimeFormat(locale.value, { dateStyle: 'full' }).format(unref(date)))
}
```
```vue [app.vue]
<script setup lang="ts">
const locales = useLocales()
const locale = useLocale()
const date = useLocaleDate(new Date('2016-10-26'))
</script>
<template>
<div>
<h1>Nuxt birthday</h1>
<p>{{ date }}</p>
<label for="locale-chooser">Preview a different locale</label>
<select id="locale-chooser" v-model="locale">
<option v-for="locale of locales" :key="locale" :value="locale">
{{ locale }}
</option>
</select>
</div>
</template>
```
::
::link-example{to="https://nuxt.com/docs/examples/advanced/locale"}
::
## Shared State
By using [auto-imported composables](https://nuxt.com/docs/guide/directory-structure/composables) we can define global type-safe states and import them across the app.
```ts [composables/states.ts] twoslash
export const useColor = () => useState<string>('color', () => 'pink')
```
```vue [app.vue]
<script setup lang="ts">
// ---cut-start---
const useColor = () => useState<string>('color', () => 'pink')
// ---cut-end---
const color = useColor() // Same as useState('color')
</script>
<template>
<p>Current color: {{ color }}</p>
</template>
```
::video-accordion
---
title: Watch a video from Daniel Roe on how to deal with global state and SSR in Nuxt
video-id: dZSNW07sO-A
---
::
## Using third-party libraries
Nuxt **used to rely** on the Vuex library to provide global state management. If you are migrating from Nuxt 2, please head to [the migration guide](https://nuxt.com/docs/migration/configuration#vuex).
Nuxt is not opinionated about state management, so feel free to choose the right solution for your needs. There are multiple integrations with the most popular state management libraries, including:
- [Pinia](https://nuxt.com/modules/pinia) - the official Vue recommendation
- [Harlem](https://nuxt.com/modules/harlem) - immutable global state management
- [XState](https://nuxt.com/modules/xstate) - state machine approach with tools for visualizing and testing your state logic
# Error Handling
Nuxt is a full-stack framework, which means there are several sources of unpreventable user runtime errors that can happen in different contexts:
- Errors during the Vue rendering lifecycle (SSR & CSR)
- Server and client startup errors (SSR + CSR)
- Errors during Nitro server lifecycle ([`server/`](https://nuxt.com/docs/guide/directory-structure/server) directory)
- Errors downloading JS chunks
::tip
**SSR** stands for **Server-Side Rendering** and **CSR** for **Client-Side Rendering**.
::
## Vue Errors
You can hook into Vue errors using [`onErrorCaptured`](https://vuejs.org/api/composition-api-lifecycle.html#onerrorcaptured){rel="nofollow"}.
In addition, Nuxt provides a [`vue:error`](https://nuxt.com/docs/api/advanced/hooks#app-hooks-runtime) hook that will be called if any errors propagate up to the top level.
If you are using an error reporting framework, you can provide a global handler through [`vueApp.config.errorHandler`](https://vuejs.org/api/application.html#app-config-errorhandler){rel="nofollow"}. It will receive all Vue errors, even if they are handled.
```ts [plugins/error-handler.ts] twoslash
export default defineNuxtPlugin((nuxtApp) => {
nuxtApp.vueApp.config.errorHandler = (error, instance, info) => {
// handle error, e.g. report to a service
}
// Also possible
nuxtApp.hook('vue:error', (error, instance, info) => {
// handle error, e.g. report to a service
})
})
```
::note
Note that the `vue:error` hook is based on [`onErrorCaptured`](https://vuejs.org/api/composition-api-lifecycle.html#onerrorcaptured){rel="nofollow"} lifecycle hook.
::
## Startup Errors
Nuxt will call the `app:error` hook if there are any errors in starting your Nuxt application.
This includes:
- running [Nuxt plugins](https://nuxt.com/docs/guide/directory-structure/plugins)
- processing `app:created` and `app:beforeMount` hooks
- rendering your Vue app to HTML (during SSR)
- mounting the app (on client-side), though you should handle this case with `onErrorCaptured` or with `vue:error`
- processing the `app:mounted` hook
## Nitro Server Errors
You cannot currently define a server-side handler for these errors, but can render an error page, see the [Render an Error Page](https://nuxt.com/#error-page) section.
## Errors with JS Chunks
You might encounter chunk loading errors due to a network connectivity failure or a new deployment (which invalidates your old, hashed JS chunk URLs). Nuxt provides built-in support for handling chunk loading errors by performing a hard reload when a chunk fails to load during route navigation.
You can change this behavior by setting `experimental.emitRouteChunkError` to `false` (to disable hooking into these errors at all) or to `manual` if you want to handle them yourself. If you want to handle chunk loading errors manually, you can check out the [the automatic implementation](https://github.com/nuxt/nuxt/blob/main/packages/nuxt/src/app/plugins/chunk-reload.client.ts){rel="nofollow"} for ideas.
## Error Page
::note
When Nuxt encounters a fatal error (any unhandled error on the server, or an error created with `fatal: true` on the client) it will either render a JSON response (if requested with `Accept: application/json` header) or trigger a full-screen error page.
::
An error may occur during the server lifecycle when:
- processing your Nuxt plugins
- rendering your Vue app into HTML
- a server API route throws an error
It can also occur on the client side when:
- processing your Nuxt plugins
- before mounting the application (`app:beforeMount` hook)
- mounting your app if the error was not handled with `onErrorCaptured` or `vue:error` hook
- the Vue app is initialized and mounted in browser (`app:mounted`).
::read-more{to="https://nuxt.com/docs/api/advanced/hooks"}
Discover all the Nuxt lifecycle hooks.
::
Customize the default error page by adding `~/error.vue` in the source directory of your application, alongside `app.vue`.
```vue [error.vue]
<script setup lang="ts">
import type { NuxtError } from '#app'
const props = defineProps({
error: Object as () => NuxtError
})
const handleError = () => clearError({ redirect: '/' })
</script>
<template>
<div>
<h2>{{ error.statusCode }}</h2>
<button @click="handleError">Clear errors</button>
</div>
</template>
```
::read-more{to="https://nuxt.com/docs/guide/directory-structure/error"}
Read more about `error.vue` and its uses.
::
For custom errors we highly recommend to use `onErrorCaptured` composable that can be called in a page/component setup function or `vue:error` runtime nuxt hook that can be configured in a nuxt plugin.
```ts [plugins/error-handler.ts] twoslash
export default defineNuxtPlugin(nuxtApp => {
nuxtApp.hook('vue:error', (err) => {
//
})
})
```
When you are ready to remove the error page, you can call the [`clearError`](https://nuxt.com/docs/api/utils/clear-error) helper function, which takes an optional path to redirect to (for example, if you want to navigate to a 'safe' page).
::important
Make sure to check before using anything dependent on Nuxt plugins, such as `$route` or `useRouter`, as if a plugin threw an error, then it won't be re-run until you clear the error.
::
::note
Rendering an error page is an entirely separate page load, meaning any registered middleware will run again. You can use [`useError`](https://nuxt.com/#useerror) in middleware to check if an error is being handled.
::
::note
If you are running on Node 16 and you set any cookies when rendering your error page, they will [overwrite cookies previously set](https://github.com/nuxt/nuxt/pull/20585){rel="nofollow"}. We recommend using a newer version of Node as Node 16 reached end-of-life in September 2023.
::
## Error Utils
### `useError`
```ts [TS Signature]
function useError (): Ref<Error | { url, statusCode, statusMessage, message, description, data }>
```
This function will return the global Nuxt error that is being handled.
::read-more{to="https://nuxt.com/docs/api/composables/use-error"}
Read more about `useError` composable.
::
### `createError`
```ts [TS Signature]
function createError (err: string | { cause, data, message, name, stack, statusCode, statusMessage, fatal }): Error
```
Create an error object with additional metadata. You can pass a string to be set as the error `message` or an object containing error properties. It is usable in both the Vue and Server portions of your app, and is meant to be thrown.
If you throw an error created with `createError`:
- on server-side, it will trigger a full-screen error page which you can clear with [`clearError`](https://nuxt.com/#clearerror).
- on client-side, it will throw a non-fatal error for you to handle. If you need to trigger a full-screen error page, then you can do this by setting `fatal: true`.
```vue [pages/movies/[slug\\].vue] twoslash
<script setup lang="ts">
const route = useRoute()
const { data } = await useFetch(`/api/movies/${route.params.slug}`)
if (!data.value) {
throw createError({
statusCode: 404,
statusMessage: 'Page Not Found'
})
}
</script>
```
::read-more{to="https://nuxt.com/docs/api/utils/create-error"}
Read more about `createError` util.
::
### `showError`
```ts [TS Signature]
function showError (err: string | Error | { statusCode, statusMessage }): Error
```
You can call this function at any point on client-side, or (on server side) directly within middleware, plugins or `setup()` functions. It will trigger a full-screen error page which you can clear with [`clearError`](https://nuxt.com/#clearerror).
It is recommended instead to use `throw createError()`.
::read-more{to="https://nuxt.com/docs/api/utils/show-error"}
Read more about `showError` util.
::
### `clearError`
```ts [TS Signature]
function clearError (options?: { redirect?: string }): Promise<void>
```
This function will clear the currently handled Nuxt error. It also takes an optional path to redirect to (for example, if you want to navigate to a 'safe' page).
::read-more{to="https://nuxt.com/docs/api/utils/clear-error"}
Read more about `clearError` util.
::
## Render Error in Component
Nuxt also provides a [`<NuxtErrorBoundary>`](https://nuxt.com/docs/api/components/nuxt-error-boundary) component that allows you to handle client-side errors within your app, without replacing your entire site with an error page.
This component is responsible for handling errors that occur within its default slot. On client-side, it will prevent the error from bubbling up to the top level, and will render the `#error` slot instead.
The `#error` slot will receive `error` as a prop. (If you set `error = null` it will trigger re-rendering the default slot; you'll need to ensure that the error is fully resolved first or the error slot will just be rendered a second time.)
::tip
If you navigate to another route, the error will be cleared automatically.
::
```vue [pages/index.vue]
<template>
<!-- some content -->
<NuxtErrorBoundary @error="someErrorLogger">
<!-- You use the default slot to render your content -->
<template #error="{ error, clearError }">
You can display the error locally here: {{ error }}
<button @click="clearError">
This will clear the error.
</button>
</template>
</NuxtErrorBoundary>
</template>
```
::link-example{to="https://nuxt.com/docs/examples/advanced/error-handling"}
::
# Server
::read-more{to="https://nuxt.com/docs/guide/directory-structure/server"}
::
## Powered by Nitro

Nuxt's server is [Nitro](https://github.com/nitrojs/nitro){rel="nofollow"}. It was originally created for Nuxt but is now part of [UnJS](https://unjs.io){rel="nofollow"} and open for other frameworks - and can even be used on its own.
Using Nitro gives Nuxt superpowers:
- Full control of the server-side part of your app
- Universal deployment on any provider (many zero-config)
- Hybrid rendering
Nitro is internally using [h3](https://github.com/unjs/h3){rel="nofollow"}, a minimal H(TTP) framework built for high performance and portability.
::video-accordion
---
title: Watch a video from Alexander Lichter to understand the responsibilities
of Nuxt and Nitro in your application
video-id: DkvgJa-X31k
---
::
## Server Endpoints & Middleware
You can easily manage the server-only part of your Nuxt app, from API endpoints to middleware.
Both endpoints and middleware can be defined like this:
```ts [server/api/test.ts] twoslash
export default defineEventHandler(async (event) => {
// ... Do whatever you want here
})
```
And you can directly return `text`, `json`, `html` or even a `stream`.
Out-of-the-box, it supports **hot module replacement** and **auto-import** like the other parts of your Nuxt application.
::read-more{to="https://nuxt.com/docs/guide/directory-structure/server"}
::
## Universal Deployment
Nitro offers the ability to deploy your Nuxt app anywhere, from a bare metal server to the edge network, with a start time of just a few milliseconds. That's fast!
::read-more{to="https://nuxt.com/blog/nuxt-on-the-edge"}
::
There are more than 15 presets to build your Nuxt app for different cloud providers and servers, including:
- [Cloudflare Workers](https://workers.cloudflare.com){rel="nofollow"}
- [Netlify Functions](https://www.netlify.com/products/functions){rel="nofollow"}
- [Vercel Edge Network](https://vercel.com/docs/edge-network){rel="nofollow"}
Or for other runtimes:
::card-group
:::card{icon="i-logos-deno" target="_blank" title="Deno" to="https://deno.land"}
:::
:::card{icon="i-logos-bun" target="_blank" title="Bun" to="https://bun.sh"}
:::
::
::read-more{to="https://nuxt.com/docs/getting-started/deployment"}
::
## Hybrid Rendering
Nitro has a powerful feature called `routeRules` which allows you to define a set of rules to customize how each route of your Nuxt app is rendered (and more).
```ts [nuxt.config.ts] twoslash
export default defineNuxtConfig({
routeRules: {
// Generated at build time for SEO purpose
'/': { prerender: true },
// Cached for 1 hour
'/api/*': { cache: { maxAge: 60 * 60 } },
// Redirection to avoid 404
'/old-page': {
redirect: { to: '/new-page', statusCode: 302 }
}
// ...
}
})
```
::read-more
---
to: https://nuxt.com/docs/guide/concepts/rendering#hybrid-rendering
---
Learn about all available route rules are available to customize the rendering mode of your routes.
::
In addition, there are some route rules (for example, `ssr`, `appMiddleware`, and `noScripts`) that are Nuxt specific to change the behavior when rendering your pages to HTML.
Some route rules (`appMiddleware`, `redirect` and `prerender`) also affect client-side behavior.
Nitro is used to build the app for server side rendering, as well as pre-rendering.
::read-more{to="https://nuxt.com/docs/guide/concepts/rendering"}
::
# Layers
One of the core features of Nuxt is the layers and extending support. You can extend a default Nuxt application to reuse components, utils, and configuration. The layers structure is almost identical to a standard Nuxt application which makes them easy to author and maintain.
## Use Cases
- Share reusable configuration presets across projects using `nuxt.config` and `app.config`
- Create a component library using [`components/`](https://nuxt.com/docs/guide/directory-structure/components) directory
- Create utility and composable library using [`composables/`](https://nuxt.com/docs/guide/directory-structure/composables) and [`utils/`](https://nuxt.com/docs/guide/directory-structure/utils) directories
- Create Nuxt module presets
- Share standard setup across projects
- Create Nuxt themes
- Enhance code organization by implementing a modular architecture and support Domain-Driven Design (DDD) pattern in large scale projects.
## Usage
By default, any layers within your project in the `~~/layers` directory will be automatically registered as layers in your project.
::note
Layer auto-registration was introduced in Nuxt v3.12.0.
::
In addition, named layer aliases to the `srcDir` of each of these layers will automatically be created. For example, you will be able to access the `~~/layers/test` layer via `#layers/test`.
::note
Named layer aliases were introduced in Nuxt v3.16.0.
::
In addition, you can extend from a layer by adding the [extends](https://nuxt.com/docs/api/nuxt-config#extends) property to your [`nuxt.config`](https://nuxt.com/docs/guide/directory-structure/nuxt-config) file.
```ts [nuxt.config.ts]
export default defineNuxtConfig({
extends: [
'../base', // Extend from a local layer
'@my-themes/awesome', // Extend from an installed npm package
'github:my-themes/awesome#v1', // Extend from a git repository
]
})
```
You can also pass an authentication token if you are extending from a private GitHub repository:
```ts [nuxt.config.ts]
export default defineNuxtConfig({
extends: [
// per layer configuration
['github:my-themes/private-awesome', { auth: process.env.GITHUB_TOKEN }]
]
})
```
::tip
You can override a layer's alias by specifying it in the options next to the layer source.
```ts [nuxt.config.ts]
export default defineNuxtConfig({
extends: [
[
'github:my-themes/awesome',
{
meta: {
name: 'my-awesome-theme',
},
},
],
]
})
```
::
Nuxt uses [unjs/c12](https://c12.unjs.io){rel="nofollow"} and [unjs/giget](https://giget.unjs.io){rel="nofollow"} for extending remote layers. Check the documentation for more information and all available options.
::read-more{to="https://nuxt.com/docs/guide/going-further/layers"}
Read more about layers in the **Layer Author Guide**.
::
::video-accordion
---
title: Watch a video from Learn Vue about Nuxt Layers
video-id: lnFCM7c9f7I
---
::
::video-accordion
---
title: Watch a video from Alexander Lichter about Nuxt Layers
video-id: fr5yo3aVkfA
---
::
## Examples
::card-group
:::card
---
icon: i-simple-icons-github
target: _blank
title: Content Wind
to: https://github.com/Atinux/content-wind
---
A lightweight Nuxt theme to build a Markdown driven website. Powered by Nuxt Content, TailwindCSS and Iconify.
:::
::
# Prerendering
Nuxt allows for select pages from your application to be rendered at build time. Nuxt will serve the prebuilt pages when requested instead of generating them on the fly.
::read-more
---
title: Nuxt rendering modes
to: https://nuxt.com/docs/guide/concepts/rendering
---
::
## Crawl-based Pre-rendering
Use the [`nuxi generate` command](https://nuxt.com/docs/api/commands/generate) to build and pre-render your application using the [Nitro](https://nuxt.com/docs/guide/concepts/server-engine) crawler. This command is similar to `nuxt build` with the `nitro.static` option set to `true`, or running `nuxt build --prerender`.
This will build your site, stand up a nuxt instance, and, by default, prerender the root page `/` along with any of your site's pages it links to, any of your site's pages they link to, and so on.
::code-group{sync="pm"}
```bash [npm]
npx nuxi generate
```
```bash [yarn]
yarn dlx nuxi generate
```
```bash [pnpm]
pnpm dlx nuxi generate
```
```bash [bun]
bun x nuxi generate
```
::
You can now deploy the `.output/public` directory to any static hosting service or preview it locally with `npx serve .output/public`.
Working of the Nitro crawler:
1. Load the HTML of your application's root route (`/`), any non-dynamic pages in your `~/pages` directory, and any other routes in the `nitro.prerender.routes` array.
2. Save the HTML and `payload.json` to the `~/.output/public/` directory to be served statically.
3. Find all anchor tags (`<a href="...">`) in the HTML to navigate to other routes.
4. Repeat steps 1-3 for each anchor tag found until there are no more anchor tags to crawl.
This is important to understand since pages that are not linked to a discoverable page can't be pre-rendered automatically.
::read-more{to="https://nuxt.com/docs/api/commands/generate#nuxi-generate"}
Read more about the `nuxi generate` command.
::
### Selective Pre-rendering
You can manually specify routes that [Nitro](https://nuxt.com/docs/guide/concepts/server-engine) will fetch and pre-render during the build or ignore routes that you don't want to pre-render like `/dynamic` in the `nuxt.config` file:
```ts [nuxt.config.ts] twoslash
export default defineNuxtConfig({
nitro: {
prerender: {
routes: ["/user/1", "/user/2"],
ignore: ["/dynamic"],
},
},
});
```
You can combine this with the `crawlLinks` option to pre-render a set of routes that the crawler can't discover like your `/sitemap.xml` or `/robots.txt`:
```ts [nuxt.config.ts] twoslash
export default defineNuxtConfig({
nitro: {
prerender: {
crawlLinks: true,
routes: ["/sitemap.xml", "/robots.txt"],
},
},
});
```
Setting `nitro.prerender` to `true` is similar to `nitro.prerender.crawlLinks` to `true`.
::read-more{to="https://nitro.unjs.io/config#prerender"}
Read more about pre-rendering in the Nitro documentation.
::
Lastly, you can manually configure this using routeRules.
```ts [nuxt.config.ts] twoslash
export default defineNuxtConfig({
routeRules: {
// Set prerender to true to configure it to be prerendered
"/rss.xml": { prerender: true },
// Set it to false to configure it to be skipped for prerendering
"/this-DOES-NOT-get-prerendered": { prerender: false },
// Everything under /blog gets prerendered as long as it
// is linked to from another page
"/blog/**": { prerender: true },
},
});
```
::read-more{to="https://nitro.unjs.io/config/#routerules"}
Read more about Nitro's `routeRules` configuration.
::
As a shorthand, you can also configure this in a page file using [`defineRouteRules`](https://nuxt.com/docs/api/utils/define-route-rules).
::read-more
---
icon: i-lucide-star
to: https://nuxt.com/docs/guide/going-further/experimental-features#inlinerouterules
---
This feature is experimental and in order to use it you must enable the `experimental.inlineRouteRules` option in your `nuxt.config`.
::
```vue [pages/index.vue]
<script setup>
// Or set at the page level
defineRouteRules({
prerender: true,
});
</script>
<template>
<div>
<h1>Homepage</h1>
<p>Pre-rendered at build time</p>
</div>
</template>
```
This will be translated to:
```ts [nuxt.config.ts]
export default defineNuxtConfig({
routeRules: {
"/": { prerender: true },
},
});
```
## Runtime prerender configuration
### `prerenderRoutes`
You can use this at runtime within a [Nuxt context](https://nuxt.com/docs/guide/going-further/nuxt-app#the-nuxt-context) to add more routes for Nitro to prerender.
```vue [pages/index.vue]
<script setup>
prerenderRoutes(["/some/other/url"]);
prerenderRoutes("/api/content/article/my-article");
</script>
<template>
<div>
<h1>This will register other routes for prerendering when prerendered</h1>
</div>
</template>
```
::read-more
---
title: prerenderRoutes
to: https://nuxt.com/docs/api/utils/prerender-routes
---
::
### `prerender:routes` Nuxt hook
This is called before prerendering for additional routes to be registered.
```ts [nuxt.config.ts]
export default defineNuxtConfig({
hooks: {
async "prerender:routes"(ctx) {
const { pages } = await fetch("https://api.some-cms.com/pages").then(
(res) => res.json(),
);
for (const page of pages) {
ctx.routes.add(`/${page.name}`);
}
},
},
});
```
### `prerender:generate` Nitro hook
This is called for each route during prerendering. You can use this for fine grained handling of each route that gets prerendered.
```ts [nuxt.config.ts]
export default defineNuxtConfig({
nitro: {
hooks: {
"prerender:generate"(route) {
if (route.route?.includes("private")) {
route.skip = true;
}
},
},
},
});
```
# Deployment
A Nuxt application can be deployed on a Node.js server, pre-rendered for static hosting, or deployed to serverless or edge (CDN) environments.
::tip
If you are looking for a list of cloud providers that support Nuxt, see the [Hosting providers](https://nuxt.com/deploy) section.
::
## Node.js Server
Discover the Node.js server preset with Nitro to deploy on any Node hosting.
- **Default output format** if none is specified or auto-detected
:br
- Loads only the required chunks to render the request for optimal cold start timing
:br
- Useful for deploying Nuxt apps to any Node.js hosting
### Entry Point
When running `nuxt build` with the Node server preset, the result will be an entry point that launches a ready-to-run Node server.
```bash [Terminal]
node .output/server/index.mjs
```
This will launch your production Nuxt server that listens on port 3000 by default.
It respects the following runtime environment variables:
- `NITRO_PORT` or `PORT` (defaults to `3000`)
- `NITRO_HOST` or `HOST` (defaults to `'0.0.0.0'`)
- `NITRO_SSL_CERT` and `NITRO_SSL_KEY` - if both are present, this will launch the server in HTTPS mode. In the vast majority of cases, this should not be used other than for testing, and the Nitro server should be run behind a reverse proxy like nginx or Cloudflare which terminates SSL.
### PM2
[PM2](https://pm2.keymetrics.io/){rel="nofollow"} (Process Manager 2) is a fast and easy solution for hosting your Nuxt application on your server or VM.
To use `pm2`, use an `ecosystem.config.cjs`:
```ts [ecosystem.config.cjs]
module.exports = {
apps: [
{
name: 'NuxtAppName',
port: '3000',
exec_mode: 'cluster',
instances: 'max',
script: './.output/server/index.mjs'
}
]
}
```
### Cluster Mode
You can use `NITRO_PRESET=node_cluster` in order to leverage multi-process performance using Node.js [cluster](https://nodejs.org/dist/latest/docs/api/cluster.html){rel="nofollow"} module.
By default, the workload gets distributed to the workers with the round robin strategy.
### Learn More
::read-more
---
title: the Nitro documentation for node-server preset
to: https://nitro.unjs.io/deploy/node
---
::
::video-accordion
---
title: Watch Daniel Roe's short video on the topic
video-id: 0x1H6K5yOfs
---
::
## Static Hosting
There are two ways to deploy a Nuxt application to any static hosting services:
- Static site generation (SSG) with `ssr: true` pre-renders routes of your application at build time. (This is the default behavior when running `nuxi generate`.) It will also generate `/200.html` and `/404.html` single-page app fallback pages, which can render dynamic routes or 404 errors on the client (though you may need to configure this on your static host).
- Alternatively, you can prerender your site with `ssr: false` (static single-page app). This will produce HTML pages with an empty `<div id="__nuxt"></div>` where your Vue app would normally be rendered. You will lose many SEO benefits of prerendering your site, so it is suggested instead to use [`<ClientOnly>`](https://nuxt.com/docs/api/components/client-only) to wrap the portions of your site that cannot be server rendered (if any).
::read-more
---
title: Nuxt prerendering
to: https://nuxt.com/docs/getting-started/prerendering
---
::
### Client-side Only Rendering
If you don't want to pre-render your routes, another way of using static hosting is to set the `ssr` property to `false` in the `nuxt.config` file. The `nuxi generate` command will then output an `.output/public/index.html` entrypoint and JavaScript bundles like a classic client-side Vue.js application.
```ts [nuxt.config.ts] twoslash
export default defineNuxtConfig({
ssr: false
})
```
## Hosting Providers
Nuxt can be deployed to several cloud providers with a minimal amount of configuration:
::read-more{to="https://nuxt.com/deploy"}
::
## Presets
In addition to Node.js servers and static hosting services, a Nuxt project can be deployed with several well-tested presets and minimal amount of configuration.
You can explicitly set the desired preset in the [`nuxt.config.ts`](https://nuxt.com/docs/guide/directory-structure/nuxt-config) file:
```js [nuxt.config.ts] twoslash
export default defineNuxtConfig({
nitro: {
preset: 'node-server'
}
})
```
... or use the `NITRO_PRESET` environment variable when running `nuxt build`:
```bash [Terminal]
NITRO_PRESET=node-server nuxt build
```
🔎 Check [the Nitro deployment](https://nitro.unjs.io/deploy){rel="nofollow"} for all possible deployment presets and providers.
## CDN Proxy
In most cases, Nuxt can work with third-party content that is not generated or created by Nuxt itself. But sometimes such content can cause problems, especially Cloudflare's "Minification and Security Options".
Accordingly, you should make sure that the following options are unchecked / disabled in Cloudflare. Otherwise, unnecessary re-rendering or hydration errors could impact your production application.
1. Speed > Optimization > Content Optimization > Disable "Rocket Loader™"
2. Speed > Optimization > Image Optimization > Disable "Mirage"
3. Scrape Shield > Disable "Email Address Obfuscation"
With these settings, you can be sure that Cloudflare won't inject scripts into your Nuxt application that may cause unwanted side effects.
::tip
Their location on the Cloudflare dashboard sometimes changes so don't hesitate to look around.
::
# Testing
::tip
If you are a module author, you can find more specific information in the [Module Author's guide](https://nuxt.com/docs/guide/going-further/modules#testing).
::
Nuxt offers first-class support for end-to-end and unit testing of your Nuxt application via `@nuxt/test-utils`, a library of test utilities and configuration that currently powers the [tests we use on Nuxt itself](https://github.com/nuxt/nuxt/tree/main/test){rel="nofollow"} and tests throughout the module ecosystem.
::video-accordion
---
title: Watch a video from Alexander Lichter about getting started with
@nuxt/test-utils
video-id: yGzwk9xi9gU
---
::
## Installation
In order to allow you to manage your other testing dependencies, `@nuxt/test-utils` ships with various optional peer dependencies. For example:
- you can choose between `happy-dom` and `jsdom` for a runtime Nuxt environment
- you can choose between `vitest`, `cucumber`, `jest` and `playwright` for end-to-end test runners
- `playwright-core` is only required if you wish to use the built-in browser testing utilities (and are not using `@playwright/test` as your test runner)
::code-group{sync="pm"}
```bash [npm]
npm i --save-dev @nuxt/test-utils vitest @vue/test-utils happy-dom playwright-core
```
```bash [yarn]
yarn add --dev @nuxt/test-utils vitest @vue/test-utils happy-dom playwright-core
```
```bash [pnpm]
pnpm add -D @nuxt/test-utils vitest @vue/test-utils happy-dom playwright-core
```
```bash [bun]
bun add --dev @nuxt/test-utils vitest @vue/test-utils happy-dom playwright-core
```
::
## Unit Testing
We currently ship an environment for unit testing code that needs a [Nuxt](https://nuxt.com){rel="nofollow"} runtime environment. It currently *only has support for `vitest`* (although contribution to add other runtimes would be welcome).
### Setup
1. Add `@nuxt/test-utils/module` to your `nuxt.config` file (optional). It adds a Vitest integration to your Nuxt DevTools which supports running your unit tests in development.
```ts twoslash
export default defineNuxtConfig({
modules: [
'@nuxt/test-utils/module'
]
})
```
2. Create a `vitest.config.ts` with the following content:
```ts twoslash
import { defineVitestConfig } from '@nuxt/test-utils/config'
export default defineVitestConfig({
// any custom Vitest config you require
})
```
::tip
When importing `@nuxt/test-utils` in your vitest config, It is necessary to have `"type": "module"` specified in your `package.json` or rename your vitest config file appropriately.
> ie. `vitest.config.m{ts,js}`.
::
::tip
It is possible to set environment variables for testing by using the `.env.test` file.
::
### Using a Nuxt Runtime Environment
By default, `@nuxt/test-utils` will not change your default Vitest environment, so you can do fine-grained opt-in and run Nuxt tests together with other unit tests.
You can opt in to a Nuxt environment by adding `.nuxt.` to the test file's name (for example, `my-file.nuxt.test.ts` or `my-file.nuxt.spec.ts`) or by adding `@vitest-environment nuxt` as a comment directly in the test file.
```ts twoslash
// @vitest-environment nuxt
import { test } from 'vitest'
test('my test', () => {
// ... test with Nuxt environment!
})
```
You can alternatively set `environment: 'nuxt'` in your Vitest configuration to enable the Nuxt environment for **all tests**.
```ts twoslash
// vitest.config.ts
import { fileURLToPath } from 'node:url'
import { defineVitestConfig } from '@nuxt/test-utils/config'
export default defineVitestConfig({
test: {
environment: 'nuxt',
// you can optionally set Nuxt-specific environment options
// environmentOptions: {
// nuxt: {
// rootDir: fileURLToPath(new URL('./playground', import.meta.url)),
// domEnvironment: 'happy-dom', // 'happy-dom' (default) or 'jsdom'
// overrides: {
// // other Nuxt config you want to pass
// }
// }
// }
}
})
```
If you have set `environment: 'nuxt'` by default, you can then opt *out* of the [default environment](https://vitest.dev/guide/environment.html#test-environment){rel="nofollow"} per test file as needed.
```ts twoslash
// @vitest-environment node
import { test } from 'vitest'
test('my test', () => {
// ... test without Nuxt environment!
})
```
::warning
When you run your tests within the Nuxt environment, they will be running in a [`happy-dom`](https://github.com/capricorn86/happy-dom){rel="nofollow"} or [`jsdom`](https://github.com/jsdom/jsdom){rel="nofollow"} environment. Before your tests run, a global Nuxt app will be initialized (including, for example, running any plugins or code you've defined in your `app.vue`).
This means you should take particular care not to mutate the global state in your tests (or, if you need to, to reset it afterwards).
::
### 🎭 Built-In Mocks
`@nuxt/test-utils` provides some built-in mocks for the DOM environment.
#### `intersectionObserver`
Default `true`, creates a dummy class without any functionality for the IntersectionObserver API
#### `indexedDB`
Default `false`, uses [`fake-indexeddb`](https://github.com/dumbmatter/fakeIndexedDB){rel="nofollow"} to create a functional mock of the IndexedDB API
These can be configured in the `environmentOptions` section of your `vitest.config.ts` file:
```ts twoslash
import { defineVitestConfig } from '@nuxt/test-utils/config'
export default defineVitestConfig({
test: {
environmentOptions: {
nuxt: {
mock: {
intersectionObserver: true,
indexedDb: true,
}
}
}
}
})
```
### 🛠️ Helpers
`@nuxt/test-utils` provides a number of helpers to make testing Nuxt apps easier.
#### `mountSuspended`
`mountSuspended` allows you to mount any Vue component within the Nuxt environment, allowing async setup and access to injections from your Nuxt plugins.
::note
Under the hood, `mountSuspended` wraps `mount` from `@vue/test-utils`, so you can check out [the Vue Test Utils documentation](https://test-utils.vuejs.org/guide/){rel="nofollow"} for more on the options you can pass, and how to use this utility.
::
For example:
```ts twoslash
// @noErrors
import { it, expect } from 'vitest'
import type { Component } from 'vue'
declare module '#components' {
export const SomeComponent: Component
}
// ---cut---
// tests/components/SomeComponents.nuxt.spec.ts
import { mountSuspended } from '@nuxt/test-utils/runtime'
import { SomeComponent } from '#components'
it('can mount some component', async () => {
const component = await mountSuspended(SomeComponent)
expect(component.text()).toMatchInlineSnapshot(
'"This is an auto-imported component"'
)
})
```
```ts twoslash
// @noErrors
import { it, expect } from 'vitest'
// ---cut---
// tests/components/SomeComponents.nuxt.spec.ts
import { mountSuspended } from '@nuxt/test-utils/runtime'
import App from '~/app.vue'
// tests/App.nuxt.spec.ts
it('can also mount an app', async () => {
const component = await mountSuspended(App, { route: '/test' })
expect(component.html()).toMatchInlineSnapshot(`
"<div>This is an auto-imported component</div>
<div> I am a global component </div>
<div>/</div>
<a href="/test"> Test link </a>"
`)
})
```
#### `renderSuspended`
`renderSuspended` allows you to render any Vue component within the Nuxt environment using `@testing-library/vue`, allowing async setup and access to injections from your Nuxt plugins.
This should be used together with utilities from Testing Library, e.g. `screen` and `fireEvent`. Install [@testing-library/vue](https://testing-library.com/docs/vue-testing-library/intro){rel="nofollow"} in your project to use these.
Additionally, Testing Library also relies on testing globals for cleanup. You should turn these on in your [Vitest config](https://vitest.dev/config/#globals){rel="nofollow"}.
The passed in component will be rendered inside a `<div id="test-wrapper"></div>`.
Examples:
```ts twoslash
// @noErrors
import { it, expect } from 'vitest'
import type { Component } from 'vue'
declare module '#components' {
export const SomeComponent: Component
}
// ---cut---
// tests/components/SomeComponents.nuxt.spec.ts
import { renderSuspended } from '@nuxt/test-utils/runtime'
import { SomeComponent } from '#components'
import { screen } from '@testing-library/vue'
it('can render some component', async () => {
await renderSuspended(SomeComponent)
expect(screen.getByText('This is an auto-imported component')).toBeDefined()
})
```
```ts twoslash
// @noErrors
import { it, expect } from 'vitest'
// ---cut---
// tests/App.nuxt.spec.ts
import { renderSuspended } from '@nuxt/test-utils/runtime'
import App from '~/app.vue'
it('can also render an app', async () => {
const html = await renderSuspended(App, { route: '/test' })
expect(html).toMatchInlineSnapshot(`
"<div id="test-wrapper">
<div>This is an auto-imported component</div>
<div> I am a global component </div>
<div>Index page</div><a href="/test"> Test link </a>
</div>"
`)
})
```
#### `mockNuxtImport`
`mockNuxtImport` allows you to mock Nuxt's auto import functionality. For example, to mock `useStorage`, you can do so like this:
```ts twoslash
import { mockNuxtImport } from '@nuxt/test-utils/runtime'
mockNuxtImport('useStorage', () => {
return () => {
return { value: 'mocked storage' }
}
})
// your tests here
```
::note
`mockNuxtImport` can only be used once per mocked import per test file. It is actually a macro that gets transformed to `vi.mock` and `vi.mock` is hoisted, as described [here](https://vitest.dev/api/vi.html#vi-mock){rel="nofollow"}.
::
If you need to mock a Nuxt import and provide different implementations between tests, you can do it by creating and exposing your mocks using [`vi.hoisted`](https://vitest.dev/api/vi.html#vi-hoisted){rel="nofollow"}, and then use those mocks in `mockNuxtImport`. You then have access to the mocked imports, and can change the implementation between tests. Be careful to [restore mocks](https://vitest.dev/api/mock.html#mockrestore){rel="nofollow"} before or after each test to undo mock state changes between runs.
```ts twoslash
import { vi } from 'vitest'
import { mockNuxtImport } from '@nuxt/test-utils/runtime'
const { useStorageMock } = vi.hoisted(() => {
return {
useStorageMock: vi.fn(() => {
return { value: 'mocked storage'}
})
}
})
mockNuxtImport('useStorage', () => {
return useStorageMock
})
// Then, inside a test
useStorageMock.mockImplementation(() => {
return { value: 'something else' }
})
```
#### `mockComponent`
`mockComponent` allows you to mock Nuxt's component.
The first argument can be the component name in PascalCase, or the relative path of the component.
The second argument is a factory function that returns the mocked component.
For example, to mock `MyComponent`, you can:
```ts twoslash
import { mockComponent } from '@nuxt/test-utils/runtime'
mockComponent('MyComponent', {
props: {
value: String
},
setup(props) {
// ...
}
})
// relative path or alias also works
mockComponent('~/components/my-component.vue', async () => {
// or a factory function
return defineComponent({
setup(props) {
// ...
}
})
})
// or you can use SFC for redirecting to a mock component
mockComponent('MyComponent', () => import('./MockComponent.vue'))
// your tests here
```
> **Note**: You can't reference local variables in the factory function since they are hoisted. If you need to access Vue APIs or other variables, you need to import them in your factory function.
```ts twoslash
import { mockComponent } from '@nuxt/test-utils/runtime'
mockComponent('MyComponent', async () => {
const { ref, h } = await import('vue')
return defineComponent({
setup(props) {
const counter = ref(0)
return () => h('div', null, counter.value)
}
})
})
```
#### `registerEndpoint`
`registerEndpoint` allows you create Nitro endpoint that returns mocked data. It can come in handy if you want to test a component that makes requests to API to display some data.
The first argument is the endpoint name (e.g. `/test/`).
The second argument is a factory function that returns the mocked data.
For example, to mock `/test/` endpoint, you can do:
```ts twoslash
import { registerEndpoint } from '@nuxt/test-utils/runtime'
registerEndpoint('/test/', () => ({
test: 'test-field'
}))
```
By default, your request will be made using the `GET` method. You may use another method by setting an object as the second argument instead of a function.
```ts twoslash
import { registerEndpoint } from '@nuxt/test-utils/runtime'
registerEndpoint('/test/', {
method: 'POST',
handler: () => ({ test: 'test-field' })
})
```
> **Note**: If your requests in a component go to an external API, you can use `baseURL` and then make it empty using [Nuxt Environment Override Config](https://nuxt.com/docs/getting-started/configuration#environment-overrides) (`$test`) so all your requests will go to Nitro server.
#### Conflict with End-To-End Testing
`@nuxt/test-utils/runtime` and `@nuxt/test-utils/e2e` need to run in different testing environments and so can't be used in the same file.
If you would like to use both the end-to-end and unit testing functionality of `@nuxt/test-utils`, you can split your tests into separate files. You then either specify a test environment per-file with the special `// @vitest-environment nuxt` comment, or name your runtime unit test files with the `.nuxt.spec.ts` extension.
`app.nuxt.spec.ts`
```ts twoslash
import { mockNuxtImport } from '@nuxt/test-utils/runtime'
mockNuxtImport('useStorage', () => {
return () => {
return { value: 'mocked storage' }
}
})
```
`app.e2e.spec.ts`
```ts twoslash
import { setup, $fetch } from '@nuxt/test-utils/e2e'
await setup({
setupTimeout: 10000,
})
// ...
```
### Using `@vue/test-utils`
If you prefer to use `@vue/test-utils` on its own for unit testing in Nuxt, and you are only testing components which do not rely on Nuxt composables, auto-imports or context, you can follow these steps to set it up.
1. Install the needed dependencies
:code-group[```bash \[npm\]
npm i --save-dev vitest @vue/test-utils happy-dom @vitejs/plugin-vue
``````bash \[yarn\]
yarn add --dev vitest @vue/test-utils happy-dom @vitejs/plugin-vue
``````bash \[pnpm\]
pnpm add -D vitest @vue/test-utils happy-dom @vitejs/plugin-vue
``````bash \[bun\]
bun add --dev vitest @vue/test-utils happy-dom @vitejs/plugin-vue
```]{sync="pm"}
2. Create a `vitest.config.ts` with the following content:
```ts twoslash
import { defineConfig } from 'vitest/config'
import vue from '@vitejs/plugin-vue'
export default defineConfig({
plugins: [vue()],
test: {
environment: 'happy-dom',
},
});
```
3. Add a new command for test in your `package.json`
```json
"scripts": {
"build": "nuxt build",
"dev": "nuxt dev",
...
"test": "vitest"
},
```
4. Create a simple `<HelloWorld>` component `components/HelloWorld.vue` with the following content:
```vue
<template>
<p>Hello world</p>
</template>
```
5. Create a simple unit test for this newly created component `~/components/HelloWorld.spec.ts`
```ts twoslash
import { describe, it, expect } from 'vitest'
import { mount } from '@vue/test-utils'
import HelloWorld from './HelloWorld.vue'
describe('HelloWorld', () => {
it('component renders Hello world properly', () => {
const wrapper = mount(HelloWorld)
expect(wrapper.text()).toContain('Hello world')
})
})
```
6. Run vitest command
:code-group[```bash \[npm\]
npm run test
``````bash \[yarn\]
yarn test
``````bash \[pnpm\]
pnpm run test
``````bash \[bun\]
bun run test
```]{sync="pm"}
Congratulations, you're all set to start unit testing with `@vue/test-utils` in Nuxt! Happy testing!
## End-To-End Testing
For end-to-end testing, we support [Vitest](https://github.com/vitest-dev/vitest){rel="nofollow"}, [Jest](https://jestjs.io){rel="nofollow"}, [Cucumber](https://cucumber.io/){rel="nofollow"} and [Playwright](https://playwright.dev/){rel="nofollow"} as test runners.
### Setup
In each `describe` block where you are taking advantage of the `@nuxt/test-utils/e2e` helper methods, you will need to set up the test context before beginning.
```ts [test/my-test.spec.ts] twoslash
import { describe, test } from 'vitest'
import { setup, $fetch } from '@nuxt/test-utils/e2e'
describe('My test', async () => {
await setup({
// test context options
})
test('my test', () => {
// ...
})
})
```
Behind the scenes, `setup` performs a number of tasks in `beforeAll`, `beforeEach`, `afterEach` and `afterAll` to set up the Nuxt test environment correctly.
Please use the options below for the `setup` method.
#### Nuxt Config
- `rootDir`: Path to a directory with a Nuxt app to be put under test.
- Type: `string`
- Default: `'.'`
- `configFile`: Name of the configuration file.
- Type: `string`
- Default: `'nuxt.config'`
#### Timings
- `setupTimeout`: The amount of time (in milliseconds) to allow for `setupTest` to complete its work (which could include building or generating files for a Nuxt application, depending on the options that are passed).
- Type: `number`
- Default: `60000`
#### Features
- `build`: Whether to run a separate build step.
- Type: `boolean`
- Default: `true` (`false` if `browser` or `server` is disabled, or if a `host` is provided)
- `server`: Whether to launch a server to respond to requests in the test suite.
- Type: `boolean`
- Default: `true` (`false` if a `host` is provided)
- `port`: If provided, set the launched test server port to the value.
- Type: `number | undefined`
- Default: `undefined`
- `host`: If provided, a URL to use as the test target instead of building and running a new server. Useful for running "real" end-to-end tests against a deployed version of your application, or against an already running local server (which may provide a significant reduction in test execution timings). See the [target host end-to-end example below](https://nuxt.com/#target-host-end-to-end-example).
- Type: `string`
- Default: `undefined`
- `browser`: Under the hood, Nuxt test utils uses [`playwright`](https://playwright.dev){rel="nofollow"} to carry out browser testing. If this option is set, a browser will be launched and can be controlled in the subsequent test suite.
- Type: `boolean`
- Default: `false`
- `browserOptions`
- Type: `object` with the following properties
- `type`: The type of browser to launch - either `chromium`, `firefox` or `webkit`
- `launch`: `object` of options that will be passed to playwright when launching the browser. See [full API reference](https://playwright.dev/docs/api/class-browsertype#browser-type-launch){rel="nofollow"}.
- `runner`: Specify the runner for the test suite. Currently, [Vitest](https://vitest.dev){rel="nofollow"} is recommended.
- Type: `'vitest' | 'jest' | 'cucumber'`
- Default: `'vitest'`
##### Target `host` end-to-end example
A common use-case for end-to-end testing is running the tests against a deployed application running in the same environment typically used for Production.
For local development or automated deploy pipelines, testing against a separate local server can be more efficient and is typically faster than allowing the test framework to rebuild between tests.
To utilize a separate target host for end-to-end tests, simply provide the `host` property of the `setup` function with the desired URL.
```ts twoslash
import { setup, createPage } from '@nuxt/test-utils/e2e'
import { describe, it, expect } from 'vitest'
describe('login page', async () => {
await setup({
host: 'http://localhost:8787',
})
it('displays the email and password fields', async () => {
const page = await createPage('/login')
expect(await page.getByTestId('email').isVisible()).toBe(true)
expect(await page.getByTestId('password').isVisible()).toBe(true)
})
})
```
### APIs
#### `$fetch(url)`
Get the HTML of a server-rendered page.
```ts twoslash
import { $fetch } from '@nuxt/test-utils/e2e'
const html = await $fetch('/')
```
#### `fetch(url)`
Get the response of a server-rendered page.
```ts twoslash
import { fetch } from '@nuxt/test-utils/e2e'
const res = await fetch('/')
const { body, headers } = res
```
#### `url(path)`
Get the full URL for a given page (including the port the test server is running on.)
```ts twoslash
import { url } from '@nuxt/test-utils/e2e'
const pageUrl = url('/page')
// 'http://localhost:6840/page'
```
### Testing in a Browser
We provide built-in support using Playwright within `@nuxt/test-utils`, either programmatically or via the Playwright test runner.
#### `createPage(url)`
Within `vitest`, `jest` or `cucumber`, you can create a configured Playwright browser instance with `createPage`, and (optionally) point it at a path from the running server. You can find out more about the API methods available from [in the Playwright documentation](https://playwright.dev/docs/api/class-page){rel="nofollow"}.
```ts twoslash
import { createPage } from '@nuxt/test-utils/e2e'
const page = await createPage('/page')
// you can access all the Playwright APIs from the `page` variable
```
#### Testing with Playwright Test Runner
We also provide first-class support for testing Nuxt within [the Playwright test runner](https://playwright.dev/docs/intro){rel="nofollow"}.
::code-group{sync="pm"}
```bash [npm]
npm i --save-dev @playwright/test @nuxt/test-utils
```
```bash [yarn]
yarn add --dev @playwright/test @nuxt/test-utils
```
```bash [pnpm]
pnpm add -D @playwright/test @nuxt/test-utils
```
```bash [bun]
bun add --dev @playwright/test @nuxt/test-utils
```
::
You can provide global Nuxt configuration, with the same configuration details as the `setup()` function mentioned earlier in this section.
```ts [playwright.config.ts]
import { fileURLToPath } from 'node:url'
import { defineConfig, devices } from '@playwright/test'
import type { ConfigOptions } from '@nuxt/test-utils/playwright'
export default defineConfig<ConfigOptions>({
use: {
nuxt: {
rootDir: fileURLToPath(new URL('.', import.meta.url))
}
},
// ...
})
```
::read-more
---
target: _blank
title: See full example config
to: https://github.com/nuxt/test-utils/blob/main/examples/app-playwright/playwright.config.ts
---
::
Your test file should then use `expect` and `test` directly from `@nuxt/test-utils/playwright`:
```ts [tests/example.test.ts]
import { expect, test } from '@nuxt/test-utils/playwright'
test('test', async ({ page, goto }) => {
await goto('/', { waitUntil: 'hydration' })
await expect(page.getByRole('heading')).toHaveText('Welcome to Playwright!')
})
```
You can alternatively configure your Nuxt server directly within your test file:
```ts [tests/example.test.ts]
import { expect, test } from '@nuxt/test-utils/playwright'
test.use({
nuxt: {
rootDir: fileURLToPath(new URL('..', import.meta.url))
}
})
test('test', async ({ page, goto }) => {
await goto('/', { waitUntil: 'hydration' })
await expect(page.getByRole('heading')).toHaveText('Welcome to Playwright!')
})
```
# Upgrade Guide
## Upgrading Nuxt
### Latest release
To upgrade Nuxt to the [latest release](https://github.com/nuxt/nuxt/releases){rel="nofollow"}, use the `nuxi upgrade` command.
::code-group{sync="pm"}
```bash [npm]
npx nuxi upgrade
```
```bash [yarn]
yarn dlx nuxi upgrade
```
```bash [pnpm]
pnpm dlx nuxi upgrade
```
```bash [bun]
bun x nuxi upgrade
```
::
### Nightly Release Channel
To use the latest Nuxt build and test features before their release, read about the [nightly release channel](https://nuxt.com/docs/guide/going-further/nightly-release-channel) guide.
::warning
The nightly release channel `latest` tag is currently tracking the Nuxt v4 branch, meaning that it is particularly likely to have breaking changes right now - be careful!
You can opt in to the 3.x branch nightly releases with `"nuxt": "npm:nuxt-nightly@3x"`.
::
## Testing Nuxt 4
The release date of Nuxt 4 is **to be announced**. It is dependent on having enough time after Nitro's major release to be properly tested in the community. You can follow progress towards Nitro's release in [this PR](https://github.com/nitrojs/nitro/pull/2521){rel="nofollow"}.
Until the release, it is possible to test many of Nuxt 4's breaking changes from Nuxt version 3.12+.
::video-accordion
---
title: Watch a video from Alexander Lichter showing how to opt in to Nuxt 4's
breaking changes already
video-id: r4wFKlcJK6c
---
::
### Opting in to Nuxt 4
First, upgrade Nuxt to the [latest release](https://github.com/nuxt/nuxt/releases){rel="nofollow"}.
Then you can set your `compatibilityVersion` to match Nuxt 4 behavior:
::code-collapse
```ts [nuxt.config.ts] twoslash
export default defineNuxtConfig({
future: {
compatibilityVersion: 4,
},
// To re-enable _all_ Nuxt v3 behavior, set the following options:
// srcDir: '.',
// dir: {
// app: 'app'
// },
// experimental: {
// scanPageMeta: 'after-resolve',
// sharedPrerenderData: false,
// compileTemplate: true,
// resetAsyncDataToUndefined: true,
// templateUtils: true,
// relativeWatchPaths: true,
// normalizeComponentNames: false,
// spaLoadingTemplateLocation: 'within',
// parseErrorData: false,
// defaults: {
// useAsyncData: {
// deep: true
// }
// }
// },
// features: {
// inlineStyles: true
// },
// unhead: {
// renderSSRHeadOptions: {
// omitLineBreaks: false
// }
// }
})
```
::
::note
For now, you need to define the compatibility version in each layer that opts into Nuxt 4 behavior. This will not be required after Nuxt 4 is released.
::
When you set your `compatibilityVersion` to `4`, defaults throughout your Nuxt configuration will change to opt in to Nuxt v4 behavior, but you can granularly re-enable Nuxt v3 behavior when testing, following the commented out lines above. Please file issues if so, so that we can address them in Nuxt or in the ecosystem.
Breaking or significant changes will be noted here along with migration steps for backward/forward compatibility.
::note
This section is subject to change until the final release, so please check back here regularly if you are testing Nuxt 4 using `compatibilityVersion: 4`.
::
### Migrating Using Codemods
To facilitate the upgrade process, we have collaborated with the [Codemod](https://github.com/codemod-com/codemod){rel="nofollow"} team to automate many migration steps with some open-source codemods.
::note
If you encounter any issues, please report them to the Codemod team with `npx codemod feedback` 🙏
::
For a complete list of Nuxt 4 codemods, detailed information on each, their source, and various ways to run them, visit the [Codemod Registry](https://go.codemod.com/codemod-registry){rel="nofollow"}.
You can run all the codemods mentioned in this guide using the following `codemod` recipe:
::code-group
```bash [npm]
npx codemod@latest nuxt/4/migration-recipe
```
```bash [yarn]
yarn dlx codemod@latest nuxt/4/migration-recipe
```
```bash [pnpm]
pnpm dlx codemod@latest nuxt/4/migration-recipe
```
```bash [bun]
bun x codemod@latest nuxt/4/migration-recipe
```
::
This command will execute all codemods in sequence, with the option to deselect any that you do not wish to run. Each codemod is also listed below alongside its respective change and can be executed independently.
### New Directory Structure
🚦 **Impact Level**: Significant
Nuxt now defaults to a new directory structure, with backwards compatibility (so if Nuxt detects you are using the old structure, such as with a top-level `pages/` directory, this new structure will not apply).
👉 [See full RFC](https://github.com/nuxt/nuxt/issues/26444){rel="nofollow"}
#### What Changed
- the new Nuxt default `srcDir` is `app/` by default, and most things are resolved from there.
- `serverDir` now defaults to `<rootDir>/server` rather than `<srcDir>/server`
- `layers/`, `modules/` and `public/` are resolved relative to `<rootDir>` by default
- if using [Nuxt Content v2.13+](https://github.com/nuxt/content/pull/2649){rel="nofollow"}, `content/` is resolved relative to `<rootDir>`
- a new `dir.app` is added, which is the directory we look for `router.options.ts` and `spa-loading-template.html` - this defaults to `<srcDir>/`
An example v4 folder structure.
```sh
.output/
.nuxt/
app/
assets/
components/
composables/
layouts/
middleware/
pages/
plugins/
utils/
app.config.ts
app.vue
router.options.ts
content/
layers/
modules/
node_modules/
public/
server/
api/
middleware/
plugins/
routes/
utils/
nuxt.config.ts
```
👉 For more details, see the [PR implementing this change](https://github.com/nuxt/nuxt/pull/27029){rel="nofollow"}.
#### Reasons for Change
1. **Performance** - placing all your code in the root of your repo causes issues with `.git/` and `node_modules/` folders being scanned/included by FS watchers which can significantly delay startup on non-Mac OSes.
2. **IDE type-safety** - `server/` and the rest of your app are running in two entirely different contexts with different global imports available, and making sure `server/` isn't *inside* the same folder as the rest of your app is a big first step to ensuring you get good auto-completes in your IDE.
::video-accordion
---
platform: vimeo
title: Watch a video from Vue School on the new directory structure
video-id: "1031028378"
---
::
#### Migration Steps
1. Create a new directory called `app/`.
2. Move your `assets/`, `components/`, `composables/`, `layouts/`, `middleware/`, `pages/`, `plugins/` and `utils/` folders under it, as well as `app.vue`, `error.vue`, `app.config.ts`. If you have an `app/router-options.ts` or `app/spa-loading-template.html`, these paths remain the same.
3. Make sure your `nuxt.config.ts`, `content/`, `layers/`, `modules/`, `public/` and `server/` folders remain outside the `app/` folder, in the root of your project.
4. Remember to update any third-party configuration files to work with the new directory structure, such as your `tailwindcss` or `eslint` configuration (if required - `@nuxtjs/tailwindcss` should automatically configure `tailwindcss` correctly).
::tip
You can automate this migration by running `npx codemod@latest nuxt/4/file-structure`
::
However, migration is *not required*. If you wish to keep your current folder structure, Nuxt should auto-detect it. (If it does not, please raise an issue.) The one exception is that if you *already* have a custom `srcDir`. In this case, you should be aware that your `modules/`, `public/` and `server/` folders will be resolved from your `rootDir` rather than from your custom `srcDir`. You can override this by configuring `dir.modules`, `dir.public` and `serverDir` if you need to.
You can also force a v3 folder structure with the following configuration:
```ts [nuxt.config.ts]
export default defineNuxtConfig({
// This reverts the new srcDir default from `app` back to your root directory
srcDir: '.',
// This specifies the directory prefix for `app/router.options.ts` and `app/spa-loading-template.html`
dir: {
app: 'app'
}
})
```
### Singleton Data Fetching Layer
🚦 **Impact Level**: Moderate
#### What Changed
Nuxt's data fetching system (`useAsyncData` and `useFetch`) has been significantly reorganized for better performance and consistency:
1. **Shared refs for the same key**: All calls to `useAsyncData` or `useFetch` with the same key now share the same `data`, `error` and `status` refs. This means that it is important that all calls with an explicit key must not have conflicting `deep`, `transform`, `pick`, `getCachedData` or `default` options.
2. **More control over `getCachedData`**: The `getCachedData` function is now called every time data is fetched, even if this is caused by a watcher or calling `refreshNuxtData`. (Previously, new data was always fetched and this function was not called in these cases.) To allow more control over when to use cached data and when to refetch, the function now receives a context object with the cause of the request.
3. **Reactive key support**: You can now use computed refs, plain refs or getter functions as keys, which enables automatic data refetching (and stores data separately).
4. **Data cleanup**: When the last component using data fetched with `useAsyncData` is unmounted, Nuxt will remove that data to avoid ever-growing memory usage.
#### Reasons for Change
These changes have been made to improve memory usage and increase consistency with loading states across calls of `useAsyncData`.
#### Migration Steps
1. **Check for inconsistent options**: Review any components using the same key with different options or fetch functions.
```ts
// This will now trigger a warning
const { data: users1 } = useAsyncData('users', () => $fetch('/api/users'), { deep: false })
const { data: users2 } = useAsyncData('users', () => $fetch('/api/users'), { deep: true })
```
:br
It may be beneficial to extract any calls to `useAsyncData` that share an explicit key (and have custom options) into their own composable:
```ts [composables/useUserData.ts]
export function useUserData(userId: string) {
return useAsyncData(
`user-${userId}`,
() => fetchUser(userId),
{
deep: true,
transform: (user) => ({ ...user, lastAccessed: new Date() })
}
)
}
```
2. **Update `getCachedData` implementations**:
```diff
useAsyncData('key', fetchFunction, {
- getCachedData: (key, nuxtApp) => {
- return cachedData[key]
- }
+ getCachedData: (key, nuxtApp, ctx) => {
+ // ctx.cause - can be 'initial' | 'refresh:hook' | 'refresh:manual' | 'watch'
+
+ // Example: Don't use cache on manual refresh
+ if (ctx.cause === 'refresh:manual') return undefined
+
+ return cachedData[key]
+ }
})
```
Alternatively, for now, you can disable this behaviour with:
```ts [nuxt.config.ts] twoslash
export default defineNuxtConfig({
experimental: {
granularCachedData: false,
purgeCachedData: false
}
})
```
### Deduplication of Route Metadata
🚦 **Impact Level**: Minimal
#### What Changed
It's possible to set some route metadata using `definePageMeta`, such as the `name`, `path`, and so on. Previously these were available both on the route and on route metadata (for example, `route.name` and `route.meta.name`).
Now, they are only accessible on the route object.
#### Reasons for Change
This is a result of enabling `experimental.scanPageMeta` by default, and is a performance optimization.
#### Migration Steps
The migration should be straightforward:
```diff
const route = useRoute()
- console.log(route.meta.name)
+ console.log(route.name)
```
### Normalized Component Names
🚦 **Impact Level**: Moderate
Vue will now generate component names that match the Nuxt pattern for component naming.
#### What Changed
By default, if you haven't set it manually, Vue will assign a component name that matches
the filename of the component.
```bash [Directory structure]
├─ components/
├─── SomeFolder/
├───── MyComponent.vue
```
In this case, the component name would be `MyComponent`, as far as Vue is concerned. If you wanted to use `<KeepAlive>` with it, or identify it in the Vue DevTools, you would need to use this name.
But in order to auto-import it, you would need to use `SomeFolderMyComponent`.
With this change, these two values will match, and Vue will generate a component name that matches the Nuxt pattern for component naming.
#### Migration Steps
Ensure that you use the updated name in any tests which use `findComponent` from `@vue/test-utils` and in any `<KeepAlive>` which depends on the name of your component.
Alternatively, for now, you can disable this behaviour with:
```ts [nuxt.config.ts] twoslash
export default defineNuxtConfig({
experimental: {
normalizeComponentNames: false
}
})
```
### Unhead v2
🚦 **Impact Level**: Minimal
#### What Changed
[Unhead](https://unhead.unjs.io/){rel="nofollow"}, used to generate `<head>` tags, has been updated to version 2. While mostly compatible it includes several breaking changes
for lower-level APIs.
- Removed props: `vmid`, `hid`, `children`, `body`.
- Promise input no longer supported.
- Tags are now sorted using Capo.js by default.
#### Migration Steps
The above changes should have minimal impact on your app.
If you have issues you should verify:
- You're not using any of the removed props.
```diff
useHead({
meta: [{
name: 'description',
// meta tags don't need a vmid, or a key
- vmid: 'description'
- hid: 'description'
}]
})
```
- If you're using [Template Params](https://unhead.unjs.io/docs/head/guides/plugins/template-params){rel="nofollow"} or [Alias Tag Sorting](https://unhead.unjs.io/docs/head/guides/plugins/alias-sorting){rel="nofollow"}, you will need to explicitly opt in to these features now.
```ts
import { TemplateParamsPlugin, AliasSortingPlugin } from '@unhead/vue/plugins'
export default defineNuxtPlugin({
setup() {
const unhead = injectHead()
unhead.use(TemplateParamsPlugin)
unhead.use(AliasSortingPlugin)
}
})
```
While not required it's recommend to update any imports from `@unhead/vue` to `#imports` or `nuxt/app`.
```diff
-import { useHead } from '@unhead/vue'
+import { useHead } from '#imports'
```
If you still have issues you may revert to the v1 behavior by enabling the `head.legacy` config.
```ts
export default defineNuxtConfig({
unhead: {
legacy: true,
}
})
```
### New DOM Location for SPA Loading Screen
🚦 **Impact Level**: Minimal
#### What Changed
When rendering a client-only page (with `ssr: false`), we optionally render a loading screen (from `app/spa-loading-template.html`), within the Nuxt app root:
```html
<div id="__nuxt">
<!-- spa loading template -->
</div>
```
Now, we default to rendering the template alongside the Nuxt app root:
```html
<div id="__nuxt"></div>
<!-- spa loading template -->
```
#### Reasons for Change
This allows the spa loading template to remain in the DOM until the Vue app suspense resolves, preventing a flash of white.
#### Migration Steps
If you were targeting the spa loading template with CSS or `document.queryElement` you will need to update your selectors. For this purpose you can use the new `app.spaLoaderTag` and `app.spaLoaderAttrs` configuration options.
Alternatively, you can revert to the previous behaviour with:
```ts [nuxt.config.ts] twoslash
export default defineNuxtConfig({
experimental: {
spaLoadingTemplateLocation: 'within',
}
})
```
### Parsed `error.data`
🚦 **Impact Level**: Minimal
It was possible to throw an error with a `data` property, but this was not parsed. Now, it is parsed and made available in the `error` object. Although a fix, this is technically a breaking change if you were relying on the previous behavior and parsing it manually.
#### Migration Steps
Update your custom `error.vue` to remove any additional parsing of `error.data`:
```diff
<script setup lang="ts">
import type { NuxtError } from '#app'
const props = defineProps({
error: Object as () => NuxtError
})
- const data = JSON.parse(error.data)
+ const data = error.data
</script>
```
Alternatively, you can disable this change:
```ts [nuxt.config.ts] twoslash
export default defineNuxtConfig({
experimental: {
parseErrorData: false
},
})
```
### More Granular Inline Styles
🚦 **Impact Level**: Moderate
Nuxt will now only inline styles for Vue components, not global CSS.
#### What Changed
Previously, Nuxt would inline all CSS, including global styles, and remove `<link>` elements to separate CSS files. Now, Nuxt will only do this for Vue components (which previously produced separate chunks of CSS). We think this is a better balance of reducing separate network requests (just as before, there will not be separate requests for individual `.css` files per-page or per-component on the initial load), as well as allowing caching of a single global CSS file and reducing the document download size of the initial request.
#### Migration Steps
This feature is fully configurable and you can revert to the previous behavior by setting `inlineStyles: true` to inline global CSS as well as per-component CSS.
```ts [nuxt.config.ts] twoslash
export default defineNuxtConfig({
features: {
inlineStyles: true
}
})
```
### Scan Page Meta After Resolution
🚦 **Impact Level**: Minimal
#### What Changed
We now scan page metadata (defined in `definePageMeta`) *after* calling the `pages:extend` hook rather than before.
#### Reasons for Change
This was to allow scanning metadata for pages that users wanted to add in `pages:extend`. We still offer an opportunity to change or override page metadata in a new `pages:resolved` hook.
#### Migration Steps
If you want to override page metadata, do that in `pages:resolved` rather than in `pages:extend`.
```diff
export default defineNuxtConfig({
hooks: {
- 'pages:extend'(pages) {
+ 'pages:resolved'(pages) {
const myPage = pages.find(page => page.path === '/')
myPage.meta ||= {}
myPage.meta.layout = 'overridden-layout'
}
}
})
```
Alternatively, you can revert to the previous behaviour with:
```ts [nuxt.config.ts] twoslash
export default defineNuxtConfig({
experimental: {
scanPageMeta: true
}
})
```
### Shared Prerender Data
🚦 **Impact Level**: Medium
#### What Changed
We enabled a previously experimental feature to share data from `useAsyncData` and `useFetch` calls, across different pages. See [original PR](https://github.com/nuxt/nuxt/pull/24894){rel="nofollow"}.
#### Reasons for Change
This feature automatically shares payload *data* between pages that are prerendered. This can result in a significant performance improvement when prerendering sites that use `useAsyncData` or `useFetch` and fetch the same data in different pages.
For example, if your site requires a `useFetch` call for every page (for example, to get navigation data for a menu, or site settings from a CMS), this data would only be fetched once when prerendering the first page that uses it, and then cached for use when prerendering other pages.
#### Migration Steps
Make sure that any unique key of your data is always resolvable to the same data. For example, if you are using `useAsyncData` to fetch data related to a particular page, you should provide a key that uniquely matches that data. (`useFetch` should do this automatically for you.)
```ts [app/pages/test/[slug\\].vue]
// This would be unsafe in a dynamic page (e.g. `[slug].vue`) because the route slug makes a difference
// to the data fetched, but Nuxt can't know that because it's not reflected in the key.
const route = useRoute()
const { data } = await useAsyncData(async () => {
return await $fetch(`/api/my-page/${route.params.slug}`)
})
// Instead, you should use a key that uniquely identifies the data fetched.
const { data } = await useAsyncData(route.params.slug, async () => {
return await $fetch(`/api/my-page/${route.params.slug}`)
})
```
Alternatively, you can disable this feature with:
```ts [nuxt.config.ts] twoslash
export default defineNuxtConfig({
experimental: {
sharedPrerenderData: false
}
})
```
### Default `data` and `error` values in `useAsyncData` and `useFetch`
🚦 **Impact Level**: Minimal
#### What Changed
`data` and `error` objects returned from `useAsyncData` will now default to `undefined`.
#### Reasons for Change
Previously `data` was initialized to `null` but reset in `clearNuxtData` to `undefined`. `error` was initialized to `null`. This change is to bring greater consistency.
#### Migration Steps
If you were checking if `data.value` or `error.value` were `null`, you can update these checks to check for `undefined` instead.
::tip
You can automate this step by running `npx codemod@latest nuxt/4/default-data-error-value`
::
If you encounter any issues you can revert back to the previous behavior with:
```ts [nuxt.config.ts] twoslash
export default defineNuxtConfig({
experimental: {
defaults: {
useAsyncData: {
value: 'null',
errorValue: 'null'
}
}
}
})
```
Please report an issue if you are doing this, as we do not plan to keep this as configurable.
### Removal of deprecated `boolean` values for `dedupe` option when calling `refresh` in `useAsyncData` and `useFetch`
🚦 **Impact Level**: Minimal
#### What Changed
Previously it was possible to pass `dedupe: boolean` to `refresh`. These were aliases of `cancel` (`true`) and `defer` (`false`).
```ts [app.vue] twoslash
const { refresh } = await useAsyncData(async () => ({ message: 'Hello, Nuxt!' }))
async function refreshData () {
await refresh({ dedupe: true })
}
```
#### Reasons for Change
These aliases were removed, for greater clarity.
The issue came up when adding `dedupe` as an option to `useAsyncData`, and we removed the boolean values as they ended up being *opposites*.
`refresh({ dedupe: false })` meant 'do not *cancel* existing requests in favour of this new one'. But passing `dedupe: true` within the options of `useAsyncData` means 'do not make any new requests if there is an existing pending request.' (See [PR](https://github.com/nuxt/nuxt/pull/24564#pullrequestreview-1764584361){rel="nofollow"}.)
#### Migration Steps
The migration should be straightforward:
```diff
const { refresh } = await useAsyncData(async () => ({ message: 'Hello, Nuxt 3!' }))
async function refreshData () {
- await refresh({ dedupe: true })
+ await refresh({ dedupe: 'cancel' })
- await refresh({ dedupe: false })
+ await refresh({ dedupe: 'defer' })
}
```
::tip
You can automate this step by running `npx codemod@latest nuxt/4/deprecated-dedupe-value`
::
### Respect defaults when clearing `data` in `useAsyncData` and `useFetch`
🚦 **Impact Level**: Minimal
#### What Changed
If you provide a custom `default` value for `useAsyncData`, this will now be used when calling `clear` or `clearNuxtData` and it will be reset to its default value rather than simply unset.
#### Reasons for Change
Often users set an appropriately empty value, such as an empty array, to avoid the need to check for `null`/`undefined` when iterating over it. This should be respected when resetting/clearing the data.
#### Migration Steps
If you encounter any issues you can revert back to the previous behavior, for now, with:
```ts [nuxt.config.ts] twoslash
export default defineNuxtConfig({
experimental: {
resetAsyncDataToUndefined: true,
}
})
```
Please report an issue if you are doing so, as we do not plan to keep this as configurable.
### Shallow Data Reactivity in `useAsyncData` and `useFetch`
🚦 **Impact Level**: Minimal
The `data` object returned from `useAsyncData`, `useFetch`, `useLazyAsyncData` and `useLazyFetch` is now a `shallowRef` rather than a `ref`.
#### What Changed
When new data is fetched, anything depending on `data` will still be reactive because the entire object is replaced. But if your code changes a property *within* that data structure, this will not trigger any reactivity in your app.
#### Reasons for Change
This brings a **significant** performance improvement for deeply nested objects and arrays because Vue does not need to watch every single property/array for modification. In most cases, `data` should also be immutable.
#### Migration Steps
In most cases, no migration steps are required, but if you rely on the reactivity of the data object then you have two options:
1. You can granularly opt in to deep reactivity on a per-composable basis:
```diff
- const { data } = useFetch('/api/test')
+ const { data } = useFetch('/api/test', { deep: true })
```
2. You can change the default behavior on a project-wide basis (not recommended):
```ts [nuxt.config.ts] twoslash
export default defineNuxtConfig({
experimental: {
defaults: {
useAsyncData: {
deep: true
}
}
}
})
```
::tip
If you need to, you can automate this step by running `npx codemod@latest nuxt/4/shallow-function-reactivity`
::
### Absolute Watch Paths in `builder:watch`
🚦 **Impact Level**: Minimal
#### What Changed
The Nuxt `builder:watch` hook now emits a path which is absolute rather than relative to your project `srcDir`.
#### Reasons for Change
This allows us to support watching paths which are outside your `srcDir`, and offers better support for layers and other more complex patterns.
#### Migration Steps
We have already proactively migrated the public Nuxt modules which we are aware use this hook. See [issue #25339](https://github.com/nuxt/nuxt/issues/25339){rel="nofollow"}.
However, if you are a module author using the `builder:watch` hook and wishing to remain backwards/forwards compatible, you can use the following code to ensure that your code works the same in both Nuxt v3 and Nuxt v4:
```diff
+ import { relative, resolve } from 'node:fs'
// ...
nuxt.hook('builder:watch', async (event, path) => {
+ path = relative(nuxt.options.srcDir, resolve(nuxt.options.srcDir, path))
// ...
})
```
::tip
You can automate this step by running `npx codemod@latest nuxt/4/absolute-watch-path`
::
### Removal of `window.__NUXT__` object
#### What Changed
We are removing the global `window.__NUXT__` object after the app finishes hydration.
#### Reasons for Change
This opens the way to multi-app patterns ([#21635](https://github.com/nuxt/nuxt/issues/21635){rel="nofollow"}) and enables us to focus on a single way to access Nuxt app data - `useNuxtApp()`.
#### Migration Steps
The data is still available, but can be accessed with `useNuxtApp().payload`:
```diff
- console.log(window.__NUXT__)
+ console.log(useNuxtApp().payload)
```
### Directory index scanning
🚦 **Impact Level**: Medium
#### What Changed
Child folders in your `middleware/` folder are also scanned for `index` files and these are now also registered as middleware in your project.
#### Reasons for Change
Nuxt scans a number of folders automatically, including `middleware/` and `plugins/`.
Child folders in your `plugins/` folder are scanned for `index` files and we wanted to make this behavior consistent between scanned directories.
#### Migration Steps
Probably no migration is necessary but if you wish to revert to previous behavior you can add a hook to filter out these middleware:
```ts
export default defineNuxtConfig({
hooks: {
'app:resolve'(app) {
app.middleware = app.middleware.filter(mw => !/\/index\.[^/]+$/.test(mw.path))
}
}
})
```
### Template Compilation Changes
🚦 **Impact Level**: Minimal
#### What Changed
Previously, Nuxt used `lodash/template` to compile templates located on the file system using the `.ejs` file format/syntax.
In addition, we provided some template utilities (`serialize`, `importName`, `importSources`) which could be used for code-generation within these templates, which are now being removed.
#### Reasons for Change
In Nuxt v3 we moved to a 'virtual' syntax with a `getContents()` function which is much more flexible and performant.
In addition, `lodash/template` has had a succession of security issues. These do not really apply to Nuxt projects because it is being used at build-time, not runtime, and by trusted code. However, they still appear in security audits. Moreover, `lodash` is a hefty dependency and is unused by most projects.
Finally, providing code serialization functions directly within Nuxt is not ideal. Instead, we maintain projects like [unjs/knitwork](http://github.com/unjs/knitwork){rel="nofollow"} which can be dependencies of your project, and where security issues can be reported/resolved directly without requiring an upgrade of Nuxt itself.
#### Migration Steps
We have raised PRs to update modules using EJS syntax, but if you need to do this yourself, you have three backwards/forwards-compatible alternatives:
- Moving your string interpolation logic directly into `getContents()`.
- Using a custom function to handle the replacement, such as in <https://github.com/nuxt-modules/color-mode/pull/240>{rel="nofollow"}.
- Use `es-toolkit/compat` (a drop-in replacement for lodash template), as a dependency of *your* project rather than Nuxt:
```diff
+ import { readFileSync } from 'node:fs'
+ import { template } from 'es-toolkit/compat'
// ...
addTemplate({
fileName: 'appinsights-vue.js'
options: { /* some options */ },
- src: resolver.resolve('./runtime/plugin.ejs'),
+ getContents({ options }) {
+ const contents = readFileSync(resolver.resolve('./runtime/plugin.ejs'), 'utf-8')
+ return template(contents)({ options })
+ },
})
```
Finally, if you are using the template utilities (`serialize`, `importName`, `importSources`), you can replace them as follows with utilities from `knitwork`:
```ts
import { genDynamicImport, genImport, genSafeVariableName } from 'knitwork'
const serialize = (data: any) => JSON.stringify(data, null, 2).replace(/"{(.+)}"(?=,?$)/gm, r => JSON.parse(r).replace(/^{(.*)}$/, '$1'))
const importSources = (sources: string | string[], { lazy = false } = {}) => {
return toArray(sources).map((src) => {
if (lazy) {
return `const ${genSafeVariableName(src)} = ${genDynamicImport(src, { comment: `webpackChunkName: ${JSON.stringify(src)}` })}`
}
return genImport(src, genSafeVariableName(src))
}).join('\n')
}
const importName = genSafeVariableName
```
::tip
You can automate this step by running `npx codemod@latest nuxt/4/template-compilation-changes`
::
### Removal of Experimental Features
🚦 **Impact Level**: Minimal
#### What Changed
Four experimental features are no longer configurable in Nuxt 4:
- `experimental.treeshakeClientOnly` will be `true` (default since v3.0)
- `experimental.configSchema` will be `true` (default since v3.3)
- `experimental.polyfillVueUseHead` will be `false` (default since v3.4)
- `experimental.respectNoSSRHeader` will be `false` (default since v3.4)
- `vite.devBundler` is no longer configurable - it will use `vite-node` by default
#### Reasons for Change
These options have been set to their current values for some time and we do not have a reason to believe that they need to remain configurable.
#### Migration Steps
- `polyfillVueUseHead` is implementable in user-land with [this plugin](https://github.com/nuxt/nuxt/blob/f209158352b09d1986aa320e29ff36353b91c358/packages/nuxt/src/head/runtime/plugins/vueuse-head-polyfill.ts#L10-L11){rel="nofollow"}
- `respectNoSSRHeader`is implementable in user-land with [server middleware](https://github.com/nuxt/nuxt/blob/c660b39447f0d5b8790c0826092638d321cd6821/packages/nuxt/src/core/runtime/nitro/no-ssr.ts#L8-L9){rel="nofollow"}
## Nuxt 2 vs. Nuxt 3+
In the table below, there is a quick comparison between 3 versions of Nuxt:
| Feature / Version | Nuxt 2 | Nuxt Bridge | Nuxt 3+ |
| ----------------------- | ---------- | ----------- | ---------- |
| Vue | 2 | 2 | 3 |
| Stability | 😊 Stable | 😊 Stable | 😊 Stable |
| Performance | 🏎 Fast | ✈️ Faster | 🚀 Fastest |
| Nitro Engine | ❌ | ✅ | ✅ |
| ESM support | 🌙 Partial | 👍 Better | ✅ |
| TypeScript | ☑️ Opt-in | 🚧 Partial | ✅ |
| Composition API | ❌ | 🚧 Partial | ✅ |
| Options API | ✅ | ✅ | ✅ |
| Components Auto Import | ✅ | ✅ | ✅ |
| `<script setup>` syntax | ❌ | 🚧 Partial | ✅ |
| Auto Imports | ❌ | ✅ | ✅ |
| webpack | 4 | 4 | 5 |
| Vite | ⚠️ Partial | 🚧 Partial | ✅ |
| Nuxi CLI | ❌ Old | ✅ nuxi | ✅ nuxi |
| Static sites | ✅ | ✅ | ✅ |
## Nuxt 2 to Nuxt 3+
The migration guide provides a step-by-step comparison of Nuxt 2 features to Nuxt 3+ features and guidance to adapt your current application.
::read-more{to="https://nuxt.com/docs/migration/overview"}
Check out the **guide to migrating from Nuxt 2 to Nuxt 3**.
::
## Nuxt 2 to Nuxt Bridge
If you prefer to progressively migrate your Nuxt 2 application to Nuxt 3, you can use Nuxt Bridge. Nuxt Bridge is a compatibility layer that allows you to use Nuxt 3+ features in Nuxt 2 with an opt-in mechanism.
::read-more{to="https://nuxt.com/docs/bridge/overview"}
**Migrate from Nuxt 2 to Nuxt Bridge**
::
# Nuxt Guide
::card-group{className="sm:grid-cols-1"}
:::card
---
icon: i-lucide-medal
title: Key Concepts
to: https://nuxt.com/docs/guide/concepts
---
Discover the main concepts behind Nuxt, from auto-import, hybrid rendering to its TypeScript support.
:::
:::card
---
icon: i-lucide-folders
title: Directory Structure
to: https://nuxt.com/docs/guide/directory-structure
---
Learn about Nuxt directory structure and what benefits each directory or file offers.
:::
:::card
---
icon: i-lucide-star
title: Going Further
to: https://nuxt.com/docs/guide/going-further
---
Master Nuxt with advanced concepts like experimental features, hooks, modules, and more.
:::
:::card
---
icon: i-lucide-book-open
title: Recipes
to: https://nuxt.com/docs/guide/recipes
---
Find solutions to common problems and learn how to implement them in your Nuxt project.
:::
::
# Auto-imports
Nuxt auto-imports components, composables and [Vue.js APIs](https://vuejs.org/api){rel="nofollow"} to use across your application without explicitly importing them.
```vue [app.vue] twoslash
<script setup lang="ts">
const count = ref(1) // ref is auto-imported
</script>
```
Thanks to its opinionated directory structure, Nuxt can auto-import your [`components/`](https://nuxt.com/docs/guide/directory-structure/components), [`composables/`](https://nuxt.com/docs/guide/directory-structure/composables) and [`utils/`](https://nuxt.com/docs/guide/directory-structure/utils).
Contrary to a classic global declaration, Nuxt preserves typings, IDEs completions and hints, and **only includes what is used in your production code**.
::note
In the docs, every function that is not explicitly imported is auto-imported by Nuxt and can be used as-is in your code. You can find a reference for auto-imported components, composables and utilities in the [API section](https://nuxt.com/docs/api).
::
::note
In the [`server`](https://nuxt.com/docs/guide/directory-structure/server) directory, Nuxt auto-imports exported functions and variables from `server/utils/`.
::
::note
You can also auto-import functions exported from custom folders or third-party packages by configuring the [`imports`](https://nuxt.com/docs/api/nuxt-config#imports) section of your `nuxt.config` file.
::
## Built-in Auto-imports
Nuxt auto-imports functions and composables to perform [data fetching](https://nuxt.com/docs/getting-started/data-fetching), get access to the [app context](https://nuxt.com/docs/api/composables/use-nuxt-app) and [runtime config](https://nuxt.com/docs/guide/going-further/runtime-config), manage [state](https://nuxt.com/docs/getting-started/state-management) or define components and plugins.
```vue twoslash
<script setup lang="ts">
/* useFetch() is auto-imported */
const { data, refresh, status } = await useFetch('/api/hello')
</script>
```
Vue exposes Reactivity APIs like `ref` or `computed`, as well as lifecycle hooks and helpers that are auto-imported by Nuxt.
```vue twoslash
<script setup lang="ts">
/* ref() and computed() are auto-imported */
const count = ref(1)
const double = computed(() => count.value * 2)
</script>
```
### Vue and Nuxt Composables
When you are using the built-in Composition API composables provided by Vue and Nuxt, be aware that many of them rely on being called in the right *context*.
During a component lifecycle, Vue tracks the temporary instance of the current component (and similarly, Nuxt tracks a temporary instance of `nuxtApp`) via a global variable, and then unsets it in same tick. This is essential when server rendering, both to avoid cross-request state pollution (leaking a shared reference between two users) and to avoid leakage between different components.
That means that (with very few exceptions) you cannot use them outside a Nuxt plugin, Nuxt route middleware or Vue setup function. On top of that, you must use them synchronously - that is, you cannot use `await` before calling a composable, except within `<script setup>` blocks, within the setup function of a component declared with `defineNuxtComponent`, in `defineNuxtPlugin` or in `defineNuxtRouteMiddleware`, where we perform a transform to keep the synchronous context even after the `await`.
If you get an error message like `Nuxt instance is unavailable` then it probably means you are calling a Nuxt composable in the wrong place in the Vue or Nuxt lifecycle.
::video-accordion
---
title: Watch a video from Alexander Lichter about avoiding the 'Nuxt instance is
unavailable' error
video-id: ofuKRZLtOdY
---
::
::tip
When using a composable that requires the Nuxt context inside a non-SFC component, you need to wrap your component with `defineNuxtComponent` instead of `defineComponent`
::
::read-more
---
icon: i-lucide-star
to: https://nuxt.com/docs/guide/going-further/experimental-features#asynccontext
---
Checkout the `asyncContext` experimental feature to use Nuxt composables in async functions.
::
::read-more
---
target: _blank
to: https://github.com/nuxt/nuxt/issues/14269#issuecomment-1397352832
---
See the full explanation in this GitHub comment.
::
**Example of breaking code:**
```ts [composables/example.ts] twoslash
// trying to access runtime config outside a composable
const config = useRuntimeConfig()
export const useMyComposable = () => {
// accessing runtime config here
}
```
**Example of working code:**
```ts [composables/example.ts] twoslash
export const useMyComposable = () => {
// Because your composable is called in the right place in the lifecycle,
// useRuntimeConfig will work here
const config = useRuntimeConfig()
// ...
}
```
## Directory-based Auto-imports
Nuxt directly auto-imports files created in defined directories:
- `components/` for [Vue components](https://nuxt.com/docs/guide/directory-structure/components).
- `composables/` for [Vue composables](https://nuxt.com/docs/guide/directory-structure/composables).
- `utils/` for helper functions and other utilities.
::link-example{to="https://nuxt.com/docs/examples/features/auto-imports"}
::
::warning
**Auto-imported `ref` and `computed` won't be unwrapped in a component `<template>`.** :br
This is due to how Vue works with refs that aren't top-level to the template. You can read more about it [in the Vue documentation](https://vuejs.org/guide/essentials/reactivity-fundamentals.html#caveat-when-unwrapping-in-templates){rel="nofollow"}.
::
### Explicit Imports
Nuxt exposes every auto-import with the `#imports` alias that can be used to make the import explicit if needed:
```vue
<script setup lang="ts">
import { ref, computed } from '#imports'
const count = ref(1)
const double = computed(() => count.value * 2)
</script>
```
### Disabling Auto-imports
If you want to disable auto-importing composables and utilities, you can set `imports.autoImport` to `false` in the `nuxt.config` file.
```ts [nuxt.config.ts] twoslash
export default defineNuxtConfig({
imports: {
autoImport: false
}
})
```
This will disable auto-imports completely but it's still possible to use [explicit imports](https://nuxt.com/#explicit-imports) from `#imports`.
### Partially Disabling Auto-imports
If you want framework-specific functions like `ref` to remain auto-imported but wish to disable auto-imports for your own code (e.g., custom composables), you can set the `imports.scan` option to `false` in your `nuxt.config.ts` file:
```ts
export default defineNuxtConfig({
imports: {
scan: false
}
})
```
With this configuration:
- Framework functions like `ref`, `computed`, or `watch` will still work without needing manual imports.
- Custom code, such as composables, will need to be manually imported in your files.
::warning
**Caution:** This setup has certain limitations:
- If you structure your project with layers, you will need to explicitly import the composables from each layer, rather than relying on auto-imports.
- This breaks the layer system’s override feature. If you use `imports.scan: false`, ensure you understand this side-effect and adjust your architecture accordingly.
::
## Auto-imported Components
Nuxt also automatically imports components from your `~/components` directory, although this is configured separately from auto-importing composables and utility functions.
::read-more{to="https://nuxt.com/docs/guide/directory-structure/components"}
::
To disable auto-importing components from your own `~/components` directory, you can set `components.dirs` to an empty array (though note that this will not affect components added by modules).
```ts [nuxt.config.ts] twoslash
export default defineNuxtConfig({
components: {
dirs: []
}
})
```
## Auto-import from Third-Party Packages
Nuxt also allows auto-importing from third-party packages.
::tip
If you are using the Nuxt module for that package, it is likely that the module has already configured auto-imports for that package.
::
For example, you could enable the auto-import of the `useI18n` composable from the `vue-i18n` package like this:
```ts [nuxt.config.ts] twoslash
export default defineNuxtConfig({
imports: {
presets: [
{
from: 'vue-i18n',
imports: ['useI18n']
}
]
}
})
```
::video-accordion
---
title: Watch a video from Alexander Lichter on how to easily set up custom auto
imports
video-id: FT2LQJ2NvVI
---
::
# Nuxt Lifecycle
The goal of this chapter is to provide a high-level overview of the different parts of the framework, their execution order, and how they work together.
## Server
On the server, the following steps are executed for every initial request to your application:
### Step 1: Setup Nitro Server and Nitro Plugins (Once)
Nuxt is powered by [Nitro](https://nitro.build/){rel="nofollow"}, a modern server engine.
When Nitro starts, it initializes and executes the plugins under the `/server/plugins` directory. These plugins can:
- Capture and handle application-wide errors.
- Register hooks that execute when Nitro shuts down.
- Register hooks for request lifecycle events, such as modifying responses.
::callout{icon="i-lucide-lightbulb"}
Nitro plugins are executed only once when the server starts. In a serverless environment, the server boots on each incoming request, and so do the Nitro plugins. However, they are not awaited.
::
::read-more
---
to: https://nuxt.com/docs/guide/directory-structure/server#server-plugins
---
::
### Step 2: Nitro Server Middleware
After initializing the Nitro server, middleware under `server/middleware/` is executed for every request. Middleware can be used for tasks such as authentication, logging, or request transformation.
::warning
Returning a value from middleware will terminate the request and send the returned value as the response. This behavior should generally be avoided to ensure proper request handling!
::
::read-more
---
to: https://nuxt.com/docs/guide/directory-structure/server#server-middleware
---
::
### Step 3: Initialize Nuxt and Execute Nuxt App Plugins
The Vue and Nuxt instances are created first. Afterward, Nuxt executes its server plugins. This includes:
- Built-in plugins, such as Vue Router and `unhead`.
- Custom plugins located in the `plugins/` directory, including those without a suffix (e.g., `myPlugin.ts`) and those with the `.server` suffix (e.g., `myServerPlugin.server.ts`).
Plugins execute in a specific order and may have dependencies on one another. For more details, including execution order and parallelism, refer to the [Plugins documentation](https://nuxt.com/docs/guide/directory-structure/plugins).
::callout{icon="i-lucide-lightbulb"}
After this step, Nuxt calls the [`app:created`](https://nuxt.com/docs/api/advanced/hooks#app-hooks-runtime) hook, which can be used to execute additional logic.
::
::read-more{to="https://nuxt.com/docs/guide/directory-structure/plugins"}
::
### Step 4: Route Validation
After initializing plugins and before executing middleware, Nuxt calls the `validate` method if it is defined in the `definePageMeta` function. The `validate` method, which can be synchronous or asynchronous, is often used to validate dynamic route parameters.
- The `validate` function should return `true` if the parameters are valid.
- If validation fails, it should return `false` or an object containing a `statusCode` and/or `statusMessage` to terminate the request.
For more information, see the [Route Validation documentation](https://nuxt.com/docs/getting-started/routing#route-validation).
::read-more{to="https://nuxt.com/docs/getting-started/routing#route-validation"}
::
### Step 5: Execute Nuxt App Middleware
Middleware allows you to run code before navigating to a particular route. It is often used for tasks such as authentication, redirection, or logging.
In Nuxt, there are three types of middleware:
- **Global route middleware**
- **Named route middleware**
- **Anonymous (or inline) route middleware**
Nuxt automatically executes global middleware for first time enter to the application and every time before route navigation. Named and anonymous middleware are executed only on the routes specified in the middleware property of the page(route) meta defined in the corresponding page components.
For details about each type and examples, see the [Middleware documentation](https://nuxt.com/docs/guide/directory-structure/middleware).
Any redirection on the server will result in a `Location:` header being sent to the browser; the browser then makes a fresh request to this new location. All application state will be reset when this happens, unless persisted in a cookie.
::read-more{to="https://nuxt.com/docs/guide/directory-structure/middleware"}
::
### Step 6: Setup Page and Components
Nuxt initializes the page and its components during this step and fetches any required data with `useFetch` and `useAsyncData`. Since there are no dynamic updates and no DOM operations occur on the server, Vue lifecycle hooks such as `onBeforeMount`, `onMounted`, and subsequent hooks are **NOT** executed during SSR.
::important
You should avoid code that produces side effects that need cleanup in root scope of `<script setup>`. An example of such side effects is setting up timers with `setInterval`. In client-side only code we may setup a timer and then tear it down in `onBeforeUnmount` or `onUnmounted`. However, because the unmount hooks will never be called during SSR, the timers will stay around forever. To avoid this, move your side-effect code into `onMounted` instead.
::
### Step 7: Render and Generate HTML Output
After all components are initialized and data is fetched, Nuxt combines the components with settings from `unhead` to generate a complete HTML document. This HTML, along with the associated data, is sent back to the client to complete the SSR process.
::callout{icon="i-lucide-lightbulb"}
After rendering the Vue application to HTML, Nuxt calls the [`app:rendered`](https://nuxt.com/docs/api/advanced/hooks#app-hooks-runtime) hook.
::
::callout{icon="i-lucide-lightbulb"}
Before finalizing and sending the HTML, Nitro will call the [`render:html`](https://nuxt.com/docs/api/advanced/hooks#nitro-app-hooks-runtime-server-side) hook. This hook allows you to manipulate the generated HTML, such as injecting additional scripts or modifying meta tags.
::
## Client (browser)
This part of the lifecycle is fully executed in the browser, no matter which Nuxt mode you've chosen.
### Step 1: Initialize Nuxt and Execute Nuxt App Plugins
This step is similar to the server-side execution and includes both built-in and custom plugins.
Custom plugins in the `plugins/` directory, such as those without a suffix (e.g., `myPlugin.ts`) and with the `.client` suffix (e.g., `myClientPlugin.client.ts`), are executed on the client side.
::callout{icon="i-lucide-lightbulb"}
After this step, Nuxt calls the [`app:created`](https://nuxt.com/docs/api/advanced/hooks#app-hooks-runtime) hook, which can be used to execute additional logic.
::
::read-more{to="https://nuxt.com/docs/guide/directory-structure/plugins"}
::
### Step 2: Route Validation
This step is the same as the server-side execution and includes the `validate` method if defined in the `definePageMeta` function.
### Step 3: Execute Nuxt App Middleware
Nuxt middleware runs on both the server and the client. If you want certain code to run in specific environments, consider splitting it by using `import.meta.client` for the client and `import.meta.server` for the server.
::read-more
---
to: https://nuxt.com/docs/guide/directory-structure/middleware#when-middleware-runs
---
::
### Step 4: Mount Vue Application and Hydration
Calling `app.mount('#__nuxt')` mounts the Vue application to the DOM. If the application uses SSR or SSG mode, Vue performs a hydration step to make the client-side application interactive. During hydration, Vue recreates the application (excluding [Server Components](https://nuxt.com/docs/guide/directory-structure/components#server-components)), matches each component to its corresponding DOM nodes, and attaches DOM event listeners.
To ensure proper hydration, it's important to maintain consistency between the data on the server and the client. For API requests, it is recommended to use `useAsyncData`, `useFetch`, or other SSR-friendly composables. These methods ensure that the data fetched on the server side is reused during hydration, avoiding repeated requests. Any new requests should only be triggered after hydration, preventing hydration errors.
::callout{icon="i-lucide-lightbulb"}
Before mounting the Vue application, Nuxt calls the [`app:beforeMount`](https://nuxt.com/docs/api/advanced/hooks#app-hooks-runtime) hook.
::
::callout{icon="i-lucide-lightbulb"}
After mounting the Vue application, Nuxt calls the [`app:mounted`](https://nuxt.com/docs/api/advanced/hooks#app-hooks-runtime) hook.
::
### Step 5: Vue Lifecycle
Unlike on the server, the browser executes the full [Vue lifecycle](https://vuejs.org/guide/essentials/lifecycle){rel="nofollow"}.
# Vue.js Development
Nuxt integrates Vue 3, the new major release of Vue that enables new patterns for Nuxt users.
::note
While an in-depth knowledge of Vue is not required to use Nuxt, we recommend that you read the documentation and go through some of the examples on [vuejs.org](https://vuejs.org){rel="nofollow"}.
::
Nuxt has always used Vue as a frontend framework.
We chose to build Nuxt on top of Vue for these reasons:
- The reactivity model of Vue, where a change in data automatically triggers a change in the interface.
- The component-based templating, while keeping HTML as the common language of the web, enables intuitive patterns to keep your interface consistent, yet powerful.
- From small projects to large web applications, Vue keeps performing well at scale to ensure that your application keeps delivering value to your users.
## Vue with Nuxt
### Single File Components
[Vue’s single-file components](https://vuejs.org/guide/scaling-up/sfc.html){rel="nofollow"} (SFC or `*.vue` files) encapsulate the markup (`<template>`), logic (`<script>`) and styling (`<style>`) of a Vue component. Nuxt provides a zero-config experience for SFCs with [Hot Module Replacement](https://vite.dev/guide/features.html#hot-module-replacement){rel="nofollow"} that offers a seamless developer experience.
### Auto-imports
Every Vue component created in the [`components/`](https://nuxt.com/docs/guide/directory-structure/components) directory of a Nuxt project will be available in your project without having to import it. If a component is not used anywhere, your production’s code will not include it.
::read-more{to="https://nuxt.com/docs/guide/concepts/auto-imports"}
::
### Vue Router
Most applications need multiple pages and a way to navigate between them. This is called **routing**. Nuxt uses a [`pages/`](https://nuxt.com/docs/guide/directory-structure/pages) directory and naming conventions to directly create routes mapped to your files using the official [Vue Router library](https://router.vuejs.org){rel="nofollow"}.
::read-more{to="https://nuxt.com/docs/getting-started/routing"}
::
::link-example{to="https://nuxt.com/docs/examples/features/auto-imports"}
::
## Differences with Nuxt 2 / Vue 2
Nuxt 3+ is based on Vue 3. The new major Vue version introduces several changes that Nuxt takes advantage of:
- Better performance
- Composition API
- TypeScript support
### Faster Rendering
The Vue Virtual DOM (VDOM) has been rewritten from the ground up and allows for better rendering performance. On top of that, when working with compiled Single-File Components, the Vue compiler can further optimize them at build time by separating static and dynamic markup.
This results in faster first rendering (component creation) and updates, and less memory usage. In Nuxt 3, it enables faster server-side rendering as well.
### Smaller Bundle
With Vue 3 and Nuxt 3, a focus has been put on bundle size reduction. With version 3, most of Vue’s functionality, including template directives and built-in components, is tree-shakable. Your production bundle will not include them if you don’t use them.
This way, a minimal Vue 3 application can be reduced to 12 kb gzipped.
### Composition API
The only way to provide data and logic to components in Vue 2 was through the Options API, which allows you to return data and methods to a template with pre-defined properties like `data` and `methods`:
```vue twoslash
<script>
export default {
data() {
return {
count: 0
}
},
methods: {
increment(){
this.count++
}
}
}
</script>
```
The [Composition API](https://vuejs.org/guide/extras/composition-api-faq.html){rel="nofollow"} introduced in Vue 3 is not a replacement of the Options API, but it enables better logic reuse throughout an application, and is a more natural way to group code by concern in complex components.
Used with the `setup` keyword in the `<script>` definition, here is the above component rewritten with Composition API and Nuxt 3’s auto-imported Reactivity APIs:
```vue [components/Counter.vue] twoslash
<script setup lang="ts">
const count = ref(0)
const increment = () => count.value++
</script>
```
The goal of Nuxt is to provide a great developer experience around the Composition API.
- Use auto-imported [Reactivity functions](https://vuejs.org/api/reactivity-core.html){rel="nofollow"} from Vue and Nuxt [built-in composables](https://nuxt.com/docs/api/composables/use-async-data).
- Write your own auto-imported reusable functions in the [`composables/` directory](https://nuxt.com/docs/guide/directory-structure/composables).
### TypeScript Support
Both Vue 3 and Nuxt 3+ are written in TypeScript. A fully typed codebase prevents mistakes and documents APIs usage. This doesn’t mean that you have to write your application in TypeScript to take advantage of it. With Nuxt 3, you can opt-in by renaming your file from `.js` to `.ts` , or add `<script setup lang="ts">` in a component.
::read-more{to="https://nuxt.com/docs/guide/concepts/typescript"}
Read the details about TypeScript in Nuxt
::
# Rendering Modes
Nuxt supports different rendering modes, [universal rendering](https://nuxt.com/#universal-rendering), [client-side rendering](https://nuxt.com/#client-side-rendering) but also offers [hybrid-rendering](https://nuxt.com/#hybrid-rendering) and the possibility to render your application on [CDN Edge Servers](https://nuxt.com/#edge-side-rendering).
Both the browser and server can interpret JavaScript code to turn Vue.js components into HTML elements. This step is called **rendering**. Nuxt supports both **universal** and **client-side** rendering. The two approaches have benefits and downsides that we will cover.
By default, Nuxt uses **universal rendering** to provide better user experience, performance and to optimize search engine indexing, but you can switch rendering modes in [one line of configuration](https://nuxt.com/docs/api/nuxt-config#ssr).
## Universal Rendering
This step is similar to traditional **server-side rendering** performed by PHP or Ruby applications. When the browser requests a URL with universal rendering enabled, Nuxt runs the JavaScript (Vue.js) code in a server environment and returns a fully rendered HTML page to the browser. Nuxt may also return a fully rendered HTML page from a cache if the page was generated in advance. Users immediately get the entirety of the initial content of the application, contrary to client-side rendering.
Once the HTML document has been downloaded, the browser interprets this and Vue.js takes control of the document. The same JavaScript code that once ran on the server runs on the client (browser) **again** in the background now enabling interactivity (hence **Universal rendering**) by binding its listeners to the HTML. This is called **Hydration**. When hydration is complete, the page can enjoy benefits such as dynamic interfaces and page transitions.
Universal rendering allows a Nuxt application to provide quick page load times while preserving the benefits of client-side rendering. Furthermore, as the content is already present in the HTML document, crawlers can index it without overhead.

**What's server-rendered and what's client-rendered?**
It is normal to ask which parts of a Vue file runs on the server and/or the client in universal rendering mode.
```vue [app.vue]
<script setup lang="ts">
const counter = ref(0); // executes in server and client environments
const handleClick = () => {
counter.value++; // executes only in a client environment
};
</script>
<template>
<div>
<p>Count: {{ counter }}</p>
<button @click="handleClick">Increment</button>
</div>
</template>
```
On the initial request, the `counter` ref is initialized in the server since it is rendered inside the `<p>` tag. The contents of `handleClick` is never executed here. During hydration in the browser, the `counter` ref is re-initialized. The `handleClick` finally binds itself to the button; Therefore it is reasonable to deduce that the body of `handleClick` will always run in a browser environment.
[Middlewares](https://nuxt.com/docs/guide/directory-structure/middleware) and [pages](https://nuxt.com/docs/guide/directory-structure/pages) run in the server and on the client during hydration. [Plugins](https://nuxt.com/docs/guide/directory-structure/plugins) can be rendered on the server or client or both. [Components](https://nuxt.com/docs/guide/directory-structure/components) can be forced to run on the client only as well. [Composables](https://nuxt.com/docs/guide/directory-structure/composables) and [utilities](https://nuxt.com/docs/guide/directory-structure/utils) are rendered based on the context of their usage.
**Benefits of server-side rendering:**
- **Performance**: Users can get immediate access to the page's content because browsers can display static content much faster than JavaScript-generated content. At the same time, Nuxt preserves the interactivity of a web application during the hydration process.
- **Search Engine Optimization**: Universal rendering delivers the entire HTML content of the page to the browser as a classic server application. Web crawlers can directly index the page's content, which makes Universal rendering a great choice for any content that you want to index quickly.
**Downsides of server-side rendering:**
- **Development constraints:** Server and browser environments don't provide the same APIs, and it can be tricky to write code that can run on both sides seamlessly. Fortunately, Nuxt provides guidelines and specific variables to help you determine where a piece of code is executed.
- **Cost:** A server needs to be running in order to render pages on the fly. This adds a monthly cost like any traditional server. However, the server calls are highly reduced thanks to universal rendering with the browser taking over on client-side navigation. A cost reduction is possible by leveraging [edge-side-rendering](https://nuxt.com/#edge-side-rendering).
Universal rendering is very versatile and can fit almost any use case, and is especially appropriate for any content-oriented websites: **blogs, marketing websites, portfolios, e-commerce sites, and marketplaces.**
::tip
For more examples about writing Vue code without hydration mismatch, see [the Vue docs](https://vuejs.org/guide/scaling-up/ssr.html#hydration-mismatch){rel="nofollow"}.
::
::important
When importing a library that relies on browser APIs and has side effects, make sure the component importing it is only called client-side. Bundlers do not treeshake imports of modules containing side effects.
::
## Client-Side Rendering
Out of the box, a traditional Vue.js application is rendered in the browser (or **client**). Then, Vue.js generates HTML elements after the browser downloads and parses all the JavaScript code containing the instructions to create the current interface.

**Benefits of client-side rendering:**
- **Development speed**: When working entirely on the client-side, we don't have to worry about the server compatibility of the code, for example, by using browser-only APIs like the `window` object.
- **Cheaper:** Running a server adds a cost of infrastructure as you would need to run on a platform that supports JavaScript. We can host Client-only applications on any static server with HTML, CSS, and JavaScript files.
- **Offline:** Because code entirely runs in the browser, it can nicely keep working while the internet is unavailable.
**Downsides of client-side rendering:**
- **Performance**: The user has to wait for the browser to download, parse and run JavaScript files. Depending on the network for the download part and the user's device for the parsing and execution, this can take some time and impact the user's experience.
- **Search Engine Optimization**: Indexing and updating the content delivered via client-side rendering takes more time than with a server-rendered HTML document. This is related to the performance drawback we discussed, as search engine crawlers won't wait for the interface to be fully rendered on their first try to index the page. Your content will take more time to show and update in search results pages with pure client-side rendering.
Client-side rendering is a good choice for heavily interactive **web applications** that don't need indexing or whose users visit frequently. It can leverage browser caching to skip the download phase on subsequent visits, such as **SaaS, back-office applications, or online games**.
You can enable client-side only rendering with Nuxt in your `nuxt.config.ts`:
```ts [nuxt.config.ts]
export default defineNuxtConfig({
ssr: false
})
```
::note
If you do use `ssr: false`, you should also place an HTML file in `~/app/spa-loading-template.html` with some HTML you would like to use to render a loading screen that will be rendered until your app is hydrated.
:::read-more
---
title: SPA Loading Template
to: https://nuxt.com/docs/api/configuration/nuxt-config#spaloadingtemplate
---
:::
::
::video-accordion
---
title: Watch a video from Alexander Lichter about Building a plain SPA with Nuxt
video-id: 7Lr0QTP1Ro8
---
::
### Deploying a Static Client-Rendered App
If you deploy your app to [static hosting](https://nuxt.com/docs/getting-started/deployment#static-hosting) with the `nuxi generate` or `nuxi build --prerender` commands, then by default, Nuxt will render every page as a separate static HTML file.
::warning
If you prerender your app with the `nuxi generate` or `nuxi build --prerender` commands, then you will not be able to use any server endpoints as no server will be included in your output folder. If you need server functionality, use `nuxi build` instead.
::
If you are using purely client-side rendering, then this might be unnecessary. You might only need a single `index.html` file, plus `200.html` and `404.html` fallbacks, which you can tell your static web host to serve up for all requests.
In order to achieve this we can change how the routes are prerendered. Just add this to [your hooks](https://nuxt.com/docs/api/advanced/hooks#nuxt-hooks-build-time) in your `nuxt.config.ts`:
```ts [nuxt.config.ts] twoslash
export default defineNuxtConfig({
hooks: {
'prerender:routes' ({ routes }) {
routes.clear() // Do not generate any routes (except the defaults)
}
},
})
```
This will produce three files:
- `index.html`
- `200.html`
- `404.html`
The `200.html` and `404.html` might be useful for the hosting provider you are using.
#### Skipping Client Fallback Generation
When prerendering a client-rendered app, Nuxt will generate `index.html`, `200.html` and `404.html` files by default. However, if you need to prevent any (or all) of these files from being generated in your build, you can use the `'prerender:generate'` hook from [Nitro](https://nuxt.com/docs/getting-started/prerendering#prerendergenerate-nitro-hook).
```ts [nuxt.config.ts] twoslash
export default defineNuxtConfig({
ssr: false,
nitro: {
hooks: {
'prerender:generate'(route) {
const routesToSkip = ['/index.html', '/200.html', '/404.html']
if (routesToSkip.includes(route.route)) {
route.skip = true
}
}
}
}
})
```
## Hybrid Rendering
Hybrid rendering allows different caching rules per route using **Route Rules** and decides how the server should respond to a new request on a given URL.
Previously every route/page of a Nuxt application and server must use the same rendering mode, universal or client-side. In various cases, some pages could be generated at build time, while others should be client-side rendered. For example, think of a content website with an admin section. Every content page should be primarily static and generated once, but the admin section requires registration and behaves more like a dynamic application.
Nuxt includes route rules and hybrid rendering support. Using route rules you can define rules for a group of nuxt routes, change rendering mode or assign a cache strategy based on route!
Nuxt server will automatically register corresponding middleware and wrap routes with cache handlers using [Nitro caching layer](https://nitro.unjs.io/guide/cache){rel="nofollow"}.
```ts [nuxt.config.ts] twoslash
export default defineNuxtConfig({
routeRules: {
// Homepage pre-rendered at build time
'/': { prerender: true },
// Products page generated on demand, revalidates in background, cached until API response changes
'/products': { swr: true },
// Product pages generated on demand, revalidates in background, cached for 1 hour (3600 seconds)
'/products/**': { swr: 3600 },
// Blog posts page generated on demand, revalidates in background, cached on CDN for 1 hour (3600 seconds)
'/blog': { isr: 3600 },
// Blog post page generated on demand once until next deployment, cached on CDN
'/blog/**': { isr: true },
// Admin dashboard renders only on client-side
'/admin/**': { ssr: false },
// Add cors headers on API routes
'/api/**': { cors: true },
// Redirects legacy urls
'/old-page': { redirect: '/new-page' }
}
})
```
### Route Rules
The different properties you can use are the following:
- `redirect: string`{className="language-ts shiki shiki-themes material-theme-lighter material-theme-lighter material-theme-palenight" lang="ts"} - Define server-side redirects.
- `ssr: boolean`{className="language-ts shiki shiki-themes material-theme-lighter material-theme-lighter material-theme-palenight" lang="ts"} - Disables server-side rendering of the HTML for sections of your app and make them render only in the browser with `ssr: false`
- `cors: boolean`{className="language-ts shiki shiki-themes material-theme-lighter material-theme-lighter material-theme-palenight" lang="ts"} - Automatically adds cors headers with `cors: true` - you can customize the output by overriding with `headers`
- `headers: object`{className="language-ts shiki shiki-themes material-theme-lighter material-theme-lighter material-theme-palenight" lang="ts"} - Add specific headers to sections of your site - for example, your assets
- `swr: number | boolean`{className="language-ts shiki shiki-themes material-theme-lighter material-theme-lighter material-theme-palenight" lang="ts"} - Add cache headers to the server response and cache it on the server or reverse proxy for a configurable TTL (time to live). The `node-server` preset of Nitro is able to cache the full response. When the TTL expired, the cached response will be sent while the page will be regenerated in the background. If true is used, a `stale-while-revalidate` header is added without a MaxAge.
- `isr: number | boolean`{className="language-ts shiki shiki-themes material-theme-lighter material-theme-lighter material-theme-palenight" lang="ts"} - The behavior is the same as `swr` except that we are able to add the response to the CDN cache on platforms that support this (currently Netlify or Vercel). If `true` is used, the content persists until the next deploy inside the CDN.
- `prerender: boolean`{className="language-ts shiki shiki-themes material-theme-lighter material-theme-lighter material-theme-palenight" lang="ts"} - Prerenders routes at build time and includes them in your build as static assets
- `noScripts: boolean`{className="language-ts shiki shiki-themes material-theme-lighter material-theme-lighter material-theme-palenight" lang="ts"} - Disables rendering of Nuxt scripts and JS resource hints for sections of your site.
- `appMiddleware: string | string[] | Record<string, boolean>`{className="language-ts shiki shiki-themes material-theme-lighter material-theme-lighter material-theme-palenight" lang="ts"} - Allows you to define middleware that should or should not run for page paths within the Vue app part of your application (that is, not your Nitro routes)
Whenever possible, route rules will be automatically applied to the deployment platform's native rules for optimal performances (Netlify and Vercel are currently supported).
::important
Note that Hybrid Rendering is not available when using [`nuxt generate`](https://nuxt.com/docs/api/commands/generate).
::
**Examples:**
::card-group
:::card
---
ui:
icon:
base: text-black dark:text-white
icon: i-simple-icons-github
target: _blank
title: Nuxt Vercel ISR
to: https://github.com/danielroe/nuxt-vercel-isr
---
Example of a Nuxt application with hybrid rendering deployed on Vercel.
:::
::
## Edge-Side Rendering
Edge-Side Rendering (ESR) is a powerful feature introduced in Nuxt that allows the rendering of your Nuxt application closer to your users via edge servers of a Content Delivery Network (CDN). By leveraging ESR, you can ensure improved performance and reduced latency, thereby providing an enhanced user experience.
With ESR, the rendering process is pushed to the 'edge' of the network - the CDN's edge servers. Note that ESR is more a deployment target than an actual rendering mode.
When a request for a page is made, instead of going all the way to the original server, it's intercepted by the nearest edge server. This server generates the HTML for the page and sends it back to the user. This process minimizes the physical distance the data has to travel, **reducing latency and loading the page faster**.
Edge-side rendering is possible thanks to [Nitro](https://nitro.unjs.io){rel="nofollow"}, the [server engine](https://nuxt.com/docs/guide/concepts/server-engine) that powers Nuxt. It offers cross-platform support for Node.js, Deno, Cloudflare Workers, and more.
The current platforms where you can leverage ESR are:
- [Cloudflare Pages](https://pages.cloudflare.com){rel="nofollow"} with zero configuration using the git integration and the `nuxt build` command
- [Vercel Edge Functions](https://vercel.com/features/edge-functions){rel="nofollow"} using the `nuxt build` command and `NITRO_PRESET=vercel-edge` environment variable
- [Netlify Edge Functions](https://www.netlify.com/products/#netlify-edge-functions){rel="nofollow"} using the `nuxt build` command and `NITRO_PRESET=netlify-edge` environment variable
Note that **Hybrid Rendering** can be used when using Edge-Side Rendering with route rules.
You can explore open source examples deployed on some of the platform mentioned above:
::card-group
:::card
---
ui:
icon:
base: text-black dark:text-white
icon: i-simple-icons-github
target: _blank
title: Nuxt Todos Edge
to: https://github.com/atinux/nuxt-todos-edge
---
A todos application with user authentication, SSR and SQLite.
:::
:::card
---
ui:
icon:
base: text-black dark:text-white
icon: i-simple-icons-github
target: _blank
title: Atinotes
to: https://github.com/atinux/atinotes
---
An editable website with universal rendering based on Cloudflare KV.
:::
::
# Server Engine
While building Nuxt, we created a new server engine: [Nitro](https://nitro.unjs.io){rel="nofollow"}.
It is shipped with many features:
- Cross-platform support for Node.js, browsers, service workers and more.
- Serverless support out-of-the-box.
- API routes support.
- Automatic code-splitting and async-loaded chunks.
- Hybrid mode for static + serverless sites.
- Development server with hot module reloading.
## API Layer
Server [API endpoints](https://nuxt.com/docs/guide/directory-structure/server#api-routes) and [Middleware](https://nuxt.com/docs/guide/directory-structure/server#server-middleware) are added by Nitro that internally uses [h3](https://github.com/unjs/h3){rel="nofollow"}.
Key features include:
- Handlers can directly return objects/arrays for an automatically-handled JSON response
- Handlers can return promises, which will be awaited (`res.end()` and `next()` are also supported)
- Helper functions for body parsing, cookie handling, redirects, headers and more
Check out [the h3 docs](https://github.com/unjs/h3){rel="nofollow"} for more information.
::read-more
---
to: https://nuxt.com/docs/guide/directory-structure/server#server-routes
---
Learn more about the API layer in the `server/` directory.
::
## Direct API Calls
Nitro allows 'direct' calling of routes via the globally-available [`$fetch`](https://nuxt.com/docs/api/utils/dollarfetch) helper. This will make an API call to the server if run on the browser, but will directly call the relevant function if run on the server, **saving an additional API call**.
[`$fetch`](https://nuxt.com/docs/api/utils/dollarfetch) API is using [ofetch](https://github.com/unjs/ofetch){rel="nofollow"}, with key features including:
- Automatic parsing of JSON responses (with access to raw response if needed)
- Request body and params are automatically handled, with correct `Content-Type` headers
For more information on `$fetch` features, check out [ofetch](https://github.com/unjs/ofetch){rel="nofollow"}.
## Typed API Routes
When using API routes (or middleware), Nitro will generate typings for these routes as long as you are returning a value instead of using `res.end()` to send a response.
You can access these types when using [`$fetch()`](https://nuxt.com/docs/api/utils/dollarfetch) or [`useFetch()`](https://nuxt.com/docs/api/composables/use-fetch).
## Standalone Server
Nitro produces a standalone server dist that is independent of `node_modules`.
The server in Nuxt 2 is not standalone and requires part of Nuxt core to be involved by running `nuxt start` (with the [`nuxt-start`](https://www.npmjs.com/package/nuxt-start){rel="nofollow"} or [`nuxt`](https://www.npmjs.com/package/nuxt){rel="nofollow"} distributions) or custom programmatic usage, which is fragile and prone to breakage and not suitable for serverless and service worker environments.
Nuxt generates this dist when running `nuxt build` into a [`.output`](https://nuxt.com/docs/guide/directory-structure/output) directory.
The output contains runtime code to run your Nuxt server in any environment (including experimental browser service workers!) and serve your static files, making it a true hybrid framework for the JAMstack. In addition, Nuxt implements a native storage layer, supporting multi-source drivers and local assets.
::read-more
---
icon: i-simple-icons-github
target: _blank
to: https://github.com/nitrojs/nitro
---
Read more about Nitro engine on GitHub.
::
# Modules
## Exploring Nuxt Modules
When developing production-grade applications with Nuxt you might find that the framework's core functionality is not enough. Nuxt can be extended with configuration options and plugins, but maintaining these customizations across multiple projects can be tedious, repetitive and time-consuming. On the other hand, supporting every project's needs out of the box would make Nuxt very complex and hard to use.
This is one of the reasons why Nuxt provides a module system that makes it possible to extend the core. Nuxt modules are async functions that sequentially run when starting Nuxt in development mode using [`nuxi dev`](https://nuxt.com/docs/api/commands/dev) or building a project for production with [`nuxi build`](https://nuxt.com/docs/api/commands/build). They can override templates, configure webpack loaders, add CSS libraries, and perform many other useful tasks.
Best of all, Nuxt modules can be distributed in npm packages. This makes it possible for them to be reused across projects and shared with the community, helping create an ecosystem of high-quality add-ons.
::read-more{to="https://nuxt.com/modules"}
Explore Nuxt Modules
::
## Add Nuxt Modules
Once you have installed the modules you can add them to your [`nuxt.config.ts`](https://nuxt.com/docs/guide/directory-structure/nuxt-config) file under the `modules` property. Module developers usually provide additional steps and details for usage.
```ts [nuxt.config.ts] twoslash
export default defineNuxtConfig({
modules: [
// Using package name (recommended usage)
'@nuxtjs/example',
// Load a local module
'./modules/example',
// Add module with inline-options
['./modules/example', { token: '123' }],
// Inline module definition
async (inlineOptions, nuxt) => { }
]
})
```
::warning
Nuxt modules are now build-time-only, and the `buildModules` property used in Nuxt 2 is deprecated in favor of `modules`.
::
## Create a Nuxt Module
Everyone has the opportunity to develop modules and we cannot wait to see what you will build.
::read-more
---
title: Module Author Guide
to: https://nuxt.com/docs/guide/going-further/modules
---
::
# ES Modules
This guide helps explain what ES Modules are and how to make a Nuxt app (or upstream library) compatible with ESM.
## Background
### CommonJS Modules
CommonJS (CJS) is a format introduced by Node.js that allows sharing functionality between isolated JavaScript modules ([read more](https://nodejs.org/api/modules.html){rel="nofollow"}).
You might be already familiar with this syntax:
```js
const a = require('./a')
module.exports.a = a
```
Bundlers like webpack and Rollup support this syntax and allow you to use modules written in CommonJS in the browser.
### ESM Syntax
Most of the time, when people talk about ESM vs. CJS, they are talking about a different syntax for writing [modules](https://developer.mozilla.org/en-US/docs/Web/JavaScript/Guide/Modules){rel="nofollow"}.
```js
import a from './a'
export { a }
```
Before ECMAScript Modules (ESM) became a standard (it took more than 10 years!), tooling like
[webpack](https://webpack.js.org/guides/ecma-script-modules){rel="nofollow"} and even languages like TypeScript started supporting so-called **ESM syntax**.
However, there are some key differences with actual spec; here's [a helpful explainer](https://hacks.mozilla.org/2018/03/es-modules-a-cartoon-deep-dive){rel="nofollow"}.
### What is 'Native' ESM?
You may have been writing your app using ESM syntax for a long time. After all, it's natively supported by the browser, and in Nuxt 2 we compiled all the code you wrote to the appropriate format (CJS for server, ESM for browser).
When adding modules to your package, things were a little different. A sample library might expose both CJS and ESM versions, and let us pick which one we wanted:
```json
{
"name": "sample-library",
"main": "dist/sample-library.cjs.js",
"module": "dist/sample-library.esm.js"
}
```
So in Nuxt 2, the bundler (webpack) would pull in the CJS file ('main') for the server build and use the ESM file ('module') for the client build.
However, in recent Node.js LTS releases, it is now possible to [use native ESM module](https://nodejs.org/api/esm.html){rel="nofollow"} within Node.js. That means that Node.js itself can process JavaScript using ESM syntax, although it doesn't do it by default. The two most common ways to enable ESM syntax are:
- set `"type": "module"` within your `package.json` and keep using `.js` extension
- use the `.mjs` file extensions (recommended)
This is what we do for Nuxt Nitro; we output a `.output/server/index.mjs` file. That tells Node.js to treat this file as a native ES module.
### What Are Valid Imports in a Node.js Context?
When you `import` a module rather than `require` it, Node.js resolves it differently. For example, when you import `sample-library`, Node.js will look not for the `main` but for the `exports` or `module` entry in that library's `package.json`.
This is also true of dynamic imports, like `const b = await import('sample-library')`.
Node supports the following kinds of imports (see [docs](https://nodejs.org/api/packages.html#determining-module-system){rel="nofollow"}):
1. files ending in `.mjs` - these are expected to use ESM syntax
2. files ending in `.cjs` - these are expected to use CJS syntax
3. files ending in `.js` - these are expected to use CJS syntax unless their `package.json` has `"type": "module"`
### What Kinds of Problems Can There Be?
For a long time module authors have been producing ESM-syntax builds but using conventions like `.esm.js` or `.es.js`, which they have added to the `module` field in their `package.json`. This hasn't been a problem until now because they have only been used by bundlers like webpack, which don't especially care about the file extension.
However, if you try to import a package with an `.esm.js` file in a Node.js ESM context, it won't work, and you'll get an error like:
```bash [Terminal]
(node:22145) Warning: To load an ES module, set "type": "module" in the package.json or use the .mjs extension.
/path/to/index.js:1
export default {}
^^^^^^
SyntaxError: Unexpected token 'export'
at wrapSafe (internal/modules/cjs/loader.js:1001:16)
at Module._compile (internal/modules/cjs/loader.js:1049:27)
at Object.Module._extensions..js (internal/modules/cjs/loader.js:1114:10)
....
at async Object.loadESM (internal/process/esm_loader.js:68:5)
```
You might also get this error if you have a named import from an ESM-syntax build that Node.js thinks is CJS:
```bash [Terminal]
file:///path/to/index.mjs:5
import { named } from 'sample-library'
^^^^^
SyntaxError: Named export 'named' not found. The requested module 'sample-library' is a CommonJS module, which may not support all module.exports as named exports.
CommonJS modules can always be imported via the default export, for example using:
import pkg from 'sample-library';
const { named } = pkg;
at ModuleJob._instantiate (internal/modules/esm/module_job.js:120:21)
at async ModuleJob.run (internal/modules/esm/module_job.js:165:5)
at async Loader.import (internal/modules/esm/loader.js:177:24)
at async Object.loadESM (internal/process/esm_loader.js:68:5)
```
## Troubleshooting ESM Issues
If you encounter these errors, the issue is almost certainly with the upstream library. They need to [fix their library](https://nuxt.com/#library-author-guide) to support being imported by Node.
### Transpiling Libraries
In the meantime, you can tell Nuxt not to try to import these libraries by adding them to `build.transpile`:
```ts twoslash
export default defineNuxtConfig({
build: {
transpile: ['sample-library']
}
})
```
You may find that you *also* need to add other packages that are being imported by these libraries.
### Aliasing Libraries
In some cases, you may also need to manually alias the library to the CJS version, for example:
```ts twoslash
export default defineNuxtConfig({
alias: {
'sample-library': 'sample-library/dist/sample-library.cjs.js'
}
})
```
### Default Exports
A dependency with CommonJS format, can use `module.exports` or `exports` to provide a default export:
```js [node_modules/cjs-pkg/index.js]
module.exports = { test: 123 }
// or
exports.test = 123
```
This normally works well if we `require` such dependency:
```js [test.cjs]
const pkg = require('cjs-pkg')
console.log(pkg) // { test: 123 }
```
[Node.js in native ESM mode](https://nodejs.org/api/esm.html#interoperability-with-commonjs){rel="nofollow"}, [typescript with `esModuleInterop` enabled](https://www.typescriptlang.org/tsconfig#esModuleInterop){rel="nofollow"} and bundlers such as webpack, provide a compatibility mechanism so that we can default import such library.
This mechanism is often referred to as "interop require default":
```js
import pkg from 'cjs-pkg'
console.log(pkg) // { test: 123 }
```
However, because of the complexities of syntax detection and different bundle formats, there is always a chance that the interop default fails and we end up with something like this:
```js
import pkg from 'cjs-pkg'
console.log(pkg) // { default: { test: 123 } }
```
Also when using dynamic import syntax (in both CJS and ESM files), we always have this situation:
```js
import('cjs-pkg').then(console.log) // [Module: null prototype] { default: { test: '123' } }
```
In this case, we need to manually interop the default export:
```js
// Static import
import { default as pkg } from 'cjs-pkg'
// Dynamic import
import('cjs-pkg').then(m => m.default || m).then(console.log)
```
For handling more complex situations and more safety, we recommend and internally use [mlly](https://github.com/unjs/mlly){rel="nofollow"} in Nuxt that can preserve named exports.
```js
import { interopDefault } from 'mlly'
// Assuming the shape is { default: { foo: 'bar' }, baz: 'qux' }
import myModule from 'my-module'
console.log(interopDefault(myModule)) // { foo: 'bar', baz: 'qux' }
```
## Library Author Guide
The good news is that it's relatively simple to fix issues of ESM compatibility. There are two main options:
1. **You can rename your ESM files to end with `.mjs`.**
:br
*This is the recommended and simplest approach.* You may have to sort out issues with your library's dependencies and possibly with your build system, but in most cases, this should fix the problem for you. It's also recommended to rename your CJS files to end with `.cjs`, for the greatest explicitness.
2. **You can opt to make your entire library ESM-only**.
:br
This would mean setting `"type": "module"` in your `package.json` and ensuring that your built library uses ESM syntax. However, you may face issues with your dependencies - and this approach means your library can *only* be consumed in an ESM context.
### Migration
The initial step from CJS to ESM is updating any usage of `require` to use `import` instead:
::code-group
```js [Before]
module.exports = ...
exports.hello = ...
```
```js [After]
export default ...
export const hello = ...
```
::
::code-group
```js [Before]
const myLib = require('my-lib')
```
```js [After]
import myLib from 'my-lib'
// or
const myLib = await import('my-lib').then(lib => lib.default || lib)
```
::
In ESM Modules, unlike CJS, `require`, `require.resolve`, `__filename` and `__dirname` globals are not available
and should be replaced with `import()` and `import.meta.filename`.
::code-group
```js [Before]
import { join } from 'path'
const newDir = join(__dirname, 'new-dir')
```
```js [After]
import { fileURLToPath } from 'node:url'
const newDir = fileURLToPath(new URL('./new-dir', import.meta.url))
```
::
::code-group
```js [Before]
const someFile = require.resolve('./lib/foo.js')
```
```js [After]
import { resolvePath } from 'mlly'
const someFile = await resolvePath('my-lib', { url: import.meta.url })
```
::
### Best Practices
- Prefer named exports rather than default export. This helps reduce CJS conflicts. (see [Default exports](https://nuxt.com/#default-exports) section)
- Avoid depending on Node.js built-ins and CommonJS or Node.js-only dependencies as much as possible to make your library usable in Browsers and Edge Workers without needing Nitro polyfills.
- Use new `exports` field with conditional exports. ([read more](https://nodejs.org/api/packages.html#conditional-exports){rel="nofollow"}).
```json
{
"exports": {
".": {
"import": "./dist/mymodule.mjs"
}
}
}
```
# TypeScript
## Type-checking
By default, Nuxt doesn't check types when you run [`nuxi dev`](https://nuxt.com/docs/api/commands/dev) or [`nuxi build`](https://nuxt.com/docs/api/commands/build), for performance reasons.
To enable type-checking at build or development time, install `vue-tsc` and `typescript` as development dependency:
::code-group{sync="pm"}
```bash [npm]
npm install --save-dev vue-tsc typescript
```
```bash [yarn]
yarn add --dev vue-tsc typescript
```
```bash [pnpm]
pnpm add -D vue-tsc typescript
```
```bash [bun]
bun add -D vue-tsc typescript
```
::
Then, run [`nuxi typecheck`](https://nuxt.com/docs/api/commands/typecheck) command to check your types:
```bash [Terminal]
npx nuxi typecheck
```
To enable type-checking at build or development time, you can also use the [`typescript.typeCheck`](https://nuxt.com/docs/api/nuxt-config#typecheck) option in your `nuxt.config` file:
```ts [nuxt.config.ts] twoslash
export default defineNuxtConfig({
typescript: {
typeCheck: true
}
})
```
## Auto-generated Types
When you run `nuxi dev` or `nuxi build`, Nuxt generates the following files for IDE type support (and type checking):
### `.nuxt/nuxt.d.ts`
This file contains the types of any modules you are using, as well as the key types that Nuxt requires. Your IDE should recognize these types automatically.
Some of the references in the file are to files that are only generated within your `buildDir` (`.nuxt`) and therefore for full typings, you will need to run `nuxi dev` or `nuxi build`.
### `.nuxt/tsconfig.json`
This file contains the recommended basic TypeScript configuration for your project, including resolved aliases injected by Nuxt or modules you are using, so you can get full type support and path auto-complete for aliases like `~/file` or `#build/file`.
::note
Consider using the `imports` section of [nuxt.config](https://nuxt.com/docs/api/nuxt-config#imports) to include directories beyond the default ones. This can be useful for auto-importing types which you're using across your app.
::
[Read more about how to extend this configuration](https://nuxt.com/docs/guide/directory-structure/tsconfig).
::tip{icon="i-lucide-video" target="_blank" to="https://youtu.be/umLI7SlPygY"}
Watch a video from Daniel Roe explaining built-in Nuxt aliases.
::
::note
Nitro also [auto-generates types](https://nuxt.com/docs/guide/concepts/server-engine#typed-api-routes) for API routes. Plus, Nuxt also generates types for globally available components and [auto-imports from your composables](https://nuxt.com/docs/guide/directory-structure/composables), plus other core functionality.
::
::note
Keep in mind that all options extended from `./.nuxt/tsconfig.json` will be overwritten by the options defined in your `tsconfig.json`.
Overwriting options such as `"compilerOptions.paths"` with your own configuration will lead TypeScript to not factor in the module resolutions from `./.nuxt/tsconfig.json`. This can lead to module resolutions such as `#imports` not being recognized.
:br :br
In case you need to extend options provided by `./.nuxt/tsconfig.json` further, you can use the [`alias` property](https://nuxt.com/docs/api/nuxt-config#alias) within your `nuxt.config`. `nuxi` will pick them up and extend `./.nuxt/tsconfig.json` accordingly.
::
## Strict Checks
TypeScript comes with certain checks to give you more safety and analysis of your program.
[Strict checks](https://www.typescriptlang.org/docs/handbook/migrating-from-javascript.html#getting-stricter-checks){rel="nofollow"} are enabled by default in Nuxt to give you greater type safety.
If you are currently converting your codebase to TypeScript, you may want to temporarily disable strict checks by setting `strict` to `false` in your `nuxt.config`:
```ts [nuxt.config.ts] twoslash
export default defineNuxtConfig({
typescript: {
strict: false
}
})
```
# Code Style
## ESLint
The recommended approach for Nuxt is to enable ESLint support using the [`@nuxt/eslint`](https://eslint.nuxt.com/packages/module){rel="nofollow"} module, that will setup project-aware ESLint configuration for you.
::callout{icon="i-lucide-lightbulb"}
The module is designed for the [new ESLint flat config format](https://eslint.org/docs/latest/use/configure/configuration-files-new){rel="nofollow"} with is the [default format since ESLint v9](https://eslint.org/blog/2024/04/eslint-v9.0.0-released/){rel="nofollow"}. If you are using the legacy `.eslintrc` config, you will need to [configure manually with `@nuxt/eslint-config`](https://eslint.nuxt.com/packages/config#legacy-config-format){rel="nofollow"}. We highly recommend you to migrate over the flat config to be future-proof.
::
## Quick Setup
```bash
npx nuxi module add eslint
```
Start your Nuxt app, a `eslint.config.mjs` file will be generated under your project root. You can customize it as needed.
You can learn more about the module and customizations in [Nuxt ESLint's documentation](https://eslint.nuxt.com/packages/module){rel="nofollow"}.
# .nuxt
::important
This directory should be added to your [`.gitignore`](https://nuxt.com/docs/guide/directory-structure/gitignore) file to avoid pushing the dev build output to your repository.
::
This directory is interesting if you want to learn more about the files Nuxt generates based on your directory structure.
Nuxt also provides a Virtual File System (VFS) for modules to add templates to this directory without writing them to disk.
You can explore the generated files by opening the [Nuxt DevTools](https://devtools.nuxt.com){rel="nofollow"} in development mode and navigating to the **Virtual Files** tab.
::warning
You should not touch any files inside since the whole directory will be re-created when running [`nuxt dev`](https://nuxt.com/docs/api/commands/dev).
::
# .output
::important
This directory should be added to your [`.gitignore`](https://nuxt.com/docs/guide/directory-structure/gitignore) file to avoid pushing the build output to your repository.
::
Use this directory to deploy your Nuxt application to production.
::read-more{to="https://nuxt.com/docs/getting-started/deployment"}
::
::warning
You should not touch any files inside since the whole directory will be re-created when running [`nuxt build`](https://nuxt.com/docs/api/commands/build).
::
# assets
The directory usually contains the following types of files:
- Stylesheets (CSS, SASS, etc.)
- Fonts
- Images that won't be served from the [`public/`](https://nuxt.com/docs/guide/directory-structure/public) directory.
If you want to serve assets from the server, we recommend taking a look at the [`public/`](https://nuxt.com/docs/guide/directory-structure/public) directory.
::read-more{to="https://nuxt.com/docs/getting-started/assets"}
::
# components
Nuxt automatically imports any components in this directory (along with components that are registered by any modules you may be using).
```bash [Directory Structure]
-| components/
---| AppHeader.vue
---| AppFooter.vue
```
```html [app.vue]
<template>
<div>
<AppHeader />
<NuxtPage />
<AppFooter />
</div>
</template>
```
## Component Names
If you have a component in nested directories such as:
```bash [Directory Structure]
-| components/
---| base/
-----| foo/
-------| Button.vue
```
... then the component's name will be based on its own path directory and filename, with duplicate segments being removed. Therefore, the component's name will be:
```html
<BaseFooButton />
```
::note
For clarity, we recommend that the component's filename matches its name. So, in the example above, you could rename `Button.vue` to be `BaseFooButton.vue`.
::
If you want to auto-import components based only on its name, not path, then you need to set `pathPrefix` option to `false` using extended form of the configuration object:
```ts [nuxt.config.ts] twoslash
export default defineNuxtConfig({
components: [
{
path: '~/components',
pathPrefix: false, // [!code ++]
},
],
});
```
This registers the components using the same strategy as used in Nuxt 2. For example, `~/components/Some/MyComponent.vue` will be usable as `<MyComponent>` and not `<SomeMyComponent>`.
## Dynamic Components
If you want to use the Vue `<component :is="someComputedComponent">`{className="language-vue shiki shiki-themes material-theme-lighter material-theme-lighter material-theme-palenight" lang="vue"} syntax, you need to use the `resolveComponent` helper provided by Vue or import the component directly from `#components` and pass it into `is` prop.
For example:
```vue [pages/index.vue]
<script setup lang="ts">
import { SomeComponent } from '#components'
const MyButton = resolveComponent('MyButton')
</script>
<template>
<component :is="clickable ? MyButton : 'div'" />
<component :is="SomeComponent" />
</template>
```
::important
If you are using `resolveComponent` to handle dynamic components, make sure not to insert anything but the name of the component, which must be a literal string and not be or contain a variable. The string is statically analyzed at compilation step.
::
::video-accordion
---
title: Watch Daniel Roe's short video about resolveComponent()
video-id: 4kq8E5IUM2U
---
::
Alternatively, though not recommended, you can register all your components globally, which will create async chunks for all your components and make them available throughout your application.
```diff
export default defineNuxtConfig({
components: {
+ global: true,
+ dirs: ['~/components']
},
})
```
You can also selectively register some components globally by placing them in a `~/components/global` directory, or by using a `.global.vue` suffix in the filename. As noted above, each global component is rendered in a separate chunk, so be careful not to overuse this feature.
::note
The `global` option can also be set per component directory.
::
## Dynamic Imports
To dynamically import a component (also known as lazy-loading a component) all you need to do is add the `Lazy` prefix to the component's name. This is particularly useful if the component is not always needed.
By using the `Lazy` prefix you can delay loading the component code until the right moment, which can be helpful for optimizing your JavaScript bundle size.
```vue [pages/index.vue]
<script setup lang="ts">
const show = ref(false)
</script>
<template>
<div>
<h1>Mountains</h1>
<LazyMountainsList v-if="show" />
<button v-if="!show" @click="show = true">Show List</button>
</div>
</template>
```
## Delayed (or Lazy) Hydration
Lazy components are great for controlling the chunk sizes in your app, but they don't always enhance runtime performance, as they still load eagerly unless conditionally rendered. In real-world applications, some pages may include a lot of content and a lot of components, and most of the time not all of them need to be interactive as soon as the page is loaded. Having them all load eagerly can negatively impact performance.
In order to optimize your app, you may want to delay the hydration of some components until they're visible, or until the browser is done with more important tasks.
Nuxt supports this using lazy (or delayed) hydration, allowing you to control when components become interactive.
### Hydration Strategies
Nuxt provides a range of built-in hydration strategies. Only one strategy can be used per lazy component.
::warning
Currently Nuxt's built-in lazy hydration only works in single-file components (SFCs), and requires you to define the prop in the template (rather than spreading an object of props via `v-bind`). It also does not work with direct imports from `#components`.
::
#### `hydrate-on-visible`
Hydrates the component when it becomes visible in the viewport.
```vue [pages/index.vue]
<template>
<div>
<LazyMyComponent hydrate-on-visible />
</div>
</template>
```
::read-more
---
title: IntersectionObserver options
to: https://developer.mozilla.org/en-US/docs/Web/API/IntersectionObserver/IntersectionObserver
---
Read more about the options for `hydrate-on-visible`.
::
::note
Under the hood, this uses Vue's built-in [`hydrateOnVisible` strategy](https://vuejs.org/guide/components/async.html#hydrate-on-visible){rel="nofollow"}.
::
#### `hydrate-on-idle`
Hydrates the component when the browser is idle. This is suitable if you need the component to load as soon as possible, but not block the critical rendering path.
You can also pass a number which serves as a max timeout.
```vue [pages/index.vue]
<template>
<div>
<LazyMyComponent hydrate-on-idle />
</div>
</template>
```
::note
Under the hood, this uses Vue's built-in [`hydrateOnIdle` strategy](https://vuejs.org/guide/components/async.html#hydrate-on-idle){rel="nofollow"}.
::
#### `hydrate-on-interaction`
Hydrates the component after a specified interaction (e.g., click, mouseover).
```vue [pages/index.vue]
<template>
<div>
<LazyMyComponent hydrate-on-interaction="mouseover" />
</div>
</template>
```
If you do not pass an event or list of events, it defaults to hydrating on `pointerenter` and `focus`.
::note
Under the hood, this uses Vue's built-in [`hydrateOnInteraction` strategy](https://vuejs.org/guide/components/async.html#hydrate-on-interaction){rel="nofollow"}.
::
#### `hydrate-on-media-query`
Hydrates the component when the window matches a media query.
```vue [pages/index.vue]
<template>
<div>
<LazyMyComponent hydrate-on-media-query="(max-width: 768px)" />
</div>
</template>
```
::note
Under the hood, this uses Vue's built-in [`hydrateOnMediaQuery` strategy](https://vuejs.org/guide/components/async.html#hydrate-on-media-query){rel="nofollow"}.
::
#### `hydrate-after`
Hydrates the component after a specified delay (in milliseconds).
```vue [pages/index.vue]
<template>
<div>
<LazyMyComponent :hydrate-after="2000" />
</div>
</template>
```
#### `hydrate-when`
Hydrates the component based on a boolean condition.
```vue [pages/index.vue]
<template>
<div>
<LazyMyComponent :hydrate-when="isReady" />
</div>
</template>
<script setup lang="ts">
const isReady = ref(false)
function myFunction() {
// trigger custom hydration strategy...
isReady.value = true
}
</script>
```
#### `hydrate-never`
Never hydrates the component.
```vue [pages/index.vue]
<template>
<div>
<LazyMyComponent hydrate-never />
</div>
</template>
```
### Listening to Hydration Events
All delayed hydration components emit a `@hydrated` event when they are hydrated.
```vue [pages/index.vue]
<template>
<div>
<LazyMyComponent hydrate-on-visible @hydrated="onHydrate" />
</div>
</template>
<script setup lang="ts">
function onHydrate() {
console.log("Component has been hydrated!")
}
</script>
```
### Caveats and Best Practices
Delayed hydration can offer performance benefits, but it's essential to use it correctly:
1. **Prioritize In-Viewport Content:** Avoid delayed hydration for critical, above-the-fold content. It's best suited for content that isn't immediately needed.
2. **Conditional Rendering:** When using `v-if="false"` on a lazy component, you might not need delayed hydration. You can just use a normal lazy component.
3. **Shared State:** Be mindful of shared state (`v-model`) across multiple components. Updating the model in one component can trigger hydration in all components bound to that model.
4. **Use Each Strategy's Intended Use Case:** Each strategy is optimized for a specific purpose.
- `hydrate-when` is best for components that might not always need to be hydrated.
- `hydrate-after` is for components that can wait a specific amount of time.
- `hydrate-on-idle` is for components that can be hydrated when the browser is idle.
5. **Avoid `hydrate-never` on interactive components:** If a component requires user interaction, it should not be set to never hydrate.
## Direct Imports
You can also explicitly import components from `#components` if you want or need to bypass Nuxt's auto-importing functionality.
```vue [pages/index.vue]
<script setup lang="ts">
import { NuxtLink, LazyMountainsList } from '#components'
const show = ref(false)
</script>
<template>
<div>
<h1>Mountains</h1>
<LazyMountainsList v-if="show" />
<button v-if="!show" @click="show = true">Show List</button>
<NuxtLink to="/">Home</NuxtLink>
</div>
</template>
```
## Custom Directories
By default, only the `~/components` directory is scanned. If you want to add other directories, or change how the components are scanned within a subfolder of this directory, you can add additional directories to the configuration:
```ts [nuxt.config.ts] twoslash
export default defineNuxtConfig({
components: [
// ~/calendar-module/components/event/Update.vue => <EventUpdate />
{ path: '~/calendar-module/components' },
// ~/user-module/components/account/UserDeleteDialog.vue => <UserDeleteDialog />
{ path: '~/user-module/components', pathPrefix: false },
// ~/components/special-components/Btn.vue => <SpecialBtn />
{ path: '~/components/special-components', prefix: 'Special' },
// It's important that this comes last if you have overrides you wish to apply
// to sub-directories of `~/components`.
//
// ~/components/Btn.vue => <Btn />
// ~/components/base/Btn.vue => <BaseBtn />
'~/components'
]
})
```
::note
Any nested directories need to be added first as they are scanned in order.
::
## npm Packages
If you want to auto-import components from an npm package, you can use [`addComponent`](https://nuxt.com/docs/api/kit/components#addcomponent) in a [local module](https://nuxt.com/docs/guide/directory-structure/modules) to register them.
::code-group
```ts [~/modules/register-component.ts] twoslash
import { addComponent, defineNuxtModule } from '@nuxt/kit'
export default defineNuxtModule({
setup() {
// import { MyComponent as MyAutoImportedComponent } from 'my-npm-package'
addComponent({
name: 'MyAutoImportedComponent',
export: 'MyComponent',
filePath: 'my-npm-package',
})
},
})
```
```vue [app.vue]
<template>
<div>
<!-- the component uses the name we specified and is auto-imported -->
<MyAutoImportedComponent />
</div>
</template>
```
::
## Component Extensions
By default, any file with an extension specified in the [extensions key of `nuxt.config.ts`](https://nuxt.com/docs/api/nuxt-config#extensions) is treated as a component.
If you need to restrict the file extensions that should be registered as components, you can use the extended form of the components directory declaration and its `extensions` key:
```ts [nuxt.config.ts] twoslash
export default defineNuxtConfig({
components: [
{
path: '~/components',
extensions: ['.vue'], // [!code ++]
}
]
})
```
## Client Components
If a component is meant to be rendered only client-side, you can add the `.client` suffix to your component.
```bash [Directory Structure]
| components/
--| Comments.client.vue
```
```vue [pages/example.vue]
<template>
<div>
<!-- this component will only be rendered on client side -->
<Comments />
</div>
</template>
```
::note
This feature only works with Nuxt auto-imports and `#components` imports. Explicitly importing these components from their real paths does not convert them into client-only components.
::
::important
`.client` components are rendered only after being mounted. To access the rendered template using `onMounted()`, add `await nextTick()` in the callback of the `onMounted()` hook.
::
::read-more{to="https://nuxt.com/docs/api/components/client-only"}
You can also achieve a similar result with the `<ClientOnly>` component.
::
## Server Components
Server components allow server-rendering individual components within your client-side apps. It's possible to use server components within Nuxt, even if you are generating a static site. That makes it possible to build complex sites that mix dynamic components, server-rendered HTML and even static chunks of markup.
Server components can either be used on their own or paired with a [client component](https://nuxt.com/#paired-with-a-client-component).
::video-accordion
---
title: Watch Learn Vue video about Nuxt Server Components
video-id: u1yyXe86xJM
---
::
::tip
---
icon: i-lucide-newspaper
target: _blank
to: https://roe.dev/blog/nuxt-server-components
---
Read Daniel Roe's guide to Nuxt Server Components.
::
### Standalone server components
Standalone server components will always be rendered on the server, also known as Islands components.
When their props update, this will result in a network request that will update the rendered HTML in-place.
Server components are currently experimental and in order to use them, you need to enable the 'component islands' feature in your nuxt.config:
```ts [nuxt.config.ts] twoslash
export default defineNuxtConfig({
experimental: {
componentIslands: true
}
})
```
Now you can register server-only components with the `.server` suffix and use them anywhere in your application automatically.
```bash [Directory Structure]
-| components/
---| HighlightedMarkdown.server.vue
```
```vue [pages/example.vue]
<template>
<div>
<!--
this will automatically be rendered on the server, meaning your markdown parsing + highlighting
libraries are not included in your client bundle.
-->
<HighlightedMarkdown markdown="# Headline" />
</div>
</template>
```
Server-only components use [`<NuxtIsland>`](https://nuxt.com/docs/api/components/nuxt-island) under the hood, meaning that `lazy` prop and `#fallback` slot are both passed down to it.
::warning
Server components (and islands) must have a single root element. (HTML comments are considered elements as well.)
::
::warning
Props are passed to server components via URL query parameters, and are therefore limited by the possible length of a URL, so be careful not to pass enormous amounts of data to server components via props.
::
::warning
Be careful when nesting islands within other islands as each island adds some extra overhead.
::
::warning
Most features for server-only components and island components, such as slots and client components, are only available for single file components.
::
#### Client components within server components
::note
This feature needs `experimental.componentIslands.selectiveClient` within your configuration to be true.
::
You can partially hydrate a component by setting a `nuxt-client` attribute on the component you wish to be loaded client-side.
```vue [components/ServerWithClient.vue]
<template>
<div>
<HighlightedMarkdown markdown="# Headline" />
<!-- Counter will be loaded and hydrated client-side -->
<Counter nuxt-client :count="5" />
</div>
</template>
```
::note
This only works within a server component. Slots for client components are working only with `experimental.componentIsland.selectiveClient` set to `'deep'` and since they are rendered server-side, they are not interactive once client-side.
::
#### Server Component Context
When rendering a server-only or island component, `<NuxtIsland>` makes a fetch request which comes back with a `NuxtIslandResponse`. (This is an internal request if rendered on the server, or a request that you can see in the network tab if it's rendering on client-side navigation.)
This means:
- A new Vue app will be created server-side to create the `NuxtIslandResponse`.
- A new 'island context' will be created while rendering the component.
- You can't access the 'island context' from the rest of your app and you can't access the context of the rest of your app from the island component. In other words, the server component or island is *isolated* from the rest of your app.
- Your plugins will run again when rendering the island, unless they have `env: { islands: false }` set (which you can do in an object-syntax plugin).
Within an island component, you can access its island context through `nuxtApp.ssrContext.islandContext`. Note that while island components are still marked as experimental, the format of this context may change.
::note
Slots can be interactive and are wrapped within a `<div>` with `display: contents;`
::
### Paired with a Client component
In this case, the `.server` + `.client` components are two 'halves' of a component and can be used in advanced use cases for separate implementations of a component on server and client side.
```bash [Directory Structure]
-| components/
---| Comments.client.vue
---| Comments.server.vue
```
```vue [pages/example.vue]
<template>
<div>
<!-- this component will render Comments.server on the server then Comments.client once mounted in the browser -->
<Comments />
</div>
</template>
```
## Built-In Nuxt Components
There are a number of components that Nuxt provides, including `<ClientOnly>` and `<DevOnly>`. You can read more about them in the API documentation.
::read-more{to="https://nuxt.com/docs/api"}
::
## Library Authors
Making Vue component libraries with automatic tree-shaking and component registration is super easy. ✨
You can use the [`addComponentsDir`](https://nuxt.com/docs/api/kit/components#addcomponentsdir) method provided from the `@nuxt/kit` to register your components directory in your Nuxt module.
Imagine a directory structure like this:
```bash [Directory Structure]
-| node_modules/
---| awesome-ui/
-----| components/
-------| Alert.vue
-------| Button.vue
-----| nuxt.ts
-| pages/
---| index.vue
-| nuxt.config.ts
```
Then in `awesome-ui/nuxt.ts` you can use the `addComponentsDir` hook:
```ts twoslash
import { createResolver, defineNuxtModule, addComponentsDir } from '@nuxt/kit'
export default defineNuxtModule({
setup() {
const resolver = createResolver(import.meta.url)
// Add ./components dir to the list
addComponentsDir({
path: resolver.resolve('./components'),
prefix: 'awesome',
})
},
})
```
That's it! Now in your project, you can import your UI library as a Nuxt module in your `nuxt.config` file:
```ts [nuxt.config.ts] twoslash
export default defineNuxtConfig({
modules: ['awesome-ui/nuxt']
})
```
... and directly use the module components (prefixed with `awesome-`) in our `pages/index.vue`:
```vue
<template>
<div>
My <AwesomeButton>UI button</AwesomeButton>!
<awesome-alert>Here's an alert!</awesome-alert>
</div>
</template>
```
It will automatically import the components only if used and also support HMR when updating your components in `node_modules/awesome-ui/components/`.
::link-example{to="https://nuxt.com/docs/examples/features/auto-imports"}
::
# composables
## Usage
**Method 1:** Using named export
```js [composables/useFoo.ts]
export const useFoo = () => {
return useState('foo', () => 'bar')
}
```
**Method 2:** Using default export
```js [composables/use-foo.ts or composables/useFoo.ts]
// It will be available as useFoo() (camelCase of file name without extension)
export default function () {
return useState('foo', () => 'bar')
}
```
**Usage:** You can now use auto imported composable in `.js`, `.ts` and `.vue` files
```vue [app.vue]
<script setup lang="ts">
const foo = useFoo()
</script>
<template>
<div>
{{ foo }}
</div>
</template>
```
::note
The `composables/` directory in Nuxt does not provide any additional reactivity capabilities to your code. Instead, any reactivity within composables is achieved using Vue's Composition API mechanisms, such as ref and reactive. Note that reactive code is also not limited to the boundaries of the `composables/` directory. You are free to employ reactivity features wherever they're needed in your application.
::
::read-more{to="https://nuxt.com/docs/guide/concepts/auto-imports"}
::
::link-example{to="https://nuxt.com/docs/examples/features/auto-imports"}
::
## Types
Under the hood, Nuxt auto generates the file `.nuxt/imports.d.ts` to declare the types.
Be aware that you have to run [`nuxi prepare`](https://nuxt.com/docs/api/commands/prepare), [`nuxi dev`](https://nuxt.com/docs/api/commands/dev) or [`nuxi build`](https://nuxt.com/docs/api/commands/build) in order to let Nuxt generate the types.
::note
If you create a composable without having the dev server running, TypeScript will throw an error, such as `Cannot find name 'useBar'.`
::
## Examples
### Nested Composables
You can use a composable within another composable using auto imports:
```js [composables/test.ts]
export const useFoo = () => {
const nuxtApp = useNuxtApp()
const bar = useBar()
}
```
### Access plugin injections
You can access [plugin injections](https://nuxt.com/docs/guide/directory-structure/plugins#providing-helpers) from composables:
```js [composables/test.ts]
export const useHello = () => {
const nuxtApp = useNuxtApp()
return nuxtApp.$hello
}
```
## How Files Are Scanned
Nuxt only scans files at the top level of the [`composables/` directory](https://nuxt.com/docs/guide/directory-structure/composables), e.g.:
```bash [Directory Structure]
-| composables/
---| index.ts // scanned
---| useFoo.ts // scanned
---| nested/
-----| utils.ts // not scanned
```
Only `composables/index.ts` and `composables/useFoo.ts` would be searched for imports.
To get auto imports working for nested modules, you could either re-export them (recommended) or configure the scanner to include nested directories:
**Example:** Re-export the composables you need from the `composables/index.ts` file:
```ts [composables/index.ts]
// Enables auto import for this export
export { utils } from './nested/utils.ts'
```
**Example:** Scan nested directories inside the `composables/` folder:
```ts [nuxt.config.ts] twoslash
export default defineNuxtConfig({
imports: {
dirs: [
// Scan top-level modules
'composables',
// ... or scan modules nested one level deep with a specific name and file extension
'composables/*/index.{ts,js,mjs,mts}',
// ... or scan all modules within given directory
'composables/**'
]
}
})
```
# content
[Nuxt Content](https://content.nuxt.com){rel="nofollow"} reads the [`content/` directory](https://nuxt.com/docs/guide/directory-structure/content) in your project and parses `.md`, `.yml`, `.csv` and `.json` files to create a file-based CMS for your application.
- Render your content with built-in components.
- Query your content with a MongoDB-like API.
- Use your Vue components in Markdown files with the MDC syntax.
- Automatically generate your navigation.
::read-more{target="_blank" to="https://content.nuxt.com"}
Learn more in **Nuxt Content** documentation.
::
## Enable Nuxt Content
Install the `@nuxt/content` module in your project as well as adding it to your `nuxt.config.ts` with one command:
```bash [Terminal]
npx nuxi module add content
```
## Create Content
Place your markdown files inside the `content/` directory:
```md [content/index.md]
# Hello Content
```
The module automatically loads and parses them.
## Render Content
To render content pages, add a [catch-all route](https://nuxt.com/docs/guide/directory-structure/pages/#catch-all-route) using the [`<ContentRenderer>`](https://content.nuxt.com/docs/components/content-renderer){rel="nofollow"} component:
```vue [pages/[...slug\\].vue]
<script lang="ts" setup>
const route = useRoute()
const { data: page } = await useAsyncData(route.path, () => {
return queryCollection('content').path(route.path).first()
})
</script>
<template>
<div>
<header><!-- ... --></header>
<ContentRenderer v-if="page" :value="page" />
<footer><!-- ... --></footer>
</div>
</template>
```
## Documentation
::tip{icon="i-lucide-book"}
Head over to <https://content.nuxt.com>{rel="nofollow"} to learn more about the Content module features, such as how to build queries and use Vue components in your Markdown files with the MDC syntax.
::
# layouts
::tip{icon="i-lucide-rocket"}
For best performance, components placed in this directory will be automatically loaded via asynchronous import when used.
::
## Enable Layouts
Layouts are enabled by adding [`<NuxtLayout>`](https://nuxt.com/docs/api/components/nuxt-layout) to your [`app.vue`](https://nuxt.com/docs/guide/directory-structure/app):
```vue [app.vue]
<template>
<NuxtLayout>
<NuxtPage />
</NuxtLayout>
</template>
```
To use a layout:
- Set a `layout` property in your page with [definePageMeta](https://nuxt.com/docs/api/utils/define-page-meta).
- Set the `name` prop of `<NuxtLayout>`.
::note
The layout name is normalized to kebab-case, so `someLayout` becomes `some-layout`.
::
::note
If no layout is specified, `layouts/default.vue` will be used.
::
::important
If you only have a single layout in your application, we recommend using [`app.vue`](https://nuxt.com/docs/guide/directory-structure/app) instead.
::
::important
Unlike other components, your layouts must have a single root element to allow Nuxt to apply transitions between layout changes - and this root element cannot be a `<slot />`.
::
## Default Layout
Add a `~/layouts/default.vue`:
```vue [layouts/default.vue]
<template>
<div>
<p>Some default layout content shared across all pages</p>
<slot />
</div>
</template>
```
In a layout file, the content of the page will be displayed in the `<slot />` component.
## Named Layout
```bash [Directory Structure]
-| layouts/
---| default.vue
---| custom.vue
```
Then you can use the `custom` layout in your page:
```vue [pages/about.vue] twoslash
<script setup lang="ts">
definePageMeta({
layout: 'custom'
})
</script>
```
::read-more
---
to: https://nuxt.com/docs/guide/directory-structure/pages#page-metadata
---
Learn more about `definePageMeta`.
::
You can directly override the default layout for all pages using the `name` property of [`<NuxtLayout>`](https://nuxt.com/docs/api/components/nuxt-layout):
```vue [app.vue]
<script setup lang="ts">
// You might choose this based on an API call or logged-in status
const layout = "custom";
</script>
<template>
<NuxtLayout :name="layout">
<NuxtPage />
</NuxtLayout>
</template>
```
If you have a layout in nested directories, the layout's name will be based on its own path directory and filename, with duplicate segments being removed.
| File | Layout Name |
| --------------------------------- | ----------------- |
| `~/layouts/desktop/default.vue` | `desktop-default` |
| `~/layouts/desktop-base/base.vue` | `desktop-base` |
| `~/layouts/desktop/index.vue` | `desktop` |
For clarity, we recommend that the layout's filename matches its name:
| File | Layout Name |
| ---------------------------------------- | ----------------- |
| `~/layouts/desktop/DesktopDefault.vue` | `desktop-default` |
| `~/layouts/desktop-base/DesktopBase.vue` | `desktop-base` |
| `~/layouts/desktop/Desktop.vue` | `desktop` |
::link-example{to="https://nuxt.com/docs/examples/features/layouts"}
::
## Changing the Layout Dynamically
You can also use the [`setPageLayout`](https://nuxt.com/docs/api/utils/set-page-layout) helper to change the layout dynamically:
```vue twoslash
<script setup lang="ts">
function enableCustomLayout () {
setPageLayout('custom')
}
definePageMeta({
layout: false,
});
</script>
<template>
<div>
<button @click="enableCustomLayout">Update layout</button>
</div>
</template>
```
::link-example{to="https://nuxt.com/docs/examples/features/layouts"}
::
## Overriding a Layout on a Per-page Basis
If you are using pages, you can take full control by setting `layout: false` and then using the `<NuxtLayout>` component within the page.
::code-group
```vue [pages/index.vue]
<script setup lang="ts">
definePageMeta({
layout: false,
})
</script>
<template>
<div>
<NuxtLayout name="custom">
<template #header> Some header template content. </template>
The rest of the page
</NuxtLayout>
</div>
</template>
```
```vue [layouts/custom.vue]
<template>
<div>
<header>
<slot name="header">
Default header content
</slot>
</header>
<main>
<slot />
</main>
</div>
</template>
```
::
::important
If you use `<NuxtLayout>` within your pages, make sure it is not the root element (or [disable layout/page transitions](https://nuxt.com/docs/getting-started/transitions#disable-transitions)).
::
# middleware
Nuxt provides a customizable **route middleware** framework you can use throughout your application, ideal for extracting code that you want to run before navigating to a particular route.
There are three kinds of route middleware:
1. Anonymous (or inline) route middleware are defined directly within the page.
2. Named route middleware, placed in the `middleware/` and automatically loaded via asynchronous import when used on a page.
3. Global route middleware, placed in the `middleware/` with a `.global` suffix and is run on every route change.
The first two kinds of route middleware can be defined in [`definePageMeta`](https://nuxt.com/docs/api/utils/define-page-meta).
::note
Name of middleware are normalized to kebab-case: `myMiddleware` becomes `my-middleware`.
::
::note
Route middleware run within the Vue part of your Nuxt app. Despite the similar name, they are completely different from [server middleware](https://nuxt.com/docs/guide/directory-structure/server#server-middleware), which are run in the Nitro server part of your app.
::
::video-accordion
---
platform: vimeo
title: Watch a video from Vue School on all 3 kinds of middleware
video-id: "761471577"
---
::
## Usage
Route middleware are navigation guards that receive the current route and the next route as arguments.
```ts [middleware/my-middleware.ts] twoslash
export default defineNuxtRouteMiddleware((to, from) => {
if (to.params.id === '1') {
return abortNavigation()
}
// In a real app you would probably not redirect every route to `/`
// however it is important to check `to.path` before redirecting or you
// might get an infinite redirect loop
if (to.path !== '/') {
return navigateTo('/')
}
})
```
Nuxt provides two globally available helpers that can be returned directly from the middleware.
1. [`navigateTo`](https://nuxt.com/docs/api/utils/navigate-to) - Redirects to the given route
2. [`abortNavigation`](https://nuxt.com/docs/api/utils/abort-navigation) - Aborts the navigation, with an optional error message.
Unlike [navigation guards](https://router.vuejs.org/guide/advanced/navigation-guards.html#global-before-guards){rel="nofollow"} from `vue-router`, a third `next()` argument is not passed, and **redirect or route cancellation is handled by returning a value from the middleware**.
Possible return values are:
- nothing (a simple `return` or no return at all) - does not block navigation and will move to the next middleware function, if any, or complete the route navigation
- `return navigateTo('/')` - redirects to the given path and will set the redirect code to [`302` Found](https://developer.mozilla.org/en-US/docs/Web/HTTP/Status/302){rel="nofollow"} if the redirect happens on the server side
- `return navigateTo('/', { redirectCode: 301 })` - redirects to the given path and will set the redirect code to [`301` Moved Permanently](https://developer.mozilla.org/en-US/docs/Web/HTTP/Status/301){rel="nofollow"} if the redirect happens on the server side
- `return abortNavigation()` - stops the current navigation
- `return abortNavigation(error)` - rejects the current navigation with an error
::read-more{to="https://nuxt.com/docs/api/utils/navigate-to"}
::
::read-more{to="https://nuxt.com/docs/api/utils/abort-navigation"}
::
::important
We recommend using the helper functions above for performing redirects or stopping navigation. Other possible return values described in [the vue-router docs](https://router.vuejs.org/guide/advanced/navigation-guards.html#global-before-guards){rel="nofollow"} may work but there may be breaking changes in future.
::
## Middleware Order
Middleware runs in the following order:
1. Global Middleware
2. Page defined middleware order (if there are multiple middleware declared with the array syntax)
For example, assuming you have the following middleware and component:
```bash [middleware/ directory]
-| middleware/
---| analytics.global.ts
---| setup.global.ts
---| auth.ts
```
```vue [pages/profile.vue] twoslash
<script setup lang="ts">
definePageMeta({
middleware: [
function (to, from) {
// Custom inline middleware
},
'auth',
],
});
</script>
```
You can expect the middleware to be run in the following order:
1. `analytics.global.ts`
2. `setup.global.ts`
3. Custom inline middleware
4. `auth.ts`
### Ordering Global Middleware
By default, global middleware is executed alphabetically based on the filename.
However, there may be times you want to define a specific order. For example, in the last scenario, `setup.global.ts` may need to run before `analytics.global.ts`. In that case, we recommend prefixing global middleware with 'alphabetical' numbering.
```bash [Directory structure]
-| middleware/
---| 01.setup.global.ts
---| 02.analytics.global.ts
---| auth.ts
```
::note
In case you're new to 'alphabetical' numbering, remember that filenames are sorted as strings, not as numeric values. For example, `10.new.global.ts` would come before `2.new.global.ts`. This is why the example prefixes single digit numbers with `0`.
::
## When Middleware Runs
If your site is server-rendered or generated, middleware for the initial page will be executed both when the page is rendered and then again on the client. This might be needed if your middleware needs a browser environment, such as if you have a generated site, aggressively cache responses, or want to read a value from local storage.
However, if you want to avoid this behaviour you can do so:
```ts [middleware/example.ts] twoslash
export default defineNuxtRouteMiddleware(to => {
// skip middleware on server
if (import.meta.server) return
// skip middleware on client side entirely
if (import.meta.client) return
// or only skip middleware on initial client load
const nuxtApp = useNuxtApp()
if (import.meta.client && nuxtApp.isHydrating && nuxtApp.payload.serverRendered) return
})
```
This is true even if you throw an error in your middleware on the server, and an error page is rendered. The middleware will still run again in the browser.
::note
Rendering an error page is an entirely separate page load, meaning any registered middleware will run again. You can use [`useError`](https://nuxt.com/docs/getting-started/error-handling#useerror) in middleware to check if an error is being handled.
::
## Adding Middleware Dynamically
It is possible to add global or named route middleware manually using the [`addRouteMiddleware()`](https://nuxt.com/docs/api/utils/add-route-middleware) helper function, such as from within a plugin.
```ts twoslash
export default defineNuxtPlugin(() => {
addRouteMiddleware('global-test', () => {
console.log('this global middleware was added in a plugin and will be run on every route change')
}, { global: true })
addRouteMiddleware('named-test', () => {
console.log('this named middleware was added in a plugin and would override any existing middleware of the same name')
})
})
```
## Example
```bash [Directory Structure]
-| middleware/
---| auth.ts
```
In your page file, you can reference this route middleware:
```vue twoslash
<script setup lang="ts">
definePageMeta({
middleware: ["auth"]
// or middleware: 'auth'
})
</script>
```
Now, before navigation to that page can complete, the `auth` route middleware will be run.
::link-example{to="https://nuxt.com/docs/examples/routing/middleware"}
::
## Setting Middleware at Build Time
Instead of using `definePageMeta` on each page, you can add named route middleware within the `pages:extend` hook.
```ts [nuxt.config.ts] twoslash
import type { NuxtPage } from 'nuxt/schema'
export default defineNuxtConfig({
hooks: {
'pages:extend' (pages) {
function setMiddleware (pages: NuxtPage[]) {
for (const page of pages) {
if (/* some condition */ true) {
page.meta ||= {}
// Note that this will override any middleware set in `definePageMeta` in the page
page.meta.middleware = ['named']
}
if (page.children) {
setMiddleware(page.children)
}
}
}
setMiddleware(pages)
}
}
})
```
# modules
It is a good place to place any local modules you develop while building your application.
The auto-registered files patterns are:
- `modules/*/index.ts`
- `modules/*.ts`
You don't need to add those local modules to your [`nuxt.config.ts`](https://nuxt.com/docs/guide/directory-structure/nuxt-config) separately.
::code-group
```ts [modules/hello/index.ts] twoslash
// `nuxt/kit` is a helper subpath import you can use when defining local modules
// that means you do not need to add `@nuxt/kit` to your project's dependencies
import { createResolver, defineNuxtModule, addServerHandler } from 'nuxt/kit'
export default defineNuxtModule({
meta: {
name: 'hello'
},
setup () {
const resolver = createResolver(import.meta.url)
// Add an API route
addServerHandler({
route: '/api/hello',
handler: resolver.resolve('./runtime/api-route')
})
}
})
```
```ts [modules/hello/runtime/api-route.ts] twoslash
export default defineEventHandler(() => {
return { hello: 'world' }
})
```
::
When starting Nuxt, the `hello` module will be registered and the `/api/hello` route will be available.
Modules are executed in the following sequence:
- First, the modules defined in [`nuxt.config.ts`](https://nuxt.com/docs/api/nuxt-config#modules-1) are loaded.
- Then, modules found in the `modules/` directory are executed, and they load in alphabetical order.
You can change the order of local module by adding a number to the front of each directory name:
```bash [Directory structure]
modules/
1.first-module/
index.ts
2.second-module.ts
```
::read-more{to="https://nuxt.com/docs/guide/going-further/modules"}
::
::tip
---
icon: i-lucide-video
target: _blank
to: https://vueschool.io/lessons/creating-your-first-module-from-scratch?friend=nuxt
---
Watch Vue School video about Nuxt private modules.
::
# node_modules
The package manager ([`npm`](https://docs.npmjs.com/cli/commands/npm){rel="nofollow"} or [`yarn`](https://yarnpkg.com){rel="nofollow"} or [`pnpm`](https://pnpm.io/cli/install){rel="nofollow"} or [`bun`](https://bun.sh/package-manager){rel="nofollow"}) creates this directory to store the dependencies of your project.
::important
This directory should be added to your [`.gitignore`](https://nuxt.com/docs/guide/directory-structure/gitignore) file to avoid pushing the dependencies to your repository.
::
# pages
::note
To reduce your application's bundle size, this directory is **optional**, meaning that [`vue-router`](https://router.vuejs.org){rel="nofollow"} won't be included if you only use [`app.vue`](https://nuxt.com/docs/guide/directory-structure/app). To force the pages system, set `pages: true` in `nuxt.config` or have a [`app/router.options.ts`](https://nuxt.com/docs/guide/recipes/custom-routing#using-approuteroptions).
::
## Usage
Pages are Vue components and can have any [valid extension](https://nuxt.com/docs/api/configuration/nuxt-config#extensions) that Nuxt supports (by default `.vue`, `.js`, `.jsx`, `.mjs`, `.ts` or `.tsx`).
Nuxt will automatically create a route for every page in your `~/pages/` directory.
::code-group
```vue [pages/index.vue]
<template>
<h1>Index page</h1>
</template>
```
```ts [pages/index.ts] twoslash
// https://vuejs.org/guide/extras/render-function.html
export default defineComponent({
render () {
return h('h1', 'Index page')
}
})
```
```tsx [pages/index.tsx] twoslash
// https://nuxt.com/docs/examples/advanced/jsx
// https://vuejs.org/guide/extras/render-function.html#jsx-tsx
export default defineComponent({
render () {
return <h1>Index page</h1>
}
})
```
::
The `pages/index.vue` file will be mapped to the `/` route of your application.
If you are using [`app.vue`](https://nuxt.com/docs/guide/directory-structure/app), make sure to use the [`<NuxtPage/>`](https://nuxt.com/docs/api/components/nuxt-page) component to display the current page:
```vue [app.vue]
<template>
<div>
<!-- Markup shared across all pages, ex: NavBar -->
<NuxtPage />
</div>
</template>
```
Pages **must have a single root element** to allow [route transitions](https://nuxt.com/docs/getting-started/transitions) between pages. HTML comments are considered elements as well.
This means that when the route is server-rendered, or statically generated, you will be able to see its contents correctly, but when you navigate towards that route during client-side navigation the transition between routes will fail and you'll see that the route will not be rendered.
Here are some examples to illustrate what a page with a single root element looks like:
::code-group
```vue [pages/working.vue]
<template>
<div>
<!-- This page correctly has only one single root element -->
Page content
</div>
</template>
```
```vue [pages/bad-1.vue]
<template>
<!-- This page will not render when route changes during client side navigation, because of this comment -->
<div>Page content</div>
</template>
```
```vue [pages/bad-2.vue]
<template>
<div>This page</div>
<div>Has more than one root element</div>
<div>And will not render when route changes during client side navigation</div>
</template>
```
::
## Dynamic Routes
If you place anything within square brackets, it will be turned into a [dynamic route](https://router.vuejs.org/guide/essentials/dynamic-matching.html){rel="nofollow"} parameter. You can mix and match multiple parameters and even non-dynamic text within a file name or directory.
If you want a parameter to be *optional*, you must enclose it in double square brackets - for example, `~/pages/[[slug]]/index.vue` or `~/pages/[[slug]].vue` will match both `/` and `/test`.
```bash [Directory Structure]
-| pages/
---| index.vue
---| users-[group]/
-----| [id].vue
```
Given the example above, you can access group/id within your component via the `$route` object:
```vue [pages/users-[group\\]/[id\\].vue]
<template>
<p>{{ $route.params.group }} - {{ $route.params.id }}</p>
</template>
```
Navigating to `/users-admins/123` would render:
```html
<p>admins - 123</p>
```
If you want to access the route using Composition API, there is a global [`useRoute`](https://nuxt.com/docs/api/composables/use-route) function that will allow you to access the route just like `this.$route` in the Options API.
```vue twoslash
<script setup lang="ts">
const route = useRoute()
if (route.params.group === 'admins' && !route.params.id) {
console.log('Warning! Make sure user is authenticated!')
}
</script>
```
::note
Named parent routes will take priority over nested dynamic routes. For the `/foo/hello` route, `~/pages/foo.vue` will take priority over `~/pages/foo/[slug].vue`. :br Use `~/pages/foo/index.vue` and `~/pages/foo/[slug].vue` to match `/foo` and `/foo/hello` with different pages,.
::
::video-accordion
---
platform: vimeo
title: Watch a video from Vue School on dynamic routes
video-id: "754465699"
---
::
## Catch-all Route
If you need a catch-all route, you create it by using a file named like `[...slug].vue`. This will match *all* routes under that path.
```vue [pages/[...slug\\].vue]
<template>
<p>{{ $route.params.slug }}</p>
</template>
```
Navigating to `/hello/world` would render:
```html
<p>["hello", "world"]</p>
```
## Nested Routes
It is possible to display [nested routes](https://next.router.vuejs.org/guide/essentials/nested-routes.html){rel="nofollow"} with `<NuxtPage>`.
Example:
```bash [Directory Structure]
-| pages/
---| parent/
-----| child.vue
---| parent.vue
```
This file tree will generate these routes:
```js
[
{
path: '/parent',
component: '~/pages/parent.vue',
name: 'parent',
children: [
{
path: 'child',
component: '~/pages/parent/child.vue',
name: 'parent-child'
}
]
}
]
```
To display the `child.vue` component, you have to insert the `<NuxtPage>` component inside `pages/parent.vue`:
```vue [pages/parent.vue]
<template>
<div>
<h1>I am the parent view</h1>
<NuxtPage :foobar="123" />
</div>
</template>
```
```vue [pages/parent/child.vue]
<script setup lang="ts">
const props = defineProps(['foobar'])
console.log(props.foobar)
</script>
```
### Child Route Keys
If you want more control over when the `<NuxtPage>` component is re-rendered (for example, for transitions), you can either pass a string or function via the `pageKey` prop, or you can define a `key` value via `definePageMeta`:
```vue [pages/parent.vue]
<template>
<div>
<h1>I am the parent view</h1>
<NuxtPage :page-key="route => route.fullPath" />
</div>
</template>
```
Or alternatively:
```vue [pages/parent/child.vue] twoslash
<script setup lang="ts">
definePageMeta({
key: route => route.fullPath
})
</script>
```
::link-example{to="https://nuxt.com/docs/examples/routing/pages"}
::
## Route Groups
In some cases, you may want to group a set of routes together in a way which doesn't affect file-based routing. For this purpose, you can put files in a folder which is wrapped in parentheses - `(` and `)`.
For example:
```bash [Directory structure]
-| pages/
---| index.vue
---| (marketing)/
-----| about.vue
-----| contact.vue
```
This will produce `/`, `/about` and `/contact` pages in your app. The `marketing` group is ignored for purposes of your URL structure.
## Page Metadata
You might want to define metadata for each route in your app. You can do this using the `definePageMeta` macro, which will work both in `<script>` and in `<script setup>`:
```vue twoslash
<script setup lang="ts">
definePageMeta({
title: 'My home page'
})
</script>
```
This data can then be accessed throughout the rest of your app from the `route.meta` object.
```vue twoslash
<script setup lang="ts">
const route = useRoute()
console.log(route.meta.title) // My home page
</script>
```
If you are using nested routes, the page metadata from all these routes will be merged into a single object. For more on route meta, see the [vue-router docs](https://router.vuejs.org/guide/advanced/meta.html#route-meta-fields){rel="nofollow"}.
Much like `defineEmits` or `defineProps` (see [Vue docs](https://vuejs.org/api/sfc-script-setup.html#defineprops-defineemits){rel="nofollow"}), `definePageMeta` is a **compiler macro**. It will be compiled away so you cannot reference it within your component. Instead, the metadata passed to it will be hoisted out of the component.
Therefore, the page meta object cannot reference the component. However, it can reference imported bindings, as well as locally defined **pure functions**.
::warning
Make sure not to reference any reactive data or functions that cause side effects. This can lead to unexpected behavior.
::
```vue
<script setup lang="ts">
import { someData } from '~/utils/example'
function validateIdParam(route) {
return route.params.id && !isNaN(Number(route.params.id))
}
const title = ref('')
definePageMeta({
validate: validateIdParam,
someData,
title, // do not do this, the ref will be hoisted out of the component
})
</script>
```
### Special Metadata
Of course, you are welcome to define metadata for your own use throughout your app. But some metadata defined with `definePageMeta` has a particular purpose:
#### `alias`
You can define page aliases. They allow you to access the same page from different paths. It can be either a string or an array of strings as defined [here](https://router.vuejs.org/guide/essentials/redirect-and-alias.html#Alias){rel="nofollow"} on vue-router documentation.
#### `keepalive`
Nuxt will automatically wrap your page in [the Vue `<KeepAlive>` component](https://vuejs.org/guide/built-ins/keep-alive.html#keepalive){rel="nofollow"} if you set `keepalive: true` in your `definePageMeta`. This might be useful to do, for example, in a parent route that has dynamic child routes, if you want to preserve page state across route changes.
When your goal is to preserve state for parent routes use this syntax: `<NuxtPage keepalive />`. You can also set props to be passed to `<KeepAlive>` (see a full list [here](https://vuejs.org/api/built-in-components.html#keepalive){rel="nofollow"}).
You can set a default value for this property [in your `nuxt.config`](https://nuxt.com/docs/api/nuxt-config#keepalive).
#### `key`
[See above](https://nuxt.com/#child-route-keys).
#### `layout`
You can define the layout used to render the route. This can be either false (to disable any layout), a string or a ref/computed, if you want to make it reactive in some way. [More about layouts](https://nuxt.com/docs/guide/directory-structure/layouts).
#### `layoutTransition` and `pageTransition`
You can define transition properties for the `<transition>` component that wraps your pages and layouts, or pass `false` to disable the `<transition>` wrapper for that route. You can see a list of options that can be passed [here](https://vuejs.org/api/built-in-components.html#transition){rel="nofollow"} or read [more about how transitions work](https://vuejs.org/guide/built-ins/transition.html#transition){rel="nofollow"}.
You can set default values for these properties [in your `nuxt.config`](https://nuxt.com/docs/api/nuxt-config#layouttransition).
#### `middleware`
You can define middleware to apply before loading this page. It will be merged with all the other middleware used in any matching parent/child routes. It can be a string, a function (an anonymous/inlined middleware function following [the global before guard pattern](https://router.vuejs.org/guide/advanced/navigation-guards.html#global-before-guards){rel="nofollow"}), or an array of strings/functions. [More about named middleware](https://nuxt.com/docs/guide/directory-structure/middleware).
#### `name`
You may define a name for this page's route.
#### `path`
You may define a path matcher, if you have a more complex pattern than can be expressed with the file name. See [the `vue-router` docs](https://router.vuejs.org/guide/essentials/route-matching-syntax.html#custom-regex-in-params){rel="nofollow"} for more information.
### Typing Custom Metadata
If you add custom metadata for your pages, you may wish to do so in a type-safe way. It is possible to augment the type of the object accepted by `definePageMeta`:
```ts [index.d.ts]
declare module '#app' {
interface PageMeta {
pageType?: string
}
}
// It is always important to ensure you import/export something when augmenting a type
export {}
```
## Navigation
To navigate between pages of your app, you should use the [`<NuxtLink>`](https://nuxt.com/docs/api/components/nuxt-link) component.
This component is included with Nuxt and therefore you don't have to import it as you do with other components.
A simple link to the `index.vue` page in your `pages` folder:
```vue
<template>
<NuxtLink to="/">Home page</NuxtLink>
</template>
```
::read-more{to="https://nuxt.com/docs/api/components/nuxt-link"}
Learn more about `<NuxtLink>` usage.
::
## Programmatic Navigation
Nuxt allows programmatic navigation through the `navigateTo()` utility method. Using this utility method, you will be able to programmatically navigate the user in your app. This is great for taking input from the user and navigating them dynamically throughout your application. In this example, we have a simple method called `navigate()` that gets called when the user submits a search form.
::note
Ensure to always `await` on `navigateTo` or chain its result by returning from functions.
::
```vue twoslash
<script setup lang="ts">
const name = ref('');
const type = ref(1);
function navigate(){
return navigateTo({
path: '/search',
query: {
name: name.value,
type: type.value
}
})
}
</script>
```
## Client-Only Pages
You can define a page as [client only](https://nuxt.com/docs/guide/directory-structure/components#client-components) by giving it a `.client.vue` suffix. None of the content of this page will be rendered on the server.
## Server-Only Pages
You can define a page as [server only](https://nuxt.com/docs/guide/directory-structure/components#server-components) by giving it a `.server.vue` suffix. While you will be able to navigate to the page using client-side navigation, controlled by `vue-router`, it will be rendered with a server component automatically, meaning the code required to render the page will not be in your client-side bundle.
::alert{type="warning"}
Server-only pages must have a single root element. (HTML comments are considered elements as well.)
::
## Custom Routing
As your app gets bigger and more complex, your routing might require more flexibility. For this reason, Nuxt directly exposes the router, routes and router options for customization in different ways.
::read-more{to="https://nuxt.com/docs/guide/recipes/custom-routing"}
::
## Multiple Pages Directories
By default, all your pages should be in one `pages` directory at the root of your project.
However, you can use [Nuxt Layers](https://nuxt.com/docs/getting-started/layers) to create groupings of your app's pages:
```bash [Directory Structure]
-| some-app/
---| nuxt.config.ts
---| pages/
-----| app-page.vue
-| nuxt.config.ts
```
```ts [some-app/nuxt.config.ts] twoslash
// some-app/nuxt.config.ts
export default defineNuxtConfig({
})
```
```ts [nuxt.config.ts] twoslash
export default defineNuxtConfig({
extends: ['./some-app'],
})
```
::read-more{to="https://nuxt.com/docs/guide/going-further/layers"}
::
# plugins
Nuxt automatically reads the files in the `plugins/` directory and loads them at the creation of the Vue application.
::note
All plugins inside are auto-registered, you don't need to add them to your `nuxt.config` separately.
::
::note
You can use `.server` or `.client` suffix in the file name to load a plugin only on the server or client side.
::
## Registered Plugins
Only files at the top level of the directory (or index files within any subdirectories) will be auto-registered as plugins.
```bash [Directory structure]
-| plugins/
---| foo.ts // scanned
---| bar/
-----| baz.ts // not scanned
-----| foz.vue // not scanned
-----| index.ts // currently scanned but deprecated
```
Only `foo.ts` and `bar/index.ts` would be registered.
To add plugins in subdirectories, you can use the [`plugins`](https://nuxt.com/docs/api/nuxt-config#plugins-1) option in `nuxt.config.ts`:
```ts [nuxt.config.ts] twoslash
export default defineNuxtConfig({
plugins: [
'~/plugins/bar/baz',
'~/plugins/bar/foz'
]
})
```
## Creating Plugins
The only argument passed to a plugin is [`nuxtApp`](https://nuxt.com/docs/api/composables/use-nuxt-app).
```ts [plugins/hello.ts] twoslash
export default defineNuxtPlugin(nuxtApp => {
// Doing something with nuxtApp
})
```
### Object Syntax Plugins
It is also possible to define a plugin using an object syntax, for more advanced use cases. For example:
```ts [plugins/hello.ts] twoslash
export default defineNuxtPlugin({
name: 'my-plugin',
enforce: 'pre', // or 'post'
async setup (nuxtApp) {
// this is the equivalent of a normal functional plugin
},
hooks: {
// You can directly register Nuxt app runtime hooks here
'app:created'() {
const nuxtApp = useNuxtApp()
// do something in the hook
}
},
env: {
// Set this value to `false` if you don't want the plugin to run when rendering server-only or island components.
islands: true
}
})
```
::video-accordion
---
title: Watch a video from Alexander Lichter about the Object Syntax for Nuxt plugins
video-id: 2aXZyXB1QGQ
---
::
::note
If you are using the object-syntax, the properties are statically analyzed to produce a more optimized build. So you should not define them at runtime. :br
For example, setting `enforce: import.meta.server ? 'pre' : 'post'` would defeat any future optimization Nuxt is able to do for your plugins.
Nuxt does statically pre-load any hook listeners when using object-syntax, allowing you to define hooks without needing to worry about order of plugin registration.
::
## Registration Order
You can control the order in which plugins are registered by prefixing with 'alphabetical' numbering to the file names.
```bash [Directory structure]
plugins/
| - 01.myPlugin.ts
| - 02.myOtherPlugin.ts
```
In this example, `02.myOtherPlugin.ts` will be able to access anything that was injected by `01.myPlugin.ts`.
This is useful in situations where you have a plugin that depends on another plugin.
::note
In case you're new to 'alphabetical' numbering, remember that filenames are sorted as strings, not as numeric values. For example, `10.myPlugin.ts` would come before `2.myOtherPlugin.ts`. This is why the example prefixes single digit numbers with `0`.
::
## Loading Strategy
### Parallel Plugins
By default, Nuxt loads plugins sequentially. You can define a plugin as `parallel` so Nuxt won't wait until the end of the plugin's execution before loading the next plugin.
```ts [plugins/my-plugin.ts] twoslash
export default defineNuxtPlugin({
name: 'my-plugin',
parallel: true,
async setup (nuxtApp) {
// the next plugin will be executed immediately
}
})
```
### Plugins With Dependencies
If a plugin needs to wait for another plugin before it runs, you can add the plugin's name to the `dependsOn` array.
```ts [plugins/depending-on-my-plugin.ts] twoslash
export default defineNuxtPlugin({
name: 'depends-on-my-plugin',
dependsOn: ['my-plugin'],
async setup (nuxtApp) {
// this plugin will wait for the end of `my-plugin`'s execution before it runs
}
})
```
## Using Composables
You can use [composables](https://nuxt.com/docs/guide/directory-structure/composables) as well as [utils](https://nuxt.com/docs/guide/directory-structure/utils) within Nuxt plugins:
```ts [plugins/hello.ts]
export default defineNuxtPlugin((nuxtApp) => {
const foo = useFoo()
})
```
However, keep in mind there are some limitations and differences:
::important
**If a composable depends on another plugin registered later, it might not work.** :br
Plugins are called in order sequentially and before everything else. You might use a composable that depends on another plugin which has not been called yet.
::
::important
**If a composable depends on the Vue.js lifecycle, it won't work.** :br
Normally, Vue.js composables are bound to the current component instance while plugins are only bound to [`nuxtApp`](https://nuxt.com/docs/api/composables/use-nuxt-app) instance.
::
## Providing Helpers
If you would like to provide a helper on the [`NuxtApp`](https://nuxt.com/docs/api/composables/use-nuxt-app) instance, return it from the plugin under a `provide` key.
::code-group
```ts [plugins/hello.ts] twoslash
export default defineNuxtPlugin(() => {
return {
provide: {
hello: (msg: string) => `Hello ${msg}!`
}
}
})
```
```ts [plugins/hello-object-syntax.ts] twoslash
export default defineNuxtPlugin({
name: 'hello',
setup () {
return {
provide: {
hello: (msg: string) => `Hello ${msg}!`
}
}
}
})
```
::
You can then use the helper in your components:
```vue [components/Hello.vue]
<script setup lang="ts">
// alternatively, you can also use it here
const { $hello } = useNuxtApp()
</script>
<template>
<div>
{{ $hello('world') }}
</div>
</template>
```
::important
Note that we highly recommend using [`composables`](https://nuxt.com/docs/guide/directory-structure/composables) instead of providing helpers to avoid polluting the global namespace and keep your main bundle entry small.
::
::warning
**If your plugin provides a `ref` or `computed`, it will not be unwrapped in a component `<template>`.** :br
This is due to how Vue works with refs that aren't top-level to the template. You can read more about it [in the Vue documentation](https://vuejs.org/guide/essentials/reactivity-fundamentals.html#caveat-when-unwrapping-in-templates){rel="nofollow"}.
::
## Typing Plugins
If you return your helpers from the plugin, they will be typed automatically; you'll find them typed for the return of `useNuxtApp()` and within your templates.
::note
If you need to use a provided helper *within* another plugin, you can call [`useNuxtApp()`](https://nuxt.com/docs/api/composables/use-nuxt-app) to get the typed version. But in general, this should be avoided unless you are certain of the plugins' order.
::
For advanced use-cases, you can declare the type of injected properties like this:
```ts [index.d.ts]
declare module '#app' {
interface NuxtApp {
$hello (msg: string): string
}
}
declare module 'vue' {
interface ComponentCustomProperties {
$hello (msg: string): string
}
}
export {}
```
::note
If you are using WebStorm, you may need to augment `@vue/runtime-core` until [this issue](https://youtrack.jetbrains.com/issue/WEB-59818/VUE-TypeScript-WS-PS-does-not-correctly-display-type-of-globally-injected-properties){rel="nofollow"} is resolved.
::
## Vue Plugins
If you want to use Vue plugins, like [vue-gtag](https://github.com/MatteoGabriele/vue-gtag){rel="nofollow"} to add Google Analytics tags, you can use a Nuxt plugin to do so.
First, install the Vue plugin dependency:
::code-group{sync="pm"}
```bash [npm]
npm install --save-dev vue-gtag-next
```
```bash [yarn]
yarn add --dev vue-gtag-next
```
```bash [pnpm]
pnpm add -D vue-gtag-next
```
```bash [bun]
bun add -D vue-gtag-next
```
::
Then create a plugin file:
```ts [plugins/vue-gtag.client.ts]
import VueGtag, { trackRouter } from 'vue-gtag-next'
export default defineNuxtPlugin((nuxtApp) => {
nuxtApp.vueApp.use(VueGtag, {
property: {
id: 'GA_MEASUREMENT_ID'
}
})
trackRouter(useRouter())
})
```
## Vue Directives
Similarly, you can register a custom Vue directive in a plugin.
```ts [plugins/my-directive.ts] twoslash
export default defineNuxtPlugin((nuxtApp) => {
nuxtApp.vueApp.directive('focus', {
mounted (el) {
el.focus()
},
getSSRProps (binding, vnode) {
// you can provide SSR-specific props here
return {}
}
})
})
```
::warning
If you register a Vue directive, you *must* register it on both client and server side unless you are only using it when rendering one side. If the directive only makes sense from a client side, you can always move it to `~/plugins/my-directive.client.ts` and provide a 'stub' directive for the server in `~/plugins/my-directive.server.ts`.
::
::read-more
---
icon: i-simple-icons-vuedotjs
target: _blank
title: Custom Directives on Vue Docs
to: https://vuejs.org/guide/reusability/custom-directives.html
---
::
# public
Files contained within the `public/` directory are served at the root and are not modified by the build process. This is suitable for files that have to keep their names (e.g. `robots.txt`) *or* likely won't change (e.g. `favicon.ico`).
```bash [Directory structure]
-| public/
---| favicon.ico
---| og-image.png
---| robots.txt
```
```vue [app.vue]
<script setup lang="ts">
useSeoMeta({
ogImage: '/og-image.png'
})
</script>
```
::tip{target="_blank" to="https://v2.nuxt.com/docs/directory-structure/static"}
This is known as the [`static/`] directory in Nuxt 2.
::
# server
Nuxt automatically scans files inside these directories to register API and server handlers with Hot Module Replacement (HMR) support.
```bash [Directory structure]
-| server/
---| api/
-----| hello.ts # /api/hello
---| routes/
-----| bonjour.ts # /bonjour
---| middleware/
-----| log.ts # log all requests
```
Each file should export a default function defined with `defineEventHandler()` or `eventHandler()` (alias).
The handler can directly return JSON data, a `Promise`, or use `event.node.res.end()` to send a response.
```ts [server/api/hello.ts] twoslash
export default defineEventHandler((event) => {
return {
hello: 'world'
}
})
```
You can now universally call this API in your pages and components:
```vue [pages/index.vue]
<script setup lang="ts">
const { data } = await useFetch('/api/hello')
</script>
<template>
<pre>{{ data }}</pre>
</template>
```
## Server Routes
Files inside the `~/server/api` are automatically prefixed with `/api` in their route.
::video-accordion
---
platform: vimeo
title: Watch a video from Vue School on API routes
video-id: "761468863"
---
::
To add server routes without `/api` prefix, put them into `~/server/routes` directory.
**Example:**
```ts [server/routes/hello.ts]
export default defineEventHandler(() => 'Hello World!')
```
Given the example above, the `/hello` route will be accessible at <http://localhost:3000/hello>{rel="nofollow"}.
::note
Note that currently server routes do not support the full functionality of dynamic routes as [pages](https://nuxt.com/docs/guide/directory-structure/pages#dynamic-routes) do.
::
## Server Middleware
Nuxt will automatically read in any file in the `~/server/middleware` to create server middleware for your project.
Middleware handlers will run on every request before any other server route to add or check headers, log requests, or extend the event's request object.
::note
Middleware handlers should not return anything (nor close or respond to the request) and only inspect or extend the request context or throw an error.
::
**Examples:**
```ts [server/middleware/log.ts]
export default defineEventHandler((event) => {
console.log('New request: ' + getRequestURL(event))
})
```
```ts [server/middleware/auth.ts]
export default defineEventHandler((event) => {
event.context.auth = { user: 123 }
})
```
## Server Plugins
Nuxt will automatically read any files in the `~/server/plugins` directory and register them as Nitro plugins. This allows extending Nitro's runtime behavior and hooking into lifecycle events.
**Example:**
```ts [server/plugins/nitroPlugin.ts]
export default defineNitroPlugin((nitroApp) => {
console.log('Nitro plugin', nitroApp)
})
```
::read-more
---
target: _blank
title: Nitro Plugins
to: https://nitro.unjs.io/guide/plugins
---
::
## Server Utilities
Server routes are powered by [unjs/h3](https://github.com/unjs/h3){rel="nofollow"} which comes with a handy set of helpers.
::read-more
---
target: _blank
title: Available H3 Request Helpers
to: https://www.jsdocs.io/package/h3#package-index-functions
---
::
You can add more helpers yourself inside the `~/server/utils` directory.
For example, you can define a custom handler utility that wraps the original handler and performs additional operations before returning the final response.
**Example:**
```ts [server/utils/handler.ts]
import type { EventHandler, EventHandlerRequest } from 'h3'
export const defineWrappedResponseHandler = <T extends EventHandlerRequest, D> (
handler: EventHandler<T, D>
): EventHandler<T, D> =>
defineEventHandler<T>(async event => {
try {
// do something before the route handler
const response = await handler(event)
// do something after the route handler
return { response }
} catch (err) {
// Error handling
return { err }
}
})
```
## Server Types
::tip
This feature is available from Nuxt >= 3.5
::
To improve clarity within your IDE between the auto-imports from 'nitro' and 'vue', you can add a `~/server/tsconfig.json` with the following content:
```json [server/tsconfig.json]
{
"extends": "../.nuxt/tsconfig.server.json"
}
```
Currently, these values won't be respected when type checking ([`nuxi typecheck`](https://nuxt.com/docs/api/commands/typecheck)), but you should get better type hints in your IDE.
## Recipes
### Route Parameters
Server routes can use dynamic parameters within brackets in the file name like `/api/hello/[name].ts` and be accessed via `event.context.params`.
```ts [server/api/hello/[name\\].ts]
export default defineEventHandler((event) => {
const name = getRouterParam(event, 'name')
return `Hello, ${name}!`
})
```
::tip{to="https://h3.unjs.io/examples/validate-data#validate-params"}
Alternatively, use `getValidatedRouterParams` with a schema validator such as Zod for runtime and type safety.
::
You can now universally call this API on `/api/hello/nuxt` and get `Hello, nuxt!`.
### Matching HTTP Method
Handle file names can be suffixed with `.get`, `.post`, `.put`, `.delete`, ... to match request's [HTTP Method](https://developer.mozilla.org/en-US/docs/Web/HTTP/Methods){rel="nofollow"}.
```ts [server/api/test.get.ts]
export default defineEventHandler(() => 'Test get handler')
```
```ts [server/api/test.post.ts]
export default defineEventHandler(() => 'Test post handler')
```
Given the example above, fetching `/test` with:
- **GET** method: Returns `Test get handler`
- **POST** method: Returns `Test post handler`
- Any other method: Returns 405 error
You can also use `index.[method].ts` inside a directory for structuring your code differently, this is useful to create API namespaces.
::code-group
```ts [server/api/foo/index.get.ts]
export default defineEventHandler((event) => {
// handle GET requests for the `api/foo` endpoint
})
```
```ts [server/api/foo/index.post.ts]
export default defineEventHandler((event) => {
// handle POST requests for the `api/foo` endpoint
})
```
```ts [server/api/foo/bar.get.ts]
export default defineEventHandler((event) => {
// handle GET requests for the `api/foo/bar` endpoint
})
```
::
### Catch-all Route
Catch-all routes are helpful for fallback route handling.
For example, creating a file named `~/server/api/foo/[...].ts` will register a catch-all route for all requests that do not match any route handler, such as `/api/foo/bar/baz`.
```ts [server/api/foo/[...\\].ts]
export default defineEventHandler((event) => {
// event.context.path to get the route path: '/api/foo/bar/baz'
// event.context.params._ to get the route segment: 'bar/baz'
return `Default foo handler`
})
```
You can set a name for the catch-all route by using `~/server/api/foo/[...slug].ts` and access it via `event.context.params.slug`.
```ts [server/api/foo/[...slug\\].ts]
export default defineEventHandler((event) => {
// event.context.params.slug to get the route segment: 'bar/baz'
return `Default foo handler`
})
```
### Body Handling
```ts [server/api/submit.post.ts]
export default defineEventHandler(async (event) => {
const body = await readBody(event)
return { body }
})
```
::tip
---
to: https://unjs.io/blog/2023-08-15-h3-towards-the-edge-of-the-web#runtime-type-safe-request-utils
---
Alternatively, use `readValidatedBody` with a schema validator such as Zod for runtime and type safety.
::
You can now universally call this API using:
```vue [app.vue]
<script setup lang="ts">
async function submit() {
const { body } = await $fetch('/api/submit', {
method: 'post',
body: { test: 123 }
})
}
</script>
```
::note
We are using `submit.post.ts` in the filename only to match requests with `POST` method that can accept the request body. When using `readBody` within a GET request, `readBody` will throw a `405 Method Not Allowed` HTTP error.
::
### Query Parameters
Sample query `/api/query?foo=bar&baz=qux`
```ts [server/api/query.get.ts]
export default defineEventHandler((event) => {
const query = getQuery(event)
return { a: query.foo, b: query.baz }
})
```
::tip
---
to: https://unjs.io/blog/2023-08-15-h3-towards-the-edge-of-the-web#runtime-type-safe-request-utils
---
Alternatively, use `getValidatedQuery` with a schema validator such as Zod for runtime and type safety.
::
### Error Handling
If no errors are thrown, a status code of `200 OK` will be returned.
Any uncaught errors will return a `500 Internal Server Error` HTTP Error.
To return other error codes, throw an exception with [`createError`](https://nuxt.com/docs/api/utils/create-error):
```ts [server/api/validation/[id\\].ts]
export default defineEventHandler((event) => {
const id = parseInt(event.context.params.id) as number
if (!Number.isInteger(id)) {
throw createError({
statusCode: 400,
statusMessage: 'ID should be an integer',
})
}
return 'All good'
})
```
### Status Codes
To return other status codes, use the [`setResponseStatus`](https://nuxt.com/docs/api/utils/set-response-status) utility.
For example, to return `202 Accepted`
```ts [server/api/validation/[id\\].ts]
export default defineEventHandler((event) => {
setResponseStatus(event, 202)
})
```
### Runtime Config
::code-group
```ts [server/api/foo.ts]
export default defineEventHandler(async (event) => {
const config = useRuntimeConfig(event)
const repo = await $fetch('https://api.github.com/repos/nuxt/nuxt', {
headers: {
Authorization: `token ${config.githubToken}`
}
})
return repo
})
```
```ts [nuxt.config.ts]
export default defineNuxtConfig({
runtimeConfig: {
githubToken: ''
}
})
```
```ini [.env]
NUXT_GITHUB_TOKEN='<my-super-token>'
```
::
::note
Giving the `event` as argument to `useRuntimeConfig` is optional, but it is recommended to pass it to get the runtime config overwritten by [environment variables](https://nuxt.com/docs/guide/going-further/runtime-config#environment-variables) at runtime for server routes.
::
### Request Cookies
```ts [server/api/cookies.ts]
export default defineEventHandler((event) => {
const cookies = parseCookies(event)
return { cookies }
})
```
### Forwarding Context & Headers
By default, neither the headers from the incoming request nor the request context are forwarded when
making fetch requests in server routes. You can use `event.$fetch` to forward the request context and headers when making fetch requests in server routes.
```ts [server/api/forward.ts]
export default defineEventHandler((event) => {
return event.$fetch('/api/forwarded')
})
```
::note
Headers that are **not meant to be forwarded** will **not be included** in the request. These headers include, for example:
`transfer-encoding`, `connection`, `keep-alive`, `upgrade`, `expect`, `host`, `accept`
::
### Awaiting Promises After Response
When handling server requests, you might need to perform asynchronous tasks that shouldn't block the response to the client (for example, caching and logging). You can use `event.waitUntil` to await a promise in the background without delaying the response.
The `event.waitUntil` method accepts a promise that will be awaited before the handler terminates, ensuring the task is completed even if the server would otherwise terminate the handler right after the response is sent. This integrates with runtime providers to leverage their native capabilities for handling asynchronous operations after the response is sent.
```ts [server/api/background-task.ts]
const timeConsumingBackgroundTask = async () => {
await new Promise((resolve) => setTimeout(resolve, 1000))
};
export default eventHandler((event) => {
// schedule a background task without blocking the response
event.waitUntil(timeConsumingBackgroundTask())
// immediately send the response to the client
return 'done'
});
```
## Advanced Usage
### Nitro Config
You can use `nitro` key in `nuxt.config` to directly set [Nitro configuration](https://nitro.unjs.io/config){rel="nofollow"}.
::warning
This is an advanced option. Custom config can affect production deployments, as the configuration interface might change over time when Nitro is upgraded in semver-minor versions of Nuxt.
::
```ts [nuxt.config.ts]
export default defineNuxtConfig({
// https://nitro.unjs.io/config
nitro: {}
})
```
::read-more{to="https://nuxt.com/docs/guide/concepts/server-engine"}
::
### Nested Router
```ts [server/api/hello/[...slug\\].ts]
import { createRouter, defineEventHandler, useBase } from 'h3'
const router = createRouter()
router.get('/test', defineEventHandler(() => 'Hello World'))
export default useBase('/api/hello', router.handler)
```
### Sending Streams
::tip
This is an experimental feature and is available in all environments.
::
```ts [server/api/foo.get.ts]
import fs from 'node:fs'
import { sendStream } from 'h3'
export default defineEventHandler((event) => {
return sendStream(event, fs.createReadStream('/path/to/file'))
})
```
### Sending Redirect
```ts [server/api/foo.get.ts]
export default defineEventHandler(async (event) => {
await sendRedirect(event, '/path/redirect/to', 302)
})
```
### Legacy Handler or Middleware
```ts [server/api/legacy.ts]
export default fromNodeMiddleware((req, res) => {
res.end('Legacy handler')
})
```
::important
Legacy support is possible using [unjs/h3](https://github.com/unjs/h3){rel="nofollow"}, but it is advised to avoid legacy handlers as much as you can.
::
```ts [server/middleware/legacy.ts]
export default fromNodeMiddleware((req, res, next) => {
console.log('Legacy middleware')
next()
})
```
::warning
Never combine `next()` callback with a legacy middleware that is `async` or returns a `Promise`.
::
### Server Storage
Nitro provides a cross-platform [storage layer](https://nitro.unjs.io/guide/storage){rel="nofollow"}. In order to configure additional storage mount points, you can use `nitro.storage`, or [server plugins](https://nuxt.com/#server-plugins).
**Example of adding a Redis storage:**
Using `nitro.storage`:
```ts [nuxt.config.ts]
export default defineNuxtConfig({
nitro: {
storage: {
redis: {
driver: 'redis',
/* redis connector options */
port: 6379, // Redis port
host: "127.0.0.1", // Redis host
username: "", // needs Redis >= 6
password: "",
db: 0, // Defaults to 0
tls: {} // tls/ssl
}
}
}
})
```
Then in your API handler:
```ts [server/api/storage/test.ts]
export default defineEventHandler(async (event) => {
// List all keys with
const keys = await useStorage('redis').getKeys()
// Set a key with
await useStorage('redis').setItem('foo', 'bar')
// Remove a key with
await useStorage('redis').removeItem('foo')
return {}
})
```
::read-more{target="_blank" to="https://nitro.unjs.io/guide/storage"}
Read more about Nitro Storage Layer.
::
Alternatively, you can create a storage mount point using a server plugin and runtime config:
::code-group
```ts [server/plugins/storage.ts]
import redisDriver from 'unstorage/drivers/redis'
export default defineNitroPlugin(() => {
const storage = useStorage()
// Dynamically pass in credentials from runtime configuration, or other sources
const driver = redisDriver({
base: 'redis',
host: useRuntimeConfig().redis.host,
port: useRuntimeConfig().redis.port,
/* other redis connector options */
})
// Mount driver
storage.mount('redis', driver)
})
```
```ts [nuxt.config.ts]
export default defineNuxtConfig({
runtimeConfig: {
redis: { // Default values
host: '',
port: 0,
/* other redis connector options */
}
}
})
```
::
# shared
The `shared/` directory allows you to share code that can be used in both the Vue app and the Nitro server.
::note
The `shared/` directory is available in Nuxt v3.14+.
::
::important
Code in the `shared/` directory cannot import any Vue or Nitro code.
::
::warning
Auto-imports are not enabled by default in Nuxt v3 to prevent breaking changes in existing projects.
To use these auto-imported utils and types, you must first [set `future.compatibilityVersion: 4` in your `nuxt.config.ts`](https://nuxt.com/docs/getting-started/upgrade#opting-in-to-nuxt-4).
::
::video-accordion
---
title: Watch a video from Vue School on sharing utils and types between app and server
video-id: nnAR-MO3q5M
---
::
## Usage
**Method 1:** Named export
```ts [shared/utils/capitalize.ts] twoslash
export const capitalize = (input: string) => {
return input[0] ? input[0].toUpperCase() + input.slice(1) : ''
}
```
**Method 2:** Default export
```ts [shared/utils/capitalize.ts] twoslash
export default function (input: string) {
return input[0] ? input[0].toUpperCase() + input.slice(1) : ''
}
```
You can now use [auto-imported](https://nuxt.com/docs/guide/directory-structure/shared#auto-imports) utilities in your Nuxt app and `server/` directory.
```vue [app.vue]
<script setup lang="ts">
const hello = capitalize('hello')
</script>
<template>
<div>
{{ hello }}
</div>
</template>
```
```ts [server/api/hello.get.ts]
export default defineEventHandler((event) => {
return {
hello: capitalize('hello')
}
})
```
## How Files Are Scanned
Only files in the `shared/utils/` and `shared/types/` directories will be auto-imported. Files nested within subdirectories of these directories will not be auto-imported unless you add these directories to `imports.dirs` and `nitro.imports.dirs`.
::tip
The way `shared/utils` and `shared/types` auto-imports work and are scanned is identical to the [`composables/`](https://nuxt.com/docs/guide/directory-structure/composables) and [`utils/`](https://nuxt.com/docs/guide/directory-structure/utils) directories.
::
::read-more
---
to: https://nuxt.com/docs/guide/directory-structure/composables#how-files-are-scanned
---
::
```bash [Directory Structure]
-| shared/
---| capitalize.ts # Not auto-imported
---| formatters
-----| lower.ts # Not auto-imported
---| utils/
-----| lower.ts # Auto-imported
-----| formatters
-------| upper.ts # Not auto-imported
---| types/
-----| bar.d.ts # Auto-imported
```
Any other files you create in the `shared/` folder must be manually imported using the `#shared` alias (automatically configured by Nuxt):
```ts
// For files directly in the shared directory
import capitalize from '#shared/capitalize'
// For files in nested directories
import lower from '#shared/formatters/lower'
// For files nested in a folder within utils
import upper from '#shared/utils/formatters/upper'
```
This alias ensures consistent imports across your application, regardless of the importing file's location.
::read-more{to="https://nuxt.com/docs/guide/concepts/auto-imports"}
::
# utils
The main purpose of the [`utils/` directory](https://nuxt.com/docs/guide/directory-structure/utils) is to allow a semantic distinction between your Vue composables and other auto-imported utility functions.
## Usage
**Method 1:** Using named export
```ts [utils/index.ts] twoslash
export const { format: formatNumber } = Intl.NumberFormat('en-GB', {
notation: 'compact',
maximumFractionDigits: 1
})
```
**Method 2:** Using default export
```ts [utils/random-entry.ts or utils/randomEntry.ts] twoslash
// It will be available as randomEntry() (camelCase of file name without extension)
export default function (arr: Array<any>) {
return arr[Math.floor(Math.random() * arr.length)]
}
```
You can now use auto imported utility functions in `.js`, `.ts` and `.vue` files
```vue [app.vue]
<template>
<p>{{ formatNumber(1234) }}</p>
</template>
```
::read-more{to="https://nuxt.com/docs/guide/concepts/auto-imports"}
::
::link-example{to="https://nuxt.com/docs/examples/features/auto-imports"}
::
::tip
The way `utils/` auto-imports work and are scanned is identical to the [`composables/`](https://nuxt.com/docs/guide/directory-structure/composables) directory.
::
::important
These utils are only available within the Vue part of your app. :br
Only `server/utils` are auto-imported in the [`server/`](https://nuxt.com/docs/guide/directory-structure/server#server-utilities) directory.
::
# .env
::important
This file should be added to your [`.gitignore`](https://nuxt.com/docs/guide/directory-structure/gitignore) file to avoid pushing secrets to your repository.
::
## Dev, Build and Generate Time
Nuxt CLI has built-in [dotenv](https://github.com/motdotla/dotenv){rel="nofollow"} support in development mode and when running [`nuxi build`](https://nuxt.com/docs/api/commands/build) and [`nuxi generate`](https://nuxt.com/docs/api/commands/generate).
In addition to any process environment variables, if you have a `.env` file in your project root directory, it will be automatically loaded **at dev, build and generate time**. Any environment variables set there will be accessible within your `nuxt.config` file and modules.
```ini [.env]
MY_ENV_VARIABLE=hello
```
::note
Note that removing a variable from `.env` or removing the `.env` file entirely will not unset values that have already been set.
::
## Custom File
If you want to use a different file - for example, to use `.env.local` or `.env.production` - you can do so by passing the `--dotenv` flag when using `nuxi`.
```bash [Terminal]
npx nuxi dev --dotenv .env.local
```
When updating `.env` in development mode, the Nuxt instance is automatically restarted to apply new values to the `process.env`.
::important
In your application code, you should use [Runtime Config](https://nuxt.com/docs/guide/going-further/runtime-config) instead of plain env variables.
::
## Production
**After your server is built**, you are responsible for setting environment variables when you run the server.
Your `.env` files will not be read at this point. How you do this is different for every environment.
This design decision was made to ensure compatibility across various deployment environments, some of which may not have a traditional file system available, such as serverless platforms or edge networks like Cloudflare Workers.
Since `.env` files are not used in production, you must explicitly set environment variables using the tools and methods provided by your hosting environment. Here are some common approaches:
- You can pass the environment variables as arguments using the terminal:
:br
`$ DATABASE_HOST=mydatabaseconnectionstring node .output/server/index.mjs`
- You can set environment variables in shell configuration files like `.bashrc` or `.profile`.
- Many cloud service providers, such as Vercel, Netlify, and AWS, provide interfaces for setting environment variables via their dashboards, CLI tools or configuration files.
## Production Preview
For local production preview purpose, we recommend using [`nuxi preview`](https://nuxt.com/docs/api/commands/preview) since using this command, the `.env` file will be loaded into `process.env` for convenience. Note that this command requires dependencies to be installed in the package directory.
Or you could pass the environment variables as arguments using the terminal. For example, on Linux or macOS:
```bash [Terminal]
DATABASE_HOST=mydatabaseconnectionstring node .output/server/index.mjs
```
Note that for a purely static site, it is not possible to set runtime configuration config after your project is prerendered.
::read-more{to="https://nuxt.com/docs/guide/going-further/runtime-config"}
::
::note
If you want to use environment variables set at build time but do not care about updating these down the line (or only need to update them reactively *within* your app) then `appConfig` may be a better choice. You can define `appConfig` both within your `nuxt.config` (using environment variables) and also within an `~/app.config.ts` file in your project.
:::read-more{to="https://nuxt.com/docs/guide/directory-structure/app-config"}
:::
::
# .gitignore
A `.gitignore` file specifies intentionally untracked files that git should ignore.
::read-more
---
icon: i-simple-icons-git
target: _blank
title: the git documentation
to: https://git-scm.com/docs/gitignore
---
::
We recommend having a `.gitignore` file that has **at least** the following entries present:
```bash [.gitignore]
# Nuxt dev/build outputs
.output
.data
.nuxt
.nitro
.cache
dist
# Node dependencies
node_modules
# Logs
logs
*.log
# Misc
.DS_Store
# Local env files
.env
.env.*
!.env.example
```
# .nuxtignore
The `.nuxtignore` file tells Nuxt to ignore files in your project’s root directory ([`rootDir`](https://nuxt.com/docs/api/nuxt-config#rootdir)) during the build phase.
It is subject to the same specification as [`.gitignore`](https://nuxt.com/docs/guide/directory-structure/gitignore) and `.eslintignore` files, in which each line is a glob pattern indicating which files should be ignored.
::tip
You can also configure [`ignoreOptions`](https://nuxt.com/docs/api/nuxt-config#ignoreoptions), [`ignorePrefix`](https://nuxt.com/docs/api/nuxt-config#ignoreprefix) and [`ignore`](https://nuxt.com/docs/api/nuxt-config#ignore) in your `nuxt.config` file.
::
## Usage
```bash [.nuxtignore]
# ignore layout foo.vue
layouts/foo.vue
# ignore layout files whose name ends with -ignore.vue
layouts/*-ignore.vue
# ignore page bar.vue
pages/bar.vue
# ignore page inside ignore folder
pages/ignore/*.vue
# ignore route middleware files under foo folder except foo/bar.js
middleware/foo/*.js
!middleware/foo/bar.js
```
::read-more
---
icon: i-simple-icons-git
target: _blank
title: the git documentation
to: https://git-scm.com/docs/gitignore
---
More details about the spec are in the **gitignore documentation**.
::
# .nuxtrc
The `.nuxtrc` file can be used to configure Nuxt with a flat syntax. It is based on [`unjs/rc9`](https://github.com/unjs/rc9){rel="nofollow"}.
::tip
For more advanced configurations, use [`nuxt.config`](https://nuxt.com/docs/guide/directory-structure/nuxt-config).
::
## Usage
```bash [.nuxtrc]
# Disable SSR
ssr=false
# Configuration for `@nuxt/devtools`
devtools.enabled=true
# Add Nuxt modules
modules[]=@nuxt/image
modules[]=nuxt-security
```
If present, the properties in the `nuxt.config` file will overwrite the properties in `.nuxtrc` file.
::read-more{to="https://nuxt.com/docs/api/configuration/nuxt-config"}
Discover all the available options in the **Nuxt configuration** documentation.
::
## Global `.nuxtrc` File
You can also create a global `.nuxtrc` file in your home directory to apply configurations globally.
- On macOS/Linux, this file is located at:
```md
~/.nuxtrc
```
- On Windows, it is located at:
```md
C:\Users\{username}\.nuxtrc
```
This global `.nuxtrc` file allows you to define default settings that apply to all Nuxt projects on your system. However, project-level `.nuxtrc` files will override these global settings, and `nuxt.config` will take precedence over both.
# app.vue
::tip
If you have a `pages/` directory, the `app.vue` file is optional. Nuxt will automatically include a default `app.vue`, but you can still add your own to customize the structure and content as needed.
::
## Usage
### Minimal Usage
With Nuxt, the [`pages/`](https://nuxt.com/docs/guide/directory-structure/pages) directory is optional. If it is not present, Nuxt will not include the [vue-router](https://router.vuejs.org){rel="nofollow"} dependency. This is useful when building a landing page or an application that does not require routing.
```vue [app.vue]
<template>
<h1>Hello World!</h1>
</template>
```
::link-example{to="https://nuxt.com/docs/examples/hello-world"}
::
### Usage with Pages
When you have a [`pages/`](https://nuxt.com/docs/guide/directory-structure/pages) directory, you need to use the [`<NuxtPage>`](https://nuxt.com/docs/api/components/nuxt-page) component to display the current page:
```vue [app.vue]
<template>
<NuxtPage />
</template>
```
You can also define the common structure of your application directly in `app.vue`. This is useful when you want to include global elements such as a header or footer:
```vue [app.vue]
<template>
<header>
Header content
</header>
<NuxtPage />
<footer>
Footer content
</footer>
</template>
```
::note
Remember that `app.vue` acts as the main component of your Nuxt application. Anything you add to it (JS and CSS) will be global and included in every page.
::
::read-more{to="https://nuxt.com/docs/guide/directory-structure/pages"}
Learn more about how to structure your pages using the `pages/` directory.
::
### Usage with Layouts
When your application requires different layouts for different pages, you can use the `layouts/` directory with the [`<NuxtLayout>`](https://nuxt.com/docs/api/components/nuxt-layout) component. This allows you to define multiple layouts and apply them per page.
```vue [app.vue]
<template>
<NuxtLayout>
<NuxtPage />
</NuxtLayout>
</template>
```
::read-more{to="https://nuxt.com/docs/guide/directory-structure/layouts"}
Learn more about how to structure your layouts using the `layouts/` directory.
::
# app.config.ts
Nuxt provides an `app.config` config file to expose reactive configuration within your application with the ability to update it at runtime within lifecycle or using a nuxt plugin and editing it with HMR (hot-module-replacement).
You can easily provide runtime app configuration using `app.config.ts` file. It can have either of `.ts`, `.js`, or `.mjs` extensions.
```ts [app.config.ts] twoslash
export default defineAppConfig({
foo: 'bar'
})
```
::caution
Do not put any secret values inside `app.config` file. It is exposed to the user client bundle.
::
::note
When configuring a custom [`srcDir`](https://nuxt.com/docs/api/nuxt-config#srcdir), make sure to place the `app.config` file at the root of the new `srcDir` path.
::
## Usage
To expose config and environment variables to the rest of your app, you will need to define configuration in `app.config` file.
```ts [app.config.ts] twoslash
export default defineAppConfig({
theme: {
primaryColor: '#ababab'
}
})
```
We can now universally access `theme` both when server-rendering the page and in the browser using [`useAppConfig`](https://nuxt.com/docs/api/composables/use-app-config) composable.
```vue [pages/index.vue]
<script setup lang="ts">
const appConfig = useAppConfig()
console.log(appConfig.theme)
</script>
```
The [`updateAppConfig`](https://nuxt.com/docs/api/utils/update-app-config) utility can be used to update the `app.config` at runtime.
```vue [pages/index.vue]
<script setup>
const appConfig = useAppConfig() // { foo: 'bar' }
const newAppConfig = { foo: 'baz' }
updateAppConfig(newAppConfig)
console.log(appConfig) // { foo: 'baz' }
</script>
```
::read-more{to="https://nuxt.com/docs/api/utils/update-app-config"}
Read more about the `updateAppConfig` utility.
::
## Typing App Config
Nuxt tries to automatically generate a TypeScript interface from provided app config so you won't have to type it yourself.
However, there are some cases where you might want to type it yourself. There are two possible things you might want to type.
### App Config Input
`AppConfigInput` might be used by module authors who are declaring what valid *input* options are when setting app config. This will not affect the type of `useAppConfig()`.
```ts [index.d.ts]
declare module 'nuxt/schema' {
interface AppConfigInput {
/** Theme configuration */
theme?: {
/** Primary app color */
primaryColor?: string
}
}
}
// It is always important to ensure you import/export something when augmenting a type
export {}
```
### App Config Output
If you want to type the result of calling [`useAppConfig()`](https://nuxt.com/docs/api/composables/use-app-config), then you will want to extend `AppConfig`.
::warning
Be careful when typing `AppConfig` as you will overwrite the types Nuxt infers from your actually defined app config.
::
```ts [index.d.ts]
declare module 'nuxt/schema' {
interface AppConfig {
// This will entirely replace the existing inferred `theme` property
theme: {
// You might want to type this value to add more specific types than Nuxt can infer,
// such as string literal types
primaryColor?: 'red' | 'blue'
}
}
}
// It is always important to ensure you import/export something when augmenting a type
export {}
```
## Merging Strategy
Nuxt uses a custom merging strategy for the `AppConfig` within [the layers](https://nuxt.com/docs/getting-started/layers) of your application.
This strategy is implemented using a [Function Merger](https://github.com/unjs/defu#function-merger){rel="nofollow"}, which allows defining a custom merging strategy for every key in `app.config` that has an array as value.
::note
The function merger can only be used in the extended layers and not the main `app.config` in project.
::
Here's an example of how you can use:
::code-group
```ts [layer/app.config.ts] twoslash
export default defineAppConfig({
// Default array value
array: ['hello'],
})
```
```ts [app.config.ts] twoslash
export default defineAppConfig({
// Overwrite default array value by using a merger function
array: () => ['bonjour'],
})
```
::
## Known Limitations
As of Nuxt v3.3, the `app.config.ts` file is shared with Nitro, which results in the following limitations:
1. You cannot import Vue components directly in `app.config.ts`.
2. Some auto-imports are not available in the Nitro context.
These limitations occur because Nitro processes the app config without full Vue component support.
While it's possible to use Vite plugins in the Nitro config as a workaround, this approach is not recommended:
```ts [nuxt.config.ts]
export default defineNuxtConfig({
nitro: {
vite: {
plugins: [vue()]
}
}
})
```
::warning
Using this workaround may lead to unexpected behavior and bugs. The Vue plugin is one of many that are not available in the Nitro context.
::
Related issues:
- [Issue #19858](https://github.com/nuxt/nuxt/issues/19858){rel="nofollow"}
- [Issue #19854](https://github.com/nuxt/nuxt/issues/19854){rel="nofollow"}
::note
Nitro v3 will resolve these limitations by removing support for the app config.
You can track the progress in [this pull request](https://github.com/nitrojs/nitro/pull/2521){rel="nofollow"}.
::
# error.vue
During the lifespan of your application, some errors may appear unexpectedly at runtime. In such case, we can use the `error.vue` file to override the default error files and display the error nicely.
```vue [error.vue]
<script setup lang="ts">
import type { NuxtError } from '#app'
const props = defineProps({
error: Object as () => NuxtError
})
</script>
<template>
<div>
<h1>{{ error.statusCode }}</h1>
<NuxtLink to="/">Go back home</NuxtLink>
</div>
</template>
```
::note
Although it is called an 'error page' it's not a route and shouldn't be placed in your `~/pages` directory. For the same reason, you shouldn't use `definePageMeta` within this page. That being said, you can still use layouts in the error file, by utilizing the [`NuxtLayout`](https://nuxt.com/docs/api/components/nuxt-layout) component and specifying the name of the layout.
::
The error page has a single prop - `error` which contains an error for you to handle.
The `error` object provides the following fields:
```ts
{
statusCode: number
fatal: boolean
unhandled: boolean
statusMessage?: string
data?: unknown
cause?: unknown
}
```
If you have an error with custom fields they will be lost; you should assign them to `data` instead:
```ts
throw createError({
statusCode: 404,
statusMessage: 'Page Not Found',
data: {
myCustomField: true
}
})
```
# nuxt.config.ts
The `nuxt.config` file extension can either be `.js`, `.ts` or `.mjs`.
```ts [nuxt.config.ts] twoslash
export default defineNuxtConfig({
// My Nuxt config
})
```
::tip
`defineNuxtConfig` helper is globally available without import.
::
You can explicitly import `defineNuxtConfig` from `nuxt/config` if you prefer:
```ts [nuxt.config.ts] twoslash
import { defineNuxtConfig } from 'nuxt/config'
export default defineNuxtConfig({
// My Nuxt config
})
```
::read-more{to="https://nuxt.com/docs/api/configuration/nuxt-config"}
Discover all the available options in the **Nuxt configuration** documentation.
::
To ensure your configuration is up to date, Nuxt will make a full restart when detecting changes in the main configuration file, the [`.env`](https://nuxt.com/docs/guide/directory-structure/env), [`.nuxtignore`](https://nuxt.com/docs/guide/directory-structure/nuxtignore) and [`.nuxtrc`](https://nuxt.com/docs/guide/directory-structure/nuxtrc) dotfiles.
# package.json
The minimal `package.json` of your Nuxt application should looks like:
```json [package.json]
{
"name": "nuxt-app",
"private": true,
"type": "module",
"scripts": {
"build": "nuxt build",
"dev": "nuxt dev",
"generate": "nuxt generate",
"preview": "nuxt preview",
"postinstall": "nuxt prepare"
},
"dependencies": {
"nuxt": "latest",
"vue": "latest",
"vue-router": "latest"
}
}
```
::read-more
---
icon: i-simple-icons-npm
target: _blank
to: https://docs.npmjs.com/cli/configuring-npm/package-json
---
Read more about the `package.json` file.
::
# tsconfig.json
Nuxt [automatically generates](https://nuxt.com/docs/guide/concepts/typescript) a `.nuxt/tsconfig.json` file with the resolved aliases you are using in your Nuxt project, as well as with other sensible defaults.
You can benefit from this by creating a `tsconfig.json` in the root of your project with the following content:
```json [tsconfig.json]
{
"extends": "./.nuxt/tsconfig.json"
}
```
::note
As you need to, you can customize the contents of this file. However, it is recommended that you don't overwrite `target`, `module` and `moduleResolution`.
::
::note
If you need to customize your `paths`, this will override the auto-generated path aliases. Instead, we recommend that you add any path aliases you need to the [`alias`](https://nuxt.com/docs/api/nuxt-config#alias) property within your `nuxt.config`, where they will get picked up and added to the auto-generated `tsconfig`.
::
# Experimental Features
The Nuxt experimental features can be enabled in the Nuxt configuration file.
Internally, Nuxt uses `@nuxt/schema` to define these experimental features. You can refer to the [API documentation](https://nuxt.com/docs/api/configuration/nuxt-config#experimental) or the [source code](https://github.com/nuxt/nuxt/blob/main/packages/schema/src/config/experimental.ts){rel="nofollow"} for more information.
::note
Note that these features are experimental and could be removed or modified in the future.
::
## asyncContext
Enable native async context to be accessible for nested composables in Nuxt and in Nitro. This opens the possibility to use composables inside async composables and reduce the chance to get the `Nuxt instance is unavailable` error.
```ts [nuxt.config.ts] twoslash
export default defineNuxtConfig({
experimental: {
asyncContext: true
}
})
```
::read-more
---
icon: i-simple-icons-github
target: _blank
to: https://github.com/nuxt/nuxt/pull/20918
---
See full explanation on the GitHub pull-request.
::
## asyncEntry
Enables generation of an async entry point for the Vue bundle, aiding module federation support.
```ts [nuxt.config.ts] twoslash
export default defineNuxtConfig({
experimental: {
asyncEntry: true
}
})
```
## externalVue
Externalizes `vue`, `@vue/*` and `vue-router` when building.
*Enabled by default.*
```ts [nuxt.config.ts] twoslash
export default defineNuxtConfig({
experimental: {
externalVue: true
}
})
```
::warning
This feature will likely be removed in a near future.
::
## treeshakeClientOnly
Tree shakes contents of client-only components from server bundle.
*Enabled by default.*
```ts [nuxt.config.ts] twoslash
export default defineNuxtConfig({
experimental: {
treeshakeClientOnly: true
}
})
```
## emitRouteChunkError
Emits `app:chunkError` hook when there is an error loading vite/webpack chunks. Default behavior is to perform a reload of the new route on navigation to a new route when a chunk fails to load.
If you set this to `'automatic-immediate'` Nuxt will reload the current route immediatly, instead of waiting for a navigation. This is useful for chunk errors that are not triggered by navigation, e.g., when your Nuxt app fails to load a [lazy component](https://nuxt.com/docs/guide/directory-structure/components#dynamic-imports). A potential downside of this behavior is undesired reloads, e.g., when your app does not need the chunk that caused the error.
You can disable automatic handling by setting this to `false`, or handle chunk errors manually by setting it to `manual`.
```ts [nuxt.config.ts] twoslash
export default defineNuxtConfig({
experimental: {
emitRouteChunkError: 'automatic' // or 'automatic-immediate', 'manual' or false
}
})
```
## restoreState
Allows Nuxt app state to be restored from `sessionStorage` when reloading the page after a chunk error or manual [`reloadNuxtApp()`](https://nuxt.com/docs/api/utils/reload-nuxt-app) call.
To avoid hydration errors, it will be applied only after the Vue app has been mounted, meaning there may be a flicker on initial load.
::important
Consider carefully before enabling this as it can cause unexpected behavior,
and consider providing explicit keys to [`useState`](https://nuxt.com/docs/api/composables/use-state) as auto-generated keys may not match across builds.
::
```ts [nuxt.config.ts] twoslash
export default defineNuxtConfig({
experimental: {
restoreState: true
}
})
```
## inlineRouteRules
Define route rules at the page level using [`defineRouteRules`](https://nuxt.com/docs/api/utils/define-route-rules).
```ts [nuxt.config.ts] twoslash
export default defineNuxtConfig({
experimental: {
inlineRouteRules: true
}
})
```
Matching route rules will be created, based on the page's `path`.
::read-more
---
icon: i-lucide-square-function
to: https://nuxt.com/docs/api/utils/define-route-rules
---
Read more in `defineRouteRules` utility.
::
::read-more
---
icon: i-lucide-medal
to: https://nuxt.com/docs/guide/concepts/rendering#hybrid-rendering
---
::
## renderJsonPayloads
Allows rendering of JSON payloads with support for revivifying complex types.
*Enabled by default.*
```ts [nuxt.config.ts] twoslash
export default defineNuxtConfig({
experimental: {
renderJsonPayloads: true
}
})
```
## noVueServer
Disables Vue server renderer endpoint within Nitro.
```ts [nuxt.config.ts] twoslash
export default defineNuxtConfig({
experimental: {
noVueServer: true
}
})
```
## payloadExtraction
Enables extraction of payloads of pages generated with `nuxt generate`.
```ts [nuxt.config.ts] twoslash
export default defineNuxtConfig({
experimental: {
payloadExtraction: true
}
})
```
## clientFallback
Enables the experimental [`<NuxtClientFallback>`](https://nuxt.com/docs/api/components/nuxt-client-fallback) component for rendering content on the client if there's an error in SSR.
```ts [nuxt.config.ts] twoslash
export default defineNuxtConfig({
experimental: {
clientFallback: true
}
})
```
## crossOriginPrefetch
Enables cross-origin prefetch using the Speculation Rules API.
```ts [nuxt.config.ts] twoslash
export default defineNuxtConfig({
experimental: {
crossOriginPrefetch: true
}
})
```
::read-more
---
icon: i-simple-icons-w3c
target: _blank
to: https://wicg.github.io/nav-speculation/prefetch.html
---
Read more about the **Speculation Rules API**.
::
## viewTransition
Enables View Transition API integration with client-side router.
```ts [nuxt.config.ts] twoslash
export default defineNuxtConfig({
experimental: {
viewTransition: true
}
})
```
::link-example
---
target: _blank
to: https://stackblitz.com/edit/nuxt-view-transitions?file=app.vue
---
::
::read-more
---
icon: i-simple-icons-mdnwebdocs
target: _blank
to: https://developer.mozilla.org/en-US/docs/Web/API/View_Transitions_API
---
Read more about the **View Transition API**.
::
## writeEarlyHints
Enables writing of early hints when using node server.
```ts [nuxt.config.ts] twoslash
export default defineNuxtConfig({
experimental: {
writeEarlyHints: true
}
})
```
## componentIslands
Enables experimental component islands support with [`<NuxtIsland>`](https://nuxt.com/docs/api/components/nuxt-island) and `.island.vue` files.
```ts [nuxt.config.ts] twoslash
export default defineNuxtConfig({
experimental: {
componentIslands: true // false or 'local+remote'
}
})
```
::read-more
---
to: https://nuxt.com/docs/guide/directory-structure/components#server-components
---
::
::read-more
---
icon: i-simple-icons-github
target: _blank
to: https://github.com/nuxt/nuxt/issues/19772
---
You can follow the server components roadmap on GitHub.
::
## configSchema
Enables config schema support.
*Enabled by default.*
```ts [nuxt.config.ts] twoslash
export default defineNuxtConfig({
experimental: {
configSchema: true
}
})
```
## polyfillVueUseHead
Adds a compatibility layer for modules, plugins, or user code relying on the old `@vueuse/head` API.
```ts [nuxt.config.ts] twoslash
export default defineNuxtConfig({
experimental: {
polyfillVueUseHead: false
}
})
```
## respectNoSSRHeader
Allow disabling Nuxt SSR responses by setting the `x-nuxt-no-ssr` header.
```ts [nuxt.config.ts] twoslash
export default defineNuxtConfig({
experimental: {
respectNoSSRHeader: false
}
})
```
## localLayerAliases
Resolve `~`, `~~`, `@` and `@@` aliases located within layers with respect to their layer source and root directories.
*Enabled by default.*
```ts [nuxt.config.ts] twoslash
export default defineNuxtConfig({
experimental: {
localLayerAliases: true
}
})
```
## typedPages
Enable the new experimental typed router using [`unplugin-vue-router`](https://github.com/posva/unplugin-vue-router){rel="nofollow"}.
```ts [nuxt.config.ts] twoslash
export default defineNuxtConfig({
experimental: {
typedPages: true
}
})
```
Out of the box, this will enable typed usage of [`navigateTo`](https://nuxt.com/docs/api/utils/navigate-to), [`<NuxtLink>`](https://nuxt.com/docs/api/components/nuxt-link), [`router.push()`](https://nuxt.com/docs/api/composables/use-router) and more.
You can even get typed params within a page by using `const route = useRoute('route-name')`.
::important
If you use `pnpm` without `shamefully-hoist=true`, you will need to have `unplugin-vue-router` installed as a devDependency in order for this feature to work.
::
::video-accordion
---
title: Watch a video from Daniel Roe explaining type-safe routing in Nuxt
video-id: SXk-L19gTZk
---
::
## watcher
Set an alternative watcher that will be used as the watching service for Nuxt.
Nuxt uses `chokidar-granular` by default, which will ignore top-level directories
(like `node_modules` and `.git`) that are excluded from watching.
You can set this instead to `parcel` to use `@parcel/watcher`, which may improve
performance in large projects or on Windows platforms.
You can also set this to `chokidar` to watch all files in your source directory.
```ts [nuxt.config.ts] twoslash
export default defineNuxtConfig({
experimental: {
watcher: 'chokidar-granular' // 'chokidar' or 'parcel' are also options
}
})
```
## sharedPrerenderData
Enabling this feature automatically shares payload *data* between pages that are prerendered. This can result
in a significant performance improvement when prerendering sites that use `useAsyncData` or `useFetch` and
fetch the same data in different pages.
```ts [nuxt.config.ts] twoslash
export default defineNuxtConfig({
experimental: {
sharedPrerenderData: true
}
})
```
::video-accordion
---
title: Watch a video from Alexander Lichter about the experimental sharedPrerenderData
video-id: 1jUupYHVvrU
---
::
It is particularly important when enabling this feature to make sure that any unique key of your data
is always resolvable to the same data. For example, if you are using `useAsyncData` to fetch
data related to a particular page, you should provide a key that uniquely matches that data. (`useFetch`
should do this automatically for you.)
```ts
// This would be unsafe in a dynamic page (e.g. `[slug].vue`) because the route slug makes a difference
// to the data fetched, but Nuxt can't know that because it's not reflected in the key.
const route = useRoute()
const { data } = await useAsyncData(async () => {
return await $fetch(`/api/my-page/${route.params.slug}`)
})
// Instead, you should use a key that uniquely identifies the data fetched.
const { data } = await useAsyncData(route.params.slug, async () => {
return await $fetch(`/api/my-page/${route.params.slug}`)
})
```
## clientNodeCompat
With this feature, Nuxt will automatically polyfill Node.js imports in the client build using [`unenv`](https://github.com/unjs/unenv){rel="nofollow"}.
::note
To make globals like `Buffer` work in the browser, you need to manually inject them.
```ts
import { Buffer } from 'node:buffer'
globalThis.Buffer = globalThis.Buffer || Buffer
```
::
## scanPageMeta
This option allows exposing some route metadata defined in `definePageMeta` at build-time to modules (specifically `alias`, `name`, `path`, `redirect`, `props` and `middleware`).
This only works with static or strings/arrays rather than variables or conditional assignment. See [original issue](https://github.com/nuxt/nuxt/issues/24770){rel="nofollow"} for more information and context.
It is also possible to scan page metadata only after all routes have been registered in `pages:extend`. Then another hook, `pages:resolved` will be called. To enable this behavior, set `scanPageMeta: 'after-resolve'`.
You can disable this feature if it causes issues in your project.
```ts [nuxt.config.ts] twoslash
export default defineNuxtConfig({
experimental: {
scanPageMeta: false
}
})
```
## cookieStore
Enables CookieStore support to listen for cookie updates (if supported by the browser) and refresh `useCookie` ref values.
```ts [nuxt.config.ts] twoslash
export default defineNuxtConfig({
experimental: {
cookieStore: true
}
})
```
::read-more
---
icon: i-simple-icons-mdnwebdocs
target: _blank
to: https://developer.mozilla.org/en-US/docs/Web/API/CookieStore
---
Read more about the **CookieStore**.
::
## buildCache
Caches Nuxt build artifacts based on a hash of the configuration and source files.
```ts [nuxt.config.ts] twoslash
export default defineNuxtConfig({
experimental: {
buildCache: true
}
})
```
When enabled, changes to the following files will trigger a full rebuild:
```bash [Directory structure]
.nuxtrc
.npmrc
package.json
package-lock.json
yarn.lock
pnpm-lock.yaml
tsconfig.json
bun.lockb
```
In addition, any changes to files within `srcDir` will trigger a rebuild of the Vue client/server bundle. Nitro will always be rebuilt (though work is in progress to allow Nitro to announce its cacheable artifacts and their hashes).
::note
A maximum of 10 cache tarballs are kept.
::
## extraPageMetaExtractionKeys
The `definePageMeta()` macro is a useful way to collect build-time meta about pages. Nuxt itself provides a set list of supported keys which is used to power some of the internal features such as redirects, page aliases and custom paths.
This option allows passing additional keys to extract from the page metadata when using `scanPageMeta`.
```vue
<script lang="ts" setup>
definePageMeta({
foo: 'bar'
})
</script>
```
```ts
export default defineNuxtConfig({
experimental: {
extraPageMetaExtractionKeys: ['foo'],
},
hooks: {
'pages:resolved' (ctx) {
// ✅ foo is available
},
},
})
```
This allows modules to access additional metadata from the page metadata in the build context. If you are using this within a module, it's recommended also to [augment the `NuxtPage` types with your keys](https://nuxt.com/docs/guide/directory-structure/pages#typing-custom-metadata).
## normalizeComponentNames
Ensure that auto-generated Vue component names match the full component name
you would use to auto-import the component.
```ts [nuxt.config.ts] twoslash
export default defineNuxtConfig({
experimental: {
normalizeComponentNames: true
}
})
```
By default, if you haven't set it manually, Vue will assign a component name that matches
the filename of the component.
```bash [Directory structure]
├─ components/
├─── SomeFolder/
├───── MyComponent.vue
```
In this case, the component name would be `MyComponent`, as far as Vue is concerned. If you wanted to use `<KeepAlive>` with it, or identify it in the Vue DevTools, you would need to use this component.
But in order to auto-import it, you would need to use `SomeFolderMyComponent`.
By setting `experimental.normalizeComponentNames`, these two values match, and Vue will generate a component name that matches the Nuxt pattern for component naming.
## spaLoadingTemplateLocation
When rendering a client-only page (with `ssr: false`), we optionally render a loading screen (from `app/spa-loading-template.html`).
It can be set to `within`, which will render it like this:
```html
<div id="__nuxt">
<!-- spa loading template -->
</div>
```
Alternatively, you can render the template alongside the Nuxt app root by setting it to `body`:
```html
<div id="__nuxt"></div>
<!-- spa loading template -->
```
This avoids a white flash when hydrating a client-only page.
## browserDevtoolsTiming
Enables performance markers for Nuxt hooks in browser devtools. This adds performance markers that you can track in the Performance tab of Chromium-based browsers, which is useful for debugging and optimizing performance.
This is enabled by default in development mode. If you need to disable this feature, it is possible to do so:
```ts [nuxt.config.ts] twoslash
export default defineNuxtConfig({
experimental: {
browserDevtoolsTiming: false
}
})
```
::read-more
---
color: gray
icon: i-simple-icons-github
target: _blank
to: https://github.com/nuxt/nuxt/pull/29922
---
See PR #29922 for implementation details.
::
::read-more
---
color: gray
icon: i-simple-icons-googlechrome
target: _blank
to: https://developer.chrome.com/docs/devtools/performance/extension#tracks
---
Learn more about Chrome DevTools Performance API.
::
## debugModuleMutation
Records mutations to `nuxt.options` in module context, helping to debug configuration changes made by modules during the Nuxt initialization phase.
This is enabled by default when `debug` mode is enabled. If you need to disable this feature, it is possible to do so:
To enable it explicitly:
```ts [nuxt.config.ts] twoslash
export default defineNuxtConfig({
experimental: {
debugModuleMutation: true
}
})
```
::read-more
---
color: gray
icon: i-simple-icons-github
target: _blank
to: https://github.com/nuxt/nuxt/pull/30555
---
See PR #30555 for implementation details.
::
## lazyHydration
This enables hydration strategies for `<Lazy>` components, which improves performance by deferring hydration of components until they're needed.
Lazy hydration is enabled by default, but you can disable this feature:
```ts [nuxt.config.ts] twoslash
export default defineNuxtConfig({
experimental: {
lazyHydration: false
}
})
```
::read-more
---
color: gray
icon: i-simple-icons-github
to: https://nuxt.com/docs/guide/directory-structure/components#delayed-or-lazy-hydration
---
Read more about lazy hydration.
::
## templateImportResolution
Controls how imports in Nuxt templates are resolved. By default, Nuxt attempts to resolve imports in templates relative to the module that added them.
This is enabled by default, so if you're experiencing resolution conflicts in certain environments, you can disable this behavior:
```ts [nuxt.config.ts] twoslash
export default defineNuxtConfig({
experimental: {
templateImportResolution: false
}
})
```
::read-more
---
color: gray
icon: i-simple-icons-github
target: _blank
to: https://github.com/nuxt/nuxt/pull/31175
---
See PR #31175 for implementation details.
::
## decorators
This option enables enabling decorator syntax across your entire Nuxt/Nitro app, powered by [esbuild](https://github.com/evanw/esbuild/releases/tag/v0.21.3){rel="nofollow"}.
For a long time, TypeScript has had support for decorators via `compilerOptions.experimentalDecorators`. This implementation predated the TC39 standardization process. Now, decorators are a [Stage 3 Proposal](https://github.com/tc39/proposal-decorators){rel="nofollow"}, and supported without special configuration in TS 5.0+ (see <https://github.com/microsoft/TypeScript/pull/52582>{rel="nofollow"} and <https://devblogs.microsoft.com/typescript/announcing-typescript-5-0-beta/#decorators>{rel="nofollow"}).
Enabling `experimental.decorators` enables support for the TC39 proposal, **NOT** for TypeScript's previous `compilerOptions.experimentalDecorators` implementation.
::warning
Note that there may be changes before this finally lands in the JS standard.
::
### Usage
```ts [nuxt.config.ts] twoslash
export default defineNuxtConfig({
experimental: {
decorators: true,
},
})
```
```ts [app.vue]
function something (_method: () => unknown) {
return () => 'decorated'
}
class SomeClass {
@something
public someMethod () {
return 'initial'
}
}
const value = new SomeClass().someMethod()
// this will return 'decorated'
```
## purgeCachedData
Nuxt will automatically purge cached data from `useAsyncData` and `nuxtApp.static.data`. This helps prevent memory leaks
and ensures fresh data is loaded when needed, but it is possible to disable it:
```ts [nuxt.config.ts] twoslash
export default defineNuxtConfig({
experimental: {
purgeCachedData: false
}
})
```
::read-more
---
color: gray
icon: i-simple-icons-github
target: _blank
to: https://github.com/nuxt/nuxt/pull/31379
---
See PR #31379 for implementation details.
::
## granularCachedData
Whether to call and use the result from `getCachedData` when refreshing data for `useAsyncData` and `useFetch` (whether by `watch`, `refreshNuxtData()`, or a manual `refresh()` call.
```ts [nuxt.config.ts] twoslash
export default defineNuxtConfig({
experimental: {
granularCachedData: true
}
})
```
::read-more
---
color: gray
icon: i-simple-icons-github
target: _blank
to: https://github.com/nuxt/nuxt/pull/31373
---
See PR #31373 for implementation details.
::
# Features
Some features of Nuxt are available on an opt-in basis, or can be disabled based on your needs.
## `features`
### inlineStyles
Inlines styles when rendering HTML. This is currently available only when using Vite.
You can also pass a function that receives the path of a Vue component and returns a boolean indicating whether to inline the styles for that component.
```ts [nuxt.config.ts]
export default defineNuxtConfig({
features: {
inlineStyles: false // or a function to determine inlining
}
})
```
### noScripts
Disables rendering of Nuxt scripts and JS resource hints. Can also be configured granularly within `routeRules`.
```ts [nuxt.config.ts]
export default defineNuxtConfig({
features: {
noScripts: true
}
})
```
## `future`
There is also a `future` namespace for early opting-in to new features that will become default in a future (possibly major) version of the framework.
### compatibilityVersion
::important
This configuration option is available in Nuxt v3.12+. Please note, that for now, you need to define the compatibility version in each layer that opts into Nuxt 4 behavior. This will not be required after Nuxt 4 is released.
::
This enables early access to Nuxt features or flags.
Setting `compatibilityVersion` to `4` changes defaults throughout your
Nuxt configuration to opt-in to Nuxt v4 behaviour, but you can granularly re-enable Nuxt v3 behaviour
when testing (see example). Please file issues if so, so that we can
address in Nuxt or in the ecosystem.
```ts
export default defineNuxtConfig({
future: {
compatibilityVersion: 4,
},
// To re-enable _all_ Nuxt v3 behaviour, set the following options:
srcDir: '.',
dir: {
app: 'app'
},
experimental: {
scanPageMeta: 'after-resolve',
sharedPrerenderData: false,
compileTemplate: true,
resetAsyncDataToUndefined: true,
templateUtils: true,
relativeWatchPaths: true,
normalizeComponentNames: false
defaults: {
useAsyncData: {
deep: true
}
}
},
features: {
inlineStyles: true
},
unhead: {
renderSSRHeadOptions: {
omitLineBreaks: false
}
}
})
```
### typescriptBundlerResolution
This enables 'Bundler' module resolution mode for TypeScript, which is the recommended setting
for frameworks like Nuxt and [Vite](https://vite.dev/guide/performance.html#reduce-resolve-operations){rel="nofollow"}.
It improves type support when using modern libraries with `exports`.
See [the original TypeScript pull request](https://github.com/microsoft/TypeScript/pull/51669){rel="nofollow"}.
```ts [nuxt.config.ts]
export default defineNuxtConfig({
future: {
typescriptBundlerResolution: true
}
})
```
# How Nuxt Works?
This guide helps you better understand Nuxt internals to develop new solutions and module integrations on top of Nuxt.
## The Nuxt Interface
When you start Nuxt in development mode with [`nuxi dev`](https://nuxt.com/docs/api/commands/dev) or building a production application with [`nuxi build`](https://nuxt.com/docs/api/commands/build),
a common context will be created, referred to as `nuxt` internally. It holds normalized options merged with `nuxt.config` file,
some internal state, and a powerful [hooking system](https://nuxt.com/docs/api/advanced/hooks) powered by [unjs/hookable](https://github.com/unjs/hookable){rel="nofollow"}
allowing different components to communicate with each other. You can think of it as **Builder Core**.
This context is globally available to be used with [Nuxt Kit](https://nuxt.com/docs/guide/going-further/kit) composables.
Therefore only one instance of Nuxt is allowed to run per process.
To extend the Nuxt interface and hook into different stages of the build process, we can use [Nuxt Modules](https://nuxt.com/docs/guide/going-further/modules).
For more details, check out [the source code](https://github.com/nuxt/nuxt/blob/main/packages/nuxt/src/core/nuxt.ts){rel="nofollow"}.
## The NuxtApp Interface
When rendering a page in the browser or on the server, a shared context will be created, referred to as `nuxtApp`.
This context keeps vue instance, runtime hooks, and internal states like ssrContext and payload for hydration.
You can think of it as **Runtime Core**.
This context can be accessed using [`useNuxtApp()`](https://nuxt.com/docs/api/composables/use-nuxt-app) composable within Nuxt plugins and `<script setup>` and vue composables.
Global usage is possible for the browser but not on the server, to avoid sharing context between users.
Since [`useNuxtApp`](https://nuxt.com/docs/api/composables/use-nuxt-app) throws an exception if context is currently unavailable, if your composable does not always require `nuxtApp`, you can use [`tryUseNuxtApp`](https://nuxt.com/docs/api/composables/use-nuxt-app#tryusenuxtapp) instead, which will return `null` instead of throwing an exception.
To extend the `nuxtApp` interface and hook into different stages or access contexts, we can use [Nuxt Plugins](https://nuxt.com/docs/guide/directory-structure/plugins).
Check [Nuxt App](https://nuxt.com/docs/api/composables/use-nuxt-app) for more information about this interface.
`nuxtApp` has the following properties:
```js
const nuxtApp = {
vueApp, // the global Vue application: https://vuejs.org/api/application.html#application-api
versions, // an object containing Nuxt and Vue versions
// These let you call and add runtime NuxtApp hooks
// https://github.com/nuxt/nuxt/blob/main/packages/nuxt/src/app/nuxt.ts#L18
hooks,
hook,
callHook,
// Only accessible on server-side
ssrContext: {
url,
req,
res,
runtimeConfig,
noSSR,
},
// This will be stringified and passed from server to client
payload: {
serverRendered: true,
data: {},
state: {}
}
provide: (name: string, value: any) => void
}
```
For more details, check out [the source code](https://github.com/nuxt/nuxt/blob/main/packages/nuxt/src/app/nuxt.ts){rel="nofollow"}.
## Runtime Context vs. Build Context
Nuxt builds and bundles project using Node.js but also has a runtime side.
While both areas can be extended, that runtime context is isolated from build-time. Therefore, they are not supposed to share state, code, or context other than runtime configuration!
`nuxt.config` and [Nuxt Modules](https://nuxt.com/docs/guide/going-further/modules) can be used to extend the build context, and [Nuxt Plugins](https://nuxt.com/docs/guide/directory-structure/plugins) can be used to extend runtime.
When building an application for production, `nuxi build` will generate a standalone build in the `.output` directory, independent of `nuxt.config` and [Nuxt modules](https://nuxt.com/docs/guide/going-further/modules).
# Runtime Config
## Exposing
To expose config and environment variables to the rest of your app, you will need to define runtime configuration in your [`nuxt.config`](https://nuxt.com/docs/guide/directory-structure/nuxt-config) file, using the [`runtimeConfig`](https://nuxt.com/docs/api/nuxt-config#runtimeconfig) option.
```ts [nuxt.config.ts]
export default defineNuxtConfig({
runtimeConfig: {
// The private keys which are only available within server-side
apiSecret: '123',
// Keys within public, will be also exposed to the client-side
public: {
apiBase: '/api'
}
}
})
```
When adding `apiBase` to the `runtimeConfig.public`, Nuxt adds it to each page payload. We can universally access `apiBase` in both server and browser.
```ts
const runtimeConfig = useRuntimeConfig()
console.log(runtimeConfig.apiSecret)
console.log(runtimeConfig.public.apiBase)
```
::tip
Public runtime config is accessible in Vue templates with `$config.public`.
::
### Serialization
Your runtime config will be serialized before being passed to Nitro. This means that anything that cannot be serialized and then deserialized (such as functions, Sets, Maps, and so on), should not be set in your `nuxt.config`.
Instead of passing non-serializable objects or functions into your application from your `nuxt.config`, you can place this code in a Nuxt or Nitro plugin or middleware.
### Environment Variables
The most common way to provide configuration is by using [Environment Variables](https://medium.com/chingu/an-introduction-to-environment-variables-and-how-to-use-them-f602f66d15fa){rel="nofollow"}.
::note
Nuxi CLI has built-in support for reading your `.env` file in development, build and generate. But when you run your built server, **your `.env` file will not be read**.
:::read-more{to="https://nuxt.com/docs/guide/directory-structure/env"}
:::
::
Runtime config values are **automatically replaced by matching environment variables at runtime**.
There are two key requirements:
1. Your desired variables must be defined in your `nuxt.config`. This ensures that arbitrary environment variables are not exposed to your application code.
2. Only a specially-named environment variable can override a runtime config property. That is, an uppercase environment variable starting with `NUXT_` which uses `_` to separate keys and case changes.
::warning
Setting the default of `runtimeConfig` values to *differently named environment variables* (for example setting `myVar` to `process.env.OTHER_VARIABLE`) will only work during build-time and will break on runtime.
It is advised to use environment variables that match the structure of your `runtimeConfig` object.
::
::tip{icon="i-lucide-video" target="_blank" to="https://youtu.be/_FYV5WfiWvs"}
Watch a video from Alexander Lichter showcasing the top mistake developers make using runtimeConfig.
::
#### Example
```ini [.env]
NUXT_API_SECRET=api_secret_token
NUXT_PUBLIC_API_BASE=https://nuxtjs.org
```
```ts [nuxt.config.ts]
export default defineNuxtConfig({
runtimeConfig: {
apiSecret: '', // can be overridden by NUXT_API_SECRET environment variable
public: {
apiBase: '', // can be overridden by NUXT_PUBLIC_API_BASE environment variable
}
},
})
```
## Reading
### Vue App
Within the Vue part of your Nuxt app, you will need to call [`useRuntimeConfig()`](https://nuxt.com/docs/api/composables/use-runtime-config) to access the runtime config.
::important
The behavior is different between the client-side and server-side:
- On client-side, only keys in `runtimeConfig.public` and `runtimeConfig.app` (which is used by Nuxt internally) are available, and the object is both writable and reactive.
- On server-side, the entire runtime config is available, but it is read-only to avoid context sharing.
::
```vue [pages/index.vue]
<script setup lang="ts">
const config = useRuntimeConfig()
console.log('Runtime config:', config)
if (import.meta.server) {
console.log('API secret:', config.apiSecret)
}
</script>
<template>
<div>
<div>Check developer console!</div>
</div>
</template>
```
::caution
**Security note:** Be careful not to expose runtime config keys to the client-side by either rendering them or passing them to `useState`.
::
### Plugins
If you want to use the runtime config within any (custom) plugin, you can use [`useRuntimeConfig()`](https://nuxt.com/docs/api/composables/use-runtime-config) inside of your `defineNuxtPlugin` function.
```ts [plugins/config.ts]
export default defineNuxtPlugin((nuxtApp) => {
const config = useRuntimeConfig()
console.log('API base URL:', config.public.apiBase)
});
```
### Server Routes
You can access runtime config within the server routes as well using `useRuntimeConfig`.
```ts [server/api/test.ts]
export default defineEventHandler(async (event) => {
const { apiSecret } = useRuntimeConfig(event)
const result = await $fetch('https://my.api.com/test', {
headers: {
Authorization: `Bearer ${apiSecret}`
}
})
return result
})
```
::note
Giving the `event` as argument to `useRuntimeConfig` is optional, but it is recommended to pass it to get the runtime config overwritten by [environment variables](https://nuxt.com/docs/guide/going-further/runtime-config#environment-variables) at runtime for server routes.
::
## Typing Runtime Config
Nuxt tries to automatically generate a typescript interface from provided runtime config using [unjs/untyped](https://github.com/unjs/untyped){rel="nofollow"}.
But it is also possible to type your runtime config manually:
```ts [index.d.ts]
declare module 'nuxt/schema' {
interface RuntimeConfig {
apiSecret: string
}
interface PublicRuntimeConfig {
apiBase: string
}
}
// It is always important to ensure you import/export something when augmenting a type
export {}
```
::note
`nuxt/schema` is provided as a convenience for end-users to access the version of the schema used by Nuxt in their project. Module authors should instead augment `@nuxt/schema`.
::
# Nightly Release Channel
Nuxt lands commits, improvements, and bug fixes every day. You can opt in to test them earlier before the next release.
After a commit is merged into the `main` branch of [nuxt/nuxt](https://github.com/nuxt/nuxt){rel="nofollow"} and **passes all tests**, we trigger an automated npm release, using GitHub Actions.
You can use these 'nightly' releases to beta test new features and changes.
The build and publishing method and quality of these 'nightly' releases are the same as stable ones. The only difference is that you should often check the GitHub repository for updates. There is a slight chance of regressions not being caught during the review process and by the automated tests. Therefore, we internally use this channel to double-check everything before each release.
::note
Features that are only available on the nightly release channel are marked with an alert in the documentation.
::
::warning
The `latest` nightly release channel is currently tracking the Nuxt v4 branch, meaning that it is particularly likely to have breaking changes right now - be careful!
You can opt in to the 3.x branch nightly releases with `"nuxt": "npm:nuxt-nightly@3x"`.
::
## Opting In
Update `nuxt` dependency inside `package.json`:
```diff [package.json]
{
"devDependencies": {
-- "nuxt": "^3.0.0"
++ "nuxt": "npm:nuxt-nightly@3x"
}
}
```
Remove lockfile (`package-lock.json`, `yarn.lock`, `pnpm-lock.yaml`, or `bun.lockb`) and reinstall dependencies.
## Opting Out
Update `nuxt` dependency inside `package.json`:
```diff [package.json]
{
"devDependencies": {
-- "nuxt": "npm:nuxt-nightly@3x"
++ "nuxt": "^3.0.0"
}
}
```
Remove lockfile (`package-lock.json`, `yarn.lock`, `pnpm-lock.yaml`, or `bun.lockb`) and reinstall dependencies.
## Using Nightly `nuxi`
::note
All cli dependencies are bundled because of the building method for reducing `nuxi` package size. :br You can get dependency updates and CLI improvements using the nightly release channel.
::
To try the latest version of [nuxt/cli](https://github.com/nuxt/cli){rel="nofollow"}:
```bash [Terminal]
npx nuxi-nightly@latest [command]
```
::read-more{to="https://nuxt.com/docs/api/commands"}
Read more about the available commands.
::
# Lifecycle Hooks
::tip
The hooking system is powered by [unjs/hookable](https://github.com/unjs/hookable){rel="nofollow"}.
::
## Nuxt Hooks (Build Time)
These hooks are available for [Nuxt Modules](https://nuxt.com/docs/guide/going-further/modules) and build context.
### Within `nuxt.config.ts`
```js [nuxt.config.ts]
export default defineNuxtConfig({
hooks: {
close: () => { }
}
})
```
### Within Nuxt Modules
```js
import { defineNuxtModule } from '@nuxt/kit'
export default defineNuxtModule({
setup (options, nuxt) {
nuxt.hook('close', async () => { })
}
})
```
::read-more{to="https://nuxt.com/docs/api/advanced/hooks#nuxt-hooks-build-time"}
Explore all available Nuxt hooks.
::
## App Hooks (Runtime)
App hooks can be mainly used by [Nuxt Plugins](https://nuxt.com/docs/guide/directory-structure/plugins) to hook into rendering lifecycle but could also be used in Vue composables.
```js [plugins/test.ts]
export default defineNuxtPlugin((nuxtApp) => {
nuxtApp.hook('page:start', () => {
/* your code goes here */
})
})
```
::read-more{to="https://nuxt.com/docs/api/advanced/hooks#app-hooks-runtime"}
Explore all available App hooks.
::
## Server Hooks (Runtime)
These hooks are available for [server plugins](https://nuxt.com/docs/guide/directory-structure/server#server-plugins) to hook into Nitro's runtime behavior.
```js [~/server/plugins/test.ts]
export default defineNitroPlugin((nitroApp) => {
nitroApp.hooks.hook('render:html', (html, { event }) => {
console.log('render:html', html)
html.bodyAppend.push('<hr>Appended by custom plugin')
})
nitroApp.hooks.hook('render:response', (response, { event }) => {
console.log('render:response', response)
})
})
```
::read-more
---
to: https://nuxt.com/docs/api/advanced/hooks#nitro-app-hooks-runtime-server-side
---
Learn more about available Nitro lifecycle hooks.
::
## Additional Hooks
You can add additional hooks by augmenting the types provided by Nuxt. This can be useful for modules.
```ts
import { HookResult } from "@nuxt/schema";
declare module '#app' {
interface RuntimeNuxtHooks {
'your-nuxt-runtime-hook': () => HookResult
}
interface NuxtHooks {
'your-nuxt-hook': () => HookResult
}
}
declare module 'nitropack' {
interface NitroRuntimeHooks {
'your-nitro-hook': () => void;
}
}
```
# Module Author Guide
Nuxt's [configuration](https://nuxt.com/docs/api/nuxt-config) and [hooks](https://nuxt.com/docs/guide/going-further/hooks) systems make it possible to customize every aspect of Nuxt and add any integration you might need (Vue plugins, CMS, server routes, components, logging, etc.).
**Nuxt Modules** are functions that sequentially run when starting Nuxt in development mode using `nuxi dev` or building a project for production with `nuxi build`.
With modules, you can encapsulate, properly test, and share custom solutions as npm packages without adding unnecessary boilerplate to your project, or requiring changes to Nuxt itself.
## Quick Start
We recommend you get started with Nuxt Modules using our [starter template](https://github.com/nuxt/starter/tree/module){rel="nofollow"}:
::code-group{sync="pm"}
```bash [npm]
npm create nuxt -- -t module my-module
```
```bash [yarn]
yarn create nuxt -t module my-module
```
```bash [pnpm]
pnpm create nuxt -- -t module my-module
```
```bash [bun]
bun create nuxt -t module my-module
```
::
This will create a `my-module` project with all the boilerplate necessary to develop and publish your module.
**Next steps:**
1. Open `my-module` in your IDE of choice
2. Install dependencies using your favorite package manager
3. Prepare local files for development using `npm run dev:prepare`
4. Follow this document to learn more about Nuxt Modules
### Using the Starter
Learn how to perform basic tasks with the module starter.
::tip
---
icon: i-lucide-video
target: _blank
to: https://vueschool.io/lessons/navigating-the-official-starter-template?friend=nuxt
---
Watch Vue School video about Nuxt module starter template.
::
#### How to Develop
While your module source code lives inside the `src` directory, in most cases, to develop a module, you need a Nuxt application. That's what the `playground` directory is about. It's a Nuxt application you can tinker with that is already configured to run with your module.
You can interact with the playground like with any Nuxt application.
- Launch its development server with `npm run dev`, it should reload itself as you make changes to your module in the `src` directory
- Build it with `npm run dev:build`
::note
All other `nuxi` commands can be used against the `playground` directory (e.g. `nuxi <COMMAND> playground`). Feel free to declare additional `dev:*` scripts within your `package.json` referencing them for convenience.
::
#### How to Test
The module starter comes with a basic test suite:
- A linter powered by [ESLint](https://eslint.org){rel="nofollow"}, run it with `npm run lint`
- A test runner powered by [Vitest](https://vitest.dev){rel="nofollow"}, run it with `npm run test` or `npm run test:watch`
::tip
Feel free to augment this default test strategy to better suit your needs.
::
#### How to Build
Nuxt Modules come with their own builder provided by [`@nuxt/module-builder`](https://github.com/nuxt/module-builder#readme){rel="nofollow"}. This builder doesn't require any configuration on your end, supports TypeScript, and makes sure your assets are properly bundled to be distributed to other Nuxt applications.
You can build your module by running `npm run prepack`.
::tip
While building your module can be useful in some cases, most of the time you won't need to build it on your own: the `playground` takes care of it while developing, and the release script also has you covered when publishing.
::
#### How to Publish
::important
Before publishing your module to npm, makes sure you have an [npmjs.com](https://www.npmjs.com){rel="nofollow"} account and that you're authenticated to it locally with `npm login`.
::
While you can publish your module by bumping its version and using the `npm publish` command, the module starter comes with a release script that helps you make sure you publish a working version of your module to npm and more.
To use the release script, first, commit all your changes (we recommend you follow [Conventional Commits](https://www.conventionalcommits.org){rel="nofollow"} to also take advantage of automatic version bump and changelog update), then run the release script with `npm run release`.
When running the release script, the following will happen:
- First, it will run your test suite by:
- Running the linter (`npm run lint`)
- Running unit, integration, and e2e tests (`npm run test`)
- Building the module (`npm run prepack`)
- Then, if your test suite went well, it will proceed to publish your module by:
- Bumping your module version and generating a changelog according to your Conventional Commits
- Publishing the module to npm (for that purpose, the module will be built again to ensure its updated version number is taken into account in the published artifact)
- Pushing a git tag representing the newly published version to your git remote origin
::tip
As with other scripts, feel free to fine-tune the default `release` script in your `package.json` to better suit your needs.
::
## Developing Modules
Nuxt Modules come with a variety of powerful APIs and patterns allowing them to alter a Nuxt application in pretty much any way possible. This section teaches you how to take advantage of those.
### Module Anatomy
We can consider two kinds of Nuxt Modules:
- published modules are distributed on npm - you can see a list of some community modules on [the Nuxt website](https://nuxt.com/modules).
- "local" modules, they exist within a Nuxt project itself, either [inlined in Nuxt config](https://nuxt.com/docs/api/nuxt-config#modules) or as part of [the `modules` directory](https://nuxt.com/docs/guide/directory-structure/modules).
In either case, their anatomy is similar.
#### Module Definition
::note
When using the starter, your module definition is available at `src/module.ts`.
::
The module definition is the entry point of your module. It's what gets loaded by Nuxt when your module is referenced within a Nuxt configuration.
At a low level, a Nuxt Module definition is a simple, potentially asynchronous, function accepting inline user options and a `nuxt` object to interact with Nuxt.
```ts
export default function (inlineOptions, nuxt) {
// You can do whatever you like here..
console.log(inlineOptions.token) // `123`
console.log(nuxt.options.dev) // `true` or `false`
nuxt.hook('ready', async nuxt => {
console.log('Nuxt is ready')
})
}
```
You can get type-hint support for this function using the higher-level `defineNuxtModule` helper provided by [Nuxt Kit](https://nuxt.com/docs/guide/going-further/kit).
```ts
import { defineNuxtModule } from '@nuxt/kit'
export default defineNuxtModule((options, nuxt) => {
nuxt.hook('pages:extend', pages => {
console.log(`Discovered ${pages.length} pages`)
})
})
```
However, **we do not recommend** using this low-level function definition. Instead, to define a module, **we recommend** using the object-syntax with `meta` property to identify your module, especially when publishing to npm.
This helper makes writing Nuxt modules more straightforward by implementing many common patterns needed by modules, guaranteeing future compatibility and improving the experience for both module authors and users.
```ts
import { defineNuxtModule } from '@nuxt/kit'
export default defineNuxtModule({
meta: {
// Usually the npm package name of your module
name: '@nuxtjs/example',
// The key in `nuxt.config` that holds your module options
configKey: 'sample',
// Compatibility constraints
compatibility: {
// Semver version of supported nuxt versions
nuxt: '>=3.0.0'
}
},
// Default configuration options for your module, can also be a function returning those
defaults: {},
// Shorthand sugar to register Nuxt hooks
hooks: {},
// The function holding your module logic, it can be asynchronous
setup(moduleOptions, nuxt) {
// ...
}
})
```
Ultimately `defineNuxtModule` returns a wrapper function with the lower level `(inlineOptions, nuxt)` module signature. This wrapper function applies defaults and other necessary steps before calling your `setup` function:
- Support `defaults` and `meta.configKey` for automatically merging module options
- Type hints and automated type inference
- Add shims for basic Nuxt 2 compatibility
- Ensure module gets installed only once using a unique key computed from `meta.name` or `meta.configKey`
- Automatically register Nuxt hooks
- Automatically check for compatibility issues based on module meta
- Expose `getOptions` and `getMeta` for internal usage of Nuxt
- Ensuring backward and upward compatibility as long as the module is using `defineNuxtModule` from the latest version of `@nuxt/kit`
- Integration with module builder tooling
#### Runtime Directory
::note
When using the starter, the runtime directory is available at `src/runtime`.
::
Modules, like everything in a Nuxt configuration, aren't included in your application runtime. However, you might want your module to provide, or inject runtime code to the application it's installed on. That's what the runtime directory enables you to do.
Inside the runtime directory, you can provide any kind of assets related to the Nuxt App:
- Vue components
- Composables
- [Nuxt plugins](https://nuxt.com/docs/guide/directory-structure/plugins)
To the [server engine](https://nuxt.com/docs/guide/concepts/server-engine), Nitro:
- API routes
- Middlewares
- Nitro plugins
Or any other kind of asset you want to inject in users' Nuxt applications:
- Stylesheets
- 3D models
- Images
- etc.
You'll then be able to inject all those assets inside the application from your [module definition](https://nuxt.com/#module-definition).
::tip
Learn more about asset injection in [the recipes section](https://nuxt.com/#recipes).
::
::warning
Published modules cannot leverage auto-imports for assets within their runtime directory. Instead, they have to import them explicitly from `#imports` or alike.
:br :br
Indeed, auto-imports are not enabled for files within `node_modules` (the location where a published module will eventually live) for performance reasons.
:br :br
If you are using the module starter, auto-imports will not be enabled in your playground either.
::
### Tooling
Modules come with a set of first-party tools to help you with their development.
#### `@nuxt/module-builder`
[Nuxt Module Builder](https://github.com/nuxt/module-builder#readme){rel="nofollow"} is a zero-configuration build tool taking care of all the heavy lifting to build and ship your module. It ensures proper compatibility of your module build artifact with Nuxt applications.
#### `@nuxt/kit`
[Nuxt Kit](https://nuxt.com/docs/guide/going-further/kit) provides composable utilities to help your module interact with Nuxt applications. It's recommended to use Nuxt Kit utilities over manual alternatives whenever possible to ensure better compatibility and code readability of your module.
::read-more{to="https://nuxt.com/docs/guide/going-further/kit"}
::
#### `@nuxt/test-utils`
[Nuxt Test Utils](https://nuxt.com/docs/getting-started/testing) is a collection of utilities to help set up and run Nuxt applications within your module tests.
### Recipes
Find here common patterns used to author modules.
#### Altering Nuxt Configuration
Nuxt configuration can be read and altered by modules. Here's an example of a module enabling an experimental feature.
```js
import { defineNuxtModule } from '@nuxt/kit'
export default defineNuxtModule({
setup (options, nuxt) {
// We create the `experimental` object if it doesn't exist yet
nuxt.options.experimental ||= {}
nuxt.options.experimental.componentIslands = true
}
})
```
When you need to handle more complex configuration alterations, you should consider using [defu](https://github.com/unjs/defu){rel="nofollow"}.
::tip
---
icon: i-lucide-video
target: _blank
to: https://vueschool.io/lessons/extending-and-altering-nuxt-configuration-and-options?friend=nuxt
---
Watch Vue School video about altering Nuxt configuration.
::
#### Exposing Options to Runtime
Because modules aren't part of the application runtime, their options aren't either. However, in many cases, you might need access to some of these module options within your runtime code. We recommend exposing the needed config using Nuxt's [`runtimeConfig`](https://nuxt.com/docs/api/nuxt-config#runtimeconfig).
```js
import { defineNuxtModule } from '@nuxt/kit'
import { defu } from 'defu'
export default defineNuxtModule({
setup (options, nuxt) {
nuxt.options.runtimeConfig.public.myModule = defu(nuxt.options.runtimeConfig.public.myModule, {
foo: options.foo
})
}
})
```
Note that we use [`defu`](https://github.com/unjs/defu){rel="nofollow"} to extend the public runtime configuration the user provides instead of overwriting it.
You can then access your module options in a plugin, component, the application like any other runtime configuration:
```js
const options = useRuntimeConfig().public.myModule
```
::warning
Be careful not to expose any sensitive module configuration on the public runtime config, such as private API keys, as they will end up in the public bundle.
::
::read-more{to="https://nuxt.com/docs/guide/going-further/runtime-config"}
::
::tip
---
icon: i-lucide-video
target: _blank
to: https://vueschool.io/lessons/passing-and-exposing-module-options?friend=nuxt
---
Watch Vue School video about passing and exposing Nuxt module options.
::
#### Injecting Plugins With `addPlugin`
Plugins are a common way for a module to add runtime logic. You can use the `addPlugin` utility to register them from your module.
```js
import { defineNuxtModule, addPlugin, createResolver } from '@nuxt/kit'
export default defineNuxtModule({
setup (options, nuxt) {
// Create resolver to resolve relative paths
const resolver = createResolver(import.meta.url)
addPlugin(resolver.resolve('./runtime/plugin'))
}
})
```
::read-more{to="https://nuxt.com/docs/guide/going-further/kit"}
::
#### Injecting Vue Components With `addComponent`
If your module should provide Vue components, you can use the `addComponent` utility to add them as auto-imports for Nuxt to resolve.
```js
import { defineNuxtModule, addComponent } from '@nuxt/kit'
export default defineNuxtModule({
setup(options, nuxt) {
const resolver = createResolver(import.meta.url)
// From the runtime directory
addComponent({
name: 'MySuperComponent', // name of the component to be used in vue templates
export: 'MySuperComponent', // (optional) if the component is a named (rather than default) export
filePath: resolver.resolve('runtime/components/MySuperComponent.vue')
})
// From a library
addComponent({
name: 'MyAwesomeComponent', // name of the component to be used in vue templates
export: 'MyAwesomeComponent', // (optional) if the component is a named (rather than default) export
filePath: '@vue/awesome-components'
})
}
})
```
Alternatively, you can add an entire directory by using `addComponentsDir`.
```ts
import { defineNuxtModule, addComponentsDir } from '@nuxt/kit'
export default defineNuxtModule({
setup(options, nuxt) {
const resolver = createResolver(import.meta.url)
addComponentsDir({
path: resolver.resolve('runtime/components')
})
}
})
```
#### Injecting Composables With `addImports` and `addImportsDir`
If your module should provide composables, you can use the `addImports` utility to add them as auto-imports for Nuxt to resolve.
```ts
import { defineNuxtModule, addImports, createResolver } from '@nuxt/kit'
export default defineNuxtModule({
setup(options, nuxt) {
const resolver = createResolver(import.meta.url)
addImports({
name: 'useComposable', // name of the composable to be used
as: 'useComposable',
from: resolver.resolve('runtime/composables/useComposable') // path of composable
})
}
})
```
Alternatively, you can add an entire directory by using `addImportsDir`.
```ts
import { defineNuxtModule, addImportsDir, createResolver } from '@nuxt/kit'
export default defineNuxtModule({
setup(options, nuxt) {
const resolver = createResolver(import.meta.url)
addImportsDir(resolver.resolve('runtime/composables'))
}
})
```
#### Injecting Server Routes With `addServerHandler`
```ts
import { defineNuxtModule, addServerHandler, createResolver } from '@nuxt/kit'
export default defineNuxtModule({
setup(options, nuxt) {
const resolver = createResolver(import.meta.url)
addServerHandler({
route: '/api/hello',
handler: resolver.resolve('./runtime/server/api/hello/index.get')
})
}
})
```
You can also add a dynamic server route:
```ts
import { defineNuxtModule, addServerHandler, createResolver } from '@nuxt/kit'
export default defineNuxtModule({
setup(options, nuxt) {
const resolver = createResolver(import.meta.url)
addServerHandler({
route: '/api/hello/:name',
handler: resolver.resolve('./runtime/server/api/hello/[name].get')
})
}
})
```
#### Injecting Other Assets
If your module should provide other kinds of assets, they can also be injected. Here's a simple example module injecting a stylesheet through Nuxt's `css` array.
```js
import { defineNuxtModule, addPlugin, createResolver } from '@nuxt/kit'
export default defineNuxtModule({
setup (options, nuxt) {
const resolver = createResolver(import.meta.url)
nuxt.options.css.push(resolver.resolve('./runtime/style.css'))
}
})
```
And a more advanced one, exposing a folder of assets through [Nitro](https://nuxt.com/docs/guide/concepts/server-engine)'s `publicAssets` option:
```js
import { defineNuxtModule, createResolver } from '@nuxt/kit'
export default defineNuxtModule({
setup (options, nuxt) {
const resolver = createResolver(import.meta.url)
nuxt.hook('nitro:config', async (nitroConfig) => {
nitroConfig.publicAssets ||= []
nitroConfig.publicAssets.push({
dir: resolver.resolve('./runtime/public'),
maxAge: 60 * 60 * 24 * 365 // 1 year
})
})
}
})
```
#### Using Other Modules in Your Module
If your module depends on other modules, you can add them by using Nuxt Kit's `installModule` utility. For example, if you wanted to use Nuxt Tailwind in your module, you could add it as below:
```ts
import { defineNuxtModule, createResolver, installModule } from '@nuxt/kit'
export default defineNuxtModule<ModuleOptions>({
async setup (options, nuxt) {
const resolver = createResolver(import.meta.url)
// We can inject our CSS file which includes Tailwind's directives
nuxt.options.css.push(resolver.resolve('./runtime/assets/styles.css'))
await installModule('@nuxtjs/tailwindcss', {
// module configuration
exposeConfig: true,
config: {
darkMode: 'class',
content: {
files: [
resolver.resolve('./runtime/components/**/*.{vue,mjs,ts}'),
resolver.resolve('./runtime/*.{mjs,js,ts}')
]
}
}
})
}
})
```
#### Using Hooks
[Lifecycle hooks](https://nuxt.com/docs/guide/going-further/hooks) allow you to expand almost every aspect of Nuxt. Modules can hook to them programmatically or through the `hooks` map in their definition.
```js
import { defineNuxtModule, addPlugin, createResolver } from '@nuxt/kit'
export default defineNuxtModule({
// Hook to the `app:error` hook through the `hooks` map
hooks: {
'app:error': (err) => {
console.info(`This error happened: ${err}`);
}
},
setup (options, nuxt) {
// Programmatically hook to the `pages:extend` hook
nuxt.hook('pages:extend', (pages) => {
console.info(`Discovered ${pages.length} pages`);
})
}
})
```
::read-more{to="https://nuxt.com/docs/api/advanced/hooks"}
::
::tip
---
icon: i-lucide-video
target: _blank
to: https://vueschool.io/lessons/nuxt-lifecycle-hooks?friend=nuxt
---
Watch Vue School video about using Nuxt lifecycle hooks in modules.
::
::note
**Module cleanup**
:br
:br
If your module opens, handles, or starts a watcher, you should close it when the Nuxt lifecycle is done. The `close` hook is available for this.
```ts
import { defineNuxtModule } from '@nuxt/kit'
export default defineNuxtModule({
setup (options, nuxt) {
nuxt.hook('close', async nuxt => {
// Your custom code here
})
}
})
```
::
#### Adding Templates/Virtual Files
If you need to add a virtual file that can be imported into the user's app, you can use the `addTemplate` utility.
```ts
import { defineNuxtModule, addTemplate } from '@nuxt/kit'
export default defineNuxtModule({
setup (options, nuxt) {
// The file is added to Nuxt's internal virtual file system and can be imported from '#build/my-module-feature.mjs'
addTemplate({
filename: 'my-module-feature.mjs',
getContents: () => 'export const myModuleFeature = () => "hello world !"'
})
}
})
```
For the server, you should use the `addServerTemplate` utility instead.
```ts
import { defineNuxtModule, addServerTemplate } from '@nuxt/kit'
export default defineNuxtModule({
setup (options, nuxt) {
// The file is added to Nitro's virtual file system and can be imported in the server code from 'my-server-module.mjs'
addServerTemplate({
filename: 'my-server-module.mjs',
getContents: () => 'export const myServerModule = () => "hello world !"'
})
}
})
```
#### Adding Type Declarations
You might also want to add a type declaration to the user's project (for example, to augment a Nuxt interface
or provide a global type of your own). For this, Nuxt provides the `addTypeTemplate` utility that both
writes a template to the disk and adds a reference to it in the generated `nuxt.d.ts` file.
If your module should augment types handled by Nuxt, you can use `addTypeTemplate` to perform this operation:
```js
import { defineNuxtModule, addTemplate, addTypeTemplate } from '@nuxt/kit'
export default defineNuxtModule({
setup (options, nuxt) {
addTypeTemplate({
filename: 'types/my-module.d.ts',
getContents: () => `// Generated by my-module
interface MyModuleNitroRules {
myModule?: { foo: 'bar' }
}
declare module 'nitropack' {
interface NitroRouteRules extends MyModuleNitroRules {}
interface NitroRouteConfig extends MyModuleNitroRules {}
}
export {}`
})
}
})
```
If you need more granular control, you can use the `prepare:types` hook to register a callback that will inject your types.
```ts
const template = addTemplate({ /* template options */ })
nuxt.hook('prepare:types', ({ references }) => {
references.push({ path: template.dst })
})
```
##### Updating Templates
If you need to update your templates/virtual files, you can leverage the `updateTemplates` utility like this :
```ts
nuxt.hook('builder:watch', async (event, path) => {
if (path.includes('my-module-feature.config')) {
// This will reload the template that you registered
updateTemplates({ filter: t => t.filename === 'my-module-feature.mjs' })
}
})
```
### Testing
Testing helps ensuring your module works as expected given various setup. Find in this section how to perform various kinds of tests against your module.
#### Unit and Integration
::tip
We're still discussing and exploring how to ease unit and integration testing on Nuxt Modules.
:br :br[Check out this RFC to join the conversation](https://github.com/nuxt/nuxt/discussions/18399){rel="nofollow"}.
::
#### End to End
[Nuxt Test Utils](https://nuxt.com/docs/getting-started/testing) is the go-to library to help you test your module in an end-to-end way. Here's the workflow to adopt with it:
1. Create a Nuxt application to be used as a "fixture" inside `test/fixtures/*`
2. Setup Nuxt with this fixture inside your test file
3. Interact with the fixture using utilities from `@nuxt/test-utils` (e.g. fetching a page)
4. Perform checks related to this fixture (e.g. "HTML contains ...")
5. Repeat
In practice, the fixture:
```js [test/fixtures/ssr/nuxt.config.ts]
// 1. Create a Nuxt application to be used as a "fixture"
import MyModule from '../../../src/module'
export default defineNuxtConfig({
ssr: true,
modules: [
MyModule
]
})
```
And its test:
```js [test/rendering.ts]
import { describe, it, expect } from 'vitest'
import { fileURLToPath } from 'node:url'
import { setup, $fetch } from '@nuxt/test-utils/e2e'
describe('ssr', async () => {
// 2. Setup Nuxt with this fixture inside your test file
await setup({
rootDir: fileURLToPath(new URL('./fixtures/ssr', import.meta.url)),
})
it('renders the index page', async () => {
// 3. Interact with the fixture using utilities from `@nuxt/test-utils`
const html = await $fetch('/')
// 4. Perform checks related to this fixture
expect(html).toContain('<div>ssr</div>')
})
})
// 5. Repeat
describe('csr', async () => { /* ... */ })
```
::tip
An example of such a workflow is available on [the module starter](https://github.com/nuxt/starter/blob/module/test/basic.test.ts){rel="nofollow"}.
::
#### Manual QA With Playground and Externally
Having a playground Nuxt application to test your module when developing it is really useful. [The module starter integrates one for that purpose](https://nuxt.com/#how-to-develop).
You can test your module with other Nuxt applications (applications that are not part of your module repository) locally. To do so, you can use [`npm pack`](https://docs.npmjs.com/cli/commands/npm-pack){rel="nofollow"} command, or your package manager equivalent, to create a tarball from your module. Then in your test project, you can add your module to `package.json` packages as: `"my-module": "file:/path/to/tarball.tgz"`.
After that, you should be able to reference `my-module` like in any regular project.
### Best Practices
With great power comes great responsibility. While modules are powerful, here are some best practices to keep in mind while authoring modules to keep applications performant and developer experience great.
#### Async Modules
As we've seen, Nuxt Modules can be asynchronous. For example, you may want to develop a module that needs fetching some API or calling an async function.
However, be careful with asynchronous behaviors as Nuxt will wait for your module to setup before going to the next module and starting the development server, build process, etc. Prefer deferring time-consuming logic to Nuxt hooks.
::warning
If your module takes more than **1 second** to setup, Nuxt will emit a warning about it.
::
#### Always Prefix Exposed Interfaces
Nuxt Modules should provide an explicit prefix for any exposed configuration, plugin, API, composable, or component to avoid conflict with other modules and internals.
Ideally, you should prefix them with your module's name (e.g. if your module is called `nuxt-foo`, expose `<FooButton>` and `useFooBar()` and **not** `<Button>` and `useBar()`).
#### Be TypeScript Friendly
Nuxt has first-class TypeScript integration for the best developer experience.
Exposing types and using TypeScript to develop modules benefits users even when not using TypeScript directly.
#### Avoid CommonJS Syntax
Nuxt relies on native ESM. Please read [Native ES Modules](https://nuxt.com/docs/guide/concepts/esm) for more information.
#### Document Module Usage
Consider documenting module usage in the readme file:
- Why use this module?
- How to use this module?
- What does this module do?
Linking to the integration website and documentation is always a good idea.
#### Provide a StackBlitz Demo or Boilerplate
It's a good practice to make a minimal reproduction with your module and [StackBlitz](https://nuxt.new/s/v3){rel="nofollow"} that you add to your module readme.
This not only provides potential users of your module a quick and easy way to experiment with the module but also an easy way for them to build minimal reproductions they can send you when they encounter issues.
#### Do Not Advertise With a Specific Nuxt Version
Nuxt, Nuxt Kit, and other new toolings are made to have both forward and backward compatibility in mind.
Please use "X for Nuxt" instead of "X for Nuxt 3" to avoid fragmentation in the ecosystem and prefer using `meta.compatibility` to set Nuxt version constraints.
#### Stick With Starter Defaults
The module starter comes with a default set of tools and configurations (e.g. ESLint configuration). If you plan on open-sourcing your module, sticking with those defaults ensures your module shares a consistent coding style with other [community modules](https://nuxt.com/modules) out there, making it easier for others to contribute.
## Ecosystem
[Nuxt Module ecosystem](https://nuxt.com/modules) represents more than 15 million monthly NPM downloads and provides extended functionalities and integrations with all sort of tools. You can be part of this ecosystem!
::tip
---
icon: i-lucide-video
target: _blank
to: https://vueschool.io/lessons/exploring-nuxt-modules-ecosystem-and-module-types?friend=nuxt
---
Watch Vue School video about Nuxt module types.
::
### Module Types
**Official modules** are modules prefixed (scoped) with `@nuxt/` (e.g. [`@nuxt/content`](https://content.nuxtjs.org){rel="nofollow"}). They are made and maintained actively by the Nuxt team. Like with the framework, contributions from the community are more than welcome to help make them better!
**Community modules** are modules prefixed (scoped) with `@nuxtjs/` (e.g. [`@nuxtjs/tailwindcss`](https://tailwindcss.nuxtjs.org){rel="nofollow"}). They are proven modules made and maintained by community members. Again, contributions are welcome from anyone.
**Third party and other community modules** are modules (often) prefixed with `nuxt-`. Anyone can make them, using this prefix allows these modules to be discoverable on npm. This is the best starting point to draft and try an idea!
**Private or personal modules** are modules made for your own use case or company. They don't need to follow any naming rules to work with Nuxt and are often seen scoped under an npm organization (e.g. `@my-company/nuxt-auth`)
### Listing Your Community Module
Any community modules are welcome to be listed on [the module list](https://nuxt.com/modules). To be listed, [open an issue in the nuxt/modules](https://github.com/nuxt/modules/issues/new?template=module_request.yml){rel="nofollow"} repository. The Nuxt team can help you to apply best practices before listing.
### Joining `nuxt-modules` and `@nuxtjs/`
By moving your modules to [nuxt-modules](https://github.com/nuxt-modules){rel="nofollow"}, there is always someone else to help, and this way, we can join forces to make one perfect solution.
If you have an already published and working module, and want to transfer it to `nuxt-modules`, [open an issue in nuxt/modules](https://github.com/nuxt/modules/issues/new){rel="nofollow"}.
By joining `nuxt-modules` we can rename your community module under the `@nuxtjs/` scope and provide a subdomain (e.g. `my-module.nuxtjs.org`) for its documentation.
# Nuxt Kit
Nuxt Kit provides composable utilities to make interacting with [Nuxt Hooks](https://nuxt.com/docs/api/advanced/hooks), the [Nuxt Interface](https://nuxt.com/docs/guide/going-further/internals#the-nuxt-interface) and developing [Nuxt Modules](https://nuxt.com/docs/guide/going-further/modules) super easy.
::read-more{to="https://nuxt.com/docs/api/kit"}
Discover all Nuxt Kit utilities.
::
## Usage
### Install Dependency
You can install the latest Nuxt Kit by adding it to the `dependencies` section of your `package.json`. However, please consider always explicitly installing the `@nuxt/kit` package even if it is already installed by Nuxt.
::note
`@nuxt/kit` and `@nuxt/schema` are key dependencies for Nuxt. If you are installing it separately, make sure that the versions of `@nuxt/kit` and `@nuxt/schema` are equal to or greater than your `nuxt` version to avoid any unexpected behavior.
::
```json [package.json]
{
"dependencies": {
"@nuxt/kit": "npm:@nuxt/kit-nightly@latest"
}
}
```
### Import Kit Utilities
```js [test.mjs]
import { useNuxt } from '@nuxt/kit'
```
::read-more{to="https://nuxt.com/docs/api/kit"}
::
::note
Nuxt Kit utilities are only available for modules and not meant to be imported in runtime (components, Vue composables, pages, plugins, or server routes).
::
Nuxt Kit is an [esm-only package](https://nuxt.com/docs/guide/concepts/esm) meaning that you **cannot** `require('@nuxt/kit')`. As a workaround, use dynamic import in the CommonJS context:
```js [test.cjs]
// This does NOT work!
// const kit = require('@nuxt/kit')
async function main() {
const kit = await import('@nuxt/kit')
}
main()
```
# NuxtApp
In Nuxt, you can access runtime app context within composables, components and plugins.
::read-more
---
target: _blank
to: https://v2.nuxt.com/docs/internals-glossary/context#the-context
---
In Nuxt 2, this was referred to as **Nuxt context**.
::
## Nuxt App Interface
::read-more
---
to: https://nuxt.com/docs/guide/going-further/internals#the-nuxtapp-interface
---
Jump over the `NuxtApp` interface documentation.
::
## The Nuxt Context
Many composables and utilities, both built-in and user-made, may require access to the Nuxt instance. This doesn't exist everywhere on your application, because a fresh instance is created on every request.
Currently, the Nuxt context is only accessible in [plugins](https://nuxt.com/docs/guide/directory-structure/plugins), [Nuxt hooks](https://nuxt.com/docs/guide/going-further/hooks), [Nuxt middleware](https://nuxt.com/docs/guide/directory-structure/middleware) (if wrapped in `defineNuxtRouteMiddleware`), and [setup functions](https://vuejs.org/api/composition-api-setup.html){rel="nofollow"} (in pages and components).
If a composable is called without access to the context, you may get an error stating that 'A composable that requires access to the Nuxt instance was called outside of a plugin, Nuxt hook, Nuxt middleware, or Vue setup function.' In that case, you can also explicitly call functions within this context by using [`nuxtApp.runWithContext`](https://nuxt.com/docs/api/composables/use-nuxt-app#runwithcontext).
## Accessing NuxtApp
Within composables, plugins and components you can access `nuxtApp` with [`useNuxtApp()`](https://nuxt.com/docs/api/composables/use-nuxt-app):
```ts [composables/useMyComposable.ts]
export function useMyComposable () {
const nuxtApp = useNuxtApp()
// access runtime nuxt app instance
}
```
If your composable does not always need `nuxtApp` or you simply want to check if it is present or not, since [`useNuxtApp`](https://nuxt.com/docs/api/composables/use-nuxt-app) throws an exception, you can use [`tryUseNuxtApp`](https://nuxt.com/docs/api/composables/use-nuxt-app#tryusenuxtapp) instead.
Plugins also receive `nuxtApp` as the first argument for convenience.
::read-more{to="https://nuxt.com/docs/guide/directory-structure/plugins"}
::
## Providing Helpers
You can provide helpers to be usable across all composables and application. This usually happens within a Nuxt plugin.
```ts
const nuxtApp = useNuxtApp()
nuxtApp.provide('hello', (name) => `Hello ${name}!`)
console.log(nuxtApp.$hello('name')) // Prints "Hello name!"
```
::read-more
---
to: https://nuxt.com/docs/guide/directory-structure/plugins#providing-helpers
---
It is possible to inject helpers by returning an object with a `provide` key in plugins.
::
::read-more
---
target: _blank
to: https://v2.nuxt.com/docs/directory-structure/plugins#inject-in-root--context
---
In Nuxt 2 plugins, this was referred to as **inject function**.
::
# Authoring Nuxt Layers
Nuxt layers are a powerful feature that you can use to share and reuse partial Nuxt applications within a monorepo, or from a git repository or npm package. The layers structure is almost identical to a standard Nuxt application, which makes them easy to author and maintain.
::read-more{to="https://nuxt.com/docs/getting-started/layers"}
::
A minimal Nuxt layer directory should contain a [`nuxt.config.ts`](https://nuxt.com/docs/guide/directory-structure/nuxt-config) file to indicate it is a layer.
```ts [base/nuxt.config.ts]
export default defineNuxtConfig({})
```
Additionally, certain other files in the layer directory will be auto-scanned and used by Nuxt for the project extending this layer.
- [`components/*`](https://nuxt.com/docs/guide/directory-structure/components) - Extend the default components
- [`composables/*`](https://nuxt.com/docs/guide/directory-structure/composables) - Extend the default composables
- [`layouts/*`](https://nuxt.com/docs/guide/directory-structure/layouts) - Extend the default layouts
- [`pages/*`](https://nuxt.com/docs/guide/directory-structure/pages) - Extend the default pages
- [`plugins/*`](https://nuxt.com/docs/guide/directory-structure/plugins) - Extend the default plugins
- [`server/*`](https://nuxt.com/docs/guide/directory-structure/server) - Extend the default server endpoints & middleware
- [`utils/*`](https://nuxt.com/docs/guide/directory-structure/utils) - Extend the default utils
- [`nuxt.config.ts`](https://nuxt.com/docs/guide/directory-structure/nuxt-config)- Extend the default nuxt config
- [`app.config.ts`](https://nuxt.com/docs/guide/directory-structure/app-config) - Extend the default app config
## Basic Example
::code-group
```ts [nuxt.config.ts]
export default defineNuxtConfig({
extends: [
'./base'
]
})
```
```vue [app.vue]
<template>
<BaseComponent/>
</template>
```
```ts [base/nuxt.config.ts]
export default defineNuxtConfig({
// Extending from base nuxt.config.ts!
app: {
head: {
title: 'Extending Configs is Fun!',
meta: [
{ name: 'description', content: 'I am using the extends feature in Nuxt!' }
],
}
}
})
```
```vue [base/components/BaseComponent.vue]
<template>
<h1>Extending Components is Fun!</h1>
</template>
```
::
## Starter Template
To get started you can initialize a layer with the [nuxt/starter/layer template](https://github.com/nuxt/starter/tree/layer){rel="nofollow"}. This will create a basic structure you can build upon. Execute this command within the terminal to get started:
```bash [Terminal]
npm create nuxt -- --template layer nuxt-layer
```
Follow up on the README instructions for the next steps.
## Publishing Layers
You can publish and share layers by either using a remote source or an npm package.
### Git Repository
You can use a git repository to share your Nuxt layer. Some examples:
```ts [nuxt.config.ts]
export default defineNuxtConfig({
extends: [
'github:username/repoName', // GitHub Remote Source
'github:username/repoName/base', // GitHub Remote Source within /base directory
'github:username/repoName#dev', // GitHub Remote Source from dev branch
'github:username/repoName#v1.0.0', // GitHub Remote Source from v1.0.0 tag
'gitlab:username/repoName', // GitLab Remote Source example
'bitbucket:username/repoName', // Bitbucket Remote Source example
]
})
```
::tip
If you want to extend a private remote source, you need to add the environment variable `GIGET_AUTH=<token>` to provide a token.
::
::tip
If you want to extend a remote source from a self-hosted GitHub or GitLab instance, you need to supply its URL with the `GIGET_GITHUB_URL=<url>` or `GIGET_GITLAB_URL=<url>` environment variable - or directly configure it with [the `auth` option](https://github.com/unjs/c12#extending-config-layer-from-remote-sources){rel="nofollow"} in your `nuxt.config`.
::
::warning
Bear in mind that if you are extending a remote source as a layer, you will not be able to access its dependencies outside of Nuxt. For example, if the remote layer depends on an eslint plugin, this will not be usable in your eslint config. That is because these dependencies will be located in a special location (`node_modules/.c12/layer_name/node_modules/`) that is not accessible to your package manager.
::
::note
When using git remote sources, if a layer has npm dependencies and you wish to install them, you can do so by specifying `install: true` in your layer options.
```ts [nuxt.config.ts]
export default defineNuxtConfig({
extends: [
['github:username/repoName', { install: true }]
]
})
```
::
### npm Package
You can publish Nuxt layers as an npm package that contains the files and dependencies you want to extend. This allows you to share your config with others, use it in multiple projects or use it privately.
To extend from an npm package, you need to make sure that the module is published to npm and installed in the user's project as a devDependency. Then you can use the module name to extend the current nuxt config:
```ts [nuxt.config.ts]
export default defineNuxtConfig({
extends: [
// Node Module with scope
'@scope/moduleName',
// or just the module name
'moduleName'
]
})
```
To publish a layer directory as an npm package, you want to make sure that the `package.json` has the correct properties filled out. This will make sure that the files are included when the package is published.
```json [package.json]
{
"name": "my-theme",
"version": "1.0.0",
"type": "module",
"main": "./nuxt.config.ts",
"dependencies": {},
"devDependencies": {
"nuxt": "^3.0.0"
}
}
```
::important
Make sure any dependency imported in the layer is **explicitly added** to the `dependencies`. The `nuxt` dependency, and anything only used for testing the layer before publishing, should remain in the `devDependencies` field.
::
Now you can proceed to publish the module to npm, either publicly or privately.
::important
When publishing the layer as a private npm package, you need to make sure you log in, to authenticate with npm to download the node module.
::
## Tips
### Named Layer Aliases
Auto-scanned layers (from your `~~/layers` directory) automatically create aliases. For example, you can access your `~~/layers/test` layer via `#layers/test`.
If you want to create named layer aliases for other layers, you can specify a name in the configuration of the layer.
```ts [nuxt.config.ts]
export default defineNuxtConfig({
$meta: {
name: 'example',
},
})
```
This will produce an alias of `#layers/example` which points to your layer.
### Relative Paths and Aliases
When importing using global aliases (such as `~/` and `@/`) in a layer components and composables, note that these aliases are resolved relative to the user's project paths. As a workaround, you can **use relative paths** to import them, or use named layer aliases.
Also when using relative paths in `nuxt.config` file of a layer, (with exception of nested `extends`) they are resolved relative to user's project instead of the layer. As a workaround, use full resolved paths in `nuxt.config`:
```js [nuxt.config.ts]
import { fileURLToPath } from 'url'
import { dirname, join } from 'path'
const currentDir = dirname(fileURLToPath(import.meta.url))
export default defineNuxtConfig({
css: [
join(currentDir, './assets/main.css')
]
})
```
## Multi-Layer Support for Nuxt Modules
You can use the internal array `nuxt.options._layers` to support custom multi-layer handling for your modules.
```ts [modules/my-module.ts]
export default defineNuxtModule({
setup(_options, nuxt) {
for (const layer of nuxt.options._layers) {
// You can check for a custom directory existence to extend for each layer
console.log('Custom extension for', layer.cwd, layer.config)
}
}
})
```
**Notes:**
- Earlier items in the `_layers` array have higher priority and override later ones
- The user's project is the first item in the `_layers` array
## Going Deeper
Configuration loading and extends support is handled by [unjs/c12](https://github.com/unjs/c12){rel="nofollow"}, merged using [unjs/defu](https://github.com/unjs/defu){rel="nofollow"} and remote git sources are supported using [unjs/giget](https://github.com/unjs/giget){rel="nofollow"}. Check the docs and source code to learn more.
::read-more
---
icon: i-simple-icons-github
target: _blank
to: https://github.com/nuxt/nuxt/issues/13367
---
Checkout our ongoing development to bring more improvements for layers support on GitHub.
::
# Debugging
## Sourcemaps
Sourcemaps are enabled for your server build by default, and for the client build in dev mode, but you can enable them more specifically in your configuration.
```ts
export default defineNuxtConfig({
// or sourcemap: true
sourcemap: {
server: true,
client: true
}
})
```
## Debugging with Node Inspector
You can use [Node inspector](https://nodejs.org/en/learn/getting-started/debugging){rel="nofollow"} to debug Nuxt server-side.
```bash
nuxi dev --inspect
```
This will start Nuxt in `dev` mode with debugger active. If everything is working correctly a Node.js icon will appear on your Chrome DevTools and you can attach to the debugger.
::important
Note that the Node.js and Chrome processes need to be run on the same platform. This doesn't work inside of Docker.
::
## Debugging in Your IDE
It is possible to debug your Nuxt app in your IDE while you are developing it.
### Example VS Code Debug Configuration
You may need to update the config below with a path to your web browser. For more information, visit the [VS Code documentation about debug configuration](https://go.microsoft.com/fwlink/?linkid=830387){rel="nofollow"}.
::important
If you use `pnpm`, you will need to have `nuxi` installed as a devDependency for the configuration below to work.
::
```json5
{
// Use IntelliSense to learn about possible attributes.
// Hover to view descriptions of existing attributes.
"version": "0.2.0",
"configurations": [
{
"type": "chrome",
"request": "launch",
"name": "client: chrome",
"url": "http://localhost:3000",
"webRoot": "${workspaceFolder}"
},
{
"type": "node",
"request": "launch",
"name": "server: nuxt",
"outputCapture": "std",
"program": "${workspaceFolder}/node_modules/nuxt/bin/nuxt.mjs",
"args": [
"dev"
],
}
],
"compounds": [
{
"name": "fullstack: nuxt",
"configurations": [
"server: nuxt",
"client: chrome"
]
}
]
}
```
If you prefer your usual browser extensions, add this to the *chrome* configuration above:
```json5
"userDataDir": false,
```
### Example JetBrains IDEs Debug Configuration
You can also debug your Nuxt app in JetBrains IDEs such as IntelliJ IDEA, WebStorm, or PhpStorm.
1. Create a new file in your project root directory and name it `nuxt.run.xml`.
2. Open the `nuxt.run.xml` file and paste the following debug configuration:
```html
<component name="ProjectRunConfigurationManager">
<configuration default="false" name="client: chrome" type="JavascriptDebugType" uri="http://localhost:3000" useFirstLineBreakpoints="true">
<method v="2" />
</configuration>
<configuration default="false" name="server: nuxt" type="NodeJSConfigurationType" application-parameters="dev" path-to-js-file="$PROJECT_DIR$/node_modules/nuxt/bin/nuxt.mjs" working-dir="$PROJECT_DIR$">
<method v="2" />
</configuration>
<configuration default="false" name="fullstack: nuxt" type="CompoundRunConfigurationType">
<toRun name="client: chrome" type="JavascriptDebugType" />
<toRun name="server: nuxt" type="NodeJSConfigurationType" />
<method v="2" />
</configuration>
</component>
```
### Other IDEs
If you have another IDE and would like to contribute sample configuration, feel free to [open a PR](https://github.com/nuxt/nuxt/edit/main/docs/2.guide/3.going-further/9.debugging.md){rel="nofollow"}!
# Custom Routing
## Adding custom routes
In Nuxt, your routing is defined by the structure of your files inside the [pages directory](https://nuxt.com/docs/guide/directory-structure/pages). However, since it uses [vue-router](https://router.vuejs.org){rel="nofollow"} under the hood, Nuxt offers you several ways to add custom routes in your project.
### Router Config
Using [router options](https://nuxt.com/docs/guide/recipes/custom-routing#router-options), you can optionally override or extend your routes using a function that accepts the scanned routes and returns customized routes.
If it returns `null` or `undefined`, Nuxt will fall back to the default routes (useful to modify input array).
```ts [app/router.options.ts]
import type { RouterConfig } from '@nuxt/schema'
export default {
// https://router.vuejs.org/api/interfaces/routeroptions.html#routes
routes: (_routes) => [
{
name: 'home',
path: '/',
component: () => import('~/pages/home.vue')
}
],
} satisfies RouterConfig
```
::note
Nuxt will not augment any new routes you return from the `routes` function with metadata defined in `definePageMeta` of the component you provide. If you want that to happen, you should use the `pages:extend` hook which is [called at build-time](https://nuxt.com/docs/api/advanced/hooks#nuxt-hooks-build-time).
::
### Pages Hook
You can add, change or remove pages from the scanned routes with the `pages:extend` nuxt hook.
For example, to prevent creating routes for any `.ts` files:
```ts [nuxt.config.ts]
import type { NuxtPage } from '@nuxt/schema'
export default defineNuxtConfig({
hooks: {
'pages:extend' (pages) {
// add a route
pages.push({
name: 'profile',
path: '/profile',
file: '~/extra-pages/profile.vue'
})
// remove routes
function removePagesMatching (pattern: RegExp, pages: NuxtPage[] = []) {
const pagesToRemove: NuxtPage[] = []
for (const page of pages) {
if (page.file && pattern.test(page.file)) {
pagesToRemove.push(page)
} else {
removePagesMatching(pattern, page.children)
}
}
for (const page of pagesToRemove) {
pages.splice(pages.indexOf(page), 1)
}
}
removePagesMatching(/\.ts$/, pages)
}
}
})
```
### Nuxt Module
If you plan to add a whole set of pages related with a specific functionality, you might want to use a [Nuxt module](https://nuxt.com/modules).
The [Nuxt kit](https://nuxt.com/docs/guide/going-further/kit) provides a few ways [to add routes](https://nuxt.com/docs/api/kit/pages):
- [`extendPages`](https://nuxt.com/docs/api/kit/pages#extendpages) (callback: pages => void)
- [`extendRouteRules`](https://nuxt.com/docs/api/kit/pages#extendrouterules) (route: string, rule: NitroRouteConfig, options: ExtendRouteRulesOptions)
## Router Options
On top of customizing options for [`vue-router`](https://router.vuejs.org/api/interfaces/routeroptions.html){rel="nofollow"}, Nuxt offers [additional options](https://nuxt.com/docs/api/nuxt-config#router) to customize the router.
### Using `app/router.options`
This is the recommended way to specify [router options](https://nuxt.com/docs/api/nuxt-config#router).
```ts [app/router.options.ts]
import type { RouterConfig } from '@nuxt/schema'
export default {
} satisfies RouterConfig
```
It is possible to add more router options files by adding files within the `pages:routerOptions` hook. Later items in the array override earlier ones.
::callout
Adding a router options file in this hook will switch on page-based routing, unless `optional` is set, in which case it will only apply when page-based routing is already enabled.
::
```ts [nuxt.config.ts]
import { createResolver } from '@nuxt/kit'
export default defineNuxtConfig({
hooks: {
'pages:routerOptions' ({ files }) {
const resolver = createResolver(import.meta.url)
// add a route
files.push({
path: resolver.resolve('./runtime/app/router-options'),
optional: true
})
}
}
})
```
### Using `nuxt.config`
**Note:** Only JSON serializable [options](https://nuxt.com/docs/api/nuxt-config#router) are configurable:
- `linkActiveClass`
- `linkExactActiveClass`
- `end`
- `sensitive`
- `strict`
- `hashMode`
- `scrollBehaviorType`
```js [nuxt.config]
export default defineNuxtConfig({
router: {
options: {}
}
})
```
### Hash Mode (SPA)
You can enable hash history in SPA mode using the `hashMode` [config](https://nuxt.com/docs/api/nuxt-config#router). In this mode, router uses a hash character (#) before the actual URL that is internally passed. When enabled, the **URL is never sent to the server** and **SSR is not supported**.
```ts [nuxt.config.ts]
export default defineNuxtConfig({
ssr: false,
router: {
options: {
hashMode: true
}
}
})
```
### Scroll Behavior for hash links
You can optionally customize the scroll behavior for hash links. When you set the [config](https://nuxt.com/docs/api/nuxt-config#router) to be `smooth` and you load a page with a hash link (e.g. `https://example.com/blog/my-article#comments`), you will see that the browser smoothly scrolls to this anchor.
```ts [nuxt.config.ts]
export default defineNuxtConfig({
router: {
options: {
scrollBehaviorType: 'smooth'
}
}
})
```
#### Custom History (advanced)
You can optionally override history mode using a function that accepts the base URL and returns the history mode. If it returns `null` or `undefined`, Nuxt will fallback to the default history.
```ts [app/router.options.ts]
import type { RouterConfig } from '@nuxt/schema'
import { createMemoryHistory } from 'vue-router'
export default {
// https://router.vuejs.org/api/interfaces/routeroptions.html
history: base => import.meta.client ? createMemoryHistory(base) : null /* default */
} satisfies RouterConfig
```
# Using Vite Plugins in Nuxt
While Nuxt modules offer extensive functionality, sometimes a specific Vite plugin might meet your needs more directly.
First, we need to install the Vite plugin, for our example, we'll use `@rollup/plugin-yaml`:
::code-group{sync="pm"}
```bash [npm]
npm install @rollup/plugin-yaml
```
```bash [yarn]
yarn add @rollup/plugin-yaml
```
```bash [pnpm]
pnpm add @rollup/plugin-yaml
```
```bash [bun]
bun add @rollup/plugin-yaml
```
::
Next, we need to import and add it to our [`nuxt.config.ts`](https://nuxt.com/docs/guide/directory-structure/nuxt-config) file:
```ts [nuxt.config.ts]
import yaml from '@rollup/plugin-yaml'
export default defineNuxtConfig({
vite: {
plugins: [
yaml()
]
}
})
```
Now we installed and configured our Vite plugin, we can start using YAML files directly in our project.
For example, we can have a `config.yaml` that stores configuration data and import this data in our Nuxt components:
::code-group
```yaml [data/hello.yaml]
greeting: "Hello, Nuxt with Vite!"
```
```vue [components/Hello.vue]
<script setup>
import config from '~/data/hello.yaml'
</script>
<template>
<h1>{{ config.greeting }}</h1>
</template>
```
::
# Custom useFetch in Nuxt
When working with Nuxt, you might be making the frontend and fetching an external API, and you might want to set some default options for fetching from your API.
The [`$fetch`](https://nuxt.com/docs/api/utils/dollarfetch) utility function (used by the [`useFetch`](https://nuxt.com/docs/api/composables/use-fetch) composable) is intentionally not globally configurable. This is important so that fetching behavior throughout your application remains consistent, and other integrations (like modules) can rely on the behavior of core utilities like `$fetch`.
However, Nuxt provides a way to create a custom fetcher for your API (or multiple fetchers if you have multiple APIs to call).
## Custom `$fetch`
Let's create a custom `$fetch` instance with a [Nuxt plugin](https://nuxt.com/docs/guide/directory-structure/plugins).
::note
`$fetch` is a configured instance of [ofetch](https://github.com/unjs/ofetch){rel="nofollow"} which supports adding the base URL of your Nuxt server as well as direct function calls during SSR (avoiding HTTP roundtrips).
::
Let's pretend here that:
- The main API is <https://api.nuxt.com>{rel="nofollow"}
- We are storing the JWT token in a session with [nuxt-auth-utils](https://github.com/atinux/nuxt-auth-utils){rel="nofollow"}
- If the API responds with a `401` status code, we redirect the user to the `/login` page
```ts [plugins/api.ts]
export default defineNuxtPlugin((nuxtApp) => {
const { session } = useUserSession()
const api = $fetch.create({
baseURL: 'https://api.nuxt.com',
onRequest({ request, options, error }) {
if (session.value?.token) {
// note that this relies on ofetch >= 1.4.0 - you may need to refresh your lockfile
options.headers.set('Authorization', `Bearer ${session.value?.token}`)
}
},
async onResponseError({ response }) {
if (response.status === 401) {
await nuxtApp.runWithContext(() => navigateTo('/login'))
}
}
})
// Expose to useNuxtApp().$api
return {
provide: {
api
}
}
})
```
With this Nuxt plugin, `$api` is exposed from `useNuxtApp()` to make API calls directly from the Vue components:
```vue [app.vue]
<script setup>
const { $api } = useNuxtApp()
const { data: modules } = await useAsyncData('modules', () => $api('/modules'))
</script>
```
::callout
Wrapping with [`useAsyncData`](https://nuxt.com/docs/api/composables/use-async-data) **avoid double data fetching when doing server-side rendering** (server & client on hydration).
::
## Custom `useFetch`/`useAsyncData`
Now that `$api` has the logic we want, let's create a `useAPI` composable to replace the usage of `useAsyncData` + `$api`:
```ts [composables/useAPI.ts]
import type { UseFetchOptions } from 'nuxt/app'
export function useAPI<T>(
url: string | (() => string),
options?: UseFetchOptions<T>,
) {
return useFetch(url, {
...options,
$fetch: useNuxtApp().$api as typeof $fetch
})
}
```
Let's use the new composable and have a nice and clean component:
```vue [app.vue]
<script setup>
const { data: modules } = await useAPI('/modules')
</script>
```
If you want to customize the type of any error returned, you can also do so:
```ts
import type { FetchError } from 'ofetch'
import type { UseFetchOptions } from 'nuxt/app'
interface CustomError {
message: string
statusCode: number
}
export function useAPI<T>(
url: string | (() => string),
options?: UseFetchOptions<T>,
) {
return useFetch<T, FetchError<CustomError>>(url, {
...options,
$fetch: useNuxtApp().$api
})
}
```
::note
This example demonstrates how to use a custom `useFetch`, but the same structure is identical for a custom `useAsyncData`.
::
::link-example
---
to: https://nuxt.com/docs/examples/advanced/use-custom-fetch-composable
---
::
::video-accordion
---
title: Watch a video about custom $fetch and Repository Pattern in Nuxt
video-id: jXH8Tr-exhI
---
::
::note
We are currently discussing to find a cleaner way to let you create a custom fetcher, see <https://github.com/nuxt/nuxt/issues/14736>{rel="nofollow"}.
::
# Sessions and Authentication
## Introduction
In this recipe we'll be setting up authentication in a full-stack Nuxt app using [Nuxt Auth Utils](https://github.com/Atinux/nuxt-auth-utils){rel="nofollow"} which provides convenient utilities for managing client-side and server-side session data.
The module uses secured & sealed cookies to store session data, so you don't need to setup a database to store session data.
## Install nuxt-auth-utils
Install the `nuxt-auth-utils` module using the `nuxi` CLI.
```bash [Terminal]
npx nuxi@latest module add auth-utils
```
::callout
This command will install `nuxt-auth-utils` as dependency and push it in the `modules` section of our `nuxt.config.ts`
::
## Cookie Encryption Key
As `nuxt-auth-utils` uses sealed cookies to store session data, session cookies are encrypted using a secret key from the `NUXT_SESSION_PASSWORD` environment variable.
::note
If not set, this environment variable will be added to your `.env` automatically when running in development mode.
::
```ini [.env]
NUXT_SESSION_PASSWORD=a-random-password-with-at-least-32-characters
```
::important
You'll need to add this environment variable to your production environment before deploying.
::
## Login API Route
For this recipe, we'll create a simple API route to sign-in a user based on static data.
Let's create a `/api/login` API route that will accept a POST request with the email and password in the request body.
```ts [server/api/login.post.ts]
import { z } from 'zod'
const bodySchema = z.object({
email: z.string().email(),
password: z.string().min(8)
})
export default defineEventHandler(async (event) => {
const { email, password } = await readValidatedBody(event, bodySchema.parse)
if (email === 'admin@admin.com' && password === 'iamtheadmin') {
// set the user session in the cookie
// this server util is auto-imported by the auth-utils module
await setUserSession(event, {
user: {
name: 'John Doe'
}
})
return {}
}
throw createError({
statusCode: 401,
message: 'Bad credentials'
})
})
```
::callout
Make sure to install the `zod` dependency in your project (`npm i zod`).
::
::tip{to="https://github.com/atinux/nuxt-auth-utils#server-utils"}
Read more about the `setUserSession` server helper exposed by `nuxt-auth-utils`.
::
## Login Page
The module exposes a Vue composable to know if a user is authenticated in our application:
```vue
<script setup>
const { loggedIn, session, user, clear, fetch } = useUserSession()
</script>
```
Let's create a login page with a form to submit the login data to our `/api/login` route.
```vue [pages/login.vue]
<script setup lang="ts">
const { loggedIn, user, fetch: refreshSession } = useUserSession()
const credentials = reactive({
email: '',
password: '',
})
async function login() {
$fetch('/api/login', {
method: 'POST',
body: credentials
})
.then(async () => {
// Refresh the session on client-side and redirect to the home page
await refreshSession()
await navigateTo('/')
})
.catch(() => alert('Bad credentials'))
}
</script>
<template>
<form @submit.prevent="login">
<input v-model="credentials.email" type="email" placeholder="Email" />
<input v-model="credentials.password" type="password" placeholder="Password" />
<button type="submit">Login</button>
</form>
</template>
```
## Protect API Routes
Protecting server routes is key to making sure your data is safe. Client-side middleware is helpful for the user, but without server-side protection your data can still be accessed. It is critical to protect any routes with sensitive data, we should return a 401 error if the user is not logged in on those.
The `auth-utils` module provides the `requireUserSession` utility function to help make sure that users are logged in and have an active session.
Let's create an example of a `/api/user/stats` route that only authenticated users can access.
```ts [server/api/user/stats.get.ts]
export default defineEventHandler(async (event) => {
// make sure the user is logged in
// This will throw a 401 error if the request doesn't come from a valid user session
const { user } = await requireUserSession(event)
// TODO: Fetch some stats based on the user
return {}
});
```
## Protect App Routes
Our data is safe with the server-side route in place, but without doing anything else, unauthenticated users would probably get some odd data when trying to access the `/users` page. We should create a [client-side middleware](https://nuxt.com/docs/guide/directory-structure/middleware){rel="nofollow"} to protect the route on the client side and redirect users to the login page.
`nuxt-auth-utils` provides a convenient `useUserSession` composable which we'll use to check if the user is logged in, and redirect them if they are not.
We'll create a middleware in the `/middleware` directory. Unlike on the server, client-side middleware is not automatically applied to all endpoints, and we'll need to specify where we want it applied.
```typescript [middleware/authenticated.ts]
export default defineNuxtRouteMiddleware(() => {
const { loggedIn } = useUserSession()
// redirect the user to the login screen if they're not authenticated
if (!loggedIn.value) {
return navigateTo('/login')
}
})
```
## Home Page
Now that we have our app middleware to protect our routes, we can use it on our home page that display our authenticated user informations. If the user is not authenticated, they will be redirected to the login page.
We'll use [`definePageMeta`](https://nuxt.com/docs/api/utils/define-page-meta) to apply the middleware to the route that we want to protect.
```vue [pages/index.vue]
<script setup lang="ts">
definePageMeta({
middleware: ['authenticated'],
})
const { user, clear: clearSession } = useUserSession()
async function logout() {
await clearSession()
await navigateTo('/login')
}
</script>
<template>
<div>
<h1>Welcome {{ user.name }}</h1>
<button @click="logout">Logout</button>
</div>
</template>
```
We also added a logout button to clear the session and redirect the user to the login page.
## Conclusion
We've successfully set up a very basic user authentication and session management in our Nuxt app. We've also protected sensitive routes on the server and client side to ensure that only authenticated users can access them.
As next steps, you can:
- Add authentication using the [20+ supported OAuth providers](https://github.com/atinux/nuxt-auth-utils?tab=readme-ov-file#supported-oauth-providers){rel="nofollow"}
- Add a database to store users, see [Nitro SQL Database](https://nitro.build/guide/database){rel="nofollow"} or [NuxtHub SQL Database](https://hub.nuxt.com/docs/features/database){rel="nofollow"}
- Let user signup with email & password using [password hashing](https://github.com/atinux/nuxt-auth-utils?tab=readme-ov-file#password-hashing){rel="nofollow"}
- Add support for [WebAuthn / Passkeys](https://github.com/atinux/nuxt-auth-utils?tab=readme-ov-file#webauthn-passkey){rel="nofollow"}
Checkout the open source [atidone repository](https://github.com/atinux/atidone){rel="nofollow"} for a full example of a Nuxt app with OAuth authentication, database and CRUD operations.
# <ClientOnly>
The `<ClientOnly>` component is used for purposely rendering a component only on client side.
::note
The content of the default slot will be tree-shaken out of the server build. (This does mean that any CSS used by components within it may not be inlined when rendering the initial HTML.)
::
## Props
- `placeholderTag` | `fallbackTag`: specify a tag to be rendered server-side.
- `placeholder` | `fallback`: specify a content to be rendered server-side.
```vue
<template>
<div>
<Sidebar />
<!-- The <Comment> component will only be rendered on client-side -->
<ClientOnly fallback-tag="span" fallback="Loading comments...">
<Comment />
</ClientOnly>
</div>
</template>
```
## Slots
- `#fallback`: specify a content to be rendered on the server and displayed until `<ClientOnly>` is mounted in the browser.
```vue [pages/example.vue]
<template>
<div>
<Sidebar />
<!-- This renders the "span" element on the server side -->
<ClientOnly fallbackTag="span">
<!-- this component will only be rendered on client side -->
<Comments />
<template #fallback>
<!-- this will be rendered on server side -->
<p>Loading comments...</p>
</template>
</ClientOnly>
</div>
</template>
```
## Examples
### Accessing HTML Elements
Components inside `<ClientOnly>` are rendered only after being mounted. To access the rendered elements in the DOM, you can watch a template ref:
```vue [pages/example.vue]
<script setup lang="ts">
const nuxtWelcomeRef = useTemplateRef('nuxtWelcomeRef')
// The watch will be triggered when the component is available
watch(nuxtWelcomeRef, () => {
console.log('<NuxtWelcome /> mounted')
}, { once: true })
</script>
<template>
<ClientOnly>
<NuxtWelcome ref="nuxtWelcomeRef" />
</ClientOnly>
</template>
```
# <DevOnly>
Nuxt provides the `<DevOnly>` component to render a component only during development.
The content will not be included in production builds.
```vue [pages/example.vue]
<template>
<div>
<Sidebar />
<DevOnly>
<!-- this component will only be rendered during development -->
<LazyDebugBar />
<!-- if you ever require to have a replacement during production -->
<!-- be sure to test these using `nuxt preview` -->
<template #fallback>
<div><!-- empty div for flex.justify-between --></div>
</template>
</DevOnly>
</div>
</template>
```
## Slots
- `#fallback`: if you ever require to have a replacement during production.
```vue
<template>
<div>
<Sidebar />
<DevOnly>
<!-- this component will only be rendered during development -->
<LazyDebugBar />
<!-- be sure to test these using `nuxt preview` -->
<template #fallback>
<div><!-- empty div for flex.justify-between --></div>
</template>
</DevOnly>
</div>
</template>
```
# <NuxtClientFallback>
Nuxt provides the `<NuxtClientFallback>` component to render its content on the client if any of its children trigger an error in SSR.
::note
---
to: https://nuxt.com/docs/guide/going-further/experimental-features#clientfallback
---
This component is experimental and in order to use it you must enable the `experimental.clientFallback` option in your `nuxt.config`.
::
```vue [pages/example.vue]
<template>
<div>
<Sidebar />
<!-- this component will be rendered on client-side -->
<NuxtClientFallback fallback-tag="span">
<Comments />
<BrokeInSSR />
</NuxtClientFallback>
</div>
</template>
```
## Events
- `@ssr-error`: Event emitted when a child triggers an error in SSR. Note that this will only be triggered on the server.
```vue
<template>
<NuxtClientFallback @ssr-error="logSomeError">
<!-- ... -->
</NuxtClientFallback>
</template>
```
## Props
- `placeholderTag` | `fallbackTag`: Specify a fallback tag to be rendered if the slot fails to render on the server.
- **type**: `string`
- **default**: `div`
- `placeholder` | `fallback`: Specify fallback content to be rendered if the slot fails to render.
- **type**: `string`
- `keepFallback`: Keep the fallback content if it failed to render server-side.
- **type**: `boolean`
- **default**: `false`
```vue
<template>
<!-- render <span>Hello world</span> server-side if the default slot fails to render -->
<NuxtClientFallback fallback-tag="span" fallback="Hello world">
<BrokeInSsr />
</NuxtClientFallback>
</template>
```
## Slots
- `#fallback`: specify content to be displayed server-side if the slot fails to render.
```vue
<template>
<NuxtClientFallback>
<!-- ... -->
<template #fallback>
<!-- this will be rendered on server side if the default slot fails to render in ssr -->
<p>Hello world</p>
</template>
</NuxtClientFallback>
</template>
```
# <NuxtPicture>
`<NuxtPicture>` is a drop-in replacement for the native `<picture>` tag.
Usage of `<NuxtPicture>` is almost identical to [`<NuxtImg>`](https://nuxt.com/docs/api/components/nuxt-img) but it also allows serving modern formats like `webp` when possible.
Learn more about the [`<picture>` tag on MDN](https://developer.mozilla.org/en-US/docs/Web/HTML/Element/picture){rel="nofollow"}.
## Setup
In order to use `<NuxtPicture>` you should install and enable the Nuxt Image module:
```bash [Terminal]
npx nuxi@latest module add image
```
::read-more{target="_blank" to="https://image.nuxt.com/usage/nuxt-picture"}
Read more about the `<NuxtPicture>` component.
::
# <Teleport>
::warning
The `to` target of [`<Teleport>`](https://vuejs.org/guide/built-ins/teleport.html){rel="nofollow"} expects a CSS selector string or an actual DOM node. Nuxt currently has SSR support for teleports to `#teleports` only, with client-side support for other targets using a `<ClientOnly>` wrapper.
::
## Body Teleport
```vue
<template>
<button @click="open = true">
Open Modal
</button>
<Teleport to="#teleports">
<div v-if="open" class="modal">
<p>Hello from the modal!</p>
<button @click="open = false">
Close
</button>
</div>
</Teleport>
</template>
```
## Client-side Teleport
```vue
<template>
<ClientOnly>
<Teleport to="#some-selector">
<!-- content -->
</Teleport>
</ClientOnly>
</template>
```
::link-example{to="https://nuxt.com/docs/examples/advanced/teleport"}
::
# <NuxtRouteAnnouncer>
::important
This component is available in Nuxt v3.12+.
::
## Usage
Add `<NuxtRouteAnnouncer/>` in your [`app.vue`](https://nuxt.com/docs/guide/directory-structure/app) or [`layouts/`](https://nuxt.com/docs/guide/directory-structure/layouts) to enhance accessibility by informing assistive technologies about page title changes. This ensures that navigational changes are announced to users relying on screen readers.
```vue [app.vue]
<template>
<NuxtRouteAnnouncer />
<NuxtLayout>
<NuxtPage />
</NuxtLayout>
</template>
```
## Slots
You can pass custom HTML or components through the route announcer's default slot.
```vue
<template>
<NuxtRouteAnnouncer>
<template #default="{ message }">
<p>{{ message }} was loaded.</p>
</template>
</NuxtRouteAnnouncer>
</template>
```
## Props
- `atomic`: Controls if screen readers only announce changes or the entire content. Set to true for full content readouts on updates, false for changes only. (default `false`)
- `politeness`: Sets the urgency for screen reader announcements: `off` (disable the announcement), `polite` (waits for silence), or `assertive` (interrupts immediately). (default `polite`)
::callout
This component is optional. :br
To achieve full customization, you can implement your own one based on [its source code](https://github.com/nuxt/nuxt/blob/main/packages/nuxt/src/app/components/nuxt-route-announcer.ts){rel="nofollow"}.
::
::callout
You can hook into the underlying announcer instance using [the `useRouteAnnouncer` composable](https://nuxt.com/docs/api/composables/use-route-announcer), which allows you to set a custom announcement message.
::
# <NuxtPage>
`<NuxtPage>` is a built-in component that comes with Nuxt. It lets you display top-level or nested pages located in the [`pages/`](https://nuxt.com/docs/guide/directory-structure/pages) directory.
::note
`<NuxtPage>` is a wrapper around [`<RouterView>`](https://router.vuejs.org/api/interfaces/RouterViewProps.html#interface-routerviewprops){rel="nofollow"} from Vue Router. It should be used instead of `<RouterView>` because the former takes additional care of internal states. Otherwise, `useRoute()` may return incorrect paths.
::
`<NuxtPage>` includes the following components:
```vue
<template>
<RouterView #default="{ Component }">
<!-- Optional, when using transitions -->
<Transition>
<!-- Optional, when using keep-alive -->
<KeepAlive>
<Suspense>
<component :is="Component" />
</Suspense>
</KeepAlive>
</Transition>
</RouterView>
</template>
```
By default, Nuxt does not enable `<Transition>` and `<KeepAlive>`. You can enable them in the nuxt.config file or by setting the `transition` and `keepalive` properties on `<NuxtPage>`. If you want to define a specific page, you can set it in `definePageMeta` in the page component.
::warning
If you enable `<Transition>` in your page component, ensure that the page has a single root element.
::
Since `<NuxtPage>` uses `<Suspense>` under the hood, the component lifecycle behavior during page changes differs from that of a typical Vue application.
In a typical Vue application, a new page component is mounted **only after** the previous one has been fully unmounted. However, in Nuxt, due to how Vue `<Suspense>` is implemented, the new page component is mounted **before** the previous one is unmounted.
## Props
- `name`: tells `<RouterView>` to render the component with the corresponding name in the matched route record's components option.
- type: `string`
- `route`: route location that has all of its components resolved.
- type: `RouteLocationNormalized`
- `pageKey`: control when the `NuxtPage` component is re-rendered.
- type: `string` or `function`
- `transition`: define global transitions for all pages rendered with the `NuxtPage` component.
- type: `boolean` or [`TransitionProps`](https://vuejs.org/api/built-in-components#transition){rel="nofollow"}
- `keepalive`: control state preservation of pages rendered with the `NuxtPage` component.
- type: `boolean` or [`KeepAliveProps`](https://vuejs.org/api/built-in-components#keepalive){rel="nofollow"}
::tip
Nuxt automatically resolves the `name` and `route` by scanning and rendering all Vue component files found in the `/pages` directory.
::
## Example
For example, if you pass a key that never changes, the `<NuxtPage>` component will be rendered only once - when it is first mounted.
```vue [app.vue]
<template>
<NuxtPage page-key="static" />
</template>
```
You can also use a dynamic key based on the current route:
```html
<NuxtPage :page-key="route => route.fullPath" />
```
::warning
Don't use `$route` object here as it can cause problems with how `<NuxtPage>` renders pages with `<Suspense>`.
::
Alternatively, `pageKey` can be passed as a `key` value via [`definePageMeta`](https://nuxt.com/docs/api/utils/define-page-meta) from the `<script>` section of your Vue component in the `/pages` directory.
```vue [pages/my-page.vue]
<script setup lang="ts">
definePageMeta({
key: route => route.fullPath
})
</script>
```
::link-example{to="https://nuxt.com/docs/examples/routing/pages"}
::
## Page's Ref
To get the `ref` of a page component, access it through `ref.value.pageRef`
```vue [app.vue]
<script setup lang="ts">
const page = ref()
function logFoo () {
page.value.pageRef.foo()
}
</script>
<template>
<NuxtPage ref="page" />
</template>
```
```vue [my-page.vue]
<script setup lang="ts">
const foo = () => {
console.log('foo method called')
}
defineExpose({
foo,
})
</script>
```
## Custom Props
`<NuxtPage>` also accepts custom props that you may need to pass further down the hierarchy.
For example, in the below example, the value of `foobar` will be passed to the `NuxtPage` component and then to the page components.
```vue [app.vue]
<template>
<NuxtPage :foobar="123" />
</template>
```
We can access the `foobar` prop in the page component:
```vue [pages/page.vue]
<script setup lang="ts">
const props = defineProps<{ foobar: number }>()
console.log(props.foobar) // Outputs: 123
```
If you have not defined the prop with `defineProps`, any props passed down to `NuxtPage` can still be accessed directly from the page `attrs`:
```vue [pages/page.vue]
<script setup lang="ts">
const attrs = useAttrs()
console.log(attrs.foobar) // Outputs: 123
</script>
```
::read-more{to="https://nuxt.com/docs/guide/directory-structure/pages"}
::
# <NuxtLayout>
You can use `<NuxtLayout />` component to activate the `default` layout on `app.vue` or `error.vue`.
```vue [app.vue]
<template>
<NuxtLayout>
some page content
</NuxtLayout>
</template>
```
::read-more{to="https://nuxt.com/docs/guide/directory-structure/layouts"}
::
## Props
- `name`: Specify a layout name to be rendered, can be a string, reactive reference or a computed property. It **must** match the name of the corresponding layout file in the [`layouts/`](https://nuxt.com/docs/guide/directory-structure/layouts) directory.
- **type**: `string`
- **default**: `default`
```vue [pages/index.vue]
<script setup lang="ts">
// layouts/custom.vue
const layout = 'custom'
</script>
<template>
<NuxtLayout :name="layout">
<NuxtPage />
</NuxtLayout>
</template>
```
::note
Please note the layout name is normalized to kebab-case, so if your layout file is named `errorLayout.vue`, it will become `error-layout` when passed as a `name` property to `<NuxtLayout />`.
::
```vue [error.vue]
<template>
<NuxtLayout name="error-layout">
<NuxtPage />
</NuxtLayout>
</template>
```
::read-more{to="https://nuxt.com/docs/guide/directory-structure/layouts"}
Read more about dynamic layouts.
::
- `fallback`: If an invalid layout is passed to the `name` prop, no layout will be rendered. Specify a `fallback` layout to be rendered in this scenario. It **must** match the name of the corresponding layout file in the [`layouts/`](https://nuxt.com/docs/guide/directory-structure/layouts) directory.
- **type**: `string`
- **default**: `null`
## Additional Props
`NuxtLayout` also accepts any additional props that you may need to pass to the layout. These custom props are then made accessible as attributes.
```vue [pages/some-page.vue]
<template>
<div>
<NuxtLayout name="custom" title="I am a custom layout">
<-- ... -->
</NuxtLayout>
</div>
</template>
```
In the above example, the value of `title` will be available using `$attrs.title` in the template or `useAttrs().title` in `<script setup>` at custom.vue.
```vue [layouts/custom.vue]
<script setup lang="ts">
const layoutCustomProps = useAttrs()
console.log(layoutCustomProps.title) // I am a custom layout
</script>
```
## Transitions
`<NuxtLayout />` renders incoming content via `<slot />`, which is then wrapped around Vue’s `<Transition />` component to activate layout transition. For this to work as expected, it is recommended that `<NuxtLayout />` is **not** the root element of the page component.
::code-group
```vue [pages/index.vue]
<template>
<div>
<NuxtLayout name="custom">
<template #header> Some header template content. </template>
</NuxtLayout>
</div>
</template>
```
```vue [layouts/custom.vue]
<template>
<div>
<!-- named slot -->
<slot name="header" />
<slot />
</div>
</template>
```
::
::read-more{to="https://nuxt.com/docs/getting-started/transitions"}
::
## Layout's Ref
To get the ref of a layout component, access it through `ref.value.layoutRef`.
::code-group
```vue [app.vue]
<script setup lang="ts">
const layout = ref()
function logFoo () {
layout.value.layoutRef.foo()
}
</script>
<template>
<NuxtLayout ref="layout">
default layout
</NuxtLayout>
</template>
```
```vue [layouts/default.vue]
<script setup lang="ts">
const foo = () => console.log('foo')
defineExpose({
foo
})
</script>
<template>
<div>
default layout
<slot />
</div>
</template>
```
::
::read-more{to="https://nuxt.com/docs/guide/directory-structure/layouts"}
::
# <NuxtLink>
::note
`<NuxtLink>` is a drop-in replacement for both Vue Router's `<RouterLink>` component and HTML's `<a>` tag. It intelligently determines whether the link is *internal* or *external* and renders it accordingly with available optimizations (prefetching, default attributes, etc.)
::
## Internal Routing
In this example, we use `<NuxtLink>` component to link to another page of the application.
::code-group
```vue [pages/index.vue]
<template>
<NuxtLink to="/about">About page</NuxtLink>
</template>
```
```html [(Renders as) index.html]
<!-- (Vue Router & Smart Prefetching) -->
<a href="/about">About page</a>
```
::
### Passing Params to Dynamic Routes
In this example, we pass the `id` param to link to the route `~/pages/posts/[id].vue`.
::code-group
```vue [pages/index.vue]
<template>
<NuxtLink :to="{ name: 'posts-id', params: { id: 123 } }">
Post 123
</NuxtLink>
</template>
```
```html [(Renders as) index.html]
<a href="/posts/123">Post 123</a>
```
::
::tip
Check out the Pages panel in Nuxt DevTools to see the route name and the params it might take.
::
### Handling Static File and Cross-App Links
By default, `<NuxtLink>` uses Vue Router's client side navigation for relative route. When linking to static files in the `/public` directory or to another application hosted on the same domain, it might result in unexpected 404 errors because they are not part of the client routes. In such cases, you can use the `external` prop with `<NuxtLink>` to bypass Vue Router's internal routing mechanism.
The `external` prop explicitly indicates that the link is external. `<NuxtLink>` will render the link as a standard HTML `<a>` tag. This ensures the link behaves correctly, bypassing Vue Router’s logic and directly pointing to the resource.
#### Linking to Static Files
For static files in the `/public` directory, such as PDFs or images, use the `external` prop to ensure the link resolves correctly.
```vue [pages/index.vue]
<template>
<NuxtLink to="/example-report.pdf" external>
Download Report
</NuxtLink>
</template>
```
#### Linking to a Cross-App URL
When pointing to a different application on the same domain, using the `external` prop ensures the correct behavior.
```vue [pages/index.vue]
<template>
<NuxtLink to="/another-app" external>
Go to Another App
</NuxtLink>
</template>
```
Using the `external` prop or relying on automatic handling ensures proper navigation, avoids unexpected routing issues, and improves compatibility with static resources or cross-application scenarios.
## External Routing
In this example, we use `<NuxtLink>` component to link to a website.
```vue [app.vue]
<template>
<NuxtLink to="https://nuxtjs.org">
Nuxt website
</NuxtLink>
<!-- <a href="https://nuxtjs.org" rel="noopener noreferrer">...</a> -->
</template>
```
## `rel` and `noRel` Attributes
A `rel` attribute of `noopener noreferrer` is applied by default to links with a `target` attribute or to absolute links (e.g., links starting with `http://`, `https://`, or `//`).
- `noopener` solves a [security bug](https://mathiasbynens.github.io/rel-noopener/){rel="nofollow"} in older browsers.
- `noreferrer` improves privacy for your users by not sending the `Referer` header to the linked site.
These defaults have no negative impact on SEO and are considered [best practice](https://developer.chrome.com/docs/lighthouse/best-practices/external-anchors-use-rel-noopener){rel="nofollow"}.
When you need to overwrite this behavior you can use the `rel` or `noRel` props.
```vue [app.vue]
<template>
<NuxtLink to="https://twitter.com/nuxt_js">
Nuxt Twitter
</NuxtLink>
<!-- <a href="https://twitter.com/nuxt_js" rel="noopener noreferrer">...</a> -->
<NuxtLink to="https://discord.nuxtjs.org" rel="noopener">
Nuxt Discord
</NuxtLink>
<!-- <a href="https://discord.nuxtjs.org" rel="noopener">...</a> -->
<NuxtLink to="/about" target="_blank">About page</NuxtLink>
<!-- <a href="/about" target="_blank" rel="noopener noreferrer">...</a> -->
</template>
```
A `noRel` prop can be used to prevent the default `rel` attribute from being added to the absolute links.
```vue [app.vue]
<template>
<NuxtLink to="https://github.com/nuxt" no-rel>
Nuxt GitHub
</NuxtLink>
<!-- <a href="https://github.com/nuxt">...</a> -->
</template>
```
::note
`noRel` and `rel` cannot be used together. `rel` will be ignored.
::
## Prefetch Links
Nuxt automatically includes smart prefetching. That means it detects when a link is visible (by default), either in the viewport or when scrolling and prefetches the JavaScript for those pages so that they are ready when the user clicks the link. Nuxt only loads the resources when the browser isn't busy and skips prefetching if your connection is offline or if you only have 2g connection.
```vue [pages/index.vue]
<NuxtLink to="/about" no-prefetch>About page not pre-fetched</NuxtLink>
<NuxtLink to="/about" :prefetch="false">About page not pre-fetched</NuxtLink>
```
### Custom Prefetch Triggers
We now support custom prefetch triggers for `<NuxtLink>` after `v3.13.0`. You can use the `prefetchOn` prop to control when to prefetch links.
```vue
<template>
<NuxtLink prefetch-on="visibility">
This will prefetch when it becomes visible (default)
</NuxtLink>
<NuxtLink prefetch-on="interaction">
This will prefetch when hovered or when it gains focus
</NuxtLink>
</template>
```
- `visibility`: Prefetches when the link becomes visible in the viewport. Monitors the element's intersection with the viewport using the [Intersection Observer API](https://developer.mozilla.org/en-US/docs/Web/API/Intersection_Observer_API){rel="nofollow"}. Prefetching is triggered when the element is scrolled into view.
- `interaction`: Prefetches when the link is hovered or focused. This approach listens for `pointerenter` and `focus` events, proactively prefetching resources when the user indicates intent to interact.
You can also use an object to configure `prefetchOn`:
```vue
<template>
<NuxtLink :prefetch-on="{ interaction: true }">
This will prefetch when hovered or when it gains focus
</NuxtLink>
</template>
```
That you probably don't want both enabled!
```vue
<template>
<NuxtLink :prefetch-on="{ visibility: true, interaction: true }">
This will prefetch when hovered/focus - or when it becomes visible
</NuxtLink>
</template>
```
This configuration will observe when the element enters the viewport and also listen for `pointerenter` and `focus` events. This may result in unnecessary resource usage or redundant prefetching, as both triggers can prefetch the same resource under different conditions.
### Enable Cross-origin Prefetch
To enable cross-origin prefetching, you can set the `crossOriginPrefetch` option in your `nuxt.config`. This will enable cross-origin prefetching using the [Speculation Rules API](https://developer.mozilla.org/en-US/docs/Web/API/Speculation_Rules_API){rel="nofollow"}.
```ts [nuxt.config.ts]
export default defineNuxtConfig({
experimental: {
crossOriginPrefetch: true,
},
})
```
### Disable prefetch globally
It's also possible to enable/disable prefetching all links globally for your app.
```ts [nuxt.config.ts]
export default defineNuxtConfig({
experimental: {
defaults: {
nuxtLink: {
prefetch: false,
},
},
},
})
```
## Props
### RouterLink
When not using `external`, `<NuxtLink>` supports all Vue Router's [`RouterLink` props](https://router.vuejs.org/api/interfaces/RouterLinkProps.html){rel="nofollow"}
- `to`: Any URL or a [route location object](https://router.vuejs.org/api/#RouteLocation){rel="nofollow"} from Vue Router
- `custom`: Whether `<NuxtLink>` should wrap its content in an `<a>` element. It allows taking full control of how a link is rendered and how navigation works when it is clicked. Works the same as [Vue Router's `custom` prop](https://router.vuejs.org/api/interfaces/RouterLinkProps.html#Properties-custom){rel="nofollow"}
- `exactActiveClass`: A class to apply on exact active links. Works the same as [Vue Router's `exactActiveClass` prop](https://router.vuejs.org/api/interfaces/RouterLinkProps.html#Properties-exactActiveClass){rel="nofollow"} on internal links. Defaults to Vue Router's default (`"router-link-exact-active"`)
- `activeClass`: A class to apply on active links. Works the same as [Vue Router's `activeClass` prop](https://router.vuejs.org/api/interfaces/RouterLinkProps.html#Properties-activeClass){rel="nofollow"} on internal links. Defaults to Vue Router's default (`"router-link-active"`)
- `replace`: Works the same as [Vue Router's `replace` prop](https://router.vuejs.org/api/interfaces/RouteLocationOptions.html#Properties-replace){rel="nofollow"} on internal links
- `ariaCurrentValue`: An `aria-current` attribute value to apply on exact active links. Works the same as [Vue Router's `ariaCurrentValue` prop](https://router.vuejs.org/api/interfaces/RouterLinkProps.html#Properties-ariaCurrentValue){rel="nofollow"} on internal links
### NuxtLink
- `href`: An alias for `to`. If used with `to`, `href` will be ignored
- `noRel`: If set to `true`, no `rel` attribute will be added to the external link
- `external`: Forces the link to be rendered as an `<a>` tag instead of a Vue Router `RouterLink`.
- `prefetch`: When enabled will prefetch middleware, layouts and payloads (when using [payloadExtraction](https://nuxt.com/docs/api/nuxt-config#crossoriginprefetch)) of links in the viewport. Used by the experimental [crossOriginPrefetch](https://nuxt.com/docs/api/nuxt-config#crossoriginprefetch) config.
- `prefetchOn`: Allows custom control of when to prefetch links. Possible options are `interaction` and `visibility` (default). You can also pass an object for full control, for example: `{ interaction: true, visibility: true }`. This prop is only used when `prefetch` is enabled (default) and `noPrefetch` is not set.
- `noPrefetch`: Disables prefetching.
- `prefetchedClass`: A class to apply to links that have been prefetched.
### Anchor
- `target`: A `target` attribute value to apply on the link
- `rel`: A `rel` attribute value to apply on the link. Defaults to `"noopener noreferrer"` for external links.
::tip
Defaults can be overwritten, see [overwriting defaults](https://nuxt.com/#overwriting-defaults) if you want to change them.
::
## Overwriting Defaults
### In Nuxt Config
You can overwrite some `<NuxtLink>` defaults in your [`nuxt.config`](https://nuxt.com/docs/api/nuxt-config#defaults)
::important
These options will likely be moved elsewhere in the future, such as into `app.config` or into the `app/` directory.
::
```ts [nuxt.config.ts]
export default defineNuxtConfig({
experimental: {
defaults: {
nuxtLink: {
// default values
componentName: 'NuxtLink',
externalRelAttribute: 'noopener noreferrer',
activeClass: 'router-link-active',
exactActiveClass: 'router-link-exact-active',
prefetchedClass: undefined, // can be any valid string class name
trailingSlash: undefined // can be 'append' or 'remove'
prefetch: true,
prefetchOn: { visibility: true }
}
}
}
})
```
### Custom Link Component
You can overwrite `<NuxtLink>` defaults by creating your own link component using `defineNuxtLink`.
```js [components/MyNuxtLink.ts]
export default defineNuxtLink({
componentName: 'MyNuxtLink',
/* see signature below for more */
})
```
You can then use `<MyNuxtLink />` component as usual with your new defaults.
### `defineNuxtLink` Signature
```ts
interface NuxtLinkOptions {
componentName?: string;
externalRelAttribute?: string;
activeClass?: string;
exactActiveClass?: string;
trailingSlash?: 'append' | 'remove'
prefetch?: boolean
prefetchedClass?: string
prefetchOn?: Partial<{
visibility: boolean
interaction: boolean
}>
}
function defineNuxtLink(options: NuxtLinkOptions): Component {}
```
- `componentName`: A name for the component. Default is `NuxtLink`.
- `externalRelAttribute`: A default `rel` attribute value applied on external links. Defaults to `"noopener noreferrer"`. Set it to `""` to disable
- `activeClass`: A default class to apply on active links. Works the same as [Vue Router's `linkActiveClass` option](https://router.vuejs.org/api/interfaces/RouterOptions.html#Properties-linkActiveClass){rel="nofollow"}. Defaults to Vue Router's default (`"router-link-active"`)
- `exactActiveClass`: A default class to apply on exact active links. Works the same as [Vue Router's `linkExactActiveClass` option](https://router.vuejs.org/api/interfaces/RouterOptions.html#Properties-linkExactActiveClass){rel="nofollow"}. Defaults to Vue Router's default (`"router-link-exact-active"`)
- `trailingSlash`: An option to either add or remove trailing slashes in the `href`. If unset or not matching the valid values `append` or `remove`, it will be ignored.
- `prefetch`: Whether or not to prefetch links by default.
- `prefetchOn`: Granular control of which prefetch strategies to apply by default.
- `prefetchedClass`: A default class to apply to links that have been prefetched.
::link-example{to="https://nuxt.com/docs/examples/routing/pages"}
::
# <NuxtLoadingIndicator>
## Usage
Add `<NuxtLoadingIndicator/>` in your [`app.vue`](https://nuxt.com/docs/guide/directory-structure/app) or [`layouts/`](https://nuxt.com/docs/guide/directory-structure/layouts).
```vue [app.vue]
<template>
<NuxtLoadingIndicator />
<NuxtLayout>
<NuxtPage />
</NuxtLayout>
</template>
```
::link-example{to="https://nuxt.com/docs/examples/routing/pages"}
::
## Slots
You can pass custom HTML or components through the loading indicator's default slot.
## Props
- `color`: The color of the loading bar. It can be set to `false` to turn off explicit color styling.
- `errorColor`: The color of the loading bar when `error` is set to `true`.
- `height`: Height of the loading bar, in pixels (default `3`).
- `duration`: Duration of the loading bar, in milliseconds (default `2000`).
- `throttle`: Throttle the appearing and hiding, in milliseconds (default `200`).
- `estimatedProgress`: By default Nuxt will back off as it approaches 100%. You can provide a custom function to customize the progress estimation, which is a function that receives the duration of the loading bar (above) and the elapsed time. It should return a value between 0 and 100.
::note
This component is optional. :br
To achieve full customization, you can implement your own one based on [its source code](https://github.com/nuxt/nuxt/blob/main/packages/nuxt/src/app/components/nuxt-loading-indicator.ts){rel="nofollow"}.
::
::note
You can hook into the underlying indicator instance using [the `useLoadingIndicator` composable](https://nuxt.com/docs/api/composables/use-loading-indicator), which will allow you to trigger start/finish events yourself.
::
::tip
The loading indicator's speed gradually decreases after reaching a specific point controlled by `estimatedProgress`. This adjustment provides a more accurate reflection of longer page loading times and prevents the indicator from prematurely showing 100% completion.
::
# <NuxtErrorBoundary>
::tip
The `<NuxtErrorBoundary>` uses Vue's [`onErrorCaptured`](https://vuejs.org/api/composition-api-lifecycle.html#onerrorcaptured){rel="nofollow"} hook under the hood.
::
## Events
- `@error`: Event emitted when the default slot of the component throws an error.
```vue
<template>
<NuxtErrorBoundary @error="logSomeError">
<!-- ... -->
</NuxtErrorBoundary>
</template>
```
## Slots
- `#error`: Specify a fallback content to display in case of error.
```vue
<template>
<NuxtErrorBoundary>
<!-- ... -->
<template #error="{ error }">
<p>An error occurred: {{ error }}</p>
</template>
</NuxtErrorBoundary>
</template>
```
::read-more{to="https://nuxt.com/docs/getting-started/error-handling"}
::
# <NuxtWelcome>
It includes links to the Nuxt documentation, source code, and social media accounts.
```vue [app.vue]
<template>
<NuxtWelcome />
</template>
```
::read-more
---
target: _blank
to: https://templates.ui.nuxtjs.org/templates/welcome
---
Preview the `<NuxtWelcome />` component.
::
::tip
This component is part of [nuxt/assets](https://github.com/nuxt/assets){rel="nofollow"}.
::
# <NuxtIsland>
When rendering an island component, the content of the island component is static, thus no JS is downloaded client-side.
Changing the island component props triggers a refetch of the island component to re-render it again.
::note
Global styles of your application are sent with the response.
::
::tip
Server only components use `<NuxtIsland>` under the hood
::
## Props
- `name` : Name of the component to render.
- **type**: `string`
- **required**
- `lazy`: Make the component non-blocking.
- **type**: `boolean`
- **default**: `false`
- `props`: Props to send to the component to render.
- **type**: `Record<string, any>`
- `source`: Remote source to call the island to render.
- **type**: `string`
- **dangerouslyLoadClientComponents**: Required to load components from a remote source.
- **type**: `boolean`
- **default**: `false`
::note
Remote islands need `experimental.componentIslands` to be `'local+remote'` in your `nuxt.config`.
It is strongly discouraged to enable `dangerouslyLoadClientComponents` as you can't trust a remote server's javascript.
::
::note
By default, component islands are scanned from the `~/components/islands/` directory. So the `~/components/islands/MyIsland.vue` component could be rendered with `<NuxtIsland name="MyIsland" />`.
::
## Slots
Slots can be passed to an island component if declared.
Every slot is interactive since the parent component is the one providing it.
Some slots are reserved to `NuxtIsland` for special cases.
- `#fallback`: Specify the content to be rendered before the island loads (if the component is lazy) or if `NuxtIsland` fails to fetch the component.
## Ref
- `refresh()`
- **type**: `() => Promise<void>`
- **description**: force refetch the server component by refetching it.
## Events
- `error`
- **parameters**:
- **error**:
- **type**: `unknown`
- **description**: emitted when when `NuxtIsland` fails to fetch the new island.
# <NuxtImg>
`<NuxtImg>` is a drop-in replacement for the native `<img>` tag.
- Uses built-in provider to optimize local and remote images
- Converts `src` to provider-optimized URLs
- Automatically resizes images based on `width` and `height`
- Generates responsive sizes when providing `sizes` option
- Supports native lazy loading as well as other `<img>` attributes
## Setup
In order to use `<NuxtImg>` you should install and enable the Nuxt Image module:
```bash [Terminal]
npx nuxi@latest module add image
```
## Usage
`<NuxtImg>` outputs a native `img` tag directly (without any wrapper around it). Use it like you would use the `<img>` tag:
```html
<NuxtImg src="/nuxt-icon.png" />
```
Will result in:
```html
<img src="/nuxt-icon.png" />
```
::read-more{target="_blank" to="https://image.nuxt.com/usage/nuxt-img"}
Read more about the `<NuxtImg>` component.
::
# onPrehydrate
::important
This composable is available in Nuxt v3.12+.
::
`onPrehydrate` is a composable lifecycle hook that allows you to run a callback on the client immediately before
Nuxt hydrates the page.
::note
This is an advanced utility and should be used with care. For example, [`nuxt-time`](https://github.com/danielroe/nuxt-time/pull/251){rel="nofollow"} and [`@nuxtjs/color-mode`](https://github.com/nuxt-modules/color-mode/blob/main/src/script.js){rel="nofollow"} manipulate the DOM to avoid hydration mismatches.
::
## Usage
`onPrehydrate` can be called directly in the setup function of a Vue component (for example, in `<script setup>`), or in a plugin.
It will only have an effect when it is called on the server, and it will not be included in your client build.
## Parameters
- `callback`: A function that will be stringified and inlined in the HTML. It should not have any external
dependencies (such as auto-imports) or refer to variables defined outside the callback. The callback will run
before Nuxt runtime initializes so it should not rely on the Nuxt or Vue context.
## Example
```vue [app.vue] twoslash
<script setup lang="ts">
declare const window: Window
// ---cut---
// onPrehydrate is guaranteed to run before Nuxt hydrates
onPrehydrate(() => {
console.log(window)
})
// As long as it only has one root node, you can access the element
onPrehydrate((el) => {
console.log(el.outerHTML)
// <div data-v-inspector="app.vue:15:3" data-prehydrate-id=":b3qlvSiBeH:"> Hi there </div>
})
// For _very_ advanced use cases (such as not having a single root node) you
// can access/set `data-prehydrate-id` yourself
const prehydrateId = onPrehydrate((el) => {})
</script>
<template>
<div>
Hi there
</div>
</template>
```
# useAppConfig
## Usage
```ts
const appConfig = useAppConfig()
console.log(appConfig)
```
::read-more{to="https://nuxt.com/docs/guide/directory-structure/app-config"}
::
# useAsyncData
Within your pages, components, and plugins you can use useAsyncData to get access to data that resolves asynchronously.
::note
[`useAsyncData`](https://nuxt.com/docs/api/composables/use-async-data) is a composable meant to be called directly in the [Nuxt context](https://nuxt.com/docs/guide/going-further/nuxt-app#the-nuxt-context). It returns reactive composables and handles adding responses to the Nuxt payload so they can be passed from server to client **without re-fetching the data on client side** when the page hydrates.
::
## Usage
```vue [pages/index.vue]
<script setup lang="ts">
const { data, status, error, refresh, clear } = await useAsyncData(
'mountains',
() => $fetch('https://api.nuxtjs.dev/mountains')
)
</script>
```
::warning
If you're using a custom useAsyncData wrapper, do not await it in the composable, as that can cause unexpected behavior. Please follow [this recipe](https://nuxt.com/docs/guide/recipes/custom-usefetch#custom-usefetch) for more information on how to make a custom async data fetcher.
::
::note
`data`, `status` and `error` are Vue refs and they should be accessed with `.value` when used within the `<script setup>`, while `refresh`/`execute` and `clear` are plain functions.
::
### Watch Params
The built-in `watch` option allows automatically rerunning the fetcher function when any changes are detected.
```vue [pages/index.vue]
<script setup lang="ts">
const page = ref(1)
const { data: posts } = await useAsyncData(
'posts',
() => $fetch('https://fakeApi.com/posts', {
params: {
page: page.value
}
}), {
watch: [page]
}
)
</script>
```
### Reactive Keys
You can use a computed ref, plain ref or a getter function as the key, allowing for dynamic data fetching that automatically updates when the key changes:
```vue [pages/[id\\].vue]
<script setup lang="ts">
const route = useRoute()
const userId = computed(() => `user-${route.params.id}`)
// When the route changes and userId updates, the data will be automatically refetched
const { data: user } = useAsyncData(
userId,
() => fetchUserById(route.params.id)
)
</script>
```
::warning
[`useAsyncData`](https://nuxt.com/docs/api/composables/use-async-data) is a reserved function name transformed by the compiler, so you should not name your own function [`useAsyncData`](https://nuxt.com/docs/api/composables/use-async-data).
::
::read-more
---
to: https://nuxt.com/docs/getting-started/data-fetching#useasyncdata
---
::
## Params
- `key`: a unique key to ensure that data fetching can be properly de-duplicated across requests. If you do not provide a key, then a key that is unique to the file name and line number of the instance of `useAsyncData` will be generated for you.
- `handler`: an asynchronous function that must return a truthy value (for example, it should not be `undefined` or `null`) or the request may be duplicated on the client side.
:warning[The `handler` function should be **side-effect free** to ensure predictable behavior during SSR and CSR hydration. If you need to trigger side effects, use the [`callOnce`](https://nuxt.com/docs/api/utils/call-once) utility to do so.]
- `options`:
- `server`: whether to fetch the data on the server (defaults to `true`)
- `lazy`: whether to resolve the async function after loading the route, instead of blocking client-side navigation (defaults to `false`)
- `immediate`: when set to `false`, will prevent the request from firing immediately. (defaults to `true`)
- `default`: a factory function to set the default value of the `data`, before the async function resolves - useful with the `lazy: true` or `immediate: false` option
- `transform`: a function that can be used to alter `handler` function result after resolving
- `getCachedData`: Provide a function which returns cached data. A `null` or `undefined` return value will trigger a fetch. By default, this is:
```ts
const getDefaultCachedData = (key, nuxtApp, ctx) => nuxtApp.isHydrating
? nuxtApp.payload.data[key]
: nuxtApp.static.data[key]
```
Which only caches data when `experimental.payloadExtraction` of `nuxt.config` is enabled.
- `pick`: only pick specified keys in this array from the `handler` function result
- `watch`: watch reactive sources to auto-refresh
- `deep`: return data in a deep ref object (it is `true` by default). It can be set to `false` to return data in a shallow ref object, which can improve performance if your data does not need to be deeply reactive.
- `dedupe`: avoid fetching same key more than once at a time (defaults to `cancel`). Possible options:
- `cancel` - cancels existing requests when a new one is made
- `defer` - does not make new requests at all if there is a pending request
::note
Under the hood, `lazy: false` uses `<Suspense>` to block the loading of the route before the data has been fetched. Consider using `lazy: true` and implementing a loading state instead for a snappier user experience.
::
::read-more{to="https://nuxt.com/docs/api/composables/use-lazy-async-data"}
You can use `useLazyAsyncData` to have the same behavior as `lazy: true` with `useAsyncData`.
::
::video-accordion
---
title: Watch a video from Alexander Lichter about client-side caching with
getCachedData
video-id: aQPR0xn-MMk
---
::
### Shared State and Option Consistency
When using the same key for multiple `useAsyncData` calls, they will share the same `data`, `error` and `status` refs. This ensures consistency across components but requires option consistency.
The following options **must be consistent** across all calls with the same key:
- `handler` function
- `deep` option
- `transform` function
- `pick` array
- `getCachedData` function
- `default` value
The following options **can differ** without triggering warnings:
- `server`
- `lazy`
- `immediate`
- `dedupe`
- `watch`
```ts
// ❌ This will trigger a development warning
const { data: users1 } = useAsyncData('users', () => $fetch('/api/users'), { deep: false })
const { data: users2 } = useAsyncData('users', () => $fetch('/api/users'), { deep: true })
// ✅ This is allowed
const { data: users1 } = useAsyncData('users', () => $fetch('/api/users'), { immediate: true })
const { data: users2 } = useAsyncData('users', () => $fetch('/api/users'), { immediate: false })
```
## Return Values
- `data`: the result of the asynchronous function that is passed in.
- `refresh`/`execute`: a function that can be used to refresh the data returned by the `handler` function.
- `error`: an error object if the data fetching failed.
- `status`: a string indicating the status of the data request:
- `idle`: when the request has not started, such as:
- when `execute` has not yet been called and `{ immediate: false }` is set
- when rendering HTML on the server and `{ server: false }` is set
- `pending`: the request is in progress
- `success`: the request has completed successfully
- `error`: the request has failed
- `clear`: a function which will set `data` to `undefined`, set `error` to `null`, set `status` to `'idle'`, and mark any currently pending requests as cancelled.
By default, Nuxt waits until a `refresh` is finished before it can be executed again.
::note
If you have not fetched data on the server (for example, with `server: false`), then the data *will not* be fetched until hydration completes. This means even if you await [`useAsyncData`](https://nuxt.com/docs/api/composables/use-async-data) on the client side, `data` will remain `null` within `<script setup>`.
::
## Type
```ts [Signature]
function useAsyncData<DataT, DataE>(
handler: (nuxtApp?: NuxtApp) => Promise<DataT>,
options?: AsyncDataOptions<DataT>
): AsyncData<DataT, DataE>
function useAsyncData<DataT, DataE>(
key: string | Ref<string> | ComputedRef<string>,
handler: (nuxtApp?: NuxtApp) => Promise<DataT>,
options?: AsyncDataOptions<DataT>
): Promise<AsyncData<DataT, DataE>>
type AsyncDataOptions<DataT> = {
server?: boolean
lazy?: boolean
immediate?: boolean
deep?: boolean
dedupe?: 'cancel' | 'defer'
default?: () => DataT | Ref<DataT> | null
transform?: (input: DataT) => DataT | Promise<DataT>
pick?: string[]
watch?: WatchSource[] | false
getCachedData?: (key: string, nuxtApp: NuxtApp, ctx: AsyncDataRequestContext) => DataT | undefined
}
type AsyncDataRequestContext = {
/** The reason for this data request */
cause: 'initial' | 'refresh:manual' | 'refresh:hook' | 'watch'
}
type AsyncData<DataT, ErrorT> = {
data: Ref<DataT | null>
refresh: (opts?: AsyncDataExecuteOptions) => Promise<void>
execute: (opts?: AsyncDataExecuteOptions) => Promise<void>
clear: () => void
error: Ref<ErrorT | null>
status: Ref<AsyncDataRequestStatus>
};
interface AsyncDataExecuteOptions {
dedupe?: 'cancel' | 'defer'
}
type AsyncDataRequestStatus = 'idle' | 'pending' | 'success' | 'error'
```
::read-more{to="https://nuxt.com/docs/getting-started/data-fetching"}
::
# useCookie
Within your pages, components and plugins you can use `useCookie`, an SSR-friendly composable to read and write cookies.
```ts
const cookie = useCookie(name, options)
```
::note
`useCookie` only works in the [Nuxt context](https://nuxt.com/docs/guide/going-further/nuxt-app#the-nuxt-context).
::
::tip
`useCookie` ref will automatically serialize and deserialize cookie value to JSON.
::
## Example
The example below creates a cookie called `counter`. If the cookie doesn't exist, it is initially set to a random value. Whenever we update the `counter` variable, the cookie will be updated accordingly.
```vue [app.vue]
<script setup lang="ts">
const counter = useCookie('counter')
counter.value = counter.value || Math.round(Math.random() * 1000)
</script>
<template>
<div>
<h1>Counter: {{ counter || '-' }}</h1>
<button @click="counter = null">reset</button>
<button @click="counter--">-</button>
<button @click="counter++">+</button>
</div>
</template>
```
::link-example{to="https://nuxt.com/docs/examples/advanced/use-cookie"}
::
::note
Refresh `useCookie` values manually when a cookie has changed with [`refreshCookie`](https://nuxt.com/docs/api/utils/refresh-cookie).
::
## Options
Cookie composable accepts several options which let you modify the behavior of cookies.
Most of the options will be directly passed to the [cookie](https://github.com/jshttp/cookie){rel="nofollow"} package.
### `maxAge` / `expires`
Use these options to set the expiration of the cookie.
`maxAge`: Specifies the `number` (in seconds) to be the value for the [`Max-Age` `Set-Cookie` attribute](https://tools.ietf.org/html/rfc6265#section-5.2.2){rel="nofollow"}.
The given number will be converted to an integer by rounding down. By default, no maximum age is set.
`expires`: Specifies the `Date` object to be the value for the [`Expires` `Set-Cookie` attribute](https://tools.ietf.org/html/rfc6265#section-5.2.1){rel="nofollow"}.
By default, no expiration is set. Most clients will consider this a "non-persistent cookie" and will delete it on a condition like exiting a web browser application.
::note
The [cookie storage model specification](https://tools.ietf.org/html/rfc6265#section-5.3){rel="nofollow"} states that if both `expires` and `maxAge` is set, then `maxAge` takes precedence, but not all clients may obey this, so if both are set, they should point to the same date and time!
::
::note
If neither of `expires` and `maxAge` is set, the cookie will be session-only and removed when the user closes their browser.
::
### `httpOnly`
Specifies the `boolean` value for the [`HttpOnly` `Set-Cookie` attribute](https://tools.ietf.org/html/rfc6265#section-5.2.6){rel="nofollow"}. When truthy, the `HttpOnly` attribute is set; otherwise it is not. By default, the `HttpOnly` attribute is not set.
::warning
Be careful when setting this to `true`, as compliant clients will not allow client-side JavaScript to see the cookie in `document.cookie`.
::
### `secure`
Specifies the `boolean` value for the [`Secure` `Set-Cookie` attribute](https://tools.ietf.org/html/rfc6265#section-5.2.5){rel="nofollow"}. When truthy, the `Secure` attribute is set; otherwise it is not. By default, the `Secure` attribute is not set.
::warning
Be careful when setting this to `true`, as compliant clients will not send the cookie back to the server in the future if the browser does not have an HTTPS connection. This can lead to hydration errors.
::
### `partitioned`
Specifies the `boolean` value for the [`Partitioned` `Set-Cookie`](https://datatracker.ietf.org/doc/html/draft-cutler-httpbis-partitioned-cookies#section-2.1){rel="nofollow"} attribute. When truthy, the `Partitioned` attribute is set, otherwise it is not. By default, the `Partitioned` attribute is not set.
::note
This is an attribute that has not yet been fully standardized, and may change in the future.
This also means many clients may ignore this attribute until they understand it.
More information can be found in the [proposal](https://github.com/privacycg/CHIPS){rel="nofollow"}.
::
### `domain`
Specifies the value for the [`Domain` `Set-Cookie` attribute](https://tools.ietf.org/html/rfc6265#section-5.2.3){rel="nofollow"}. By default, no domain is set, and most clients will consider applying the cookie only to the current domain.
### `path`
Specifies the value for the [`Path` `Set-Cookie` attribute](https://tools.ietf.org/html/rfc6265#section-5.2.4){rel="nofollow"}. By default, the path is considered the ["default path"](https://tools.ietf.org/html/rfc6265#section-5.1.4){rel="nofollow"}.
### `sameSite`
Specifies the `boolean` or `string` value for the [`SameSite` `Set-Cookie` attribute](https://tools.ietf.org/html/draft-ietf-httpbis-rfc6265bis-03#section-4.1.2.7){rel="nofollow"}.
- `true` will set the `SameSite` attribute to `Strict` for strict same-site enforcement.
- `false` will not set the `SameSite` attribute.
- `'lax'` will set the `SameSite` attribute to `Lax` for lax same-site enforcement.
- `'none'` will set the `SameSite` attribute to `None` for an explicit cross-site cookie.
- `'strict'` will set the `SameSite` attribute to `Strict` for strict same-site enforcement.
More information about the different enforcement levels can be found in [the specification](https://tools.ietf.org/html/draft-ietf-httpbis-rfc6265bis-03#section-4.1.2.7){rel="nofollow"}.
### `encode`
Specifies a function that will be used to encode a cookie's value. Since the value of a cookie has a limited character set (and must be a simple string), this function can be used to encode a value into a string suited for a cookie's value.
The default encoder is the `JSON.stringify` + `encodeURIComponent`.
### `decode`
Specifies a function that will be used to decode a cookie's value. Since the value of a cookie has a limited character set (and must be a simple string), this function can be used to decode a previously encoded cookie value into a JavaScript string or other object.
The default decoder is `decodeURIComponent` + [destr](https://github.com/unjs/destr){rel="nofollow"}.
::note
If an error is thrown from this function, the original, non-decoded cookie value will be returned as the cookie's value.
::
### `default`
Specifies a function that returns the cookie's default value. The function can also return a `Ref`.
### `readonly`
Allows *accessing* a cookie value without the ability to set it.
### `watch`
Specifies the `boolean` or `string` value for [watch](https://vuejs.org/api/reactivity-core.html#watch){rel="nofollow"} cookie ref data.
- `true` - Will watch cookie ref data changes and its nested properties (default).
- `shallow` - Will watch cookie ref data changes for only top level properties
- `false` - Will not watch cookie ref data changes.
::note
Refresh `useCookie` values manually when a cookie has changed with [`refreshCookie`](https://nuxt.com/docs/api/utils/refresh-cookie).
::
**Example 1:**
```vue
<script setup lang="ts">
const user = useCookie(
'userInfo',
{
default: () => ({ score: -1 }),
watch: false
}
)
if (user.value && user.value !== null) {
user.value.score++; // userInfo cookie not update with this change
}
</script>
<template>
<div>User score: {{ user?.score }}</div>
</template>
```
**Example 2:**
```vue
<script setup lang="ts">
const list = useCookie(
'list',
{
default: () => [],
watch: 'shallow'
}
)
function add() {
list.value?.push(Math.round(Math.random() * 1000))
// list cookie not update with this change
}
function save() {
if (list.value && list.value !== null) {
list.value = [...list.value]
// list cookie update with this change
}
}
</script>
<template>
<div>
<h1>List</h1>
<pre>{{ list }}</pre>
<button @click="add">Add</button>
<button @click="save">Save</button>
</div>
</template>
```
## Cookies in API Routes
You can use `getCookie` and `setCookie` from [`h3`](https://github.com/unjs/h3){rel="nofollow"} package to set cookies in server API routes.
```ts [server/api/counter.ts]
export default defineEventHandler(event => {
// Read counter cookie
let counter = getCookie(event, 'counter') || 0
// Increase counter cookie by 1
setCookie(event, 'counter', ++counter)
// Send JSON response
return { counter }
})
```
::link-example{to="https://nuxt.com/docs/examples/advanced/use-cookie"}
::
# useError
The composable returns the global Nuxt error that is being handled and it is available on both client and server.
```ts
const error = useError()
```
`useError` sets an error in the state and creates a reactive as well as SSR-friendly global Nuxt error across components.
Nuxt errors have the following properties:
```ts
interface {
// HTTP response status code
statusCode: number
// HTTP response status message
statusMessage: string
// Error message
message: string
}
```
::read-more{to="https://nuxt.com/docs/getting-started/error-handling"}
::
# useFetch
This composable provides a convenient wrapper around [`useAsyncData`](https://nuxt.com/docs/api/composables/use-async-data) and [`$fetch`](https://nuxt.com/docs/api/utils/dollarfetch).
It automatically generates a key based on URL and fetch options, provides type hints for request url based on server routes, and infers API response type.
::note
`useFetch` is a composable meant to be called directly in a setup function, plugin, or route middleware. It returns reactive composables and handles adding responses to the Nuxt payload so they can be passed from server to client without re-fetching the data on client side when the page hydrates.
::
## Usage
```vue [pages/modules.vue]
<script setup lang="ts">
const { data, status, error, refresh, clear } = await useFetch('/api/modules', {
pick: ['title']
})
</script>
```
::warning
If you're using a custom useFetch wrapper, do not await it in the composable, as that can cause unexpected behavior. Please follow [this recipe](https://nuxt.com/docs/guide/recipes/custom-usefetch#custom-usefetch) for more information on how to make a custom async data fetcher.
::
::note
`data`, `status`, and `error` are Vue refs, and they should be accessed with `.value` when used within the `<script setup>`, while `refresh`/`execute` and `clear` are plain functions.
::
Using the `query` option, you can add search parameters to your query. This option is extended from [unjs/ofetch](https://github.com/unjs/ofetch){rel="nofollow"} and is using [unjs/ufo](https://github.com/unjs/ufo){rel="nofollow"} to create the URL. Objects are automatically stringified.
```ts
const param1 = ref('value1')
const { data, status, error, refresh } = await useFetch('/api/modules', {
query: { param1, param2: 'value2' }
})
```
The above example results in `https://api.nuxt.com/modules?param1=value1¶m2=value2`.
You can also use [interceptors](https://github.com/unjs/ofetch#%EF%B8%8F-interceptors){rel="nofollow"}:
```ts
const { data, status, error, refresh, clear } = await useFetch('/api/auth/login', {
onRequest({ request, options }) {
// Set the request headers
// note that this relies on ofetch >= 1.4.0 - you may need to refresh your lockfile
options.headers.set('Authorization', '...')
},
onRequestError({ request, options, error }) {
// Handle the request errors
},
onResponse({ request, response, options }) {
// Process the response data
localStorage.setItem('token', response._data.token)
},
onResponseError({ request, response, options }) {
// Handle the response errors
}
})
```
### Reactive Keys and Shared State
You can use a computed ref or a plain ref as the URL, allowing for dynamic data fetching that automatically updates when the URL changes:
```vue [pages/[id\\].vue]
<script setup lang="ts">
const route = useRoute()
const id = computed(() => route.params.id)
// When the route changes and id updates, the data will be automatically refetched
const { data: post } = await useFetch(() => `/api/posts/${id.value}`)
</script>
```
When using `useFetch` with the same URL and options in multiple components, they will share the same `data`, `error` and `status` refs. This ensures consistency across components.
::warning
`useFetch` is a reserved function name transformed by the compiler, so you should not name your own function `useFetch`.
::
::warning
If you encounter the `data` variable destructured from a `useFetch` returns a string and not a JSON parsed object then make sure your component doesn't include an import statement like `import { useFetch } from '@vueuse/core`.
::
::video-accordion
---
title: Watch the video from Alexander Lichter to avoid using useFetch the wrong way
video-id: njsGVmcWviY
---
::
::link-example
---
to: https://nuxt.com/docs/examples/advanced/use-custom-fetch-composable
---
::
::read-more{to="https://nuxt.com/docs/getting-started/data-fetching"}
::
::link-example{to="https://nuxt.com/docs/examples/features/data-fetching"}
::
## Params
- `URL`: The URL to fetch.
- `Options` (extends [unjs/ofetch](https://github.com/unjs/ofetch){rel="nofollow"} options & [AsyncDataOptions](https://nuxt.com/docs/api/composables/use-async-data#params)):
- `method`: Request method.
- `query`: Adds query search params to URL using [ufo](https://github.com/unjs/ufo){rel="nofollow"}
- `params`: Alias for `query`
- `body`: Request body - automatically stringified (if an object is passed).
- `headers`: Request headers.
- `baseURL`: Base URL for the request.
- `timeout`: Milliseconds to automatically abort request
- `cache`: Handles cache control according to [Fetch API](https://developer.mozilla.org/en-US/docs/Web/API/fetch#cache){rel="nofollow"}
- You can pass boolean to disable the cache or you can pass one of the following values: `default`, `no-store`, `reload`, `no-cache`, `force-cache`, and `only-if-cached`.
::note
All fetch options can be given a `computed` or `ref` value. These will be watched and new requests made automatically with any new values if they are updated.
::
- `Options` (from [`useAsyncData`](https://nuxt.com/docs/api/composables/use-async-data)):
- `key`: a unique key to ensure that data fetching can be properly de-duplicated across requests, if not provided, it will be automatically generated based on URL and fetch options
- `server`: whether to fetch the data on the server (defaults to `true`)
- `lazy`: whether to resolve the async function after loading the route, instead of blocking client-side navigation (defaults to `false`)
- `immediate`: when set to `false`, will prevent the request from firing immediately. (defaults to `true`)
- `default`: a factory function to set the default value of the `data`, before the async function resolves - useful with the `lazy: true` or `immediate: false` option
- `transform`: a function that can be used to alter `handler` function result after resolving
- `getCachedData`: Provide a function which returns cached data. A `null` or `undefined` return value will trigger a fetch. By default, this is:
```ts
const getDefaultCachedData = (key, nuxtApp, ctx) => nuxtApp.isHydrating
? nuxtApp.payload.data[key]
: nuxtApp.static.data[key]
```
Which only caches data when `experimental.payloadExtraction` of `nuxt.config` is enabled.
- `pick`: only pick specified keys in this array from the `handler` function result
- `watch`: watch an array of reactive sources and auto-refresh the fetch result when they change. Fetch options and URL are watched by default. You can completely ignore reactive sources by using `watch: false`. Together with `immediate: false`, this allows for a fully-manual `useFetch`. (You can [see an example here](https://nuxt.com/docs/getting-started/data-fetching#watch) of using `watch`.)
- `deep`: return data in a deep ref object (it is `true` by default). It can be set to `false` to return data in a shallow ref object, which can improve performance if your data does not need to be deeply reactive.
- `dedupe`: avoid fetching same key more than once at a time (defaults to `cancel`). Possible options:
- `cancel` - cancels existing requests when a new one is made
- `defer` - does not make new requests at all if there is a pending request
::note
If you provide a function or ref as the `url` parameter, or if you provide functions as arguments to the `options` parameter, then the `useFetch` call will not match other `useFetch` calls elsewhere in your codebase, even if the options seem to be identical. If you wish to force a match, you may provide your own key in `options`.
::
::note
If you use `useFetch` to call an (external) HTTPS URL with a self-signed certificate in development, you will need to set `NODE_TLS_REJECT_UNAUTHORIZED=0` in your environment.
::
::video-accordion
---
title: Watch a video from Alexander Lichter about client-side caching with
getCachedData
video-id: aQPR0xn-MMk
---
::
## Return Values
- `data`: the result of the asynchronous function that is passed in.
- `refresh`/`execute`: a function that can be used to refresh the data returned by the `handler` function.
- `error`: an error object if the data fetching failed.
- `status`: a string indicating the status of the data request:
- `idle`: when the request has not started, such as:
- when `execute` has not yet been called and `{ immediate: false }` is set
- when rendering HTML on the server and `{ server: false }` is set
- `pending`: the request is in progress
- `success`: the request has completed successfully
- `error`: the request has failed
- `clear`: a function which will set `data` to `undefined`, set `error` to `null`, set `status` to `'idle'`, and mark any currently pending requests as cancelled.
By default, Nuxt waits until a `refresh` is finished before it can be executed again.
::note
If you have not fetched data on the server (for example, with `server: false`), then the data *will not* be fetched until hydration completes. This means even if you await `useFetch` on client-side, `data` will remain null within `<script setup>`.
::
## Type
```ts [Signature]
function useFetch<DataT, ErrorT>(
url: string | Request | Ref<string | Request> | (() => string | Request),
options?: UseFetchOptions<DataT>
): Promise<AsyncData<DataT, ErrorT>>
type UseFetchOptions<DataT> = {
key?: string
method?: string
query?: SearchParams
params?: SearchParams
body?: RequestInit['body'] | Record<string, any>
headers?: Record<string, string> | [key: string, value: string][] | Headers
baseURL?: string
server?: boolean
lazy?: boolean
immediate?: boolean
getCachedData?: (key: string, nuxtApp: NuxtApp, ctx: AsyncDataRequestContext) => DataT | undefined
deep?: boolean
dedupe?: 'cancel' | 'defer'
default?: () => DataT
transform?: (input: DataT) => DataT | Promise<DataT>
pick?: string[]
watch?: WatchSource[] | false
}
type AsyncDataRequestContext = {
/** The reason for this data request */
cause: 'initial' | 'refresh:manual' | 'refresh:hook' | 'watch'
}
type AsyncData<DataT, ErrorT> = {
data: Ref<DataT | null>
refresh: (opts?: AsyncDataExecuteOptions) => Promise<void>
execute: (opts?: AsyncDataExecuteOptions) => Promise<void>
clear: () => void
error: Ref<ErrorT | null>
status: Ref<AsyncDataRequestStatus>
}
interface AsyncDataExecuteOptions {
dedupe?: 'cancel' | 'defer'
}
type AsyncDataRequestStatus = 'idle' | 'pending' | 'success' | 'error'
```
# useHead
The [`useHead`](https://nuxt.com/docs/api/composables/use-head) composable function allows you to manage your head tags in a programmatic and reactive way, powered by [Unhead](https://unhead.unjs.io){rel="nofollow"}. If the data comes from a user or other untrusted source, we recommend you check out [`useHeadSafe`](https://nuxt.com/docs/api/composables/use-head-safe).
::read-more{to="https://nuxt.com/docs/getting-started/seo-meta"}
::
## Type
```ts
useHead(meta: MaybeComputedRef<MetaObject>): void
```
Below are the non-reactive types for [`useHead`](https://nuxt.com/docs/api/composables/use-head) .
```ts
interface MetaObject {
title?: string
titleTemplate?: string | ((title?: string) => string)
base?: Base
link?: Link[]
meta?: Meta[]
style?: Style[]
script?: Script[]
noscript?: Noscript[]
htmlAttrs?: HtmlAttributes
bodyAttrs?: BodyAttributes
}
```
See [@unhead/vue](https://github.com/unjs/unhead/blob/main/packages/vue/src/types/schema.ts){rel="nofollow"} for more detailed types.
::note
The properties of `useHead` can be dynamic, accepting `ref`, `computed` and `reactive` properties. `meta` parameter can also accept a function returning an object to make the entire object reactive.
::
## Params
### `meta`
**Type**: `MetaObject`
An object accepting the following head metadata:
- `meta`: Each element in the array is mapped to a newly-created `<meta>` tag, where object properties are mapped to the corresponding attributes.
- **Type**: `Array<Record<string, any>>`
- `link`: Each element in the array is mapped to a newly-created `<link>` tag, where object properties are mapped to the corresponding attributes.
- **Type**: `Array<Record<string, any>>`
- `style`: Each element in the array is mapped to a newly-created `<style>` tag, where object properties are mapped to the corresponding attributes.
- **Type**: `Array<Record<string, any>>`
- `script`: Each element in the array is mapped to a newly-created `<script>` tag, where object properties are mapped to the corresponding attributes.
- **Type**: `Array<Record<string, any>>`
- `noscript`: Each element in the array is mapped to a newly-created `<noscript>` tag, where object properties are mapped to the corresponding attributes.
- **Type**: `Array<Record<string, any>>`
- `titleTemplate`: Configures dynamic template to customize the page title on an individual page.
- **Type**: `string` | `((title: string) => string)`
- `title`: Sets static page title on an individual page.
- **Type**: `string`
- `bodyAttrs`: Sets attributes of the `<body>` tag. Each object property is mapped to the corresponding attribute.
- **Type**: `Record<string, any>`
- `htmlAttrs`: Sets attributes of the `<html>` tag. Each object property is mapped to the corresponding attribute.
- **Type**: `Record<string, any>`
# useHeadSafe
The `useHeadSafe` composable is a wrapper around the [`useHead`](https://nuxt.com/docs/api/composables/use-head) composable that restricts the input to only allow safe values.
## Usage
You can pass all the same values as [`useHead`](https://nuxt.com/docs/api/composables/use-head)
```ts
useHeadSafe({
script: [
{ id: 'xss-script', innerHTML: 'alert("xss")' }
],
meta: [
{ 'http-equiv': 'refresh', content: '0;javascript:alert(1)' }
]
})
// Will safely generate
// <script id="xss-script"></script>
// <meta content="0;javascript:alert(1)">
```
::read-more
---
target: _blank
to: https://unhead.unjs.io/docs/typescript/head/api/composables/use-head-safe
---
Read more on the `Unhead` documentation.
::
## Type
```ts
useHeadSafe(input: MaybeComputedRef<HeadSafe>): void
```
The list of allowed values is:
```ts
const WhitelistAttributes = {
htmlAttrs: ['class', 'style', 'lang', 'dir'],
bodyAttrs: ['class', 'style'],
meta: ['name', 'property', 'charset', 'content', 'media'],
noscript: ['textContent'],
style: ['media', 'textContent', 'nonce', 'title', 'blocking'],
script: ['type', 'textContent', 'nonce', 'blocking'],
link: ['color', 'crossorigin', 'fetchpriority', 'href', 'hreflang', 'imagesrcset', 'imagesizes', 'integrity', 'media', 'referrerpolicy', 'rel', 'sizes', 'type'],
}
```
See [@unhead/vue](https://github.com/unjs/unhead/blob/main/packages/vue/src/types/safeSchema.ts){rel="nofollow"} for more detailed types.
# useHydration
::note
This is an advanced composable, primarily designed for use within plugins, mostly used by Nuxt modules.
::
::note
`useHydration` is designed to **ensure state synchronization and restoration during SSR**. If you need to create a globally reactive state that is SSR-friendly in Nuxt, [`useState`](https://nuxt.com/docs/api/composables/use-state) is the recommended choice.
::
`useHydration` is a built-in composable that provides a way to set data on the server side every time a new HTTP request is made and receive that data on the client side. This way `useHydration` allows you to take full control of the hydration cycle.
The data returned from the `get` function on the server is stored in `nuxtApp.payload` under the unique key provided as the first parameter to `useHydration`. During hydration, this data is then retrieved on the client, preventing redundant computations or API calls.
## Usage
::code-group
```ts [Without useHydration]
export default defineNuxtPlugin((nuxtApp) => {
const myStore = new MyStore()
if (import.meta.server) {
nuxt.hooks.hook('app:rendered', () => {
nuxtApp.payload.myStoreState = myStore.getState()
})
}
if (import.meta.client) {
nuxt.hooks.hook('app:created', () => {
myStore.setState(nuxtApp.payload.myStoreState)
})
}
})
```
```ts [With useHydration]
export default defineNuxtPlugin((nuxtApp) => {
const myStore = new MyStore()
useHydration(
'myStoreState',
() => myStore.getState(),
(data) => myStore.setState(data)
)
})
```
::
## Type
```ts [signature]
useHydration <T> (key: string, get: () => T, set: (value: T) => void) => void
```
## Parameters
- `key`: A unique key that identifies the data in your Nuxt application.
- `get`: A function executed **only on the server** (called when SSR rendering is done) to set the initial value.
- `set`: A function executed **only on the client** (called when initial vue instance is created) to receive the data.
# useLazyAsyncData
## Description
By default, [`useAsyncData`](https://nuxt.com/docs/api/composables/use-async-data) blocks navigation until its async handler is resolved. `useLazyAsyncData` provides a wrapper around [`useAsyncData`](https://nuxt.com/docs/api/composables/use-async-data) that triggers navigation before the handler is resolved by setting the `lazy` option to `true`.
::note
`useLazyAsyncData` has the same signature as [`useAsyncData`](https://nuxt.com/docs/api/composables/use-async-data).
::
::read-more{to="https://nuxt.com/docs/api/composables/use-async-data"}
::
## Example
```vue [pages/index.vue]
<script setup lang="ts">
/* Navigation will occur before fetching is complete.
Handle 'pending' and 'error' states directly within your component's template
*/
const { status, data: count } = await useLazyAsyncData('count', () => $fetch('/api/count'))
watch(count, (newCount) => {
// Because count might start out null, you won't have access
// to its contents immediately, but you can watch it.
})
</script>
<template>
<div>
{{ status === 'pending' ? 'Loading' : count }}
</div>
</template>
```
::warning
`useLazyAsyncData` is a reserved function name transformed by the compiler, so you should not name your own function `useLazyAsyncData`.
::
::read-more{to="https://nuxt.com/docs/getting-started/data-fetching"}
::
# useLazyFetch
## Description
By default, [`useFetch`](https://nuxt.com/docs/api/composables/use-fetch) blocks navigation until its async handler is resolved. `useLazyFetch` provides a wrapper around [`useFetch`](https://nuxt.com/docs/api/composables/use-fetch) that triggers navigation before the handler is resolved by setting the `lazy` option to `true`.
::note
`useLazyFetch` has the same signature as [`useFetch`](https://nuxt.com/docs/api/composables/use-fetch).
::
::note
Awaiting `useLazyFetch` in this mode only ensures the call is initialized. On client-side navigation, data may not be immediately available, and you should make sure to handle the pending state in your app.
::
::read-more{to="https://nuxt.com/docs/api/composables/use-fetch"}
::
## Example
```vue [pages/index.vue]
<script setup lang="ts">
/* Navigation will occur before fetching is complete.
* Handle 'pending' and 'error' states directly within your component's template
*/
const { status, data: posts } = await useLazyFetch('/api/posts')
watch(posts, (newPosts) => {
// Because posts might start out null, you won't have access
// to its contents immediately, but you can watch it.
})
</script>
<template>
<div v-if="status === 'pending'">
Loading ...
</div>
<div v-else>
<div v-for="post in posts">
<!-- do something -->
</div>
</div>
</template>
```
::note
`useLazyFetch` is a reserved function name transformed by the compiler, so you should not name your own function `useLazyFetch`.
::
::read-more{to="https://nuxt.com/docs/getting-started/data-fetching"}
::
# useLoadingIndicator
## Description
A composable which returns the loading state of the page. Used by [`<NuxtLoadingIndicator>`](https://nuxt.com/docs/api/components/nuxt-loading-indicator) and controllable.
It hooks into [`page:loading:start`](https://nuxt.com/docs/api/advanced/hooks#app-hooks-runtime) and [`page:loading:end`](https://nuxt.com/docs/api/advanced/hooks#app-hooks-runtime) to change its state.
## Parameters
- `duration`: Duration of the loading bar, in milliseconds (default `2000`).
- `throttle`: Throttle the appearing and hiding, in milliseconds (default `200`).
- `estimatedProgress`: By default Nuxt will back off as it approaches 100%. You can provide a custom function to customize the progress estimation, which is a function that receives the duration of the loading bar (above) and the elapsed time. It should return a value between 0 and 100.
## Properties
### `isLoading`
- **type**: `Ref<boolean>`
- **description**: The loading state
### `error`
- **type**: `Ref<boolean>`
- **description**: The error state
### `progress`
- **type**: `Ref<number>`
- **description**: The progress state. From `0` to `100`.
## Methods
### `start()`
Set `isLoading` to true and start to increase the `progress` value. `start` accepts a `{ force: true }` option to skip the interval and show the loading state immediately.
### `set()`
Set the `progress` value to a specific value. `set` accepts a `{ force: true }` option to skip the interval and show the loading state immediately.
### `finish()`
Set the `progress` value to `100`, stop all timers and intervals then reset the loading state `500` ms later. `finish` accepts a `{ force: true }` option to skip the interval before the state is reset, and `{ error: true }` to change the loading bar color and set the error property to true.
### `clear()`
Used by `finish()`. Clear all timers and intervals used by the composable.
## Example
```vue
<script setup lang="ts">
const { progress, isLoading, start, finish, clear } = useLoadingIndicator({
duration: 2000,
throttle: 200,
// This is how progress is calculated by default
estimatedProgress: (duration, elapsed) => (2 / Math.PI * 100) * Math.atan(elapsed / duration * 100 / 50)
})
</script>
```
```vue
<script setup lang="ts">
const { start, set } = useLoadingIndicator()
// same as set(0, { force: true })
// set the progress to 0, and show loading immediately
start({ force: true })
</script>
```
# useNuxtApp
`useNuxtApp` is a built-in composable that provides a way to access shared runtime context of Nuxt, also known as the [Nuxt context](https://nuxt.com/docs/guide/going-further/nuxt-app#the-nuxt-context), which is available on both client and server side (but not within Nitro routes). It helps you access the Vue app instance, runtime hooks, runtime config variables and internal states, such as `ssrContext` and `payload`.
```vue [app.vue]
<script setup lang="ts">
const nuxtApp = useNuxtApp()
</script>
```
If runtime context is unavailable in your scope, `useNuxtApp` will throw an exception when called. You can use [`tryUseNuxtApp`](https://nuxt.com/#tryusenuxtapp) instead for composables that do not require `nuxtApp`, or to simply check if context is available or not without an exception.
## Methods
### `provide (name, value)`
`nuxtApp` is a runtime context that you can extend using [Nuxt plugins](https://nuxt.com/docs/guide/directory-structure/plugins). Use the `provide` function to create Nuxt plugins to make values and helper methods available in your Nuxt application across all composables and components.
`provide` function accepts `name` and `value` parameters.
```js
const nuxtApp = useNuxtApp()
nuxtApp.provide('hello', (name) => `Hello ${name}!`)
// Prints "Hello name!"
console.log(nuxtApp.$hello('name'))
```
As you can see in the example above, `$hello` has become the new and custom part of `nuxtApp` context and it is available in all places where `nuxtApp` is accessible.
### `hook(name, cb)`
Hooks available in `nuxtApp` allows you to customize the runtime aspects of your Nuxt application. You can use runtime hooks in Vue.js composables and [Nuxt plugins](https://nuxt.com/docs/guide/directory-structure/plugins) to hook into the rendering lifecycle.
`hook` function is useful for adding custom logic by hooking into the rendering lifecycle at a specific point. `hook` function is mostly used when creating Nuxt plugins.
See [Runtime Hooks](https://nuxt.com/docs/api/advanced/hooks#app-hooks-runtime) for available runtime hooks called by Nuxt.
```ts [plugins/test.ts]
export default defineNuxtPlugin((nuxtApp) => {
nuxtApp.hook('page:start', () => {
/* your code goes here */
})
nuxtApp.hook('vue:error', (..._args) => {
console.log('vue:error')
// if (import.meta.client) {
// console.log(..._args)
// }
})
})
```
### `callHook(name, ...args)`
`callHook` returns a promise when called with any of the existing hooks.
```ts
await nuxtApp.callHook('my-plugin:init')
```
## Properties
`useNuxtApp()` exposes the following properties that you can use to extend and customize your app and share state, data and variables.
### `vueApp`
`vueApp` is the global Vue.js [application instance](https://vuejs.org/api/application.html#application-api){rel="nofollow"} that you can access through `nuxtApp`.
Some useful methods:
- [`component()`](https://vuejs.org/api/application.html#app-component){rel="nofollow"} - Registers a global component if passing both a name string and a component definition, or retrieves an already registered one if only the name is passed.
- [`directive()`](https://vuejs.org/api/application.html#app-directive){rel="nofollow"} - Registers a global custom directive if passing both a name string and a directive definition, or retrieves an already registered one if only the name is passed[(example)](https://nuxt.com/docs/guide/directory-structure/plugins#vue-directives).
- [`use()`](https://vuejs.org/api/application.html#app-use){rel="nofollow"} - Installs a **[Vue.js Plugin](https://vuejs.org/guide/reusability/plugins.html){rel="nofollow"}** [(example)](https://nuxt.com/docs/guide/directory-structure/plugins#vue-plugins).
::read-more
---
icon: i-simple-icons-vuedotjs
to: https://vuejs.org/api/application.html#application-api
---
::
### `ssrContext`
`ssrContext` is generated during server-side rendering and it is only available on the server side.
Nuxt exposes the following properties through `ssrContext`:
- `url` (string) - Current request url.
- `event` ([unjs/h3](https://github.com/unjs/h3){rel="nofollow"} request event) - Access the request & response of the current route.
- `payload` (object) - NuxtApp payload object.
### `payload`
`payload` exposes data and state variables from server side to client side. The following keys will be available on the client after they have been passed from the server side:
- `serverRendered` (boolean) - Indicates if response is server-side-rendered.
- `data` (object) - When you fetch the data from an API endpoint using either [`useFetch`](https://nuxt.com/docs/api/composables/use-fetch) or [`useAsyncData`](https://nuxt.com/docs/api/composables/use-async-data) , resulting payload can be accessed from the `payload.data`. This data is cached and helps you prevent fetching the same data in case an identical request is made more than once.
:code-group[```vue \[app.vue\]
<script setup lang="ts">
const { data } = await useAsyncData('count', () => $fetch('/api/count'))
</script>
``````ts \[server/api/count.ts\]
export default defineEventHandler(event => {
return { count: 1 }
})
```]
:br
After fetching the value of `count` using [`useAsyncData`](https://nuxt.com/docs/api/composables/use-async-data) in the example above, if you access `payload.data`, you will see `{ count: 1 }` recorded there.
:br
When accessing the same `payload.data` from [`ssrcontext`](https://nuxt.com/#ssrcontext), you can access the same value on the server side as well.
- `state` (object) - When you use [`useState`](https://nuxt.com/docs/api/composables/use-state) composable in Nuxt to set shared state, this state data is accessed through `payload.state.[name-of-your-state]`.
```ts [plugins/my-plugin.ts]
export const useColor = () => useState<string>('color', () => 'pink')
export default defineNuxtPlugin((nuxtApp) => {
if (import.meta.server) {
const color = useColor()
}
})
```
:br
It is also possible to use more advanced types, such as `ref`, `reactive`, `shallowRef`, `shallowReactive` and `NuxtError`.
:br
Since [Nuxt v3.4](https://nuxt.com/blog/v3-4#payload-enhancements){rel="nofollow"}, it is possible to define your own reducer/reviver for types that are not supported by Nuxt.
:video-accordion{title="Watch a video from Alexander Lichter about serializing payloads, especially with regards to classes" video-id="8w6ffRBs8a4"}
:br
In the example below, we define a reducer (or a serializer) and a reviver (or deserializer) for the [Luxon](https://moment.github.io/luxon/#/){rel="nofollow"} DateTime class, using a payload plugin.
```ts [plugins/date-time-payload.ts]
/**
* This kind of plugin runs very early in the Nuxt lifecycle, before we revive the payload.
* You will not have access to the router or other Nuxt-injected properties.
*
* Note that the "DateTime" string is the type identifier and must
* be the same on both the reducer and the reviver.
*/
export default definePayloadPlugin((nuxtApp) => {
definePayloadReducer('DateTime', (value) => {
return value instanceof DateTime && value.toJSON()
})
definePayloadReviver('DateTime', (value) => {
return DateTime.fromISO(value)
})
})
```
### `isHydrating`
Use `nuxtApp.isHydrating` (boolean) to check if the Nuxt app is hydrating on the client side.
```ts [components/nuxt-error-boundary.ts]
export default defineComponent({
setup (_props, { slots, emit }) {
const nuxtApp = useNuxtApp()
onErrorCaptured((err) => {
if (import.meta.client && !nuxtApp.isHydrating) {
// ...
}
})
}
})
```
### `runWithContext`
::note
You are likely here because you got a "Nuxt instance unavailable" message. Please use this method sparingly, and report examples that are causing issues, so that it can ultimately be solved at the framework level.
::
The `runWithContext` method is meant to be used to call a function and give it an explicit Nuxt context. Typically, the Nuxt context is passed around implicitly and you do not need to worry about this. However, when working with complex `async`/`await` scenarios in middleware/plugins, you can run into instances where the current instance has been unset after an async call.
```ts [middleware/auth.ts]
export default defineNuxtRouteMiddleware(async (to, from) => {
const nuxtApp = useNuxtApp()
let user
try {
user = await fetchUser()
// the Vue/Nuxt compiler loses context here because of the try/catch block.
} catch (e) {
user = null
}
if (!user) {
// apply the correct Nuxt context to our `navigateTo` call.
return nuxtApp.runWithContext(() => navigateTo('/auth'))
}
})
```
#### Usage
```js
const result = nuxtApp.runWithContext(() => functionWithContext())
```
- `functionWithContext`: Any function that requires the context of the current Nuxt application. This context will be correctly applied automatically.
`runWithContext` will return whatever is returned by `functionWithContext`.
#### A Deeper Explanation of Context
Vue.js Composition API (and Nuxt composables similarly) work by depending on an implicit context. During the lifecycle, Vue sets the temporary instance of the current component (and Nuxt temporary instance of nuxtApp) to a global variable and unsets it in same tick. When rendering on the server side, there are multiple requests from different users and nuxtApp running in a same global context. Because of this, Nuxt and Vue immediately unset this global instance to avoid leaking a shared reference between two users or components.
What it does mean? The Composition API and Nuxt Composables are only available during lifecycle and in same tick before any async operation:
```js
// --- Vue internal ---
const _vueInstance = null
const getCurrentInstance = () => _vueInstance
// ---
// Vue / Nuxt sets a global variable referencing to current component in _vueInstance when calling setup()
async function setup() {
getCurrentInstance() // Works
await someAsyncOperation() // Vue unsets the context in same tick before async operation!
getCurrentInstance() // null
}
```
The classic solution to this, is caching the current instance on first call to a local variable like `const instance = getCurrentInstance()` and use it in the next composable call but the issue is that any nested composable calls now needs to explicitly accept the instance as an argument and not depend on the implicit context of composition-api. This is design limitation with composables and not an issue per-se.
To overcome this limitation, Vue does some behind the scenes work when compiling our application code and restores context after each call for `<script setup>`:
```js
const __instance = getCurrentInstance() // Generated by Vue compiler
getCurrentInstance() // Works!
await someAsyncOperation() // Vue unsets the context
__restoreInstance(__instance) // Generated by Vue compiler
getCurrentInstance() // Still works!
```
For a better description of what Vue actually does, see [unjs/unctx#2 (comment)](https://github.com/unjs/unctx/issues/2#issuecomment-942193723){rel="nofollow"}.
#### Solution
This is where `runWithContext` can be used to restore context, similarly to how `<script setup>` works.
Nuxt internally uses [unjs/unctx](https://github.com/unjs/unctx){rel="nofollow"} to support composables similar to Vue for plugins and middleware. This enables composables like `navigateTo()` to work without directly passing `nuxtApp` to them - bringing the DX and performance benefits of Composition API to the whole Nuxt framework.
Nuxt composables have the same design as the Vue Composition API and therefore need a similar solution to magically do this transform. Check out [unjs/unctx#2](https://github.com/unjs/unctx/issues/2){rel="nofollow"} (proposal), [unjs/unctx#4](https://github.com/unjs/unctx/pull/4){rel="nofollow"} (transform implementation), and [nuxt/framework#3884](https://github.com/nuxt/framework/pull/3884){rel="nofollow"} (Integration to Nuxt).
Vue currently only supports async context restoration for `<script setup>` for async/await usage. In Nuxt, the transform support for `defineNuxtPlugin()` and `defineNuxtRouteMiddleware()` was added, which means when you use them Nuxt automatically transforms them with context restoration.
#### Remaining Issues
The `unjs/unctx` transformation to automatically restore context seems buggy with `try/catch` statements containing `await` which ultimately needs to be solved in order to remove the requirement of the workaround suggested above.
#### Native Async Context
Using a new experimental feature, it is possible to enable native async context support using [Node.js `AsyncLocalStorage`](https://nodejs.org/api/async_context.html#class-asynclocalstorage){rel="nofollow"} and new unctx support to make async context available **natively** to **any nested async composable** without needing a transform or manual passing/calling with context.
::tip
Native async context support works currently in Bun and Node.
::
::read-more
---
to: https://nuxt.com/docs/guide/going-further/experimental-features#asynccontext
---
::
## tryUseNuxtApp
This function works exactly the same as `useNuxtApp`, but returns `null` if context is unavailable instead of throwing an exception.
You can use it for composables that do not require `nuxtApp`, or to simply check if context is available or not without an exception.
Example usage:
```ts [composable.ts]
export function useStandType() {
// Always works on the client
if (tryUseNuxtApp()) {
return useRuntimeConfig().public.STAND_TYPE
} else {
return process.env.STAND_TYPE
}
}
```
# useNuxtData
::note
`useNuxtData` gives you access to the current cached value of [`useAsyncData`](https://nuxt.com/docs/api/composables/use-async-data) , [`useLazyAsyncData`](https://nuxt.com/docs/api/composables/use-lazy-async-data), [`useFetch`](https://nuxt.com/docs/api/composables/use-fetch) and [`useLazyFetch`](https://nuxt.com/docs/api/composables/use-lazy-fetch) with explicitly provided key.
::
## Usage
The `useNuxtData` composable is used to access the current cached value of data-fetching composables such as `useAsyncData`, `useLazyAsyncData`, `useFetch`, and `useLazyFetch`. By providing the key used during the data fetch, you can retrieve the cached data and use it as needed.
This is particularly useful for optimizing performance by reusing already-fetched data or implementing features like Optimistic Updates or cascading data updates.
To use `useNuxtData`, ensure that the data-fetching composable (`useFetch`, `useAsyncData`, etc.) has been called with an explicitly provided key.
::video-accordion
---
title: Watch a video from LearnVue about useNuxtData
video-id: e-_u6swXRWk
---
::
## Params
- `key`: The unique key that identifies the cached data. This key should match the one used during the original data fetch.
## Return Values
- `data`: A reactive reference to the cached data associated with the provided key. If no cached data exists, the value will be `null`. This `Ref` automatically updates if the cached data changes, allowing seamless reactivity in your components.
## Example
The example below shows how you can use cached data as a placeholder while the most recent data is being fetched from the server.
```vue [pages/posts.vue]
<script setup lang="ts">
// We can access same data later using 'posts' key
const { data } = await useFetch('/api/posts', { key: 'posts' })
</script>
```
```vue [pages/posts/[id\\].vue]
<script setup lang="ts">
// Access to the cached value of useFetch in posts.vue (parent route)
const { data: posts } = useNuxtData('posts')
const route = useRoute()
const { data } = useLazyFetch(`/api/posts/${route.params.id}`, {
key: `post-${route.params.id}`,
default() {
// Find the individual post from the cache and set it as the default value.
return posts.value.find(post => post.id === route.params.id)
}
})
</script>
```
## Optimistic Updates
The example below shows how implementing Optimistic Updates can be achieved using useNuxtData.
Optimistic Updates is a technique where the user interface is updated immediately, assuming a server operation will succeed. If the operation eventually fails, the UI is rolled back to its previous state.
```vue [pages/todos.vue]
<script setup lang="ts">
// We can access same data later using 'todos' key
const { data } = await useAsyncData('todos', () => $fetch('/api/todos'))
</script>
```
```vue [components/NewTodo.vue]
<script setup lang="ts">
const newTodo = ref('')
let previousTodos = []
// Access to the cached value of useAsyncData in todos.vue
const { data: todos } = useNuxtData('todos')
async function addTodo () {
return $fetch('/api/addTodo', {
method: 'post',
body: {
todo: newTodo.value
},
onRequest () {
// Store the previously cached value to restore if fetch fails.
previousTodos = todos.value
// Optimistically update the todos.
todos.value = [...todos.value, newTodo.value]
},
onResponseError () {
// Rollback the data if the request failed.
todos.value = previousTodos
},
async onResponse () {
// Invalidate todos in the background if the request succeeded.
await refreshNuxtData('todos')
}
})
}
</script>
```
## Type
```ts
useNuxtData<DataT = any> (key: string): { data: Ref<DataT | null> }
```
# `usePreviewMode`
Preview mode allows you to see how your changes would be displayed on a live site without revealing them to users.
You can use the built-in `usePreviewMode` composable to access and control preview state in Nuxt. If the composable detects preview mode it will automatically force any updates necessary for [`useAsyncData`](https://nuxt.com/docs/api/composables/use-async-data) and [`useFetch`](https://nuxt.com/docs/api/composables/use-fetch) to rerender preview content.
```js
const { enabled, state } = usePreviewMode()
```
## Options
### Custom `enable` check
You can specify a custom way to enable preview mode. By default the `usePreviewMode` composable will enable preview mode if there is a `preview` param in url that is equal to `true` (for example, `http://localhost:3000?preview=true`). You can wrap the `usePreviewMode` into custom composable, to keep options consistent across usages and prevent any errors.
```js
export function useMyPreviewMode () {
return usePreviewMode({
shouldEnable: () => {
return !!route.query.customPreview
}
});
}
```
### Modify default state
`usePreviewMode` will try to store the value of a `token` param from url in state. You can modify this state and it will be available for all [`usePreviewMode`](https://nuxt.com/docs/api/composables/use-preview-mode) calls.
```js
const data1 = ref('data1')
const { enabled, state } = usePreviewMode({
getState: (currentState) => {
return { data1, data2: 'data2' }
}
})
```
::note
The `getState` function will append returned values to current state, so be careful not to accidentally overwrite important state.
::
### Customize the `onEnable` and `onDisable` callbacks
By default, when `usePreviewMode` is enabled, it will call `refreshNuxtData()` to re-fetch all data from the server.
When preview mode is disabled, the composable will attach a callback to call `refreshNuxtData()` to run after a subsequent router navigation.
You can specify custom callbacks to be triggered by providing your own functions for the `onEnable` and `onDisable` options.
```js
const { enabled, state } = usePreviewMode({
onEnable: () => {
console.log('preview mode has been enabled')
},
onDisable: () => {
console.log('preview mode has been disabled')
}
})
```
## Example
The example below creates a page where part of a content is rendered only in preview mode.
```vue [pages/some-page.vue]
<script setup>
const { enabled, state } = usePreviewMode()
const { data } = await useFetch('/api/preview', {
query: {
apiKey: state.token
}
})
</script>
<template>
<div>
Some base content
<p v-if="enabled">
Only preview content: {{ state.token }}
<br>
<button @click="enabled = false">
disable preview mode
</button>
</p>
</div>
</template>
```
Now you can generate your site and serve it:
```bash [Terminal]
npx nuxi generate
npx nuxi preview
```
Then you can see your preview page by adding the query param `preview` to the end of the page you want to see once:
```js
?preview=true
```
::note
`usePreviewMode` should be tested locally with `nuxi generate` and then `nuxi preview` rather than `nuxi dev`. (The [preview command](https://nuxt.com/docs/api/commands/preview) is not related to preview mode.)
::
# useRequestEvent
Within the [Nuxt context](https://nuxt.com/docs/guide/going-further/nuxt-app#the-nuxt-context) you can use `useRequestEvent` to access the incoming request.
```ts
// Get underlying request event
const event = useRequestEvent()
// Get the URL
const url = event?.path
```
::tip
In the browser, `useRequestEvent` will return `undefined`.
::
# useRequestFetch
You can use `useRequestFetch` to forward the request context and headers when making server-side fetch requests.
When making a client-side fetch request, the browser automatically sends the necessary headers.
However, when making a request during server-side rendering, due to security considerations, we need to forward the headers manually.
::note
Headers that are **not meant to be forwarded** will **not be included** in the request. These headers include, for example:
`transfer-encoding`, `connection`, `keep-alive`, `upgrade`, `expect`, `host`, `accept`
::
::tip
The [`useFetch`](https://nuxt.com/docs/api/composables/use-fetch) composable uses `useRequestFetch` under the hood to automatically forward the request context and headers.
::
::code-group
```vue [pages/index.vue]
<script setup lang="ts">
// This will forward the user's headers to the `/api/cookies` event handler
// Result: { cookies: { foo: 'bar' } }
const requestFetch = useRequestFetch()
const { data: forwarded } = await useAsyncData(() => requestFetch('/api/cookies'))
// This will NOT forward anything
// Result: { cookies: {} }
const { data: notForwarded } = await useAsyncData(() => $fetch('/api/cookies'))
</script>
```
```ts [server/api/cookies.ts]
export default defineEventHandler((event) => {
const cookies = parseCookies(event)
return { cookies }
})
```
::
::tip
In the browser during client-side navigation, `useRequestFetch` will behave just like regular [`$fetch`](https://nuxt.com/docs/api/utils/dollarfetch).
::
# useRequestHeader
You can use the built-in [`useRequestHeader`](https://nuxt.com/docs/api/composables/use-request-header) composable to access any incoming request header within your pages, components, and plugins.
```ts
// Get the authorization request header
const authorization = useRequestHeader('authorization')
```
::tip
In the browser, `useRequestHeader` will return `undefined`.
::
## Example
We can use `useRequestHeader` to easily figure out if a user is authorized or not.
The example below reads the `authorization` request header to find out if a person can access a restricted resource.
```ts [middleware/authorized-only.ts]
export default defineNuxtRouteMiddleware((to, from) => {
if (!useRequestHeader('authorization')) {
return navigateTo('/not-authorized')
}
})
```
# useRequestHeaders
You can use built-in [`useRequestHeaders`](https://nuxt.com/docs/api/composables/use-request-headers) composable to access the incoming request headers within your pages, components, and plugins.
```js
// Get all request headers
const headers = useRequestHeaders()
// Get only cookie request header
const headers = useRequestHeaders(['cookie'])
```
::tip
In the browser, `useRequestHeaders` will return an empty object.
::
## Example
We can use `useRequestHeaders` to access and proxy the initial request's `authorization` header to any future internal requests during SSR.
The example below adds the `authorization` request header to an isomorphic `$fetch` call.
```vue [pages/some-page.vue]
<script setup lang="ts">
const { data } = await useFetch('/api/confidential', {
headers: useRequestHeaders(['authorization'])
})
</script>
```
# useRequestURL
`useRequestURL` is a helper function that returns an [URL object](https://developer.mozilla.org/en-US/docs/Web/API/URL/URL){rel="nofollow"} working on both server-side and client-side.
::important
When utilizing [Hybrid Rendering](https://nuxt.com/docs/guide/concepts/rendering#hybrid-rendering) with cache strategies, all incoming request headers are dropped when handling the cached responses via the [Nitro caching layer](https://nitro.unjs.io/guide/cache){rel="nofollow"} (meaning `useRequestURL` will return `localhost` for the `host`).
You can define the [`cache.varies` option](https://nitro.unjs.io/guide/cache#options){rel="nofollow"} to specify headers that will be considered when caching and serving the responses, such as `host` and `x-forwarded-host` for multi-tenant environments.
::
::code-group
```vue [pages/about.vue]
<script setup lang="ts">
const url = useRequestURL()
</script>
<template>
<p>URL is: {{ url }}</p>
<p>Path is: {{ url.pathname }}</p>
</template>
```
```html [Result in development]
<p>URL is: http://localhost:3000/about</p>
<p>Path is: /about</p>
```
::
::tip
---
icon: i-simple-icons-mdnwebdocs
target: _blank
to: https://developer.mozilla.org/en-US/docs/Web/API/URL#instance_properties
---
Read about the URL instance properties on the MDN documentation.
::
# useResponseHeader
::important
This composable is available in Nuxt v3.14+.
::
You can use the built-in [`useResponseHeader`](https://nuxt.com/docs/api/composables/use-response-header) composable to set any server response header within your pages, components, and plugins.
```ts
// Set the a custom response header
const header = useResponseHeader('X-My-Header');
header.value = 'my-value';
```
## Example
We can use `useResponseHeader` to easily set a response header on a per-page basis.
```vue [pages/test.vue]
<script setup>
// pages/test.vue
const header = useResponseHeader('X-My-Header');
header.value = 'my-value';
</script>
<template>
<h1>Test page with custom header</h1>
<p>The response from the server for this "/test" page will have a custom "X-My-Header" header.</p>
</template>
```
We can use `useResponseHeader` for example in Nuxt [middleware](https://nuxt.com/docs/guide/directory-structure/middleware) to set a response header for all pages.
```ts [middleware/my-header-middleware.ts]
export default defineNuxtRouteMiddleware((to, from) => {
const header = useResponseHeader('X-My-Always-Header');
header.value = `I'm Always here!`;
});
```
# useRoute
::note
Within the template of a Vue component, you can access the route using `$route`.
::
## Example
In the following example, we call an API via [`useFetch`](https://nuxt.com/docs/api/composables/use-fetch) using a dynamic page parameter - `slug` - as part of the URL.
```html [~/pages/[slug\\].vue]
<script setup lang="ts">
const route = useRoute()
const { data: mountain } = await useFetch(`/api/mountains/${route.params.slug}`)
</script>
<template>
<div>
<h1>{{ mountain.title }}</h1>
<p>{{ mountain.description }}</p>
</div>
</template>
```
If you need to access the route query parameters (for example `example` in the path `/test?example=true`), then you can use `useRoute().query` instead of `useRoute().params`.
## API
Apart from dynamic parameters and query parameters, `useRoute()` also provides the following computed references related to the current route:
- `fullPath`: encoded URL associated with the current route that contains path, query and hash
- `hash`: decoded hash section of the URL that starts with a #
- `query`: access route query parameters
- `matched`: array of normalized matched routes with current route location
- `meta`: custom data attached to the record
- `name`: unique name for the route record
- `path`: encoded pathname section of the URL
- `redirectedFrom`: route location that was attempted to access before ending up on the current route location
::note
Browsers don't send [URL fragments](https://url.spec.whatwg.org/#concept-url-fragment){rel="nofollow"} (for example `#foo`) when making requests. So using `route.fullPath` in your template can trigger hydration issues because this will include the fragment on client but not the server.
::
::read-more
---
icon: i-simple-icons-vuedotjs
to: https://router.vuejs.org/api/#RouteLocationNormalizedLoaded
---
::
# useRouteAnnouncer
::important
This composable is available in Nuxt v3.12+.
::
## Description
A composable which observes the page title changes and updates the announcer message accordingly. Used by [`<NuxtRouteAnnouncer>`](https://nuxt.com/docs/api/components/nuxt-route-announcer) and controllable.
It hooks into Unhead's [`dom:rendered`](https://unhead.unjs.io/docs/typescript/head/api/hooks/dom-rendered){rel="nofollow"} to read the page's title and set it as the announcer message.
## Parameters
- `politeness`: Sets the urgency for screen reader announcements: `off` (disable the announcement), `polite` (waits for silence), or `assertive` (interrupts immediately). (default `polite`).
## Properties
### `message`
- **type**: `Ref<string>`
- **description**: The message to announce
### `politeness`
- **type**: `Ref<string>`
- **description**: Screen reader announcement urgency level `off`, `polite`, or `assertive`
## Methods
### `set(message, politeness = "polite")`
Sets the message to announce with its urgency level.
### `polite(message)`
Sets the message with `politeness = "polite"`
### `assertive(message)`
Sets the message with `politeness = "assertive"`
## Example
```vue [pages/index.vue]
<script setup lang="ts">
const { message, politeness, set, polite, assertive } = useRouteAnnouncer({
politeness: 'assertive'
})
</script>
```
# useRouter
```vue [pages/index.vue]
<script setup lang="ts">
const router = useRouter()
</script>
```
If you only need the router instance within your template, use `$router`:
```vue [pages/index.vue]
<template>
<button @click="$router.back()">Back</button>
</template>
```
If you have a `pages/` directory, `useRouter` is identical in behavior to the one provided by `vue-router`.
::read-more
---
icon: i-simple-icons-vuedotjs
target: _blank
to: https://router.vuejs.org/api/interfaces/Router.html#Properties-currentRoute
---
Read `vue-router` documentation about the `Router` interface.
::
## Basic Manipulation
- [`addRoute()`](https://router.vuejs.org/api/interfaces/Router.html#addRoute){rel="nofollow"}: Add a new route to the router instance. `parentName` can be provided to add new route as the child of an existing route.
- [`removeRoute()`](https://router.vuejs.org/api/interfaces/Router.html#removeRoute){rel="nofollow"}: Remove an existing route by its name.
- [`getRoutes()`](https://router.vuejs.org/api/interfaces/Router.html#getRoutes){rel="nofollow"}: Get a full list of all the route records.
- [`hasRoute()`](https://router.vuejs.org/api/interfaces/Router.html#hasRoute){rel="nofollow"}: Checks if a route with a given name exists.
- [`resolve()`](https://router.vuejs.org/api/interfaces/Router.html#resolve){rel="nofollow"}: Returns the normalized version of a route location. Also includes an `href` property that includes any existing base.
```ts [Example]
const router = useRouter()
router.addRoute({ name: 'home', path: '/home', component: Home })
router.removeRoute('home')
router.getRoutes()
router.hasRoute('home')
router.resolve({ name: 'home' })
```
::note
`router.addRoute()` adds route details into an array of routes and it is useful while building [Nuxt plugins](https://nuxt.com/docs/guide/directory-structure/plugins) while `router.push()` on the other hand, triggers a new navigation immediately and it is useful in pages, Vue components and composable.
::
## Based on History API
- [`back()`](https://router.vuejs.org/api/interfaces/Router.html#back){rel="nofollow"}: Go back in history if possible, same as `router.go(-1)`.
- [`forward()`](https://router.vuejs.org/api/interfaces/Router.html#forward){rel="nofollow"}: Go forward in history if possible, same as `router.go(1)`.
- [`go()`](https://router.vuejs.org/api/interfaces/Router.html#go){rel="nofollow"}: Move forward or backward through the history without the hierarchical restrictions enforced in `router.back()` and `router.forward()`.
- [`push()`](https://router.vuejs.org/api/interfaces/Router.html#push){rel="nofollow"}: Programmatically navigate to a new URL by pushing an entry in the history stack. **It is recommended to use [`navigateTo`](https://nuxt.com/docs/api/utils/navigate-to) instead.**
- [`replace()`](https://router.vuejs.org/api/interfaces/Router.html#replace){rel="nofollow"}: Programmatically navigate to a new URL by replacing the current entry in the routes history stack. **It is recommended to use [`navigateTo`](https://nuxt.com/docs/api/utils/navigate-to) instead.**
```ts [Example]
const router = useRouter()
router.back()
router.forward()
router.go(3)
router.push({ path: "/home" })
router.replace({ hash: "#bio" })
```
::read-more
---
icon: i-simple-icons-mdnwebdocs
target: _blank
to: https://developer.mozilla.org/en-US/docs/Web/API/History
---
Read more about the browser's History API.
::
## Navigation Guards
`useRouter` composable provides `afterEach`, `beforeEach` and `beforeResolve` helper methods that acts as navigation guards.
However, Nuxt has a concept of **route middleware** that simplifies the implementation of navigation guards and provides a better developer experience.
::read-more{to="https://nuxt.com/docs/guide/directory-structure/middleware"}
::
## Promise and Error Handling
- [`isReady()`](https://router.vuejs.org/api/interfaces/Router.html#isReady){rel="nofollow"}: Returns a Promise that resolves when the router has completed the initial navigation.
- [`onError`](https://router.vuejs.org/api/interfaces/Router.html#onError){rel="nofollow"}: Adds an error handler that is called every time a non caught error happens during navigation.
::read-more
---
icon: i-simple-icons-vuedotjs
target: _blank
title: Vue Router Docs
to: https://router.vuejs.org/api/interfaces/Router.html#Methods
---
::
## Universal Router Instance
If you do not have a `pages/` folder, then [`useRouter`](https://nuxt.com/docs/api/composables/use-router) will return a universal router instance with similar helper methods, but be aware that not all features may be supported or behave in exactly the same way as with `vue-router`.
# useRuntimeConfig
## Usage
```vue [app.vue]
<script setup lang="ts">
const config = useRuntimeConfig()
</script>
```
```ts [server/api/foo.ts]
export default defineEventHandler((event) => {
const config = useRuntimeConfig(event)
})
```
::read-more{to="https://nuxt.com/docs/guide/going-further/runtime-config"}
::
## Define Runtime Config
The example below shows how to set a public API base URL and a secret API token that is only accessible on the server.
We should always define `runtimeConfig` variables inside `nuxt.config`.
```ts [nuxt.config.ts]
export default defineNuxtConfig({
runtimeConfig: {
// Private keys are only available on the server
apiSecret: '123',
// Public keys that are exposed to the client
public: {
apiBase: process.env.NUXT_PUBLIC_API_BASE || '/api'
}
}
})
```
::note
Variables that need to be accessible on the server are added directly inside `runtimeConfig`. Variables that need to be accessible on both the client and the server are defined in `runtimeConfig.public`.
::
::read-more{to="https://nuxt.com/docs/guide/going-further/runtime-config"}
::
## Access Runtime Config
To access runtime config, we can use `useRuntimeConfig()` composable:
```ts [server/api/test.ts]
export default defineEventHandler((event) => {
const config = useRuntimeConfig(event)
// Access public variables
const result = await $fetch(`/test`, {
baseURL: config.public.apiBase,
headers: {
// Access a private variable (only available on the server)
Authorization: `Bearer ${config.apiSecret}`
}
})
return result
}
```
In this example, since `apiBase` is defined within the `public` namespace, it is universally accessible on both server and client-side, while `apiSecret` **is only accessible on the server-side**.
## Environment Variables
It is possible to update runtime config values using a matching environment variable name prefixed with `NUXT_`.
::read-more{to="https://nuxt.com/docs/guide/going-further/runtime-config"}
::
### Using the `.env` File
We can set the environment variables inside the `.env` file to make them accessible during **development** and **build/generate**.
```ini [.env]
NUXT_PUBLIC_API_BASE = "https://api.localhost:5555"
NUXT_API_SECRET = "123"
```
::note
Any environment variables set within `.env` file are accessed using `process.env` in the Nuxt app during **development** and **build/generate**.
::
::warning
In **production runtime**, you should use platform environment variables and `.env` is not used.
::
::read-more{to="https://nuxt.com/docs/guide/directory-structure/env"}
::
## `app` namespace
Nuxt uses `app` namespace in runtime-config with keys including `baseURL` and `cdnURL`. You can customize their values at runtime by setting environment variables.
::note
This is a reserved namespace. You should not introduce additional keys inside `app`.
::
### `app.baseURL`
By default, the `baseURL` is set to `'/'`.
However, the `baseURL` can be updated at runtime by setting the `NUXT_APP_BASE_URL` as an environment variable.
Then, you can access this new base URL using `config.app.baseURL`:
```ts [/plugins/my-plugin.ts]
export default defineNuxtPlugin((NuxtApp) => {
const config = useRuntimeConfig()
// Access baseURL universally
const baseURL = config.app.baseURL
})
```
### `app.cdnURL`
This example shows how to set a custom CDN url and access them using `useRuntimeConfig()`.
You can use a custom CDN for serving static assets inside `.output/public` using the `NUXT_APP_CDN_URL` environment variable.
And then access the new CDN url using `config.app.cdnURL`.
```ts [server/api/foo.ts]
export default defineEventHandler((event) => {
const config = useRuntimeConfig(event)
// Access cdnURL universally
const cdnURL = config.app.cdnURL
})
```
::read-more{to="https://nuxt.com/docs/guide/going-further/runtime-config"}
::
# useRuntimeHook
::important
This composable is available in Nuxt v3.14+.
::
```ts [signature]
function useRuntimeHook<THookName extends keyof RuntimeNuxtHooks>(
name: THookName,
fn: RuntimeNuxtHooks[THookName] extends HookCallback ? RuntimeNuxtHooks[THookName] : never
): void
```
## Usage
### Parameters
- `name`: The name of the runtime hook to register. You can see the full list of [runtime Nuxt hooks here](https://nuxt.com/docs/api/advanced/hooks#app-hooks-runtime).
- `fn`: The callback function to execute when the hook is triggered. The function signature varies based on the hook name.
### Returns
The composable doesn't return a value, but it automatically unregisters the hook when the component's scope is destroyed.
## Example
```vue [pages/index.vue] twoslash
<script setup lang="ts">
// Register a hook that runs every time a link is prefetched, but which will be
// automatically cleaned up (and not called again) when the component is unmounted
useRuntimeHook('link:prefetch', (link) => {
console.log('Prefetching', link)
})
</script>
```
# useSeoMeta
This helps you avoid common mistakes, such as using `name` instead of `property`, as well as typos - with over 100+ meta tags fully typed.
::important
This is the recommended way to add meta tags to your site as it is XSS safe and has full TypeScript support.
::
::read-more{to="https://nuxt.com/docs/getting-started/seo-meta"}
::
## Usage
```vue [app.vue]
<script setup lang="ts">
useSeoMeta({
title: 'My Amazing Site',
ogTitle: 'My Amazing Site',
description: 'This is my amazing site, let me tell you all about it.',
ogDescription: 'This is my amazing site, let me tell you all about it.',
ogImage: 'https://example.com/image.png',
twitterCard: 'summary_large_image',
})
</script>
```
When inserting tags that are reactive, you should use the computed getter syntax (`() => value`):
```vue [app.vue]
<script setup lang="ts">
const title = ref('My title')
useSeoMeta({
title,
description: () => `This is a description for the ${title.value} page`
})
</script>
```
## Parameters
There are over 100 parameters. See the [full list of parameters in the source code](https://github.com/harlan-zw/zhead/blob/main/packages/zhead/src/metaFlat.ts#L1035){rel="nofollow"}.
::read-more{to="https://nuxt.com/docs/getting-started/seo-meta"}
::
## Performance
In most instances, SEO meta tags don't need to be reactive as search engine robots primarily scan the initial page load.
For better performance, you can wrap your `useSeoMeta` calls in a server-only condition when the meta tags don't need to be reactive:
```vue [app.vue]
<script setup lang="ts">
if (import.meta.server) {
// These meta tags will only be added during server-side rendering
useSeoMeta({
robots: 'index, follow',
description: 'Static description that does not need reactivity',
ogImage: 'https://example.com/image.png',
// other static meta tags...
})
}
const dynamicTitle = ref('My title')
// Only use reactive meta tags outside the condition when necessary
useSeoMeta({
title: () => dynamicTitle.value,
ogTitle: () => dynamicTitle.value,
})
</script>
```
This previously used the [`useServerSeoMeta`](https://nuxt.com/docs/api/composables/use-server-seo-meta) composable, but it has been deprecated in favor of this approach.
# useServerSeoMeta
Just like [`useSeoMeta`](https://nuxt.com/docs/api/composables/use-seo-meta), `useServerSeoMeta` composable lets you define your site's SEO meta tags as a flat object with full TypeScript support.
::read-more{to="https://nuxt.com/docs/api/composables/use-seo-meta"}
::
In most instances, the meta doesn't need to be reactive as robots will only scan the initial load. So we recommend using [`useServerSeoMeta`](https://nuxt.com/docs/api/composables/use-server-seo-meta) as a performance-focused utility that will not do anything (or return a `head` object) on the client.
```vue [app.vue]
<script setup lang="ts">
useServerSeoMeta({
robots: 'index, follow'
})
</script>
```
Parameters are exactly the same as with [`useSeoMeta`](https://nuxt.com/docs/api/composables/use-seo-meta)
::read-more{to="https://nuxt.com/docs/getting-started/seo-meta"}
::
# useState
## Usage
```ts
// Create a reactive state and set default value
const count = useState('counter', () => Math.round(Math.random() * 100))
```
::read-more{to="https://nuxt.com/docs/getting-started/state-management"}
::
::important
Because the data inside `useState` will be serialized to JSON, it is important that it does not contain anything that cannot be serialized, such as classes, functions or symbols.
::
::warning
`useState` is a reserved function name transformed by the compiler, so you should not name your own function `useState`.
::
::video-accordion
---
title: Watch a video from Alexander Lichter about why and when to use useState
video-id: mv0WcBABcIk
---
::
## Using `shallowRef`
If you don't need your state to be deeply reactive, you can combine `useState` with [`shallowRef`](https://vuejs.org/api/reactivity-advanced.html#shallowref){rel="nofollow"}. This can improve performance when your state contains large objects and arrays.
```ts
const state = useState('my-shallow-state', () => shallowRef({ deep: 'not reactive' }))
// isShallow(state) === true
```
## Type
```ts
useState<T>(init?: () => T | Ref<T>): Ref<T>
useState<T>(key: string, init?: () => T | Ref<T>): Ref<T>
```
- `key`: A unique key ensuring that data fetching is properly de-duplicated across requests. If you do not provide a key, then a key that is unique to the file and line number of the instance of [`useState`](https://nuxt.com/docs/api/composables/use-state) will be generated for you.
- `init`: A function that provides initial value for the state when not initiated. This function can also return a `Ref`.
- `T`: (typescript only) Specify the type of state
# $fetch
Nuxt uses [ofetch](https://github.com/unjs/ofetch){rel="nofollow"} to expose globally the `$fetch` helper for making HTTP requests within your Vue app or API routes.
::tip{icon="i-lucide-rocket"}
During server-side rendering, calling `$fetch` to fetch your internal [API routes](https://nuxt.com/docs/guide/directory-structure/server) will directly call the relevant function (emulating the request), **saving an additional API call**.
::
::note{color="blue" icon="i-lucide-info"}
Using `$fetch` in components without wrapping it with [`useAsyncData`](https://nuxt.com/docs/api/composables/use-async-data) causes fetching the data twice: initially on the server, then again on the client-side during hydration, because `$fetch` does not transfer state from the server to the client. Thus, the fetch will be executed on both sides because the client has to get the data again.
::
## Usage
We recommend to use [`useFetch`](https://nuxt.com/docs/api/composables/use-fetch) or [`useAsyncData`](https://nuxt.com/docs/api/composables/use-async-data) + `$fetch` to prevent double data fetching when fetching the component data.
```vue [app.vue]
<script setup lang="ts">
// During SSR data is fetched twice, once on the server and once on the client.
const dataTwice = await $fetch('/api/item')
// During SSR data is fetched only on the server side and transferred to the client.
const { data } = await useAsyncData('item', () => $fetch('/api/item'))
// You can also useFetch as shortcut of useAsyncData + $fetch
const { data } = await useFetch('/api/item')
</script>
```
::read-more{to="https://nuxt.com/docs/getting-started/data-fetching"}
::
You can use `$fetch` in any methods that are executed only on client-side.
```vue [pages/contact.vue]
<script setup lang="ts">
async function contactForm() {
await $fetch('/api/contact', {
method: 'POST',
body: { hello: 'world '}
})
}
</script>
<template>
<button @click="contactForm">Contact</button>
</template>
```
::tip
`$fetch` is the preferred way to make HTTP calls in Nuxt instead of [@nuxt/http](https://github.com/nuxt/http){rel="nofollow"} and [@nuxtjs/axios](https://github.com/nuxt-community/axios-module){rel="nofollow"} that are made for Nuxt 2.
::
::note
If you use `$fetch` to call an (external) HTTPS URL with a self-signed certificate in development, you will need to set `NODE_TLS_REJECT_UNAUTHORIZED=0` in your environment.
::
### Passing Headers and Cookies
When we call `$fetch` in the browser, user headers like `cookie` will be directly sent to the API.
However, during Server-Side Rendering, due to security risks such as **Server-Side Request Forgery (SSRF)** or **Authentication Misuse**, the `$fetch` wouldn't include the user's browser cookies, nor pass on cookies from the fetch response.
::code-group
```vue [pages/index.vue]
<script setup lang="ts">
// This will NOT forward headers or cookies during SSR
const { data } = await useAsyncData(() => $fetch('/api/cookies'))
</script>
```
```ts [server/api/cookies.ts]
export default defineEventHandler((event) => {
const foo = getCookie(event, 'foo')
// ... Do something with the cookie
})
```
::
If you need to forward headers and cookies on the server, you must manually pass them:
```vue [pages/index.vue]
<script setup lang="ts">
// This will forward the user's headers and cookies to `/api/cookies`
const requestFetch = useRequestFetch()
const { data } = await useAsyncData(() => requestFetch('/api/cookies'))
</script>
```
However, when calling `useFetch` with a relative URL on the server, Nuxt will use [`useRequestFetch`](https://nuxt.com/docs/api/composables/use-request-fetch) to proxy headers and cookies (with the exception of headers not meant to be forwarded, like `host`).
# abortNavigation
::warning
`abortNavigation` is only usable inside a [route middleware handler](https://nuxt.com/docs/guide/directory-structure/middleware).
::
## Type
```ts
abortNavigation(err?: Error | string): false
```
## Parameters
### `err`
- **Type**: [`Error`](https://developer.mozilla.org/pl/docs/Web/JavaScript/Reference/Global_Objects/Error){rel="nofollow"} | `string`
:br
Optional error to be thrown by `abortNavigation`.
## Examples
The example below shows how you can use `abortNavigation` in a route middleware to prevent unauthorized route access:
```ts [middleware/auth.ts]
export default defineNuxtRouteMiddleware((to, from) => {
const user = useState('user')
if (!user.value.isAuthorized) {
return abortNavigation()
}
if (to.path !== '/edit-post') {
return navigateTo('/edit-post')
}
})
```
### `err` as a String
You can pass the error as a string:
```ts [middleware/auth.ts]
export default defineNuxtRouteMiddleware((to, from) => {
const user = useState('user')
if (!user.value.isAuthorized) {
return abortNavigation('Insufficient permissions.')
}
})
```
### `err` as an Error Object
You can pass the error as an [`Error`](https://developer.mozilla.org/pl/docs/Web/JavaScript/Reference/Global_Objects/Error){rel="nofollow"} object, e.g. caught by the `catch`-block:
```ts [middleware/auth.ts]
export default defineNuxtRouteMiddleware((to, from) => {
try {
/* code that might throw an error */
} catch (err) {
return abortNavigation(err)
}
})
```
# addRouteMiddleware
::note
Route middleware are navigation guards stored in the [`middleware/`](https://nuxt.com/docs/guide/directory-structure/middleware) directory of your Nuxt application (unless [set otherwise](https://nuxt.com/docs/api/nuxt-config#middleware)).
::
## Type
```ts
function addRouteMiddleware (name: string, middleware: RouteMiddleware, options?: AddRouteMiddlewareOptions): void
function addRouteMiddleware (middleware: RouteMiddleware): void
interface AddRouteMiddlewareOptions {
global?: boolean
}
```
## Parameters
### `name`
- **Type:** `string` | `RouteMiddleware`
Can be either a string or a function of type `RouteMiddleware`. Function takes the next route `to` as the first argument and the current route `from` as the second argument, both of which are Vue route objects.
Learn more about available properties of [route objects](https://nuxt.com/docs/api/composables/use-route).
### `middleware`
- **Type:** `RouteMiddleware`
The second argument is a function of type `RouteMiddleware`. Same as above, it provides `to` and `from` route objects. It becomes optional if the first argument in `addRouteMiddleware()` is already passed as a function.
### `options`
- **Type:** `AddRouteMiddlewareOptions`
An optional `options` argument lets you set the value of `global` to `true` to indicate whether the router middleware is global or not (set to `false` by default).
## Examples
### Named Route Middleware
Named route middleware is defined by providing a string as the first argument and a function as the second:
```ts [plugins/my-plugin.ts]
export default defineNuxtPlugin(() => {
addRouteMiddleware('named-middleware', () => {
console.log('named middleware added in Nuxt plugin')
})
})
```
When defined in a plugin, it overrides any existing middleware of the same name located in the `middleware/` directory.
### Global Route Middleware
Global route middleware can be defined in two ways:
- Pass a function directly as the first argument without a name. It will automatically be treated as global middleware and applied on every route change.
```ts [plugins/my-plugin.ts]
export default defineNuxtPlugin(() => {
addRouteMiddleware((to, from) => {
console.log('anonymous global middleware that runs on every route change')
})
})
```
- Set an optional, third argument `{ global: true }` to indicate whether the route middleware is global.
```ts [plugins/my-plugin.ts]
export default defineNuxtPlugin(() => {
addRouteMiddleware('global-middleware', (to, from) => {
console.log('global middleware that runs on every route change')
},
{ global: true }
)
})
```
# callOnce
::important
This utility is available since [Nuxt v3.9](https://nuxt.com/blog/v3-9).
::
## Purpose
The `callOnce` function is designed to execute a given function or block of code only once during:
- server-side rendering but not hydration
- client-side navigation
This is useful for code that should be executed only once, such as logging an event or setting up a global state.
## Usage
The default mode of `callOnce` is to run code only once. For example, if the code runs on the server it won't run again on the client. It also won't run again if you `callOnce` more than once on the client, for example by navigating back to this page.
```vue [app.vue]
<script setup lang="ts">
const websiteConfig = useState('config')
await callOnce(async () => {
console.log('This will only be logged once')
websiteConfig.value = await $fetch('https://my-cms.com/api/website-config')
})
</script>
```
It is also possible to run on every navigation while still avoiding the initial server/client double load. For this, it is possible to use the `navigation` mode:
```vue [app.vue]
<script setup lang="ts">
const websiteConfig = useState('config')
await callOnce(async () => {
console.log('This will only be logged once and then on every client side navigation')
websiteConfig.value = await $fetch('https://my-cms.com/api/website-config')
}, { mode: 'navigation' })
</script>
```
::important
`navigation` mode is available since [Nuxt v3.15](https://nuxt.com/blog/v3-15).
::
::tip
---
to: https://nuxt.com/docs/getting-started/state-management#usage-with-pinia
---
`callOnce` is useful in combination with the [Pinia module](https://nuxt.com/modules/pinia) to call store actions.
::
::read-more{to="https://nuxt.com/docs/getting-started/state-management"}
::
::warning
Note that `callOnce` doesn't return anything. You should use [`useAsyncData`](https://nuxt.com/docs/api/composables/use-async-data) or [`useFetch`](https://nuxt.com/docs/api/composables/use-fetch) if you want to do data fetching during SSR.
::
::note
`callOnce` is a composable meant to be called directly in a setup function, plugin, or route middleware, because it needs to add data to the Nuxt payload to avoid re-calling the function on the client when the page hydrates.
::
## Type
```ts
callOnce (key?: string, fn?: (() => any | Promise<any>), options?: CallOnceOptions): Promise<void>
callOnce(fn?: (() => any | Promise<any>), options?: CallOnceOptions): Promise<void>
type CallOnceOptions = {
/**
* Execution mode for the callOnce function
* @default 'render'
*/
mode?: 'navigation' | 'render'
}
```
## Parameters
- `key`: A unique key ensuring that the code is run once. If you do not provide a key, then a key that is unique to the file and line number of the instance of `callOnce` will be generated for you.
- `fn`: The function to run once. It can be asynchronous.
- `options`: Setup the mode, either to re-execute on navigation (`navigation`) or just once for the lifetime of the app (`render`). Defaults to `render`.
- `render`: Executes once during initial render (either SSR or CSR) - Default mode
- `navigation`: Executes once during initial render and once per subsequent client-side navigation
# clearError
Within your pages, components, and plugins, you can use `clearError` to clear all errors and redirect the user.
**Parameters:**
- `options?: { redirect?: string }`
You can provide an optional path to redirect to (for example, if you want to navigate to a 'safe' page).
```js
// Without redirect
clearError()
// With redirect
clearError({ redirect: '/homepage' })
```
Errors are set in state using [`useError()`](https://nuxt.com/docs/api/composables/use-error). The `clearError` composable will reset this state and calls the `app:error:cleared` hook with the provided options.
::read-more{to="https://nuxt.com/docs/getting-started/error-handling"}
::
# clearNuxtData
::note
This method is useful if you want to invalidate the data fetching for another page.
::
## Type
```ts
clearNuxtData (keys?: string | string[] | ((key: string) => boolean)): void
```
## Parameters
- `keys`: One or an array of keys that are used in [`useAsyncData`](https://nuxt.com/docs/api/composables/use-async-data) to delete their cached data. If no keys are provided, **all data** will be invalidated.
# clearNuxtState
::note
This method is useful if you want to invalidate the state of `useState`.
::
## Type
```ts
clearNuxtState (keys?: string | string[] | ((key: string) => boolean)): void
```
## Parameters
- `keys`: One or an array of keys that are used in [`useState`](https://nuxt.com/docs/api/composables/use-state) to delete their cached state. If no keys are provided, **all state** will be invalidated.
# createError
You can use this function to create an error object with additional metadata. It is usable in both the Vue and Nitro portions of your app, and is meant to be thrown.
## Parameters
- `err`: `string | { cause, data, message, name, stack, statusCode, statusMessage, fatal }`
You can pass either a string or an object to the `createError` function. If you pass a string, it will be used as the error `message`, and the `statusCode` will default to `500`. If you pass an object, you can set multiple properties of the error, such as `statusCode`, `message`, and other error properties.
## In Vue App
If you throw an error created with `createError`:
- on server-side, it will trigger a full-screen error page which you can clear with `clearError`.
- on client-side, it will throw a non-fatal error for you to handle. If you need to trigger a full-screen error page, then you can do this by setting `fatal: true`.
### Example
```vue [pages/movies/[slug\\].vue]
<script setup lang="ts">
const route = useRoute()
const { data } = await useFetch(`/api/movies/${route.params.slug}`)
if (!data.value) {
throw createError({ statusCode: 404, statusMessage: 'Page Not Found' })
}
</script>
```
## In API Routes
Use `createError` to trigger error handling in server API routes.
### Example
```ts [server/api/error.ts]
export default eventHandler(() => {
throw createError({
statusCode: 404,
statusMessage: 'Page Not Found'
})
})
```
In API routes, using `createError` by passing an object with a short `statusMessage` is recommended because it can be accessed on the client side. Otherwise, a `message` passed to `createError` on an API route will not propagate to the client. Alternatively, you can use the `data` property to pass data back to the client. In any case, always consider avoiding to put dynamic user input to the message to avoid potential security issues.
::read-more{to="https://nuxt.com/docs/getting-started/error-handling"}
::
# defineNuxtComponent
::note
`defineNuxtComponent()` is a helper function for defining type safe Vue components using options API similar to [`defineComponent()`](https://vuejs.org/api/general.html#definecomponent){rel="nofollow"}. `defineNuxtComponent()` wrapper also adds support for `asyncData` and `head` component options.
::
::note
Using `<script setup lang="ts">` is the recommended way of declaring Vue components in Nuxt.
::
::read-more{to="https://nuxt.com/docs/getting-started/data-fetching"}
::
## `asyncData()`
If you choose not to use `setup()` in your app, you can use the `asyncData()` method within your component definition:
```vue [pages/index.vue]
<script lang="ts">
export default defineNuxtComponent({
async asyncData() {
return {
data: {
greetings: 'hello world!'
}
}
},
})
</script>
```
## `head()`
If you choose not to use `setup()` in your app, you can use the `head()` method within your component definition:
```vue [pages/index.vue]
<script lang="ts">
export default defineNuxtComponent({
head(nuxtApp) {
return {
title: 'My site'
}
},
})
</script>
```
# defineNuxtRouteMiddleware
Route middleware are stored in the [`middleware/`](https://nuxt.com/docs/guide/directory-structure/middleware) of your Nuxt application (unless [set otherwise](https://nuxt.com/docs/api/nuxt-config#middleware)).
## Type
```ts
defineNuxtRouteMiddleware(middleware: RouteMiddleware) => RouteMiddleware
interface RouteMiddleware {
(to: RouteLocationNormalized, from: RouteLocationNormalized): ReturnType<NavigationGuard>
}
```
## Parameters
### `middleware`
- **Type**: `RouteMiddleware`
A function that takes two Vue Router's route location objects as parameters: the next route `to` as the first, and the current route `from` as the second.
Learn more about available properties of `RouteLocationNormalized` in the **[Vue Router docs](https://router.vuejs.org/api/#RouteLocationNormalized){rel="nofollow"}**.
## Examples
### Showing Error Page
You can use route middleware to throw errors and show helpful error messages:
```ts [middleware/error.ts]
export default defineNuxtRouteMiddleware((to) => {
if (to.params.id === '1') {
throw createError({ statusCode: 404, statusMessage: 'Page Not Found' })
}
})
```
The above route middleware will redirect a user to the custom error page defined in the `~/error.vue` file, and expose the error message and code passed from the middleware.
### Redirection
Use [`useState`](https://nuxt.com/docs/api/composables/use-state) in combination with `navigateTo` helper function inside the route middleware to redirect users to different routes based on their authentication status:
```ts [middleware/auth.ts]
export default defineNuxtRouteMiddleware((to, from) => {
const auth = useState('auth')
if (!auth.value.isAuthenticated) {
return navigateTo('/login')
}
if (to.path !== '/dashboard') {
return navigateTo('/dashboard')
}
})
```
Both [navigateTo](https://nuxt.com/docs/api/utils/navigate-to) and [abortNavigation](https://nuxt.com/docs/api/utils/abort-navigation) are globally available helper functions that you can use inside `defineNuxtRouteMiddleware`.
# definePageMeta
`definePageMeta` is a compiler macro that you can use to set metadata for your **page** components located in the [`pages/`](https://nuxt.com/docs/guide/directory-structure/pages) directory (unless [set otherwise](https://nuxt.com/docs/api/nuxt-config#pages)). This way you can set custom metadata for each static or dynamic route of your Nuxt application.
```vue [pages/some-page.vue]
<script setup lang="ts">
definePageMeta({
layout: 'default'
})
</script>
```
::read-more
---
to: https://nuxt.com/docs/guide/directory-structure/pages#page-metadata
---
::
## Type
```ts
definePageMeta(meta: PageMeta) => void
interface PageMeta {
validate?: (route: RouteLocationNormalized) => boolean | Promise<boolean> | Partial<NuxtError> | Promise<Partial<NuxtError>>
redirect?: RouteRecordRedirectOption
name?: string
path?: string
props?: RouteRecordRaw['props']
alias?: string | string[]
pageTransition?: boolean | TransitionProps
layoutTransition?: boolean | TransitionProps
viewTransition?: boolean | 'always'
key?: false | string | ((route: RouteLocationNormalizedLoaded) => string)
keepalive?: boolean | KeepAliveProps
layout?: false | LayoutKey | Ref<LayoutKey> | ComputedRef<LayoutKey>
middleware?: MiddlewareKey | NavigationGuard | Array<MiddlewareKey | NavigationGuard>
scrollToTop?: boolean | ((to: RouteLocationNormalizedLoaded, from: RouteLocationNormalizedLoaded) => boolean)
[key: string]: unknown
}
```
## Parameters
### `meta`
- **Type**: `PageMeta`
:br
An object accepting the following page metadata:
:br
**`name`**
- **Type**: `string`
:br
You may define a name for this page's route. By default, name is generated based on path inside the [`pages/` directory](https://nuxt.com/docs/guide/directory-structure/pages).
:br
**`path`**
- **Type**: `string`
:br
You may define a [custom regular expression](https://nuxt.com/#using-a-custom-regular-expression) if you have a more complex pattern than can be expressed with the file name.
:br
**`props`**
- **Type**: [`RouteRecordRaw['props']`](https://router.vuejs.org/guide/essentials/passing-props){rel="nofollow"}
:br
Allows accessing the route `params` as props passed to the page component.
:br
**`alias`**
- **Type**: `string | string[]`
:br
Aliases for the record. Allows defining extra paths that will behave like a copy of the record. Allows having paths shorthands like `/users/:id` and `/u/:id`. All `alias` and `path` values must share the same params.
:br
**`keepalive`**
- **Type**: `boolean` | [`KeepAliveProps`](https://vuejs.org/api/built-in-components.html#keepalive){rel="nofollow"}
:br
Set to `true` when you want to preserve page state across route changes or use the [`KeepAliveProps`](https://vuejs.org/api/built-in-components.html#keepalive){rel="nofollow"} for a fine-grained control.
:br
**`key`**
- **Type**: `false` | `string` | `((route: RouteLocationNormalizedLoaded) => string)`
:br
Set `key` value when you need more control over when the `<NuxtPage>` component is re-rendered.
:br
**`layout`**
- **Type**: `false` | `LayoutKey` | `Ref<LayoutKey>` | `ComputedRef<LayoutKey>`
:br
Set a static or dynamic name of the layout for each route. This can be set to `false` in case the default layout needs to be disabled.
:br
**`layoutTransition`**
- **Type**: `boolean` | [`TransitionProps`](https://vuejs.org/api/built-in-components.html#transition){rel="nofollow"}
:br
Set name of the transition to apply for current layout. You can also set this value to `false` to disable the layout transition.
:br
**`middleware`**
- **Type**: `MiddlewareKey` | [`NavigationGuard`](https://router.vuejs.org/api/interfaces/NavigationGuard.html#navigationguard){rel="nofollow"} | `Array<MiddlewareKey | NavigationGuard>`
:br
Define anonymous or named middleware directly within `definePageMeta`. Learn more about [route middleware](https://nuxt.com/docs/guide/directory-structure/middleware).
:br
**`pageTransition`**
- **Type**: `boolean` | [`TransitionProps`](https://vuejs.org/api/built-in-components.html#transition){rel="nofollow"}
:br
Set name of the transition to apply for current page. You can also set this value to `false` to disable the page transition.
:br
**`viewTransition`**
- **Type**: `boolean | 'always'`
:br
**Experimental feature, only available when [enabled in your nuxt.config file](https://nuxt.com/docs/getting-started/transitions#view-transitions-api-experimental)**
:br
Enable/disable View Transitions for the current page.
If set to true, Nuxt will not apply the transition if the users browser matches `prefers-reduced-motion: reduce` (recommended). If set to `always`, Nuxt will always apply the transition.
:br
**`redirect`**
- **Type**: [`RouteRecordRedirectOption`](https://router.vuejs.org/guide/essentials/redirect-and-alias.html#redirect-and-alias){rel="nofollow"}
:br
Where to redirect if the route is directly matched. The redirection happens before any navigation guard and triggers a new navigation with the new target location.
:br
**`validate`**
- **Type**: `(route: RouteLocationNormalized) => boolean | Promise<boolean> | Partial<NuxtError> | Promise<Partial<NuxtError>>`
:br
Validate whether a given route can validly be rendered with this page. Return true if it is valid, or false if not. If another match can't be found, this will mean a 404. You can also directly return an object with `statusCode`/`statusMessage` to respond immediately with an error (other matches will not be checked).
:br
**`scrollToTop`**
- **Type**: `boolean | (to: RouteLocationNormalized, from: RouteLocationNormalized) => boolean`
:br
Tell Nuxt to scroll to the top before rendering the page or not. If you want to overwrite the default scroll behavior of Nuxt, you can do so in `~/app/router.options.ts` (see [custom routing](https://nuxt.com/docs/guide/recipes/custom-routing#using-approuteroptions)) for more info.
:br
**`[key: string]`**
- **Type**: `any`
:br
Apart from the above properties, you can also set **custom** metadata. You may wish to do so in a type-safe way by [augmenting the type of the `meta` object](https://nuxt.com/docs/guide/directory-structure/pages/#typing-custom-metadata).
## Examples
### Basic Usage
The example below demonstrates:
- how `key` can be a function that returns a value;
- how `keepalive` property makes sure that the `<modal>` component is not cached when switching between multiple components;
- adding `pageType` as a custom property:
```vue [pages/some-page.vue]
<script setup lang="ts">
definePageMeta({
key: (route) => route.fullPath,
keepalive: {
exclude: ['modal']
},
pageType: 'Checkout'
})
</script>
```
### Defining Middleware
The example below shows how the middleware can be defined using a `function` directly within the `definePageMeta` or set as a `string` that matches the middleware file name located in the `middleware/` directory:
```vue [pages/some-page.vue]
<script setup lang="ts">
definePageMeta({
// define middleware as a function
middleware: [
function (to, from) {
const auth = useState('auth')
if (!auth.value.authenticated) {
return navigateTo('/login')
}
if (to.path !== '/checkout') {
return navigateTo('/checkout')
}
}
],
// ... or a string
middleware: 'auth'
// ... or multiple strings
middleware: ['auth', 'another-named-middleware']
})
</script>
```
### Using a Custom Regular Expression
A custom regular expression is a good way to resolve conflicts between overlapping routes, for instance:
The two routes "/test-category" and "/1234-post" match both `[postId]-[postSlug].vue` and `[categorySlug].vue` page routes.
To make sure that we are only matching digits (`\d+`) for `postId` in the `[postId]-[postSlug]` route, we can add the following to the `[postId]-[postSlug].vue` page template:
```vue [pages/[postId\\]-[postSlug\\].vue]
<script setup lang="ts">
definePageMeta({
path: '/:postId(\\d+)-:postSlug'
})
</script>
```
For more examples see [Vue Router's Matching Syntax](https://router.vuejs.org/guide/essentials/route-matching-syntax.html){rel="nofollow"}.
### Defining Layout
You can define the layout that matches the layout's file name located (by default) in the [`layouts/` directory](https://nuxt.com/docs/guide/directory-structure/layouts). You can also disable the layout by setting the `layout` to `false`:
```vue [pages/some-page.vue]
<script setup lang="ts">
definePageMeta({
// set custom layout
layout: 'admin'
// ... or disable a default layout
layout: false
})
</script>
```
# defineRouteRules
::read-more
---
icon: i-lucide-star
to: https://nuxt.com/docs/guide/going-further/experimental-features#inlinerouterules
---
This feature is experimental and in order to use it you must enable the `experimental.inlineRouteRules` option in your `nuxt.config`.
::
## Usage
```vue [pages/index.vue]
<script setup lang="ts">
defineRouteRules({
prerender: true
})
</script>
<template>
<h1>Hello world!</h1>
</template>
```
Will be translated to:
```ts [nuxt.config.ts]
export default defineNuxtConfig({
routeRules: {
'/': { prerender: true }
}
})
```
::note
When running [`nuxt build`](https://nuxt.com/docs/api/commands/build), the home page will be pre-rendered in `.output/public/index.html` and statically served.
::
## Notes
- A rule defined in `~/pages/foo/bar.vue` will be applied to `/foo/bar` requests.
- A rule in `~/pages/foo/[id].vue` will be applied to `/foo/**` requests.
For more control, such as if you are using a custom `path` or `alias` set in the page's [`definePageMeta`](https://nuxt.com/docs/api/utils/define-page-meta), you should set `routeRules` directly within your `nuxt.config`.
::read-more
---
icon: i-lucide-medal
to: https://nuxt.com/docs/guide/concepts/rendering#hybrid-rendering
---
Read more about the `routeRules`.
::
# navigateTo
## Usage
`navigateTo` is available on both server side and client side. It can be used within the [Nuxt context](https://nuxt.com/docs/guide/going-further/nuxt-app#the-nuxt-context), or directly, to perform page navigation.
::warning
Make sure to always use `await` or `return` on result of `navigateTo` when calling it.
::
::note
`navigateTo` cannot be used within Nitro routes. To perform a server-side redirect in Nitro routes, use [`sendRedirect`](https://h3.unjs.io/utils/response#sendredirectevent-location-code){rel="nofollow"} instead.
::
### Within a Vue Component
```vue
<script setup lang="ts">
// passing 'to' as a string
await navigateTo('/search')
// ... or as a route object
await navigateTo({ path: '/search' })
// ... or as a route object with query parameters
await navigateTo({
path: '/search',
query: {
page: 1,
sort: 'asc'
}
})
</script>
```
### Within Route Middleware
```ts
export default defineNuxtRouteMiddleware((to, from) => {
if (to.path !== '/search') {
// setting the redirect code to '301 Moved Permanently'
return navigateTo('/search', { redirectCode: 301 })
}
})
```
When using `navigateTo` within route middleware, you must **return its result** to ensure the middleware execution flow works correctly.
For example, the following implementation **will not work as expected**:
```ts
export default defineNuxtRouteMiddleware((to, from) => {
if (to.path !== '/search') {
// ❌ This will not work as expected
navigateTo('/search', { redirectCode: 301 })
return
}
})
```
In this case, `navigateTo` will be executed but not returned, which may lead to unexpected behavior.
::read-more{to="https://nuxt.com/docs/guide/directory-structure/middleware"}
::
### Navigating to an External URL
The `external` parameter in `navigateTo` influences how navigating to URLs is handled:
- **Without `external: true`**:
- Internal URLs navigate as expected.
- External URLs throw an error.
- **With `external: true`**:
- Internal URLs navigate with a full-page reload.
- External URLs navigate as expected.
#### Example
```vue
<script setup lang="ts">
// will throw an error;
// navigating to an external URL is not allowed by default
await navigateTo('https://nuxt.com')
// will redirect successfully with the 'external' parameter set to 'true'
await navigateTo('https://nuxt.com', {
external: true
})
</script>
```
### Opening a Page in a New Tab
```vue
<script setup lang="ts">
// will open 'https://nuxt.com' in a new tab
await navigateTo('https://nuxt.com', {
open: {
target: '_blank',
windowFeatures: {
width: 500,
height: 500
}
}
})
</script>
```
## Type
```ts
function navigateTo(
to: RouteLocationRaw | undefined | null,
options?: NavigateToOptions
) => Promise<void | NavigationFailure | false> | false | void | RouteLocationRaw
interface NavigateToOptions {
replace?: boolean
redirectCode?: number
external?: boolean
open?: OpenOptions
}
type OpenOptions = {
target: string
windowFeatures?: OpenWindowFeatures
}
type OpenWindowFeatures = {
popup?: boolean
noopener?: boolean
noreferrer?: boolean
} & XOR<{ width?: number }, { innerWidth?: number }>
& XOR<{ height?: number }, { innerHeight?: number }>
& XOR<{ left?: number }, { screenX?: number }>
& XOR<{ top?: number }, { screenY?: number }>
```
## Parameters
### `to`
**Type**: [`RouteLocationRaw`](https://router.vuejs.org/api/interfaces/RouteLocationOptions.html#Interface-RouteLocationOptions){rel="nofollow"} | `undefined` | `null`
**Default**: `'/'`
`to` can be a plain string or a route object to redirect to. When passed as `undefined` or `null`, it will default to `'/'`.
#### Example
```ts
// Passing the URL directly will redirect to the '/blog' page
await navigateTo('/blog')
// Using the route object, will redirect to the route with the name 'blog'
await navigateTo({ name: 'blog' })
// Redirects to the 'product' route while passing a parameter (id = 1) using the route object.
await navigateTo({ name: 'product', params: { id: 1 } })
```
### `options` (optional)
**Type**: `NavigateToOptions`
An object accepting the following properties:
- `replace`
- **Type**: `boolean`
- **Default**: `false`
- By default, `navigateTo` pushes the given route into the Vue Router's instance on the client side.
:br
This behavior can be changed by setting `replace` to `true`, to indicate that given route should be replaced.
- `redirectCode`
- **Type**: `number`
- **Default**: `302`
- `navigateTo` redirects to the given path and sets the redirect code to [`302 Found`](https://developer.mozilla.org/en-US/docs/Web/HTTP/Status/302){rel="nofollow"} by default when the redirection takes place on the server side.
:br
This default behavior can be modified by providing different `redirectCode`. Commonly, [`301 Moved Permanently`](https://developer.mozilla.org/en-US/docs/Web/HTTP/Status/301){rel="nofollow"} can be used for permanent redirections.
- `external`
- **Type**: `boolean`
- **Default**: `false`
- Allows navigating to an external URL when set to `true`. Otherwise, `navigateTo` will throw an error, as external navigation is not allowed by default.
- `open`
- **Type**: `OpenOptions`
- Allows navigating to the URL using the [open()](https://developer.mozilla.org/en-US/docs/Web/API/Window/open){rel="nofollow"} method of the window. This option is only applicable on the client side and will be ignored on the server side.
:br
An object accepting the following properties:
- `target`
- **Type**: `string`
- **Default**: `'_blank'`
- A string, without whitespace, specifying the name of the browsing context the resource is being loaded into.
- `windowFeatures`
- **Type**: `OpenWindowFeatures`
- An object accepting the following properties:
| Property | Type | Description |
| ------------------------- | --------- | ---------------------------------------------------------------------------------------------- |
| `popup` | `boolean` | Requests a minimal popup window instead of a new tab, with UI features decided by the browser. |
| `width` or `innerWidth` | `number` | Specifies the content area's width (minimum 100 pixels), including scrollbars. |
| `height` or `innerHeight` | `number` | Specifies the content area's height (minimum 100 pixels), including scrollbars. |
| `left` or `screenX` | `number` | Sets the horizontal position of the new window relative to the left edge of the screen. |
| `top` or `screenY` | `number` | Sets the vertical position of the new window relative to the top edge of the screen. |
| `noopener` | `boolean` | Prevents the new window from accessing the originating window via `window.opener`. |
| `noreferrer` | `boolean` | Prevents the Referer header from being sent and implicitly enables `noopener`. |
:br
Refer to the [documentation](https://developer.mozilla.org/en-US/docs/Web/API/Window/open#windowfeatures){rel="nofollow"} for more detailed information on the **windowFeatures** properties.
# onBeforeRouteLeave
::read-more
---
icon: i-simple-icons-vuedotjs
target: _blank
title: Vue Router Docs
to: https://router.vuejs.org/api/#onBeforeRouteLeave
---
::
# onBeforeRouteUpdate
::read-more
---
icon: i-simple-icons-vuedotjs
target: _blank
title: Vue Router Docs
to: https://router.vuejs.org/api/#onBeforeRouteUpdate
---
::
# onNuxtReady
::important
`onNuxtReady` only runs on the client-side. :br
It is ideal for running code that should not block the initial rendering of your app.
::
```ts [plugins/ready.client.ts]
export default defineNuxtPlugin(() => {
onNuxtReady(async () => {
const myAnalyticsLibrary = await import('my-big-analytics-library')
// do something with myAnalyticsLibrary
})
})
```
It is 'safe' to run even after your app has initialized. In this case, then the code will be registered to run in the next idle callback.
# prefetchComponents
Prefetching component downloads the code in the background, this is based on the assumption that the component will likely be used for rendering, enabling the component to load instantly if and when the user requests it. The component is downloaded and cached for anticipated future use without the user making an explicit request for it.
Use `prefetchComponents` to manually prefetch individual components that have been registered globally in your Nuxt app. By default Nuxt registers these as async components. You must use the Pascal-cased version of the component name.
```ts
await prefetchComponents('MyGlobalComponent')
await prefetchComponents(['MyGlobalComponent1', 'MyGlobalComponent2'])
```
::note
Current implementation behaves exactly the same as [`preloadComponents`](https://nuxt.com/docs/api/utils/preload-components) by preloading components instead of just prefetching we are working to improve this behavior.
::
::note
On server, `prefetchComponents` will have no effect.
::
# preloadComponents
Preloading components loads components that your page will need very soon, which you want to start loading early in rendering lifecycle. This ensures they are available earlier and are less likely to block the page's render, improving performance.
Use `preloadComponents` to manually preload individual components that have been registered globally in your Nuxt app. By default Nuxt registers these as async components. You must use the Pascal-cased version of the component name.
```js
await preloadComponents('MyGlobalComponent')
await preloadComponents(['MyGlobalComponent1', 'MyGlobalComponent2'])
```
::note
On server, `preloadComponents` will have no effect.
::
# preloadRouteComponents
Preloading routes loads the components of a given route that the user might navigate to in future. This ensures that the components are available earlier and less likely to block the navigation, improving performance.
::tip{icon="i-lucide-rocket"}
Nuxt already automatically preloads the necessary routes if you're using the `NuxtLink` component.
::
::read-more{to="https://nuxt.com/docs/api/components/nuxt-link"}
::
## Example
Preload a route when using `navigateTo`.
```ts
// we don't await this async function, to avoid blocking rendering
// this component's setup function
preloadRouteComponents('/dashboard')
const submit = async () => {
const results = await $fetch('/api/authentication')
if (results.token) {
await navigateTo('/dashboard')
}
}
```
::read-more{to="https://nuxt.com/docs/api/utils/navigate-to"}
::
::note
On server, `preloadRouteComponents` will have no effect.
::
# prerenderRoutes
When prerendering, you can hint to Nitro to prerender additional paths, even if their URLs do not show up in the HTML of the generated page.
::important
`prerenderRoutes` can only be called within the [Nuxt context](https://nuxt.com/docs/guide/going-further/nuxt-app#the-nuxt-context).
::
::note
`prerenderRoutes` has to be executed during prerendering. If the `prerenderRoutes` is used in dynamic pages/routes which are not prerendered, then it will not be executed.
::
```js
const route = useRoute()
prerenderRoutes('/')
prerenderRoutes(['/', '/about'])
```
::note
In the browser, or if called outside prerendering, `prerenderRoutes` will have no effect.
::
You can even prerender API routes which is particularly useful for full statically generated sites (SSG) because you can then `$fetch` data as if you have an available server!
```js
prerenderRoutes('/api/content/article/name-of-article')
// Somewhere later in App
const articleContent = await $fetch('/api/content/article/name-of-article', {
responseType: 'json',
})
```
::warning
Prerendered API routes in production may not return the expected response headers, depending on the provider you deploy to. For example, a JSON response might be served with an `application/octet-stream` content type.
Always manually set `responseType` when fetching prerendered API routes.
::
# refreshCookie
::important
This utility is available since [Nuxt v3.10](https://nuxt.com/blog/v3-10).
::
## Purpose
The `refreshCookie` function is designed to refresh cookie value returned by `useCookie`.
This is useful for updating the `useCookie` ref when we know the new cookie value has been set in the browser.
## Usage
```vue [app.vue]
<script setup lang="ts">
const tokenCookie = useCookie('token')
const login = async (username, password) => {
const token = await $fetch('/api/token', { ... }) // Sets `token` cookie on response
refreshCookie('token')
}
const loggedIn = computed(() => !!tokenCookie.value)
</script>
```
::note
---
to: https://nuxt.com/docs/guide/going-further/experimental-features#cookiestore
---
You can enable experimental `cookieStore` option to automatically refresh `useCookie` value when cookie changes in the browser.
::
## Type
```ts
refreshCookie(name: string): void
```
# refreshNuxtData
`refreshNuxtData` is used to refetch all or specific `asyncData` instances, including those from [`useAsyncData`](https://nuxt.com/docs/api/composables/use-async-data), [`useLazyAsyncData`](https://nuxt.com/docs/api/composables/use-lazy-async-data), [`useFetch`](https://nuxt.com/docs/api/composables/use-fetch), and [`useLazyFetch`](https://nuxt.com/docs/api/composables/use-lazy-fetch).
::note
If your component is cached by `<KeepAlive>` and enters a deactivated state, the `asyncData` inside the component will still be refetched until the component is unmounted.
::
## Type
```ts
refreshNuxtData(keys?: string | string[])
```
## Parameters
- `keys`: A single string or an array of strings as `keys` that are used to fetch the data. This parameter is **optional**. All [`useAsyncData`](https://nuxt.com/docs/api/composables/use-async-data) and [`useFetch`](https://nuxt.com/docs/api/composables/use-fetch) keys are re-fetched when no `keys` are explicitly specified.
## Return Values
`refreshNuxtData` returns a promise, resolving when all or specific `asyncData` instances have been refreshed.
## Examples
### Refresh All Data
This example below refreshes all data being fetched using `useAsyncData` and `useFetch` in Nuxt application.
```vue [pages/some-page.vue]
<script setup lang="ts">
const refreshing = ref(false)
async function refreshAll () {
refreshing.value = true
try {
await refreshNuxtData()
} finally {
refreshing.value = false
}
}
</script>
<template>
<div>
<button :disabled="refreshing" @click="refreshAll">
Refetch All Data
</button>
</div>
</template>
```
### Refresh Specific Data
This example below refreshes only data where the key matches to `count` and `user`.
```vue [pages/some-page.vue]
<script setup lang="ts">
const refreshing = ref(false)
async function refresh () {
refreshing.value = true
try {
// you could also pass an array of keys to refresh multiple data
await refreshNuxtData(['count', 'user'])
} finally {
refreshing.value = false
}
}
</script>
<template>
<div v-if="refreshing">
Loading
</div>
<button @click="refresh">Refresh</button>
</template>
```
::note
If you have access to the `asyncData` instance, it is recommended to use its `refresh` or `execute` method as the preferred way to refetch the data.
::
::read-more{to="https://nuxt.com/docs/getting-started/data-fetching"}
::
# reloadNuxtApp
::note
`reloadNuxtApp` will perform a hard reload of your app, re-requesting a page and its dependencies from the server.
::
By default, it will also save the current `state` of your app (that is, any state you could access with `useState`).
::read-more
---
icon: i-lucide-star
to: https://nuxt.com/docs/guide/going-further/experimental-features#restorestate
---
You can enable experimental restoration of this state by enabling the `experimental.restoreState` option in your `nuxt.config` file.
::
## Type
```ts
reloadNuxtApp(options?: ReloadNuxtAppOptions)
interface ReloadNuxtAppOptions {
ttl?: number
force?: boolean
path?: string
persistState?: boolean
}
```
### `options` (optional)
**Type**: `ReloadNuxtAppOptions`
An object accepting the following properties:
- `path` (optional)
:br
**Type**: `string`
:br
**Default**: `window.location.pathname`
:br
The path to reload (defaulting to the current path). If this is different from the current window location it
will trigger a navigation and add an entry in the browser history.
- `ttl` (optional)
:br
**Type**: `number`
:br
**Default**: `10000`
:br
The number of milliseconds in which to ignore future reload requests. If called again within this time period,
`reloadNuxtApp` will not reload your app to avoid reload loops.
- `force` (optional)
:br
**Type**: `boolean`
:br
**Default**: `false`
:br
This option allows bypassing reload loop protection entirely, forcing a reload even if one has occurred within
the previously specified TTL.
- `persistState` (optional)
:br
**Type**: `boolean`
:br
**Default**: `false`
:br
Whether to dump the current Nuxt state to sessionStorage (as `nuxt:reload:state`). By default this will have no
effect on reload unless `experimental.restoreState` is also set, or unless you handle restoring the state yourself.
# setPageLayout
::important
`setPageLayout` allows you to dynamically change the layout of a page. It relies on access to the Nuxt context and therefore can only be called within the [Nuxt context](https://nuxt.com/docs/guide/going-further/nuxt-app#the-nuxt-context).
::
```ts [middleware/custom-layout.ts]
export default defineNuxtRouteMiddleware((to) => {
// Set the layout on the route you are navigating _to_
setPageLayout('other')
})
```
::note
If you choose to set the layout dynamically on the server side, you *must* do so before the layout is rendered by Vue (that is, within a plugin or route middleware) to avoid a hydration mismatch.
::
# setResponseStatus
Nuxt provides composables and utilities for first-class server-side-rendering support.
`setResponseStatus` sets the statusCode (and optionally the statusMessage) of the response.
::important
`setResponseStatus` can only be called in the [Nuxt context](https://nuxt.com/docs/guide/going-further/nuxt-app#the-nuxt-context).
::
```js
const event = useRequestEvent()
// event will be undefined in the browser
if (event) {
// Set the status code to 404 for a custom 404 page
setResponseStatus(event, 404)
// Set the status message as well
setResponseStatus(event, 404, 'Page Not Found')
}
```
::note
In the browser, `setResponseStatus` will have no effect.
::
::read-more{to="https://nuxt.com/docs/getting-started/error-handling"}
::
# showError
Within the [Nuxt context](https://nuxt.com/docs/guide/going-further/nuxt-app#the-nuxt-context) you can use `showError` to show an error.
**Parameters:**
- `error`: `string | Error | Partial<{ cause, data, message, name, stack, statusCode, statusMessage }>`
```ts
showError("😱 Oh no, an error has been thrown.")
showError({
statusCode: 404,
statusMessage: "Page Not Found"
})
```
The error is set in the state using [`useError()`](https://nuxt.com/docs/api/composables/use-error) to create a reactive and SSR-friendly shared error state across components.
::tip
`showError` calls the `app:error` hook.
::
::read-more{to="https://nuxt.com/docs/getting-started/error-handling"}
::
# updateAppConfig
::note
Updates the [`app.config`](https://nuxt.com/docs/guide/directory-structure/app-config) using deep assignment. Existing (nested) properties will be preserved.
::
## Usage
```js
const appConfig = useAppConfig() // { foo: 'bar' }
const newAppConfig = { foo: 'baz' }
updateAppConfig(newAppConfig)
console.log(appConfig) // { foo: 'baz' }
```
::read-more{to="https://nuxt.com/docs/guide/directory-structure/app-config"}
::
# nuxi add
```bash [Terminal]
npx nuxi add <TEMPLATE> <NAME> [--cwd=<directory>] [--logLevel=<silent|info|verbose>] [--force]
```
### Arguments
| Argument | Description |
| ---------- | -------------------------------------------------------------------------------------------------------------------- |
| `TEMPLATE` | Specify which template to generate (options: \<api\|plugin\|component\|composable\|middleware\|layout\|page\|layer>) |
| `NAME` | Specify name of the generated file |
### Options
| Option | Default | Description |
| ---------------------------------- | ------- | ---------------------------------------- |
| `--cwd=<directory>` | `.` | Specify the working directory |
| `--logLevel=<silent|info|verbose>` | | Specify build-time log level |
| `--force` | `false` | Force override file if it already exists |
**Modifiers:**
Some templates support additional modifier flags to add a suffix (like `.client` or `.get`) to their name.
```bash [Terminal]
# Generates `/plugins/sockets.client.ts`
npx nuxi add plugin sockets --client
```
## `nuxi add component`
- Modifier flags: `--mode client|server` or `--client` or `--server`
```bash [Terminal]
# Generates `components/TheHeader.vue`
npx nuxi add component TheHeader
```
## `nuxi add composable`
```bash [Terminal]
# Generates `composables/foo.ts`
npx nuxi add composable foo
```
## `nuxi add layout`
```bash [Terminal]
# Generates `layouts/custom.vue`
npx nuxi add layout custom
```
## `nuxi add plugin`
- Modifier flags: `--mode client|server` or `--client`or `--server`
```bash [Terminal]
# Generates `plugins/analytics.ts`
npx nuxi add plugin analytics
```
## `nuxi add page`
```bash [Terminal]
# Generates `pages/about.vue`
npx nuxi add page about
```
```bash [Terminal]
# Generates `pages/category/[id].vue`
npx nuxi add page "category/[id]"
```
## `nuxi add middleware`
- Modifier flags: `--global`
```bash [Terminal]
# Generates `middleware/auth.ts`
npx nuxi add middleware auth
```
## `nuxi add api`
- Modifier flags: `--method` (can accept `connect`, `delete`, `get`, `head`, `options`, `patch`, `post`, `put` or `trace`) or alternatively you can directly use `--get`, `--post`, etc.
```bash [Terminal]
# Generates `server/api/hello.ts`
npx nuxi add api hello
```
## `nuxi add layer`
```bash [Terminal]
# Generates `layers/subscribe/nuxt.config.ts`
npx nuxi add layer subscribe
```
# nuxi analyze
```bash [Terminal]
npx nuxi analyze [ROOTDIR] [--cwd=<directory>] [--logLevel=<silent|info|verbose>] [--dotenv] [--name=<name>] [--no-serve]
```
The `analyze` command builds Nuxt and analyzes the production bundle (experimental).
## Arguments
| Argument | Description |
| ------------- | ---------------------------------------------- |
| `ROOTDIR="."` | Specifies the working directory (default: `.`) |
## Options
| Option | Default | Description |
| ---------------------------------- | --------- | -------------------------------------------------------------------------------- |
| `--cwd=<directory>` | | Specify the working directory, this takes precedence over ROOTDIR (default: `.`) |
| `--logLevel=<silent|info|verbose>` | | Specify build-time log level |
| `--dotenv` | | Path to `.env` file to load, relative to the root directory |
| `--name=<name>` | `default` | Name of the analysis |
| `--no-serve` | | Skip serving the analysis results |
::note
This command sets `process.env.NODE_ENV` to `production`.
::
# nuxi build
```bash [Terminal]
npx nuxi build [ROOTDIR] [--cwd=<directory>] [--logLevel=<silent|info|verbose>] [--prerender] [--preset] [--dotenv] [--envName]
```
The `build` command creates a `.output` directory with all your application, server and dependencies ready for production.
## Arguments
| Argument | Description |
| ------------- | ---------------------------------------------- |
| `ROOTDIR="."` | Specifies the working directory (default: `.`) |
## Options
| Option | Default | Description |
| ---------------------------------- | ------- | ---------------------------------------------------------------------------------------------------------------------------------------------------- |
| `--cwd=<directory>` | | Specify the working directory, this takes precedence over ROOTDIR (default: `.`) |
| `--logLevel=<silent|info|verbose>` | | Specify build-time log level |
| `--prerender` | | Build Nuxt and prerender static routes |
| `--preset` | | Nitro server preset |
| `--dotenv` | | Path to `.env` file to load, relative to the root directory |
| `--envName` | | The environment to use when resolving configuration overrides (default is `production` when building, and `development` when running the dev server) |
::note
This command sets `process.env.NODE_ENV` to `production`.
::
::note
`--prerender` will always set the `preset` to `static`
::
# nuxi build-module
```bash [Terminal]
npx nuxi build-module [ROOTDIR] [--cwd=<directory>] [--logLevel=<silent|info|verbose>] [--build] [--stub] [--sourcemap] [--prepare]
```
The `build-module` command runs `@nuxt/module-builder` to generate `dist` directory within your `rootDir` that contains the full build for your **nuxt-module**.
## Arguments
| Argument | Description |
| ------------- | ---------------------------------------------- |
| `ROOTDIR="."` | Specifies the working directory (default: `.`) |
## Options
| Option | Default | Description |
| ---------------------------------- | ------- | -------------------------------------------------------------------------------- |
| `--cwd=<directory>` | | Specify the working directory, this takes precedence over ROOTDIR (default: `.`) |
| `--logLevel=<silent|info|verbose>` | | Specify build-time log level |
| `--build` | `false` | Build module for distribution |
| `--stub` | `false` | Stub dist instead of actually building it for development |
| `--sourcemap` | `false` | Generate sourcemaps |
| `--prepare` | `false` | Prepare module for local development |
::read-more
---
icon: i-simple-icons-github
target: \_blank
to: https://github.com/nuxt/module-builder
---
Read more about `@nuxt/module-builder`.
::
# nuxi cleanup
```bash [Terminal]
npx nuxi cleanup [ROOTDIR] [--cwd=<directory>]
```
The `cleanup` command removes common generated Nuxt files and caches, including:
- `.nuxt`
- `.output`
- `node_modules/.vite`
- `node_modules/.cache`
## Arguments
| Argument | Description |
| ------------- | ---------------------------------------------- |
| `ROOTDIR="."` | Specifies the working directory (default: `.`) |
## Options
| Option | Default | Description |
| ------------------- | ------- | -------------------------------------------------------------------------------- |
| `--cwd=<directory>` | | Specify the working directory, this takes precedence over ROOTDIR (default: `.`) |
# nuxi dev
```bash [Terminal]
npx nuxi dev [ROOTDIR] [--cwd=<directory>] [--logLevel=<silent|info|verbose>] [--dotenv] [--envName] [--no-clear] [--no-fork] [-p, --port] [-h, --host] [--clipboard] [-o, --open] [--https] [--publicURL] [--qr] [--public] [--tunnel] [--sslCert] [--sslKey]
```
The `dev` command starts a development server with hot module replacement at [http://localhost:3000](https://localhost:3000){rel="nofollow"}
## Arguments
| Argument | Description |
| ------------- | ---------------------------------------------- |
| `ROOTDIR="."` | Specifies the working directory (default: `.`) |
## Options
| Option | Default | Description |
| ---------------------------------- | ------- | ---------------------------------------------------------------------------------------------------------------------------------------------------- |
| `--cwd=<directory>` | | Specify the working directory, this takes precedence over ROOTDIR (default: `.`) |
| `--logLevel=<silent|info|verbose>` | | Specify build-time log level |
| `--dotenv` | | Path to `.env` file to load, relative to the root directory |
| `--envName` | | The environment to use when resolving configuration overrides (default is `production` when building, and `development` when running the dev server) |
| `--no-clear` | | Disable clear console on restart |
| `--no-fork` | | Disable forked mode |
| `-p, --port` | | Port to listen on (default: `NUXT_PORT || NITRO_PORT || PORT || nuxtOptions.devServer.port`) |
| `-h, --host` | | Host to listen on (default: `NUXT_HOST || NITRO_HOST || HOST || nuxtOptions._layers?.[0]?.devServer?.host`) |
| `--clipboard` | `false` | Copy the URL to the clipboard |
| `-o, --open` | `false` | Open the URL in the browser |
| `--https` | | Enable HTTPS |
| `--publicURL` | | Displayed public URL (used for QR code) |
| `--qr` | | Display The QR code of public URL when available |
| `--public` | | Listen to all network interfaces |
| `--tunnel` | | Open a tunnel using <https://github.com/unjs/untun>{rel="nofollow"} |
| `--sslCert` | | (DEPRECATED) Use `--https.cert` instead. |
| `--sslKey` | | (DEPRECATED) Use `--https.key` instead. |
The port and host can also be set via NUXT\_PORT, PORT, NUXT\_HOST or HOST environment variables.
Additionally to the above options, `nuxi` can pass options through to `listhen`, e.g. `--no-qr` to turn off the dev server QR code. You can find the list of `listhen` options in the [unjs/listhen](https://github.com/unjs/listhen){rel="nofollow"} docs.
This command sets `process.env.NODE_ENV` to `development`.
::note
If you are using a self-signed certificate in development, you will need to set `NODE_TLS_REJECT_UNAUTHORIZED=0` in your environment.
::
# nuxi devtools
```bash [Terminal]
npx nuxi devtools <COMMAND> [ROOTDIR] [--cwd=<directory>]
```
Running `nuxi devtools enable` will install the Nuxt DevTools globally, and also enable it within the particular project you are using. It is saved as a preference in your user-level `.nuxtrc`. If you want to remove devtools support for a particular project, you can run `nuxi devtools disable`.
## Arguments
| Argument | Description |
| ------------- | ---------------------------------------------- |
| `COMMAND` | Command to run (options: \<enable\|disable>) |
| `ROOTDIR="."` | Specifies the working directory (default: `.`) |
## Options
| Option | Default | Description |
| ------------------- | ------- | -------------------------------------------------------------------------------- |
| `--cwd=<directory>` | | Specify the working directory, this takes precedence over ROOTDIR (default: `.`) |
::read-more
---
icon: i-simple-icons-nuxtdotjs
target: \_blank
to: https://devtools.nuxt.com
---
Read more about the **Nuxt DevTools**.
::
# nuxi generate
```bash [Terminal]
npx nuxi generate [ROOTDIR] [--cwd=<directory>] [--logLevel=<silent|info|verbose>] [--preset] [--dotenv] [--envName]
```
The `generate` command pre-renders every route of your application and stores the result in plain HTML files that you can deploy on any static hosting services. The command triggers the `nuxi build` command with the `prerender` argument set to `true`
## Arguments
| Argument | Description |
| ------------- | ---------------------------------------------- |
| `ROOTDIR="."` | Specifies the working directory (default: `.`) |
## Options
| Option | Default | Description |
| ---------------------------------- | ------- | ---------------------------------------------------------------------------------------------------------------------------------------------------- |
| `--cwd=<directory>` | | Specify the working directory, this takes precedence over ROOTDIR (default: `.`) |
| `--logLevel=<silent|info|verbose>` | | Specify build-time log level |
| `--preset` | | Nitro server preset |
| `--dotenv` | | Path to `.env` file to load, relative to the root directory |
| `--envName` | | The environment to use when resolving configuration overrides (default is `production` when building, and `development` when running the dev server) |
::read-more
---
to: https://nuxt.com/docs/getting-started/deployment#static-hosting
---
Read more about pre-rendering and static hosting.
::
# nuxi info
```bash [Terminal]
npx nuxi info [ROOTDIR] [--cwd=<directory>]
```
The `info` command logs information about the current or specified Nuxt project.
## Arguments
| Argument | Description |
| ------------- | ---------------------------------------------- |
| `ROOTDIR="."` | Specifies the working directory (default: `.`) |
## Options
| Option | Default | Description |
| ------------------- | ------- | -------------------------------------------------------------------------------- |
| `--cwd=<directory>` | | Specify the working directory, this takes precedence over ROOTDIR (default: `.`) |
# nuxi init
```bash [Terminal]
npx nuxi init [DIR] [--cwd=<directory>] [-t, --template] [-f, --force] [--offline] [--preferOffline] [--no-install] [--gitInit] [--shell] [--packageManager]
```
The `init` command initializes a fresh Nuxt project using [unjs/giget](https://github.com/unjs/giget){rel="nofollow"}.
## Arguments
| Argument | Description |
| -------- | ----------------- |
| `DIR=""` | Project directory |
## Options
| Option | Default | Description |
| ------------------- | ------- | --------------------------------------------------- |
| `--cwd=<directory>` | `.` | Specify the working directory |
| `-t, --template` | | Template name |
| `-f, --force` | | Override existing directory |
| `--offline` | | Force offline mode |
| `--preferOffline` | | Prefer offline mode |
| `--no-install` | | Skip installing dependencies |
| `--gitInit` | | Initialize git repository |
| `--shell` | | Start shell after installation in project directory |
| `--packageManager` | | Package manager choice (npm, pnpm, yarn, bun) |
## Environment variables
- `NUXI_INIT_REGISTRY`: Set to a custom template registry. ([learn more](https://github.com/unjs/giget#custom-registry){rel="nofollow"}).
- Default registry is loaded from [nuxt/starter/templates](https://github.com/nuxt/starter/tree/templates/templates){rel="nofollow"}
# nuxi module
Nuxi provides a few utilities to work with [Nuxt modules](https://nuxt.com/modules) seamlessly.
## nuxi module add
```bash [Terminal]
npx nuxi module add <MODULENAME> [--cwd=<directory>] [--logLevel=<silent|info|verbose>] [--skipInstall] [--skipConfig] [--dev]
```
| Argument | Description |
| ------------ | ----------- |
| `MODULENAME` | Module name |
| Option | Default | Description |
| ---------------------------------- | ------- | -------------------------------- |
| `--cwd=<directory>` | `.` | Specify the working directory |
| `--logLevel=<silent|info|verbose>` | | Specify build-time log level |
| `--skipInstall` | | Skip npm install |
| `--skipConfig` | | Skip nuxt.config.ts update |
| `--dev` | | Install module as dev dependency |
The command lets you install [Nuxt modules](https://nuxt.com/modules) in your application with no manual work.
When running the command, it will:
- install the module as a dependency using your package manager
- add it to your [package.json](https://nuxt.com/docs/guide/directory-structure/package) file
- update your [`nuxt.config`](https://nuxt.com/docs/guide/directory-structure/nuxt-config) file
**Example:**
Installing the [`Pinia`](https://nuxt.com/modules/pinia) module
```bash [Terminal]
npx nuxi module add pinia
```
## nuxi module search
```bash [Terminal]
npx nuxi module search <QUERY> [--cwd=<directory>] [--nuxtVersion=<2|3>]
```
### Arguments
| Argument | Description |
| -------- | ---------------------- |
| `QUERY` | keywords to search for |
### Options
| Option | Default | Description |
| --------------------- | ------- | ---------------------------------------------------------------------------------- |
| `--cwd=<directory>` | `.` | Specify the working directory |
| `--nuxtVersion=<2|3>` | | Filter by Nuxt version and list compatible modules only (auto detected by default) |
The command searches for Nuxt modules matching your query that are compatible with your Nuxt version.
**Example:**
```bash [Terminal]
npx nuxi module search pinia
```
# nuxi prepare
```bash [Terminal]
npx nuxi prepare [ROOTDIR] [--dotenv] [--cwd=<directory>] [--logLevel=<silent|info|verbose>] [--envName]
```
The `prepare` command creates a [`.nuxt`](https://nuxt.com/docs/guide/directory-structure/nuxt) directory in your application and generates types. This can be useful in a CI environment or as a `postinstall` command in your [`package.json`](https://nuxt.com/docs/guide/directory-structure/package).
## Arguments
| Argument | Description |
| ------------- | ---------------------------------------------- |
| `ROOTDIR="."` | Specifies the working directory (default: `.`) |
## Options
| Option | Default | Description |
| ---------------------------------- | ------- | ---------------------------------------------------------------------------------------------------------------------------------------------------- |
| `--dotenv` | | Path to `.env` file to load, relative to the root directory |
| `--cwd=<directory>` | | Specify the working directory, this takes precedence over ROOTDIR (default: `.`) |
| `--logLevel=<silent|info|verbose>` | | Specify build-time log level |
| `--envName` | | The environment to use when resolving configuration overrides (default is `production` when building, and `development` when running the dev server) |
# nuxi preview
```bash [Terminal]
npx nuxi preview [ROOTDIR] [--cwd=<directory>] [--logLevel=<silent|info|verbose>] [--envName] [--dotenv] [-p, --port]
```
The `preview` command starts a server to preview your Nuxt application after running the `build` command. The `start` command is an alias for `preview`. When running your application in production refer to the [Deployment section](https://nuxt.com/docs/getting-started/deployment).
## Arguments
| Argument | Description |
| ------------- | ---------------------------------------------- |
| `ROOTDIR="."` | Specifies the working directory (default: `.`) |
## Options
| Option | Default | Description |
| ---------------------------------- | ------- | ---------------------------------------------------------------------------------------------------------------------------------------------------- |
| `--cwd=<directory>` | | Specify the working directory, this takes precedence over ROOTDIR (default: `.`) |
| `--logLevel=<silent|info|verbose>` | | Specify build-time log level |
| `--envName` | | The environment to use when resolving configuration overrides (default is `production` when building, and `development` when running the dev server) |
| `--dotenv` | | Path to `.env` file to load, relative to the root directory |
| `-p, --port` | | Port to listen on (default: `NUXT_PORT || NITRO_PORT || PORT`) |
This command sets `process.env.NODE_ENV` to `production`. To override, define `NODE_ENV` in a `.env` file or as command-line argument.
::note
For convenience, in preview mode, your [`.env`](https://nuxt.com/docs/guide/directory-structure/env) file will be loaded into `process.env`. (However, in production you will need to ensure your environment variables are set yourself.)
::
# nuxi typecheck
```bash [Terminal]
npx nuxi typecheck [ROOTDIR] [--cwd=<directory>] [--logLevel=<silent|info|verbose>]
```
The `typecheck` command runs [`vue-tsc`](https://github.com/vuejs/language-tools/tree/master/packages/tsc){rel="nofollow"} to check types throughout your app.
## Arguments
| Argument | Description |
| ------------- | ---------------------------------------------- |
| `ROOTDIR="."` | Specifies the working directory (default: `.`) |
## Options
| Option | Default | Description |
| ---------------------------------- | ------- | -------------------------------------------------------------------------------- |
| `--cwd=<directory>` | | Specify the working directory, this takes precedence over ROOTDIR (default: `.`) |
| `--logLevel=<silent|info|verbose>` | | Specify build-time log level |
::note
This command sets `process.env.NODE_ENV` to `production`. To override, define `NODE_ENV` in a [`.env`](https://nuxt.com/docs/guide/directory-structure/env) file or as a command-line argument.
::
::read-more{to="https://nuxt.com/docs/guide/concepts/typescript#type-checking"}
Read more on how to enable type-checking at build or development time.
::
# nuxi upgrade
```bash [Terminal]
npx nuxi upgrade [ROOTDIR] [--cwd=<directory>] [--logLevel=<silent|info|verbose>] [--dedupe] [-f, --force] [-ch, --channel=<stable|nightly>]
```
The `upgrade` command upgrades Nuxt to the latest version.
## Arguments
| Argument | Description |
| ------------- | ---------------------------------------------- |
| `ROOTDIR="."` | Specifies the working directory (default: `.`) |
## Options
| Option | Default | Description |
| ---------------------------------- | -------- | -------------------------------------------------------------------------------- |
| `--cwd=<directory>` | | Specify the working directory, this takes precedence over ROOTDIR (default: `.`) |
| `--logLevel=<silent|info|verbose>` | | Specify build-time log level |
| `--dedupe` | | Will deduplicate dependencies but not recreate the lockfile |
| `-f, --force` | | Force upgrade to recreate lockfile and node\_modules |
| `-ch, --channel=<stable|nightly>` | `stable` | Specify a channel to install from (default: stable) |
# Modules
Modules are the building blocks of Nuxt. Kit provides a set of utilities to help you create and use modules. You can use these utilities to create your own modules or to reuse existing modules. For example, you can use the `defineNuxtModule` function to define a module and the `installModule` function to install a module programmatically.
## `defineNuxtModule`
Define a Nuxt module, automatically merging defaults with user provided options, installing any hooks that are provided, and calling an optional setup function for full control.
### Type
```ts
function defineNuxtModule<OptionsT extends ModuleOptions> (definition: ModuleDefinition<OptionsT> | NuxtModule<OptionsT>): NuxtModule<OptionsT>
type ModuleOptions = Record<string, any>
interface ModuleDefinition<T extends ModuleOptions = ModuleOptions> {
meta?: ModuleMeta
defaults?: T | ((nuxt: Nuxt) => T)
schema?: T
hooks?: Partial<NuxtHooks>
setup?: (this: void, resolvedOptions: T, nuxt: Nuxt) => Awaitable<void | false | ModuleSetupReturn>
}
interface NuxtModule<T extends ModuleOptions = ModuleOptions> {
(this: void, inlineOptions: T, nuxt: Nuxt): Awaitable<void | false | ModuleSetupReturn>
getOptions?: (inlineOptions?: T, nuxt?: Nuxt) => Promise<T>
getMeta?: () => Promise<ModuleMeta>
}
interface ModuleSetupReturn {
timings?: {
setup?: number
[key: string]: number | undefined
}
}
interface ModuleMeta {
name?: string
version?: string
configKey?: string
compatibility?: NuxtCompatibility
[key: string]: unknown
}
```
### Parameters
#### `definition`
**Type**: `ModuleDefinition<T> | NuxtModule<T>`
**Required**: `true`
A module definition object or a module function.
- `meta` (optional)
:br
**Type**: `ModuleMeta`
:br
Metadata of the module. It defines the module name, version, config key and compatibility.
- `defaults` (optional)
:br
**Type**: `T | ((nuxt: Nuxt) => T)`
:br
Default options for the module. If a function is provided, it will be called with the Nuxt instance as the first argument.
- `schema` (optional)
:br
**Type**: `T`
:br
Schema for the module options. If provided, options will be applied to the schema.
- `hooks` (optional)
:br
**Type**: `Partial<NuxtHooks>`
:br
Hooks to be installed for the module. If provided, the module will install the hooks.
- `setup` (optional)
:br
**Type**: `(this: void, resolvedOptions: T, nuxt: Nuxt) => Awaitable<void | false | ModuleSetupReturn>`
:br
Setup function for the module. If provided, the module will call the setup function.
### Examples
```ts
// https://github.com/nuxt/starter/tree/module
import { defineNuxtModule } from '@nuxt/kit'
export default defineNuxtModule({
meta: {
name: 'my-module',
configKey: 'myModule'
},
defaults: {
test: 123
},
setup (options, nuxt) {
nuxt.hook('modules:done', () => {
console.log('My module is ready with current test option: ', options.test)
})
}
})
```
## `installModule`
Install specified Nuxt module programmatically. This is helpful when your module depends on other modules. You can pass the module options as an object to `inlineOptions` and they will be passed to the module's `setup` function.
### Type
```ts
async function installModule (moduleToInstall: string | NuxtModule, inlineOptions?: any, nuxt?: Nuxt)
```
### Parameters
#### `moduleToInstall`
**Type**: `string` | `NuxtModule`
**Required**: `true`
The module to install. Can be either a string with the module name or a module object itself.
#### `inlineOptions`
**Type**: `any`
**Default**: `{}`
An object with the module options to be passed to the module's `setup` function.
#### `nuxt`
**Type**: `Nuxt`
**Default**: `useNuxt()`
Nuxt instance. If not provided, it will be retrieved from the context via `useNuxt()` call.
### Examples
```ts
import { defineNuxtModule, installModule } from '@nuxt/kit'
export default defineNuxtModule({
async setup (options, nuxt) {
// will install @nuxtjs/fontaine with Roboto font and Impact fallback
await installModule('@nuxtjs/fontaine', {
// module configuration
fonts: [
{
family: 'Roboto',
fallbacks: ['Impact'],
fallbackName: 'fallback-a',
}
]
})
}
})
```
# Runtime Config
## `useRuntimeConfig`
At build-time, it is possible to access the resolved Nuxt [runtime config](https://nuxt.com/docs/guide/going-further/runtime-config).
### Type
```ts
function useRuntimeConfig (): Record<string, unknown>
```
## `updateRuntimeConfig`
It is also possible to update runtime configuration. This will be merged with the existing runtime configuration, and if Nitro has already been initialized it will trigger an HMR event to reload the Nitro runtime config.
```ts
function updateRuntimeConfig (config: Record<string, unknown>): void | Promise<void>
```
# Templates
Templates allows to generate extra files during development and build time. These files will be available in virtual filesystem and can be used in plugins, layouts, components, etc. `addTemplate` and `addTypeTemplate` allow you to add templates to the Nuxt application. `updateTemplates` allows you to regenerate templates that match the filter.
## `addTemplate`
Renders given template during build into the project buildDir.
### Type
```ts
function addTemplate (template: NuxtTemplate | string): ResolvedNuxtTemplate
interface NuxtTemplate {
src?: string
filename?: string
dst?: string
options?: Record<string, any>
getContents?: (data: Record<string, any>) => string | Promise<string>
write?: boolean
}
interface ResolvedNuxtTemplate {
src: string
filename: string
dst: string
options: Record<string, any>
getContents: (data: Record<string, any>) => string | Promise<string>
write: boolean
filename: string
dst: string
}
```
### Parameters
#### `template`
**Type**: `NuxtTemplate | string`
**Required**: `true`
A template object or a string with the path to the template. If a string is provided, it will be converted to a template object with `src` set to the string value. If a template object is provided, it must have the following properties:
- `src` (optional)
:br
**Type**: `string`
:br
Path to the template. If `src` is not provided, `getContents` must be provided instead.
- `filename` (optional)
:br
**Type**: `string`
:br
Filename of the template. If `filename` is not provided, it will be generated from the `src` path. In this case, the `src` option is required.
- `dst` (optional)
:br
**Type**: `string`
:br
Path to the destination file. If `dst` is not provided, it will be generated from the `filename` path and nuxt `buildDir` option.
- `options` (optional)
:br
**Type**: `Options`
:br
Options to pass to the template.
- `getContents` (optional)
:br
**Type**: `(data: Options) => string | Promise<string>`
:br
A function that will be called with the `options` object. It should return a string or a promise that resolves to a string. If `src` is provided, this function will be ignored.
- `write` (optional)
:br
**Type**: `boolean`
:br
If set to `true`, the template will be written to the destination file. Otherwise, the template will be used only in virtual filesystem.
### Examples
::code-group
```ts [module.ts]
// https://github.com/nuxt/bridge
import { addTemplate, defineNuxtModule } from '@nuxt/kit'
import { defu } from 'defu'
export default defineNuxtModule({
setup(options, nuxt) {
const globalMeta = defu(nuxt.options.app.head, {
charset: options.charset,
viewport: options.viewport
})
addTemplate({
filename: 'meta.config.mjs',
getContents: () => 'export default ' + JSON.stringify({ globalMeta, mixinKey: 'setup' })
})
}
})
```
```ts [plugin.ts]
import { createHead as createServerHead } from '@unhead/vue/server'
import { createHead as createClientHead } from '@unhead/vue/client'
import { defineNuxtPlugin } from '#imports'
// @ts-ignore
import metaConfig from '#build/meta.config.mjs'
export default defineNuxtPlugin((nuxtApp) => {
const createHead = import.meta.server ? createServerHead : createClientHead
const head = createHead()
head.push(metaConfig.globalMeta)
nuxtApp.vueApp.use(head)
})
```
::
## `addTypeTemplate`
Renders given template during build into the project buildDir, then registers it as types.
### Type
```ts
function addTypeTemplate (template: NuxtTypeTemplate | string): ResolvedNuxtTemplate
interface NuxtTemplate {
src?: string
filename?: string
dst?: string
options?: Record<string, any>
getContents?: (data: Record<string, any>) => string | Promise<string>
}
interface ResolvedNuxtTemplate {
src: string
filename: string
dst: string
options: Record<string, any>
getContents: (data: Record<string, any>) => string | Promise<string>
write: boolean
filename: string
dst: string
}
```
### Parameters
#### `template`
**Type**: `NuxtTypeTemplate | string`
**Required**: `true`
A template object or a string with the path to the template. If a string is provided, it will be converted to a template object with `src` set to the string value. If a template object is provided, it must have the following properties:
- `src` (optional)
:br
**Type**: `string`
:br
Path to the template. If `src` is not provided, `getContents` must be provided instead.
- `filename` (optional)
:br
**Type**: `string`
:br
Filename of the template. If `filename` is not provided, it will be generated from the `src` path. In this case, the `src` option is required.
- `dst` (optional)
:br
**Type**: `string`
:br
Path to the destination file. If `dst` is not provided, it will be generated from the `filename` path and nuxt `buildDir` option.
- `options` (optional)
:br
**Type**: `Options`
:br
Options to pass to the template.
- `getContents` (optional)
:br
**Type**: `(data: Options) => string | Promise<string>`
:br
A function that will be called with the `options` object. It should return a string or a promise that resolves to a string. If `src` is provided, this function will be ignored.
### Examples
```ts
// https://github.com/Hebilicious/nuxtpress
import { addTypeTemplate, defineNuxtModule } from "@nuxt/kit"
export default defineNuxtModule({
setup() {
addTypeTemplate({
filename: "types/markdown.d.ts",
getContents: () => /* ts */`
declare module '*.md' {
import type { ComponentOptions } from 'vue'
const Component: ComponentOptions
export default Component
}`
})
}
}
```
## `updateTemplates`
Regenerate templates that match the filter. If no filter is provided, all templates will be regenerated.
### Type
```ts
async function updateTemplates (options: UpdateTemplatesOptions): void
interface UpdateTemplatesOptions {
filter?: (template: ResolvedNuxtTemplate) => boolean
}
interface ResolvedNuxtTemplate {
src: string
filename: string
dst: string
options: Record<string, any>
getContents: (data: Record<string, any>) => string | Promise<string>
write: boolean
filename: string
dst: string
}
```
### Parameters
#### `options`
**Type**: `UpdateTemplatesOptions`
**Default**: `{}`
Options to pass to the template. This object can have the following property:
- `filter` (optional)
:br
**Type**: `(template: ResolvedNuxtTemplate) => boolean`
:br
A function that will be called with the `template` object. It should return a boolean indicating whether the template should be regenerated. If `filter` is not provided, all templates will be regenerated.
### Example
```ts
// https://github.com/nuxt/nuxt
import { defineNuxtModule, updateTemplates } from '@nuxt/kit'
export default defineNuxtModule({
setup(options, nuxt) {
// watch and rebuild routes template list when one of the pages changes
nuxt.hook('builder:watch', async (event, relativePath) => {
if (event === 'change') { return }
const path = resolve(nuxt.options.srcDir, relativePath)
if (updateTemplatePaths.some(dir => path.startsWith(dir))) {
await updateTemplates({
filter: template => template.filename === 'routes.mjs'
})
}
})
}
})
```
# Nitro
Nitro is an open source TypeScript framework to build ultra-fast web servers. Nuxt uses Nitro as its server engine. You can use `useNitro` to access the Nitro instance, `addServerHandler` to add a server handler, `addDevServerHandler` to add a server handler to be used only in development mode, `addServerPlugin` to add a plugin to extend Nitro's runtime behavior, and `addPrerenderRoutes` to add routes to be prerendered by Nitro.
## `addServerHandler`
Adds a nitro server handler. Use it if you want to create server middleware or custom route.
### Type
```ts
function addServerHandler (handler: NitroEventHandler): void
export interface NitroEventHandler {
handler: string;
route?: string;
middleware?: boolean;
lazy?: boolean;
method?: string;
}
```
### Parameters
#### `handler`
**Type**: `NitroEventHandler`
**Required**: `true`
A handler object with the following properties:
- `handler` (required)
:br
**Type**: `string`
:br
Path to event handler.
- `route` (optional)
:br
**Type**: `string`
:br
Path prefix or route. If an empty string used, will be used as a middleware.
- `middleware` (optional)
:br
**Type**: `boolean`
:br
Specifies this is a middleware handler. Middleware are called on every route and should normally return nothing to pass to the next handlers.
- `lazy` (optional)
:br
**Type**: `boolean`
:br
Use lazy loading to import handler.
- `method` (optional)
:br
**Type**: `string`
:br
Router method matcher. If handler name contains method name, it will be used as a default value.
### Examples
::code-group
```ts [module.ts]
// https://github.com/nuxt-modules/robots
import { createResolver, defineNuxtModule, addServerHandler } from '@nuxt/kit'
export default defineNuxtModule({
setup(options) {
const resolver = createResolver(import.meta.url)
addServerHandler({
route: '/robots.txt',
handler: resolver.resolve('./runtime/robots.get')
})
}
})
```
```ts [runtime/robots.get.ts]
export default defineEventHandler(() => {
return {
body: `User-agent: *\nDisallow: /`
}
})
```
::
## `addDevServerHandler`
Adds a nitro server handler to be used only in development mode. This handler will be excluded from production build.
### Type
```ts
function addDevServerHandler (handler: NitroDevEventHandler): void
export interface NitroDevEventHandler {
handler: EventHandler;
route?: string;
}
```
### Parameters
#### `handler`
**Type**: `NitroEventHandler`
**Required**: `true`
A handler object with the following properties:
- `handler` (required)
:br
**Type**: `string`
:br
The event handler.
- `route` (optional)
:br
**Type**: `string`
:br
Path prefix or route. If an empty string used, will be used as a middleware.
### Examples
::code-group
```ts [module.ts]
import { createResolver, defineNuxtModule, addDevServerHandler } from '@nuxt/kit'
export default defineNuxtModule({
setup() {
const resolver = createResolver(import.meta.url)
addDevServerHandler({
handler: () => {
return {
body: `Response generated at ${new Date().toISOString()}`
}
},
route: '/_handler'
})
}
})
```
::
```ts
// https://github.com/nuxt-modules/tailwindcss
import { joinURL } from 'ufo'
import { defineNuxtModule, addDevServerHandler } from '@nuxt/kit'
export default defineNuxtModule({
async setup(options) {
const route = joinURL(nuxt.options.app?.baseURL, '/_tailwind')
// @ts-ignore
const createServer = await import('tailwind-config-viewer/server/index.js').then(r => r.default || r) as any
const viewerDevMiddleware = createServer({ tailwindConfigProvider: () => options, routerPrefix: route }).asMiddleware()
addDevServerHandler({ route, handler: viewerDevMiddleware })
}
})
```
## `useNitro`
Returns the Nitro instance.
::warning
You can call `useNitro()` only after `ready` hook.
::
::note
Changes to the Nitro instance configuration are not applied.
::
### Type
```ts
function useNitro (): Nitro
export interface Nitro {
options: NitroOptions;
scannedHandlers: NitroEventHandler[];
vfs: Record<string, string>;
hooks: Hookable<NitroHooks>;
unimport?: Unimport;
logger: ConsolaInstance;
storage: Storage;
close: () => Promise<void>;
updateConfig: (config: NitroDynamicConfig) => void | Promise<void>;
}
```
### Examples
```ts
// https://github.com/nuxt/nuxt/blob/4e05650cde31ca73be4d14b1f0d23c7854008749/packages/nuxt/src/core/nuxt.ts#L404
import { defineNuxtModule, useNitro, addPlugin, createResolver } from '@nuxt/kit'
export default defineNuxtModule({
setup(options, nuxt) {
const resolver = createResolver(import.meta.url)
nuxt.hook('ready', () => {
const nitro = useNitro()
if (nitro.options.static && nuxt.options.experimental.payloadExtraction === undefined) {
console.warn('Using experimental payload extraction for full-static output. You can opt-out by setting `experimental.payloadExtraction` to `false`.')
nuxt.options.experimental.payloadExtraction = true
}
nitro.options.replace['process.env.NUXT_PAYLOAD_EXTRACTION'] = String(!!nuxt.options.experimental.payloadExtraction)
nitro.options._config.replace!['process.env.NUXT_PAYLOAD_EXTRACTION'] = String(!!nuxt.options.experimental.payloadExtraction)
if (!nuxt.options.dev && nuxt.options.experimental.payloadExtraction) {
addPlugin(resolver.resolve(nuxt.options.appDir, 'plugins/payload.client'))
}
})
}
})
```
## `addServerPlugin`
Add plugin to extend Nitro's runtime behavior.
::tip
You can read more about Nitro plugins in the [Nitro documentation](https://nitro.unjs.io/guide/plugins){rel="nofollow"}.
::
### Type
```ts
function addServerPlugin (plugin: string): void
```
### Parameters
#### `plugin`
**Type**: `string`
**Required**: `true`
Path to the plugin. The plugin must export a function that accepts Nitro instance as an argument.
### Examples
::code-group
```ts [module.ts]
import { createResolver, defineNuxtModule, addServerPlugin } from '@nuxt/kit'
export default defineNuxtModule({
setup() {
const resolver = createResolver(import.meta.url)
addServerPlugin(resolver.resolve('./runtime/plugin.ts'))
}
})
```
```ts [runtime/plugin.ts]
export default defineNitroPlugin((nitroApp) => {
nitroApp.hooks.hook("request", (event) => {
console.log("on request", event.path);
});
nitroApp.hooks.hook("beforeResponse", (event, { body }) => {
console.log("on response", event.path, { body });
});
nitroApp.hooks.hook("afterResponse", (event, { body }) => {
console.log("on after response", event.path, { body });
});
});
```
::
## `addPrerenderRoutes`
Add routes to be prerendered to Nitro.
### Type
```ts
function function addPrerenderRoutes (routes: string | string[]): void
```
### Parameters
#### `routes`
**Type**: `string | string[]`
**Required**: `true`
A route or an array of routes to prerender.
### Examples
```ts
import { defineNuxtModule, addPrerenderRoutes } from '@nuxt/kit'
export default defineNuxtModule({
meta: {
name: 'nuxt-sitemap',
configKey: 'sitemap',
},
defaults: {
sitemapUrl: '/sitemap.xml',
prerender: true,
},
setup(options) {
if (options.prerender) {
addPrerenderRoutes(options.sitemapUrl)
}
}
})
```
## `addServerImportsDir`
Add a directory to be scanned for auto-imports by Nitro.
### Type
```ts
function addServerImportsDir (dirs: string | string[], opts: { prepend?: boolean }): void
```
### Parameters
#### `dirs`
**Type**: `string | string[]`
**Required**: `true`
A directory or an array of directories to register to be scanned by Nitro
### Examples
```ts
import { defineNuxtModule, createResolver, addServerImportsDir } from '@nuxt/kit'
export default defineNuxtModule({
meta: {
name: 'my-module',
configKey: 'myModule',
},
setup(options) {
const resolver = createResolver(import.meta.url)
addServerImportsDir(resolver.resolve('./runtime/server/utils'))
}
})
```
## `addServerScanDir`
Add directories to be scanned by Nitro. It will check for subdirectories, which will be registered
just like the `~/server` folder is.
### Type
```ts
function addServerScanDir (dirs: string | string[], opts: { prepend?: boolean }): void
```
### Parameters
#### `dirs`
**Type**: `string | string[]`
**Required**: `true`
A directory or an array of directories to register to be scanned for by Nitro as server dirs.
### Examples
```ts
import { defineNuxtModule, createResolver, addServerScanDir } from '@nuxt/kit'
export default defineNuxtModule({
meta: {
name: 'my-module',
configKey: 'myModule',
},
setup(options) {
const resolver = createResolver(import.meta.url)
addServerScanDir(resolver.resolve('./runtime/server'))
}
})
```
# Resolving
Sometimes you need to resolve a paths: relative to the current module, with unknown name or extension. For example, you may want to add a plugin that is located in the same directory as the module. To handle this cases, nuxt provides a set of utilities to resolve paths. `resolvePath` and `resolveAlias` are used to resolve paths relative to the current module. `findPath` is used to find first existing file in given paths. `createResolver` is used to create resolver relative to base path.
## `resolvePath`
Resolves full path to a file or directory respecting Nuxt alias and extensions options. If path could not be resolved, normalized input path will be returned.
### Type
```ts
async function resolvePath (path: string, options?: ResolvePathOptions): Promise<string>
```
### Parameters
#### `path`
**Type**: `string`
**Required**: `true`
Path to resolve.
#### `options`
**Type**: `ResolvePathOptions`
**Default**: `{}`
Options to pass to the resolver. This object can have the following properties:
- `cwd` (optional)
:br
**Type**: `string`
:br
**Default**: `process.cwd()`
:br
Current working directory.
- `alias` (optional)
:br
**Type**: `Record<string, string>`
:br
**Default**: `{}`
:br
Alias map.
- `extensions` (optional)
:br
**Type**: `string[]`
:br
**Default**: `['.js', '.mjs', '.ts', '.jsx', '.tsx', '.json']`
:br
Extensions to try.
### Examples
```ts
// https://github.com/P4sca1/nuxt-headlessui
import { defineNuxtModule, resolvePath } from '@nuxt/kit'
import { join } from 'pathe'
const headlessComponents: ComponentGroup[] = [
{
relativePath: 'combobox/combobox.js',
chunkName: 'headlessui/combobox',
exports: [
'Combobox',
'ComboboxLabel',
'ComboboxButton',
'ComboboxInput',
'ComboboxOptions',
'ComboboxOption'
]
},
]
export default defineNuxtModule({
meta: {
name: 'nuxt-headlessui',
configKey: 'headlessui',
},
defaults: {
prefix: 'Headless'
},
async setup (options) {
const entrypoint = await resolvePath('@headlessui/vue')
const root = join(entrypoint, '../components')
for (const group of headlessComponents) {
for (const e of group.exports) {
addComponent(
{
name: e,
export: e,
filePath: join(root, group.relativePath),
chunkName: group.chunkName,
mode: 'all'
}
)
}
}
}
})
```
## `resolveAlias`
Resolves path aliases respecting Nuxt alias options.
### Type
```ts
function resolveAlias (path: string, alias?: Record<string, string>): string
```
### Parameters
#### `path`
**Type**: `string`
**Required**: `true`
Path to resolve.
#### `alias`
**Type**: `Record<string, string>`
**Default**: `{}`
Alias map. If not provided, it will be read from `nuxt.options.alias`.
## `findPath`
Try to resolve first existing file in given paths.
### Type
```ts
async function findPath (paths: string | string[], options?: ResolvePathOptions, pathType: 'file' | 'dir'): Promise<string | null>
interface ResolvePathOptions {
cwd?: string
alias?: Record<string, string>
extensions?: string[]
}
```
### Parameters
#### `paths`
**Type**: `string | string[]`
**Required**: `true`
A path or an array of paths to resolve.
#### `options`
**Type**: `ResolvePathOptions`
**Default**: `{}`
Options to pass to the resolver. This object can have the following properties:
- `cwd` (optional)
:br
**Type**: `string`
:br
**Default**: `process.cwd()`
:br
Current working directory.
- `alias` (optional)
:br
**Type**: `Record<string, string>`
:br
**Default**: `{}`
:br
Alias map.
- `extensions` (optional)
:br
**Type**: `string[]`
:br
**Default**: `['.js', '.mjs', '.ts', '.jsx', '.tsx', '.json']`
:br
Extensions to try.
#### `pathType`
**Type**: `'file' | 'dir'`
**Default**: `'file'`
Type of path to resolve. If set to `'file'`, the function will try to resolve a file. If set to `'dir'`, the function will try to resolve a directory.
## `createResolver`
Creates resolver relative to base path.
::tip
---
icon: i-lucide-video
target: _blank
to: https://vueschool.io/lessons/resolving-paths-and-injecting-assets-to-the-app?friend=nuxt
---
Watch Vue School video about createResolver.
::
### Type
```ts
function createResolver (basePath: string | URL): Resolver
interface Resolver {
resolve (...path: string[]): string
resolvePath (path: string, options?: ResolvePathOptions): Promise<string>
}
interface ResolvePathOptions {
cwd?: string
alias?: Record<string, string>
extensions?: string[]
}
```
### Parameters
#### `basePath`
**Type**: `string`
**Required**: `true`
Base path to resolve from.
### Examples
```ts
// https://github.com/vuejs/pinia/blob/v2/packages/nuxt
import {
defineNuxtModule,
isNuxt2,
createResolver,
} from '@nuxt/kit'
export default defineNuxtModule({
setup(options, nuxt) {
const resolver = createResolver(import.meta.url)
nuxt.hook('modules:done', () => {
if (isNuxt2()) {
addPlugin(resolver.resolve('./runtime/plugin.vue2'))
} else {
addPlugin(resolver.resolve('./runtime/plugin.vue3'))
}
})
}
})
```
# Logging
Nuxt provides a logger instance that you can use to log messages with extra features. `useLogger` allows you to get a logger instance.
## `useLogger`
Returns a logger instance. It uses [consola](https://github.com/unjs/consola){rel="nofollow"} under the hood.
### Type
```ts
function useLogger (tag?: string, options?: Partial<ConsolaOptions>): ConsolaInstance
```
### Parameters
#### `tag`
**Type**: `string`
**Optional**: `true`
A tag to prefix all log messages with.
#### `options`
**Type**: `Partial<ConsolaOptions>`
**Optional**: `true`
Consola configuration options
### Examples
```ts
import { defineNuxtModule, useLogger } from '@nuxt/kit'
export default defineNuxtModule({
setup(options, nuxt) {
const logger = useLogger('my-module')
logger.info('Hello from my module!')
}
})
```
```ts
import { defineNuxtModule, useLogger } from '@nuxt/kit'
export default defineNuxtModule({
setup(options, nuxt) {
const logger = useLogger('my-module', { level: options.quiet ? 0 : 3 })
logger.info('Hello from my module!')
}
})
```
# Builder
Nuxt have builders based on [webpack](https://github.com/nuxt/nuxt/tree/main/packages/webpack){rel="nofollow"} and [vite](https://github.com/nuxt/nuxt/tree/main/packages/vite){rel="nofollow"}. You can extend the config passed to each one using `extendWebpackConfig` and `extendViteConfig` functions. You can also add additional plugins via `addVitePlugin`, `addWebpackPlugin` and `addBuildPlugin`.
## `extendWebpackConfig`
Extends the webpack configuration. Callback function can be called multiple times, when applying to both client and server builds.
### Type
```ts
function extendWebpackConfig (callback: ((config: WebpackConfig) => void), options?: ExtendWebpackConfigOptions): void
export interface ExtendWebpackConfigOptions {
dev?: boolean
build?: boolean
server?: boolean
client?: boolean
prepend?: boolean
}
```
::read-more
---
icon: i-simple-icons-webpack
target: _blank
to: https://webpack.js.org/configuration
---
Checkout webpack website for more information about its configuration.
::
### Parameters
#### `callback`
**Type**: `(config: WebpackConfig) => void`
**Required**: `true`
A callback function that will be called with the webpack configuration object.
#### `options`
**Type**: `ExtendWebpackConfigOptions`
**Default**: `{}`
Options to pass to the callback function. This object can have the following properties:
- `dev` (optional)
:br
**Type**: `boolean`
:br
**Default**: `true`
:br
If set to `true`, the callback function will be called when building in development mode.
- `build` (optional)
:br
**Type**: `boolean`
:br
**Default**: `true`
:br
If set to `true`, the callback function will be called when building in production mode.
- `server` (optional)
:br
**Type**: `boolean`
:br
**Default**: `true`
:br
If set to `true`, the callback function will be called when building the server bundle.
- `client` (optional)
:br
**Type**: `boolean`
:br
**Default**: `true`
:br
If set to `true`, the callback function will be called when building the client bundle.
- `prepend` (optional)
:br
**Type**: `boolean`
:br
If set to `true`, the callback function will be prepended to the array with `unshift()` instead of `push()`.
### Examples
```ts
import { defineNuxtModule, extendWebpackConfig } from '@nuxt/kit'
export default defineNuxtModule({
setup() {
extendWebpackConfig((config) => {
config.module?.rules.push({
test: /\.txt$/,
use: 'raw-loader'
})
})
}
})
```
## `extendViteConfig`
Extends the Vite configuration. Callback function can be called multiple times, when applying to both client and server builds.
### Type
```ts
function extendViteConfig (callback: ((config: ViteConfig) => void), options?: ExtendViteConfigOptions): void
export interface ExtendViteConfigOptions {
dev?: boolean
build?: boolean
server?: boolean
client?: boolean
prepend?: boolean
}
```
::read-more
---
icon: i-simple-icons-vite
target: _blank
to: https://vite.dev/config
---
Checkout Vite website for more information about its configuration.
::
### Parameters
#### `callback`
**Type**: `(config: ViteConfig) => void`
**Required**: `true`
A callback function that will be called with the Vite configuration object.
#### `options`
**Type**: `ExtendViteConfigOptions`
**Default**: `{}`
Options to pass to the callback function. This object can have the following properties:
- `dev` (optional)
:br
**Type**: `boolean`
:br
**Default**: `true`
:br
If set to `true`, the callback function will be called when building in development mode.
- `build` (optional)
:br
**Type**: `boolean`
:br
**Default**: `true`
:br
If set to `true`, the callback function will be called when building in production mode.
- `server` (optional)
:br
**Type**: `boolean`
:br
**Default**: `true`
:br
If set to `true`, the callback function will be called when building the server bundle.
- `client` (optional)
:br
**Type**: `boolean`
:br
**Default**: `true`
:br
If set to `true`, the callback function will be called when building the client bundle.
- `prepend` (optional)
:br
**Type**: `boolean`
:br
If set to `true`, the callback function will be prepended to the array with `unshift()` instead of `push()`.
### Examples
```ts
// https://github.com/Hrdtr/nuxt-appwrite
import { defineNuxtModule, extendViteConfig } from '@nuxt/kit'
export default defineNuxtModule({
setup() {
extendViteConfig((config) => {
config.optimizeDeps = config.optimizeDeps || {}
config.optimizeDeps.include = config.optimizeDeps.include || []
config.optimizeDeps.include.push('cross-fetch')
})
}
})
```
## `addWebpackPlugin`
Append webpack plugin to the config.
### Type
```ts
function addWebpackPlugin (pluginOrGetter: PluginOrGetter, options?: ExtendWebpackConfigOptions): void
type PluginOrGetter = WebpackPluginInstance | WebpackPluginInstance[] | (() => WebpackPluginInstance | WebpackPluginInstance[])
interface ExtendWebpackConfigOptions {
dev?: boolean
build?: boolean
server?: boolean
client?: boolean
prepend?: boolean
}
```
::tip
See [webpack website](https://webpack.js.org/concepts/plugins){rel="nofollow"} for more information about webpack plugins. You can also use [this collection](https://webpack.js.org/awesome-webpack/#webpack-plugins){rel="nofollow"} to find a plugin that suits your needs.
::
### Parameters
#### `pluginOrGetter`
**Type**: `PluginOrGetter`
**Required**: `true`
A webpack plugin instance or an array of webpack plugin instances. If a function is provided, it must return a webpack plugin instance or an array of webpack plugin instances.
#### `options`
**Type**: `ExtendWebpackConfigOptions`
**Default**: `{}`
Options to pass to the callback function. This object can have the following properties:
- `dev` (optional)
:br
**Type**: `boolean`
:br
**Default**: `true`
:br
If set to `true`, the callback function will be called when building in development mode.
- `build` (optional)
:br
**Type**: `boolean`
:br
**Default**: `true`
:br
If set to `true`, the callback function will be called when building in production mode.
- `server` (optional)
:br
**Type**: `boolean`
:br
**Default**: `true`
:br
If set to `true`, the callback function will be called when building the server bundle.
- `client` (optional)
:br
**Type**: `boolean`
:br
**Default**: `true`
:br
If set to `true`, the callback function will be called when building the client bundle.
- `prepend` (optional)
:br
**Type**: `boolean`
:br
If set to `true`, the callback function will be prepended to the array with `unshift()` instead of `push()`.
### Examples
```ts
// https://github.com/nuxt-modules/eslint
import EslintWebpackPlugin from 'eslint-webpack-plugin'
import { defineNuxtModule, addWebpackPlugin } from '@nuxt/kit'
export default defineNuxtModule({
meta: {
name: 'nuxt-eslint',
configKey: 'eslint',
},
defaults: nuxt => ({
include: [`${nuxt.options.srcDir}/**/*.{js,jsx,ts,tsx,vue}`],
lintOnStart: true,
}),
setup(options, nuxt) {
const webpackOptions = {
...options,
context: nuxt.options.srcDir,
files: options.include,
lintDirtyModulesOnly: !options.lintOnStart
}
addWebpackPlugin(new EslintWebpackPlugin(webpackOptions), { server: false })
}
})
```
## `addVitePlugin`
Append Vite plugin to the config.
### Type
```ts
function addVitePlugin (pluginOrGetter: PluginOrGetter, options?: ExtendViteConfigOptions): void
type PluginOrGetter = VitePlugin | VitePlugin[] | (() => VitePlugin | VitePlugin[])
interface ExtendViteConfigOptions {
dev?: boolean
build?: boolean
server?: boolean
client?: boolean
prepend?: boolean
}
```
::tip
See [Vite website](https://vite.dev/guide/api-plugin.html){rel="nofollow"} for more information about Vite plugins. You can also use [this repository](https://github.com/vitejs/awesome-vite#plugins){rel="nofollow"} to find a plugin that suits your needs.
::
### Parameters
#### `pluginOrGetter`
**Type**: `PluginOrGetter`
**Required**: `true`
A Vite plugin instance or an array of Vite plugin instances. If a function is provided, it must return a Vite plugin instance or an array of Vite plugin instances.
#### `options`
**Type**: `ExtendViteConfigOptions`
**Default**: `{}`
Options to pass to the callback function. This object can have the following properties:
- `dev` (optional)
:br
**Type**: `boolean`
:br
**Default**: `true`
:br
If set to `true`, the callback function will be called when building in development mode.
- `build` (optional)
:br
**Type**: `boolean`
:br
**Default**: `true`
:br
If set to `true`, the callback function will be called when building in production mode.
- `server` (optional)
:br
**Type**: `boolean`
:br
**Default**: `true`
:br
If set to `true`, the callback function will be called when building the server bundle.
- `client` (optional)
:br
**Type**: `boolean`
:br
**Default**: `true`
:br
If set to `true`, the callback function will be called when building the client bundle.
- `prepend` (optional)
:br
**Type**: `boolean`
:br
If set to `true`, the callback function will be prepended to the array with `unshift()` instead of `push()`.
### Examples
```ts
// https://github.com/yisibell/nuxt-svg-icons
import { defineNuxtModule, addVitePlugin } from '@nuxt/kit'
import { svg4VuePlugin } from 'vite-plugin-svg4vue'
export default defineNuxtModule({
meta: {
name: 'nuxt-svg-icons',
configKey: 'nuxtSvgIcons',
},
defaults: {
svg4vue: {
assetsDirName: 'assets/icons',
},
},
setup(options) {
addVitePlugin(svg4VuePlugin(options.svg4vue))
},
})
```
## `addBuildPlugin`
Builder-agnostic version of `addWebpackPlugin` and `addVitePlugin`. It will add the plugin to both webpack and vite configurations if they are present.
### Type
```ts
function addBuildPlugin (pluginFactory: AddBuildPluginFactory, options?: ExtendConfigOptions): void
interface AddBuildPluginFactory {
vite?: () => VitePlugin | VitePlugin[]
webpack?: () => WebpackPluginInstance | WebpackPluginInstance[]
}
interface ExtendConfigOptions {
dev?: boolean
build?: boolean
server?: boolean
client?: boolean
prepend?: boolean
}
```
### Parameters
#### `pluginFactory`
**Type**: `AddBuildPluginFactory`
**Required**: `true`
A factory function that returns an object with `vite` and/or `webpack` properties. These properties must be functions that return a Vite plugin instance or an array of Vite plugin instances and/or a webpack plugin instance or an array of webpack plugin instances.
#### `options`
**Type**: `ExtendConfigOptions`
**Default**: `{}`
Options to pass to the callback function. This object can have the following properties:
- `dev` (optional)
:br
**Type**: `boolean`
:br
**Default**: `true`
:br
If set to `true`, the callback function will be called when building in development mode.
- `build` (optional)
:br
**Type**: `boolean`
:br
**Default**: `true`
:br
If set to `true`, the callback function will be called when building in production mode.
- `server` (optional)
:br
**Type**: `boolean`
:br
**Default**: `true`
:br
If set to `true`, the callback function will be called when building the server bundle.
- `client` (optional)
:br
**Type**: `boolean`
:br
**Default**: `true`
:br
If set to `true`, the callback function will be called when building the client bundle.
- `prepend` (optional)
:br
**Type**: `boolean`
:br
If set to `true`, the callback function will be prepended to the array with `unshift()` instead of `push()`.
# Examples
## Accessing Nuxt Vite Config
If you are building an integration that needs access to the runtime Vite or webpack config that Nuxt uses, it is possible to extract this using Kit utilities.
Some examples of projects doing this already:
- [histoire](https://github.com/histoire-dev/histoire/blob/main/packages/histoire-plugin-nuxt/src/index.ts){rel="nofollow"}
- [nuxt-vitest](https://github.com/danielroe/nuxt-vitest/blob/main/packages/nuxt-vitest/src/config.ts){rel="nofollow"}
- [@storybook-vue/nuxt](https://github.com/storybook-vue/storybook-nuxt/blob/main/packages/storybook-nuxt/src/preset.ts){rel="nofollow"}
Here is a brief example of how you might access the Vite config from a project; you could implement a similar approach to get the webpack configuration.
```js
import { loadNuxt, buildNuxt } from '@nuxt/kit'
// https://github.com/nuxt/nuxt/issues/14534
async function getViteConfig() {
const nuxt = await loadNuxt({ cwd: process.cwd(), dev: false, overrides: { ssr: false } })
return new Promise((resolve, reject) => {
nuxt.hook('vite:extendConfig', (config, { isClient }) => {
if (isClient) {
resolve(config)
throw new Error('_stop_')
}
})
buildNuxt(nuxt).catch((err) => {
if (!err.toString().includes('_stop_')) {
reject(err)
}
})
}).finally(() => nuxt.close())
}
const viteConfig = await getViteConfig()
console.log(viteConfig)
```
# Programmatic Usage
Programmatic usage can be helpful when you want to use Nuxt programmatically, for example, when building a [CLI tool](https://github.com/nuxt/cli){rel="nofollow"} or [test utils](https://github.com/nuxt/nuxt/tree/main/packages/test-utils){rel="nofollow"}.
## `loadNuxt`
Load Nuxt programmatically. It will load the Nuxt configuration, instantiate and return the promise with Nuxt instance.
### Type
```ts
async function loadNuxt (loadOptions?: LoadNuxtOptions): Promise<Nuxt>
interface LoadNuxtOptions extends LoadNuxtConfigOptions {
dev?: boolean
ready?: boolean
}
```
### Parameters
#### `loadOptions`
**Type**: `LoadNuxtOptions`
**Default**: `{}`
Loading conditions for Nuxt. `loadNuxt` uses [`c12`](https://github.com/unjs/c12){rel="nofollow"} under the hood, so it accepts the same options as `c12.loadConfig` with some additional options:
- `dev` (optional)
:br
**Type**: `boolean`
:br
**Default**: `false`
:br
If set to `true`, Nuxt will be loaded in development mode.
- `ready` (optional)
:br
**Type**: `boolean`
:br
**Default**: `true`
:br
If set to `true`, Nuxt will be ready to use after the `loadNuxt` call. If set to `false`, you will need to call `nuxt.ready()` to make sure Nuxt is ready to use.
## `buildNuxt`
Build Nuxt programmatically. It will invoke the builder (currently [@nuxt/vite-builder](https://github.com/nuxt/nuxt/tree/main/packages/vite){rel="nofollow"} or [@nuxt/webpack-builder](https://github.com/nuxt/nuxt/tree/main/packages/webpack){rel="nofollow"}) to bundle the application.
### Type
```ts
async function buildNuxt (nuxt: Nuxt): Promise<any>
```
### Parameters
#### `nuxt`
**Type**: `Nuxt`
**Required**: `true`
Nuxt instance to build. It can be retrieved from the context via `useNuxt()` call.
## `loadNuxtConfig`
Load Nuxt configuration. It will return the promise with the configuration object.
### Type
```ts
async function loadNuxtConfig (options: LoadNuxtConfigOptions): Promise<NuxtOptions>
```
### Parameters
#### `options`
**Type**: `LoadNuxtConfigOptions`
**Required**: `true`
Options to pass in [`c12`](https://github.com/unjs/c12#options){rel="nofollow"} `loadConfig` call.
## `writeTypes`
Generates `tsconfig.json` and writes it to the project buildDir.
### Type
```ts
function writeTypes (nuxt?: Nuxt): void
interface Nuxt {
options: NuxtOptions
hooks: Hookable<NuxtHooks>
hook: Nuxt['hooks']['hook']
callHook: Nuxt['hooks']['callHook']
addHooks: Nuxt['hooks']['addHooks']
ready: () => Promise<void>
close: () => Promise<void>
server?: any
vfs: Record<string, string>
apps: Record<string, NuxtApp>
}
```
### Parameters
#### `nuxt`
**Type**: `Nuxt`
**Required**: `true`
Nuxt instance to build. It can be retrieved from the context via `useNuxt()` call.
# Compatibility
Nuxt Kit utilities can be used in Nuxt 3, Nuxt 2 with Bridge and even Nuxt 2 without Bridge. To make sure your module is compatible with all versions, you can use the `checkNuxtCompatibility`, `assertNuxtCompatibility` and `hasNuxtCompatibility` functions. They will check if the current Nuxt version meets the constraints you provide. Also you can use `isNuxt2`, `isNuxt3` and `getNuxtVersion` functions for more granular checks.
## `checkNuxtCompatibility`
Checks if constraints are met for the current Nuxt version. If not, returns an array of messages. Nuxt 2 version also checks for `bridge` support.
### Type
```ts
async function checkNuxtCompatibility(
constraints: NuxtCompatibility,
nuxt?: Nuxt
): Promise<NuxtCompatibilityIssues>;
interface NuxtCompatibility {
nuxt?: string;
bridge?: boolean;
builder?: {
// Set `false` if your module is not compatible with a builder
// or a semver-compatible string version constraint
vite?: false | string;
webpack?: false | string;
};
}
interface NuxtCompatibilityIssue {
name: string;
message: string;
}
interface NuxtCompatibilityIssues extends Array<NuxtCompatibilityIssue> {
toString(): string;
}
```
### Parameters
#### `constraints`
**Type**: `NuxtCompatibility`
**Default**: `{}`
Constraints to check for. It accepts the following properties:
- `nuxt` (optional)
:br
**Type**: `string`
:br
Nuxt version in semver format. Versions may be defined in Node.js way, for example: `>=2.15.0 <3.0.0`.
- `bridge` (optional)
:br
**Type**: `boolean`
:br
If set to `true`, it will check if the current Nuxt version supports `bridge`.
#### `nuxt`
**Type**: `Nuxt`
**Default**: `useNuxt()`
Nuxt instance. If not provided, it will be retrieved from the context via `useNuxt()` call.
## `assertNuxtCompatibility`
Asserts that constraints are met for the current Nuxt version. If not, throws an error with the list of issues as string.
### Type
```ts
async function assertNuxtCompatibility(
constraints: NuxtCompatibility,
nuxt?: Nuxt
): Promise<true>;
interface NuxtCompatibility {
nuxt?: string;
bridge?: boolean;
}
```
### Parameters
#### `constraints`
**Type**: `NuxtCompatibility`
**Default**: `{}`
Constraints to check for. It accepts the following properties:
- `nuxt` (optional)
:br
**Type**: `string`
:br
Nuxt version in semver format. Versions may be defined in Node.js way, for example: `>=2.15.0 <3.0.0`.
- `bridge` (optional)
:br
**Type**: `boolean`
:br
If set to `true`, it will check if the current Nuxt version supports `bridge`.
#### `nuxt`
**Type**: `Nuxt`
**Default**: `useNuxt()`
Nuxt instance. If not provided, it will be retrieved from the context via `useNuxt()` call.
## `hasNuxtCompatibility`
Checks if constraints are met for the current Nuxt version. Return `true` if all constraints are met, otherwise returns `false`. Nuxt 2 version also checks for `bridge` support.
### Type
```ts
async function hasNuxtCompatibility(
constraints: NuxtCompatibility,
nuxt?: Nuxt
): Promise<boolean>;
interface NuxtCompatibility {
nuxt?: string;
bridge?: boolean;
}
```
### Parameters
#### `constraints`
**Type**: `NuxtCompatibility`
**Default**: `{}`
Constraints to check for. It accepts the following properties:
- `nuxt` (optional)
:br
**Type**: `string`
:br
Nuxt version in semver format. Versions may be defined in Node.js way, for example: `>=2.15.0 <3.0.0`.
- `bridge` (optional)
:br
**Type**: `boolean`
:br
If set to `true`, it will check if the current Nuxt version supports `bridge`.
#### `nuxt`
**Type**: `Nuxt`
**Default**: `useNuxt()`
Nuxt instance. If not provided, it will be retrieved from the context via `useNuxt()` call.
## `isNuxt2`
Checks if the current Nuxt version is 2.x.
### Type
```ts
function isNuxt2(nuxt?: Nuxt): boolean;
```
### Parameters
#### `nuxt`
**Type**: `Nuxt`
**Default**: `useNuxt()`
Nuxt instance. If not provided, it will be retrieved from the context via `useNuxt()` call.
## `isNuxt3`
Checks if the current Nuxt version is 3.x.
### Type
```ts
function isNuxt3(nuxt?: Nuxt): boolean;
```
### Parameters
#### `nuxt`
**Type**: `Nuxt`
**Default**: `useNuxt()`
Nuxt instance. If not provided, it will be retrieved from the context via `useNuxt()` call.
## `getNuxtVersion`
Returns the current Nuxt version.
### Type
```ts
function getNuxtVersion(nuxt?: Nuxt): string;
```
### Parameters
#### `nuxt`
**Type**: `Nuxt`
**Default**: `useNuxt()`
Nuxt instance. If not provided, it will be retrieved from the context via `useNuxt()` call.
# Auto-imports
Nuxt auto-imports helper functions, composables and Vue APIs to use across your application without explicitly importing them. Based on the directory structure, every Nuxt application can also use auto-imports for its own composables and plugins.
With Nuxt Kit you can also add your own auto-imports. `addImports` and `addImportsDir` allow you to add imports to the Nuxt application. `addImportsSources` allows you to add listed imports from 3rd party packages to the Nuxt application.
These utilities are powered by [`unimport`](https://github.com/unjs/unimport){rel="nofollow"}, which provides the underlying auto-import mechanism used in Nuxt.
::note
These functions are designed for registering your own utils, composables and Vue APIs. For pages, components and plugins, please refer to the specific sections: [Pages](https://nuxt.com/docs/api/kit/pages), [Components](https://nuxt.com/docs/api/kit/components), [Plugins](https://nuxt.com/docs/api/kit/plugins).
::
::tip
---
icon: i-lucide-video
target: _blank
to: https://vueschool.io/lessons/expanding-nuxt-s-auto-imports?friend=nuxt
---
Watch Vue School video about Auto-imports Nuxt Kit utilities.
::
## `addImports`
Add imports to the Nuxt application. It makes your imports available in the Nuxt application without the need to import them manually.
### Usage
```ts twoslash
import { defineNuxtModule, addImports } from "@nuxt/kit";
export default defineNuxtModule({
setup(options, nuxt) {
const names = [
"useStoryblok",
"useStoryblokApi",
"useStoryblokBridge",
"renderRichText",
"RichTextSchema"
];
names.forEach((name) =>
addImports({ name, as: name, from: "@storyblok/vue" })
);
}
})
```
### Type
```ts
function addImports (imports: Import | Import[]): void
```
### Parameters
`imports`: An object or an array of objects with the following properties:
| Prop | Type | Required | Description |
| ---------- | --------------------- | -------- | --------------------------------------------------------------------------------------------------------------- |
| `name` | `string` | `true` | Import name to be detected. |
| `from` | `string` | `true` | Module specifier to import from. |
| `priority` | `number` | `false` | Priority of the import; if multiple imports have the same name, the one with the highest priority will be used. |
| `disabled` | `boolean` | `false` | If this import is disabled. |
| `meta` | `Record<string, any>` | `false` | Metadata of the import. |
| `type` | `boolean` | `false` | If this import is a pure type import. |
| `typeFrom` | `string` | `false` | Use this as the `from` value when generating type declarations. |
| `as` | `string` | `false` | Import as this name. |
## `addImportsDir`
Add imports from a directory to the Nuxt application. It will automatically import all files from the directory and make them available in the Nuxt application without the need to import them manually.
### Usage
```ts twoslash
import { defineNuxtModule, addImportsDir, createResolver } from '@nuxt/kit'
export default defineNuxtModule({
meta: {
name: '@vueuse/motion',
configKey: 'motion',
},
setup(options, nuxt) {
const resolver = createResolver(import.meta.url)
addImportsDir(resolver.resolve('./runtime/composables'))
},
})
```
### Type
```ts
function addImportsDir (dirs: string | string[], options?: { prepend?: boolean }): void
```
### Parameters
| Prop | Type | Required | Description |
| --------- | ---------------------------------------------------------------------------------------------------------------------------------------------------- | -------- | ------------------------------------------------------------------------------------------------------------------- |
| `dirs` | `string | string[]`{className="language-ts shiki shiki-themes material-theme-lighter material-theme-lighter material-theme-palenight" lang="ts"} | `true` | A string or an array of strings with the path to the directory to import from. |
| `options` | `{ prepend?: boolean }`{className="language-ts shiki shiki-themes material-theme-lighter material-theme-lighter material-theme-palenight" lang="ts"} | `false` | Options to pass to the import. If `prepend` is set to `true`, the imports will be prepended to the list of imports. |
## `addImportsSources`
Add listed imports to the Nuxt application.
### Usage
```ts twoslash
import { defineNuxtModule, addImportsSources } from '@nuxt/kit'
export default defineNuxtModule({
setup() {
addImportsSources({
from: 'h3',
imports: [
'defineEventHandler',
'getQuery',
'getRouterParams',
'readBody',
'sendRedirect'
],
})
}
})
```
### Type
```ts
function addImportsSources (importSources: ImportSource | ImportSource[]): void
```
### Parameters
**importSources**: An object or an array of objects with the following properties:
| Prop | Type | Required | Description |
| --------- | ------------------------------------------------------------------------------------------------------------------------------------------------------------ | -------- | ---------------------------------------------------------------------------------------------- |
| `from` | `string` | `true` | Module specifier to import from. |
| `imports` | `PresetImport | ImportSource[]`{className="language-ts shiki shiki-themes material-theme-lighter material-theme-lighter material-theme-palenight" lang="ts"} | `true` | An object or an array of objects, which can be import names, import objects or import sources. |
# Components
Components are the building blocks of your Nuxt application. They are reusable Vue instances that can be used to create a user interface. In Nuxt, components from the components directory are automatically imported by default. However, if you need to import components from an alternative directory or wish to selectively import them as needed, `@nuxt/kit` provides the `addComponentsDir` and `addComponent` methods. These utils allow you to customize the component configuration to better suit your needs.
::tip
---
icon: i-lucide-video
target: _blank
to: https://vueschool.io/lessons/injecting-components-and-component-directories?friend=nuxt
---
Watch Vue School video about injecting components.
::
## `addComponentsDir`
Register a directory to be scanned for components and imported only when used. Keep in mind, that this does not register components globally, until you specify `global: true` option.
### Usage
```ts
export default defineNuxtModule({
meta: {
name: '@nuxt/ui',
configKey: 'ui',
},
setup() {
addComponentsDir({
path: resolve('./runtime/components'),
prefix: 'U',
pathPrefix: false
})
}
})
```
### Type
```ts
function addComponentsDir (dir: ComponentsDir, opts: { prepend?: boolean } = {}): void
```
### Parameters
`dir` An object with the following properties:
| Prop | Type | Required | Description |
| ----------------- | ------------------------------------------------------------------------------------------------------------------------------------------------------------------------------------------------------- | -------- | ----------------------------------------------------------------------------------------------------------------------------------------------------------------------------------------------------------------------------------------------------------------------- |
| `path` | `string` | `true` | Path (absolute or relative) to the directory containing your components. You can use Nuxt aliases (\~ or @) to refer to directories inside project or directly use an npm package path similar to require. |
| `pattern` | `string | string[]`{className="language-ts shiki shiki-themes material-theme-lighter material-theme-lighter material-theme-palenight" lang="ts"} | `false` | Accept Pattern that will be run against specified path. |
| `ignore` | `string[]` | `false` | Ignore patterns that will be run against specified path. |
| `prefix` | `string` | `false` | Prefix all matched components with this string. |
| `pathPrefix` | `boolean` | `false` | Prefix component name by its path. |
| `enabled` | `boolean` | `false` | Ignore scanning this directory if set to `true`. |
| `prefetch` | `boolean` | `false` | These properties (prefetch/preload) are used in production to configure how components with Lazy prefix are handled by webpack via its magic comments. Learn more on [webpack documentation](https://webpack.js.org/api/module-methods/#magic-comments){rel="nofollow"} |
| `preload` | `boolean` | `false` | These properties (prefetch/preload) are used in production to configure how components with Lazy prefix are handled by webpack via its magic comments. Learn more on [webpack documentation](https://webpack.js.org/api/module-methods/#magic-comments){rel="nofollow"} |
| `isAsync` | `boolean` | `false` | This flag indicates, component should be loaded async (with a separate chunk) regardless of using Lazy prefix or not. |
| `extendComponent` | `(component: Component) => Promise<Component | void> | (Component | void)`{className="language-ts shiki shiki-themes material-theme-lighter material-theme-lighter material-theme-palenight" lang="ts"} | `false` | A function that will be called for each component found in the directory. It accepts a component object and should return a component object or a promise that resolves to a component object. |
| `global` | `boolean` | `false` | If enabled, registers components to be globally available. |
| `island` | `boolean` | `false` | If enabled, registers components as islands. You can read more about islands in [`<NuxtIsland/>`](https://nuxt.com/docs/api/components/nuxt-island#nuxtisland) component description. |
| `watch` | `boolean` | `false` | Watch specified path for changes, including file additions and file deletions. |
| `extensions` | `string[]` | `false` | Extensions supported by Nuxt builder. |
| `transpile` | `'auto' | boolean`{className="language-ts shiki shiki-themes material-theme-lighter material-theme-lighter material-theme-palenight" lang="ts"} | `false` | Transpile specified path using build.transpile. If set to `'auto'`, it will set `transpile: true` if `node_modules/` is in path. |
`opts`
| Prop | Type | Required | Description |
| --------- | --------- | -------- | ---------------------------------------------------------------------------------------------------- |
| `prepend` | `boolean` | `false` | If set to `true`, the directory will be prepended to the array with `unshift()` instead of `push()`. |
## `addComponent`
Register a component to be automatically imported.
### Usage
```ts
import { defineNuxtModule, createResolver, addComponent } from '@nuxt/kit'
export default defineNuxtModule({
meta: {
name: '@nuxt/image',
configKey: 'image',
},
async setup() {
const resolver = createResolver(import.meta.url)
addComponent({
name: 'NuxtImg',
filePath: resolver.resolve('./runtime/components/NuxtImg.vue'),
})
addComponent({
name: 'NuxtPicture',
filePath: resolver.resolve('./runtime/components/NuxtPicture.vue'),
})
},
})
```
### Type
```ts
function addComponent (options: AddComponentOptions): void
```
### Parameters
`options`: An object with the following properties:
| Prop | Type | Required | Description |
| ------------ | ---------------------------------------------------------------------------------------------------------------------------------------------------------- | -------- | ----------------------------------------------------------------------------------------------------------------------------------------------------------------------------------------------------------------------------------------------------------------------- |
| `name` | `string` | `true` | Component name. |
| `filePath` | `string` | `true` | Path to the component. |
| `pascalName` | `string` | `false` | Pascal case component name. If not provided, it will be generated from the component name. |
| `kebabName` | `string` | `false` | Kebab case component name. If not provided, it will be generated from the component name. |
| `export` | `string` | `false` | Specify named or default export. If not provided, it will be set to `'default'`. |
| `shortPath` | `string` | `false` | Short path to the component. If not provided, it will be generated from the component path. |
| `chunkName` | `string` | `false` | Chunk name for the component. If not provided, it will be generated from the component name. |
| `prefetch` | `boolean` | `false` | These properties (prefetch/preload) are used in production to configure how components with Lazy prefix are handled by webpack via its magic comments. Learn more on [webpack documentation](https://webpack.js.org/api/module-methods/#magic-comments){rel="nofollow"} |
| `preload` | `boolean` | `false` | These properties (prefetch/preload) are used in production to configure how components with Lazy prefix are handled by webpack via its magic comments. Learn more on [webpack documentation](https://webpack.js.org/api/module-methods/#magic-comments){rel="nofollow"} |
| `global` | `boolean` | `false` | If enabled, registers component to be globally available. |
| `island` | `boolean` | `false` | If enabled, registers component as island. You can read more about islands in [`<NuxtIsland/>`](https://nuxt.com/docs/api/components/nuxt-island#nuxtisland) component description. |
| `mode` | `'client' | 'server' | 'all'`{className="language-ts shiki shiki-themes material-theme-lighter material-theme-lighter material-theme-palenight" lang="ts"} | `false` | This options indicates if component should render on client, server or both. By default, it will render on both client and server. |
| `priority` | `number` | `false` | Priority of the component, if multiple components have the same name, the one with the highest priority will be used. |
# Context
Nuxt modules allow you to enhance Nuxt's capabilities. They offer a structured way to keep your code organized and modular. If you're looking to break down your module into smaller components, Nuxt offers the `useNuxt` and `tryUseNuxt` functions. These functions enable you to conveniently access the Nuxt instance from the context without having to pass it as argument.
::note
When you're working with the `setup` function in Nuxt modules, Nuxt is already provided as the second argument. This means you can directly utilize it without needing to call `useNuxt()`. You can look at [Nuxt Site Config](https://github.com/harlan-zw/nuxt-site-config){rel="nofollow"} as an example of usage.
::
## `useNuxt`
Get the Nuxt instance from the context. It will throw an error if Nuxt is not available.
### Type
```ts
function useNuxt(): Nuxt
interface Nuxt {
options: NuxtOptions
hooks: Hookable<NuxtHooks>
hook: Nuxt['hooks']['hook']
callHook: Nuxt['hooks']['callHook']
addHooks: Nuxt['hooks']['addHooks']
ready: () => Promise<void>
close: () => Promise<void>
server?: any
vfs: Record<string, string>
apps: Record<string, NuxtApp>
}
```
### Examples
::code-group
```ts [setupTranspilation.ts]
// https://github.com/Lexpeartha/nuxt-xstate/blob/main/src/parts/transpile.ts
import { useNuxt } from '@nuxt/kit'
export const setupTranspilation = () => {
const nuxt = useNuxt()
nuxt.options.build.transpile = nuxt.options.build.transpile || []
if (nuxt.options.builder === '@nuxt/webpack-builder') {
nuxt.options.build.transpile.push(
'xstate',
)
}
}
```
```ts [module.ts]
import { useNuxt } from '@nuxt/kit'
import { setupTranspilation } from './setupTranspilation'
export default defineNuxtModule({
setup() {
setupTranspilation()
}
})
```
::
## `tryUseNuxt`
Get the Nuxt instance from the context. It will return `null` if Nuxt is not available.
### Type
```ts
function tryUseNuxt(): Nuxt | null
interface Nuxt {
options: NuxtOptions
hooks: Hookable<NuxtHooks>
hook: Nuxt['hooks']['hook']
callHook: Nuxt['hooks']['callHook']
addHooks: Nuxt['hooks']['addHooks']
ready: () => Promise<void>
close: () => Promise<void>
server?: any
vfs: Record<string, string>
apps: Record<string, NuxtApp>
}
```
### Examples
::code-group
```ts [requireSiteConfig.ts]
// https://github.com/harlan-zw/nuxt-site-config/blob/main/test/assertions.test.ts
import { tryUseNuxt } from '@nuxt/kit'
interface SiteConfig {
title: string
}
export const requireSiteConfig = (): SiteConfig => {
const nuxt = tryUseNuxt()
if (!nuxt) {
return { title: null }
}
return nuxt.options.siteConfig
}
```
```ts [module.ts]
import { useNuxt } from '@nuxt/kit'
import { requireSiteConfig } from './requireSiteConfig'
export default defineNuxtModule({
setup(_, nuxt) {
const config = requireSiteConfig()
nuxt.options.app.head.title = config.title
}
})
```
::
# Pages
## `extendPages`
In Nuxt, routes are automatically generated based on the structure of the files in the `pages` directory. However, there may be scenarios where you'd want to customize these routes. For instance, you might need to add a route for a dynamic page not generated by Nuxt, remove an existing route, or modify the configuration of a route. For such customizations, Nuxt offers the `extendPages` feature, which allows you to extend and alter the pages configuration.
::tip
---
icon: i-lucide-video
target: _blank
to: https://vueschool.io/lessons/extend-and-alter-nuxt-pages?friend=nuxt
---
Watch Vue School video about extendPages.
::
### Type
```ts
function extendPages (callback: (pages: NuxtPage[]) => void): void
type NuxtPage = {
name?: string
path: string
file?: string
meta?: Record<string, any>
alias?: string[] | string
redirect?: RouteLocationRaw
children?: NuxtPage[]
}
```
### Parameters
#### `callback`
**Type**: `(pages: NuxtPage[]) => void`
**Required**: `true`
A function that will be called with the pages configuration. You can alter this array by adding, deleting, or modifying its elements. Note: You should modify the provided pages array directly, as changes made to a copied array will not be reflected in the configuration.
### Examples
```ts
// https://github.com/nuxt-modules/prismic/blob/master/src/module.ts
import { createResolver, defineNuxtModule, extendPages } from '@nuxt/kit'
export default defineNuxtModule({
setup(options) {
const resolver = createResolver(import.meta.url)
extendPages((pages) => {
pages.unshift({
name: 'prismic-preview',
path: '/preview',
file: resolver.resolve('runtime/preview.vue')
})
})
}
})
```
## `extendRouteRules`
Nuxt is powered by the [Nitro](https://nitro.unjs.io){rel="nofollow"} server engine. With Nitro, you can incorporate high-level logic directly into your configuration, which is useful for actions like redirects, proxying, caching, and appending headers to routes. This configuration works by associating route patterns with specific route settings.
::tip
You can read more about Nitro route rules in the [Nitro documentation](https://nitro.unjs.io/guide/routing#route-rules){rel="nofollow"}.
::
::tip
---
icon: i-lucide-video
target: _blank
to: https://vueschool.io/lessons/adding-route-rules-and-route-middlewares?friend=nuxt
---
Watch Vue School video about adding route rules and route middelwares.
::
### Type
```ts
function extendRouteRules (route: string, rule: NitroRouteConfig, options: ExtendRouteRulesOptions): void
interface NitroRouteConfig {
cache?: CacheOptions | false;
headers?: Record<string, string>;
redirect?: string | { to: string; statusCode?: HTTPStatusCode };
prerender?: boolean;
proxy?: string | ({ to: string } & ProxyOptions);
isr?: number | boolean;
cors?: boolean;
swr?: boolean | number;
static?: boolean | number;
}
interface ExtendRouteRulesOptions {
override?: boolean
}
interface CacheOptions {
swr?: boolean
name?: string
group?: string
integrity?: any
maxAge?: number
staleMaxAge?: number
base?: string
headersOnly?: boolean
}
// See https://www.jsdocs.io/package/h3#ProxyOptions
interface ProxyOptions {
headers?: RequestHeaders | HeadersInit;
fetchOptions?: RequestInit & { duplex?: Duplex } & {
ignoreResponseError?: boolean;
};
fetch?: typeof fetch;
sendStream?: boolean;
streamRequest?: boolean;
cookieDomainRewrite?: string | Record<string, string>;
cookiePathRewrite?: string | Record<string, string>;
onResponse?: (event: H3Event, response: Response) => void;
}
```
### Parameters
#### `route`
**Type**: `string`
**Required**: `true`
A route pattern to match against.
#### `rule`
**Type**: `NitroRouteConfig`
**Required**: `true`
A route configuration to apply to the matched route.
#### `options`
**Type**: `ExtendRouteRulesOptions`
**Default**: `{}`
Options to pass to the route configuration. If `override` is set to `true`, it will override the existing route configuration.
### Examples
```ts
// https://github.com/directus/website/blob/main/modules/redirects.ts
import { createResolver, defineNuxtModule, extendRouteRules, extendPages } from '@nuxt/kit'
export default defineNuxtModule({
setup(options) {
const resolver = createResolver(import.meta.url)
extendPages((pages) => {
pages.unshift({
name: 'preview-new',
path: '/preview-new',
file: resolver.resolve('runtime/preview.vue')
})
})
extendRouteRules('/preview', {
redirect: {
to: '/preview-new',
statusCode: 302
}
})
extendRouteRules('/preview-new', {
cache: {
maxAge: 60 * 60 * 24 * 7
}
})
}
})
```
## `addRouteMiddleware`
Registers route middlewares to be available for all routes or for specific routes.
Route middlewares can be also defined in plugins via [`addRouteMiddleware`](https://nuxt.com/docs/api/utils/add-route-middleware) composable.
::tip
Read more about route middlewares in the [Route middleware documentation](https://nuxt.com/docs/getting-started/routing#route-middleware).
::
::tip
---
icon: i-lucide-video
target: _blank
to: https://vueschool.io/lessons/adding-route-rules-and-route-middlewares?friend=nuxt
---
Watch Vue School video about adding route rules and route middelwares.
::
### Type
```ts
function addRouteMiddleware (input: NuxtMiddleware | NuxtMiddleware[], options: AddRouteMiddlewareOptions): void
type NuxtMiddleware = {
name: string
path: string
global?: boolean
}
interface AddRouteMiddlewareOptions {
override?: boolean
prepend?: boolean
}
```
### Parameters
#### `input`
**Type**: `NuxtMiddleware | NuxtMiddleware[]`
**Required**: `true`
A middleware object or an array of middleware objects with the following properties:
- `name` (required)
:br
**Type**: `string`
:br
Middleware name.
- `path` (required)
:br
**Type**: `string`
:br
Path to the middleware.
- `global` (optional)
:br
**Type**: `boolean`
:br
If enabled, registers middleware to be available for all routes.
#### `options`
**Type**: `AddRouteMiddlewareOptions`
**Default**: `{}`
- `override` (optional)
:br
**Type**: `boolean`
:br
**Default**: `false`
:br
If enabled, overrides the existing middleware with the same name.
- `prepend` (optional)
:br
**Type**: `boolean`
:br
**Default**: `false`
:br
If enabled, prepends the middleware to the list of existing middleware.
### Examples
::code-group
```ts [runtime/auth.ts]
export default defineNuxtRouteMiddleware((to, from) => {
// isAuthenticated() is an example method verifying if a user is authenticated
if (to.path !== '/login' && isAuthenticated() === false) {
return navigateTo('/login')
}
})
```
```ts [module.ts]
import { createResolver, defineNuxtModule, addRouteMiddleware } from '@nuxt/kit'
export default defineNuxtModule({
setup() {
const resolver = createResolver(import.meta.url)
addRouteMiddleware({
name: 'auth',
path: resolver.resolve('runtime/auth.ts'),
global: true
}, { prepend: true })
}
})
```
::
# Layout
Layouts is used to be a wrapper around your pages. It can be used to wrap your pages with common components, for example, a header and a footer. Layouts can be registered using `addLayout` utility.
## `addLayout`
Register template as layout and add it to the layouts.
::note
In Nuxt 2 `error` layout can also be registered using this utility. In Nuxt 3+ `error` layout [replaced](https://nuxt.com/docs/getting-started/error-handling#rendering-an-error-page) with `error.vue` page in project root.
::
### Type
```ts
function addLayout (layout: NuxtTemplate | string, name: string): void
interface NuxtTemplate {
src?: string
filename?: string
dst?: string
options?: Record<string, any>
getContents?: (data: Record<string, any>) => string | Promise<string>
write?: boolean
}
```
### Parameters
#### `layout`
**Type**: `NuxtTemplate | string`
**Required**: `true`
A template object or a string with the path to the template. If a string is provided, it will be converted to a template object with `src` set to the string value. If a template object is provided, it must have the following properties:
- `src` (optional)
:br
**Type**: `string`
:br
Path to the template. If `src` is not provided, `getContents` must be provided instead.
- `filename` (optional)
:br
**Type**: `string`
:br
Filename of the template. If `filename` is not provided, it will be generated from the `src` path. In this case, the `src` option is required.
- `dst` (optional)
:br
**Type**: `string`
:br
Path to the destination file. If `dst` is not provided, it will be generated from the `filename` path and nuxt `buildDir` option.
- `options` (optional)
:br
**Type**: `Options`
:br
Options to pass to the template.
- `getContents` (optional)
:br
**Type**: `(data: Options) => string | Promise<string>`
:br
A function that will be called with the `options` object. It should return a string or a promise that resolves to a string. If `src` is provided, this function will be ignored.
- `write` (optional)
:br
**Type**: `boolean`
:br
If set to `true`, the template will be written to the destination file. Otherwise, the template will be used only in virtual filesystem.
# Plugins
Plugins are self-contained code that usually add app-level functionality to Vue. In Nuxt, plugins are automatically imported from the `plugins` directory. However, if you need to ship a plugin with your module, Nuxt Kit provides the `addPlugin` and `addPluginTemplate` methods. These utils allow you to customize the plugin configuration to better suit your needs.
## `addPlugin`
Registers a Nuxt plugin and to the plugins array.
::tip
---
icon: i-lucide-video
target: _blank
to: https://vueschool.io/lessons/injecting-plugins?friend=nuxt
---
Watch Vue School video about addPlugin.
::
### Type
```ts
function addPlugin (plugin: NuxtPlugin | string, options: AddPluginOptions): NuxtPlugin
interface NuxtPlugin {
src: string
mode?: 'all' | 'server' | 'client'
order?: number
}
interface AddPluginOptions { append?: boolean }
```
### Parameters
#### `plugin`
**Type**: `NuxtPlugin | string`
**Required**: `true`
A plugin object or a string with the path to the plugin. If a string is provided, it will be converted to a plugin object with `src` set to the string value. If a plugin object is provided, it must have the following properties:
- `src` (required)
:br
**Type**: `string`
:br
Path to the plugin.
- `mode` (optional)
:br
**Type**: `'all' | 'server' | 'client'`
:br
**Default**: `'all'`
:br
If set to `'all'`, the plugin will be included in both client and server bundles. If set to `'server'`, the plugin will only be included in the server bundle. If set to `'client'`, the plugin will only be included in the client bundle. You can also use `.client` and `.server` modifiers when specifying `src` option to use plugin only in client or server side.
- `order` (optional)
:br
**Type**: `number`
:br
**Default**: `0`
:br
Order of the plugin. This allows more granular control over plugin order and should only be used by advanced users. Lower numbers run first, and user plugins default to `0`. It's recommended to set `order` to a number between `-20` for `pre`-plugins (plugins that run before Nuxt plugins) and `20` for `post`-plugins (plugins that run after Nuxt plugins).
::warning
Don't use `order` unless you know what you're doing. For most plugins, the default `order` of `0` is sufficient. To append a plugin to the end of the plugins array, use the `append` option instead.
::
#### `options`
**Type**: `AddPluginOptions`
**Default**: `{}`
Options to pass to the plugin. If `append` is set to `true`, the plugin will be appended to the plugins array instead of prepended.
### Examples
::code-group
```ts [module.ts]
import { createResolver, defineNuxtModule, addPlugin } from '@nuxt/kit'
export default defineNuxtModule({
setup() {
const resolver = createResolver(import.meta.url)
addPlugin({
src: resolver.resolve('runtime/plugin.js'),
mode: 'client'
})
}
})
```
```ts [runtime/plugin.js]
// https://github.com/nuxt/nuxters
export default defineNuxtPlugin((nuxtApp) => {
const colorMode = useColorMode()
nuxtApp.hook('app:mounted', () => {
if (colorMode.preference !== 'dark') {
colorMode.preference = 'dark'
}
})
})
```
::
## `addPluginTemplate`
Adds a template and registers as a nuxt plugin. This is useful for plugins that need to generate code at build time.
::tip
---
icon: i-lucide-video
target: _blank
to: https://vueschool.io/lessons/injecting-plugin-templates?friend=nuxt
---
Watch Vue School video about addPluginTemplate.
::
### Type
```ts
function addPluginTemplate (pluginOptions: NuxtPluginTemplate, options: AddPluginOptions): NuxtPlugin
interface NuxtPluginTemplate<Options = Record<string, any>> {
src?: string,
filename?: string,
dst?: string,
mode?: 'all' | 'server' | 'client',
options?: Options,
getContents?: (data: Options) => string | Promise<string>,
write?: boolean,
order?: number
}
interface AddPluginOptions { append?: boolean }
interface NuxtPlugin {
src: string
mode?: 'all' | 'server' | 'client'
order?: number
}
```
### Parameters
#### `pluginOptions`
**Type**: `NuxtPluginTemplate`
**Required**: `true`
A plugin template object with the following properties:
- `src` (optional)
:br
**Type**: `string`
:br
Path to the template. If `src` is not provided, `getContents` must be provided instead.
- `filename` (optional)
:br
**Type**: `string`
:br
Filename of the template. If `filename` is not provided, it will be generated from the `src` path. In this case, the `src` option is required.
- `dst` (optional)
:br
**Type**: `string`
:br
Path to the destination file. If `dst` is not provided, it will be generated from the `filename` path and nuxt `buildDir` option.
- `mode` (optional)
:br
**Type**: `'all' | 'server' | 'client'`
:br
**Default**: `'all'`
:br
If set to `'all'`, the plugin will be included in both client and server bundles. If set to `'server'`, the plugin will only be included in the server bundle. If set to `'client'`, the plugin will only be included in the client bundle. You can also use `.client` and `.server` modifiers when specifying `src` option to use plugin only in client or server side.
- `options` (optional)
:br
**Type**: `Options`
:br
Options to pass to the template.
- `getContents` (optional)
:br
**Type**: `(data: Options) => string | Promise<string>`
:br
A function that will be called with the `options` object. It should return a string or a promise that resolves to a string. If `src` is provided, this function will be ignored.
- `write` (optional)
:br
**Type**: `boolean`
:br
If set to `true`, the template will be written to the destination file. Otherwise, the template will be used only in virtual filesystem.
- `order` (optional)
:br
**Type**: `number`
:br
**Default**: `0`
:br
Order of the plugin. This allows more granular control over plugin order and should only be used by advanced users. Lower numbers run first, and user plugins default to `0`. It's recommended to set `order` to a number between `-20` for `pre`-plugins (plugins that run before Nuxt plugins) and `20` for `post`-plugins (plugins that run after Nuxt plugins).
::warning
Don't use `order` unless you know what you're doing. For most plugins, the default `order` of `0` is sufficient. To append a plugin to the end of the plugins array, use the `append` option instead.
::
#### `options`
**Type**: `AddPluginOptions`
**Default**: `{}`
Options to pass to the plugin. If `append` is set to `true`, the plugin will be appended to the plugins array instead of prepended.
### Examples
::code-group
```ts [module.ts]
// https://github.com/vuejs/vuefire
import { createResolver, defineNuxtModule, addPluginTemplate } from '@nuxt/kit'
export default defineNuxtModule({
setup() {
const resolver = createResolver(import.meta.url)
addPluginTemplate({
src: resolve(templatesDir, 'plugin.ejs'),
filename: 'plugin.mjs',
options: {
...options,
ssr: nuxt.options.ssr,
},
})
}
})
```
```ts [runtime/plugin.ejs]
import { VueFire, useSSRInitialState } from 'vuefire'
import { defineNuxtPlugin } from '#imports'
export default defineNuxtPlugin((nuxtApp) => {
const firebaseApp = nuxtApp.$firebaseApp
nuxtApp.vueApp.use(VueFire, { firebaseApp })
<% if(options.ssr) { %>
if (import.meta.server) {
nuxtApp.payload.vuefire = useSSRInitialState(undefined, firebaseApp)
} else if (nuxtApp.payload?.vuefire) {
useSSRInitialState(nuxtApp.payload.vuefire, firebaseApp)
}
<% } %>
})
```
::
# Lifecycle Hooks
::read-more{to="https://nuxt.com/docs/guide/going-further/hooks"}
::
## App Hooks (runtime)
Check the [app source code](https://github.com/nuxt/nuxt/blob/main/packages/nuxt/src/app/nuxt.ts#L37){rel="nofollow"} for all available hooks.
| Hook | Arguments | Environment | Description |
| ---------------------------- | ------------------- | --------------- | ------------------------------------------------------------------------------------------------------------------------------------------------------------------------------------------------- |
| `app:created` | `vueApp` | Server & Client | Called when initial `vueApp` instance is created. |
| `app:error` | `err` | Server & Client | Called when a fatal error occurs. |
| `app:error:cleared` | `{ redirect? }` | Server & Client | Called when a fatal error occurs. |
| `vue:setup` | - | Server & Client | Called when the setup of Nuxt root is initialized. This callback must be synchronous. |
| `vue:error` | `err, target, info` | Server & Client | Called when a vue error propagates to the root component. [Learn More](https://vuejs.org/api/composition-api-lifecycle.html#onerrorcaptured){rel="nofollow"}. |
| `app:rendered` | `renderContext` | Server | Called when SSR rendering is done. |
| `app:redirected` | - | Server | Called before SSR redirection. |
| `app:beforeMount` | `vueApp` | Client | Called before mounting the app, called only on client side. |
| `app:mounted` | `vueApp` | Client | Called when Vue app is initialized and mounted in browser. |
| `app:suspense:resolve` | `appComponent` | Client | On [Suspense](https://vuejs.org/guide/built-ins/suspense.html#suspense){rel="nofollow"} resolved event. |
| `app:manifest:update` | `{ id, timestamp }` | Client | Called when there is a newer version of your app detected. |
| `app:data:refresh` | `keys?` | Client | Called when `refreshNuxtData` is called. |
| `link:prefetch` | `to` | Client | Called when a `<NuxtLink>` is observed to be prefetched. |
| `page:start` | `pageComponent?` | Client | Called on [Suspense](https://vuejs.org/guide/built-ins/suspense.html#suspense){rel="nofollow"} inside of `NuxtPage` pending event. |
| `page:finish` | `pageComponent?` | Client | Called on [Suspense](https://vuejs.org/guide/built-ins/suspense.html#suspense){rel="nofollow"} inside of `NuxtPage` resolved event. |
| `page:loading:start` | - | Client | Called when the `setup()` of the new page is running. |
| `page:loading:end` | - | Client | Called after `page:finish` |
| `page:transition:finish` | `pageComponent?` | Client | After page transition [onAfterLeave](https://vuejs.org/guide/built-ins/transition.html#javascript-hooks){rel="nofollow"} event. |
| `dev:ssr-logs` | `logs` | Client | Called with an array of server-side logs that have been passed to the client (if `features.devLogs` is enabled). |
| `page:view-transition:start` | `transition` | Client | Called after `document.startViewTransition` is called when [experimental viewTransition support is enabled](https://nuxt.com/docs/getting-started/transitions#view-transitions-api-experimental). |
## Nuxt Hooks (build time)
Check the [schema source code](https://github.com/nuxt/nuxt/blob/main/packages/schema/src/types/hooks.ts#L83){rel="nofollow"} for all available hooks.
| Hook | Arguments | Description |
| --------------------------- | -------------------------------------------------------- | --------------------------------------------------------------------------------------------------------------------------------------------------------------------------------------------------- |
| `kit:compatibility` | `compatibility, issues` | Allows extending compatibility checks. |
| `ready` | `nuxt` | Called after Nuxt initialization, when the Nuxt instance is ready to work. |
| `close` | `nuxt` | Called when Nuxt instance is gracefully closing. |
| `restart` | `{ hard?: boolean }` | To be called to restart the current Nuxt instance. |
| `modules:before` | - | Called during Nuxt initialization, before installing user modules. |
| `modules:done` | - | Called during Nuxt initialization, after installing user modules. |
| `app:resolve` | `app` | Called after resolving the `app` instance. |
| `app:templates` | `app` | Called during `NuxtApp` generation, to allow customizing, modifying or adding new files to the build directory (either virtually or to written to `.nuxt`). |
| `app:templatesGenerated` | `app` | Called after templates are compiled into the [virtual file system](https://nuxt.com/docs/guide/directory-structure/nuxt#virtual-file-system) (vfs). |
| `build:before` | - | Called before Nuxt bundle builder. |
| `build:done` | - | Called after Nuxt bundle builder is complete. |
| `build:manifest` | `manifest` | Called during the manifest build by Vite and webpack. This allows customizing the manifest that Nitro will use to render `<script>` and `<link>` tags in the final HTML. |
| `builder:generateApp` | `options` | Called before generating the app. |
| `builder:watch` | `event, path` | Called at build time in development when the watcher spots a change to a file or directory in the project. |
| `pages:extend` | `pages` | Called after page routes are scanned from the file system. |
| `pages:resolved` | `pages` | Called after page routes have been augmented with scanned metadata. |
| `pages:routerOptions` | `{ files: Array<{ path: string, optional?: boolean }> }` | Called when resolving `router.options` files. Later items in the array override earlier ones. |
| `server:devHandler` | `handler` | Called when the dev middleware is being registered on the Nitro dev server. |
| `imports:sources` | `presets` | Called at setup allowing modules to extend sources. |
| `imports:extend` | `imports` | Called at setup allowing modules to extend imports. |
| `imports:context` | `context` | Called when the [unimport](https://github.com/unjs/unimport){rel="nofollow"} context is created. |
| `imports:dirs` | `dirs` | Allows extending import directories. |
| `components:dirs` | `dirs` | Called within `app:resolve` allowing to extend the directories that are scanned for auto-importable components. |
| `components:extend` | `components` | Allows extending new components. |
| `nitro:config` | `nitroConfig` | Called before initializing Nitro, allowing customization of Nitro's configuration. |
| `nitro:init` | `nitro` | Called after Nitro is initialized, which allows registering Nitro hooks and interacting directly with Nitro. |
| `nitro:build:before` | `nitro` | Called before building the Nitro instance. |
| `nitro:build:public-assets` | `nitro` | Called after copying public assets. Allows modifying public assets before Nitro server is built. |
| `prerender:routes` | `ctx` | Allows extending the routes to be pre-rendered. |
| `build:error` | `error` | Called when an error occurs at build time. |
| `prepare:types` | `options` | Called before Nuxi writes `.nuxt/tsconfig.json` and `.nuxt/nuxt.d.ts`, allowing addition of custom references and declarations in `nuxt.d.ts`, or directly modifying the options in `tsconfig.json` |
| `listen` | `listenerServer, listener` | Called when the dev server is loading. |
| `schema:extend` | `schemas` | Allows extending default schemas. |
| `schema:resolved` | `schema` | Allows extending resolved schema. |
| `schema:beforeWrite` | `schema` | Called before writing the given schema. |
| `schema:written` | - | Called after the schema is written. |
| `vite:extend` | `viteBuildContext` | Allows to extend Vite default context. |
| `vite:extendConfig` | `viteInlineConfig, env` | Allows to extend Vite default config. |
| `vite:configResolved` | `viteInlineConfig, env` | Allows to read the resolved Vite config. |
| `vite:serverCreated` | `viteServer, env` | Called when the Vite server is created. |
| `vite:compiled` | - | Called after Vite server is compiled. |
| `webpack:config` | `webpackConfigs` | Called before configuring the webpack compiler. |
| `webpack:configResolved` | `webpackConfigs` | Allows to read the resolved webpack config. |
| `webpack:compile` | `options` | Called right before compilation. |
| `webpack:compiled` | `options` | Called after resources are loaded. |
| `webpack:change` | `shortPath` | Called on `change` on WebpackBar. |
| `webpack:error` | - | Called on `done` if has errors on WebpackBar. |
| `webpack:done` | - | Called on `allDone` on WebpackBar. |
| `webpack:progress` | `statesArray` | Called on `progress` on WebpackBar. |
## Nitro App Hooks (runtime, server-side)
See [Nitro](https://nitro.unjs.io/guide/plugins#available-hooks){rel="nofollow"} for all available hooks.
| Hook | Arguments | Description | Types |
| ----------------- | ------------------------------------------ | ------------------------------------------- | ------------------------------------------------------------------------------------------------------------------------------------------------------------------------------------------------------------------------------------------------------------------------------------------------------------------------------------------------------------------------------------------------------------------------------------------------------- |
| `dev:ssr-logs` | `{ path, logs }` | Server | Called at the end of a request cycle with an array of server-side logs. |
| `render:response` | `response, { event }` | Called before sending the response. | [response](https://github.com/nuxt/nuxt/blob/71ef8bd3ff207fd51c2ca18d5a8c7140476780c7/packages/nuxt/src/core/runtime/nitro/renderer.ts#L24){rel="nofollow"}, [event](https://github.com/unjs/h3/blob/f6ceb5581043dc4d8b6eab91e9be4531e0c30f8e/src/types.ts#L38){rel="nofollow"} |
| `render:html` | `html, { event }` | Called before constructing the HTML. | [html](https://github.com/nuxt/nuxt/blob/71ef8bd3ff207fd51c2ca18d5a8c7140476780c7/packages/nuxt/src/core/runtime/nitro/renderer.ts#L15){rel="nofollow"}, [event](https://github.com/unjs/h3/blob/f6ceb5581043dc4d8b6eab91e9be4531e0c30f8e/src/types.ts#L38){rel="nofollow"} |
| `render:island` | `islandResponse, { event, islandContext }` | Called before constructing the island HTML. | [islandResponse](https://github.com/nuxt/nuxt/blob/e50cabfed1984c341af0d0c056a325a8aec26980/packages/nuxt/src/core/runtime/nitro/renderer.ts#L28){rel="nofollow"}, [event](https://github.com/unjs/h3/blob/f6ceb5581043dc4d8b6eab91e9be4531e0c30f8e/src/types.ts#L38){rel="nofollow"}, [islandContext](https://github.com/nuxt/nuxt/blob/e50cabfed1984c341af0d0c056a325a8aec26980/packages/nuxt/src/core/runtime/nitro/renderer.ts#L38){rel="nofollow"} |
| `close` | - | Called when Nitro is closed. | - |
| `error` | `error, { event? }` | Called when an error occurs. | [error](https://github.com/nitrojs/nitro/blob/d20ffcbd16fc4003b774445e1a01e698c2bb078a/src/types/runtime/nitro.ts#L48){rel="nofollow"}, [event](https://github.com/unjs/h3/blob/f6ceb5581043dc4d8b6eab91e9be4531e0c30f8e/src/types.ts#L38){rel="nofollow"} |
| `request` | `event` | Called when a request is received. | [event](https://github.com/unjs/h3/blob/f6ceb5581043dc4d8b6eab91e9be4531e0c30f8e/src/types.ts#L38){rel="nofollow"} |
| `beforeResponse` | `event, { body }` | Called before sending the response. | [event](https://github.com/unjs/h3/blob/f6ceb5581043dc4d8b6eab91e9be4531e0c30f8e/src/types.ts#L38){rel="nofollow"}, unknown |
| `afterResponse` | `event, { body }` | Called after sending the response. | [event](https://github.com/unjs/h3/blob/f6ceb5581043dc4d8b6eab91e9be4531e0c30f8e/src/types.ts#L38){rel="nofollow"}, unknown |
# Import meta
## The `import.meta` object
With ES modules you can obtain some metadata from the code that imports or compiles your ES-module.
This is done through `import.meta`, which is an object that provides your code with this information.
Throughout the Nuxt documentation you may see snippets that use this already to figure out whether the
code is currently running on the client or server side.
::read-more
---
to: https://developer.mozilla.org/en-US/docs/Web/JavaScript/Reference/Operators/import.meta
---
Read more about `import.meta`.
::
## Runtime (App) Properties
These values are statically injected and can be used for tree-shaking your runtime code.
| Property | Type | Description |
| ----------------------- | ------- | ---------------------------------------------------------------------------- |
| `import.meta.client` | boolean | True when evaluated on the client side. |
| `import.meta.browser` | boolean | True when evaluated on the client side. |
| `import.meta.server` | boolean | True when evaluated on the server side. |
| `import.meta.nitro` | boolean | True when evaluated on the server side. |
| `import.meta.dev` | boolean | True when running the Nuxt dev server. |
| `import.meta.test` | boolean | True when running in a test context. |
| `import.meta.prerender` | boolean | True when rendering HTML on the server in the prerender stage of your build. |
## Builder Properties
These values are available both in modules and in your `nuxt.config`.
| Property | Type | Description |
| ----------------- | ------ | ------------------------------------- |
| `import.meta.env` | object | Equals `process.env` |
| `import.meta.url` | string | Resolvable path for the current file. |
## Examples
### Using `import.meta.url` to resolve files within modules
```ts [modules/my-module/index.ts]
import { createResolver } from 'nuxt/kit'
// Resolve relative from the current file
const resolver = createResolver(import.meta.url)
export default defineNuxtModule({
meta: { name: 'myModule' },
setup() {
addComponent({
name: 'MyModuleComponent',
// Resolves to '/modules/my-module/components/MyModuleComponent.vue'
filePath: resolver.resolve('./components/MyModuleComponent.vue')
})
}
})
```
# Nuxt Configuration
::note
---
icon: i-simple-icons-github
target: _blank
to: https://github.com/nuxt/nuxt/tree/main/packages/schema/src/config
---
This file is auto-generated from Nuxt source code.
::
## alias
You can improve your DX by defining additional aliases to access custom directories within your JavaScript and CSS.
- **Type**: `object`
- **Default**
```json
{
"~": "/<srcDir>",
"@": "/<srcDir>",
"~~": "/<rootDir>",
"@@": "/<rootDir>",
"#shared": "/<rootDir>/shared",
"assets": "/<srcDir>/assets",
"public": "/<srcDir>/public",
"#build": "/<rootDir>/.nuxt",
"#internal/nuxt/paths": "/<rootDir>/.nuxt/paths.mjs"
}
```
::callout
**Note**: Within a webpack context (image sources, CSS - but not JavaScript) you *must* access
your alias by prefixing it with `~`.
::
::callout
**Note**: These aliases will be automatically added to the generated `.nuxt/tsconfig.json` so you can get full
type support and path auto-complete. In case you need to extend options provided by `./.nuxt/tsconfig.json`
further, make sure to add them here or within the `typescript.tsConfig` property in `nuxt.config`.
::
**Example**:
```js
export default {
alias: {
'images': fileURLToPath(new URL('./assets/images', import.meta.url)),
'style': fileURLToPath(new URL('./assets/style', import.meta.url)),
'data': fileURLToPath(new URL('./assets/other/data', import.meta.url))
}
}
```
## analyzeDir
The directory where Nuxt will store the generated files when running `nuxt analyze`.
If a relative path is specified, it will be relative to your `rootDir`.
- **Type**: `string`
- **Default:** `"/<rootDir>/.nuxt/analyze"`
## app
Nuxt App configuration.
### `baseURL`
The base path of your Nuxt application.
For example:
- **Type**: `string`
- **Default:** `"/"`
**Example**:
```ts
export default defineNuxtConfig({
app: {
baseURL: '/prefix/'
}
})
```
**Example**:
```bash
NUXT_APP_BASE_URL=/prefix/ node .output/server/index.mjs
```
### `buildAssetsDir`
The folder name for the built site assets, relative to `baseURL` (or `cdnURL` if set). This is set at build time and should not be customized at runtime.
- **Type**: `string`
- **Default:** `"/_nuxt/"`
### `cdnURL`
An absolute URL to serve the public folder from (production-only).
For example:
- **Type**: `string`
- **Default:** `""`
**Example**:
```ts
export default defineNuxtConfig({
app: {
cdnURL: 'https://mycdn.org/'
}
})
```
**Example**:
```bash
NUXT_APP_CDN_URL=https://mycdn.org/ node .output/server/index.mjs
```
### `head`
Set default configuration for `<head>` on every page.
- **Type**: `object`
- **Default**
```json
{
"meta": [
{
"name": "viewport",
"content": "width=device-width, initial-scale=1"
},
{
"charset": "utf-8"
}
],
"link": [],
"style": [],
"script": [],
"noscript": []
}
```
**Example**:
```js
app: {
head: {
meta: [
// <meta name="viewport" content="width=device-width, initial-scale=1">
{ name: 'viewport', content: 'width=device-width, initial-scale=1' }
],
script: [
// <script src="https://myawesome-lib.js"></script>
{ src: 'https://awesome-lib.js' }
],
link: [
// <link rel="stylesheet" href="https://myawesome-lib.css">
{ rel: 'stylesheet', href: 'https://awesome-lib.css' }
],
// please note that this is an area that is likely to change
style: [
// <style>:root { color: red }</style>
{ textContent: ':root { color: red }' }
],
noscript: [
// <noscript>JavaScript is required</noscript>
{ textContent: 'JavaScript is required' }
]
}
}
```
### `keepalive`
Default values for KeepAlive configuration between pages.
This can be overridden with `definePageMeta` on an individual page. Only JSON-serializable values are allowed.
- **Type**: `boolean`
- **Default:** `false`
**See**: [Vue KeepAlive](https://vuejs.org/api/built-in-components.html#keepalive){rel="nofollow"}
### `layoutTransition`
Default values for layout transitions.
This can be overridden with `definePageMeta` on an individual page. Only JSON-serializable values are allowed.
- **Type**: `boolean`
- **Default:** `false`
**See**: [Vue Transition docs](https://vuejs.org/api/built-in-components.html#transition){rel="nofollow"}
### `pageTransition`
Default values for page transitions.
This can be overridden with `definePageMeta` on an individual page. Only JSON-serializable values are allowed.
- **Type**: `boolean`
- **Default:** `false`
**See**: [Vue Transition docs](https://vuejs.org/api/built-in-components.html#transition){rel="nofollow"}
### `rootAttrs`
Customize Nuxt root element id.
- **Type**: `object`
- **Default**
```json
{
"id": "__nuxt"
}
```
### `rootId`
Customize Nuxt root element id.
- **Type**: `string`
- **Default:** `"__nuxt"`
### `rootTag`
Customize Nuxt root element tag.
- **Type**: `string`
- **Default:** `"div"`
### `spaLoaderAttrs`
Customize Nuxt Nuxt SpaLoader element attributes.
#### `id`
- **Type**: `string`
- **Default:** `"__nuxt-loader"`
### `spaLoaderTag`
Customize Nuxt SpaLoader element tag.
- **Type**: `string`
- **Default:** `"div"`
### `teleportAttrs`
Customize Nuxt Teleport element attributes.
- **Type**: `object`
- **Default**
```json
{
"id": "teleports"
}
```
### `teleportId`
Customize Nuxt Teleport element id.
- **Type**: `string`
- **Default:** `"teleports"`
### `teleportTag`
Customize Nuxt Teleport element tag.
- **Type**: `string`
- **Default:** `"div"`
### `viewTransition`
Default values for view transitions.
This only has an effect when **experimental** support for View Transitions is [enabled in your nuxt.config file](https://nuxt.com/docs/getting-started/transitions#view-transitions-api-experimental).
This can be overridden with `definePageMeta` on an individual page.
- **Type**: `boolean`
- **Default:** `false`
**See**: [Nuxt View Transition API docs](https://nuxt.com/docs/getting-started/transitions#view-transitions-api-experimental){rel="nofollow"}
## appConfig
Additional app configuration
For programmatic usage and type support, you can directly provide app config with this option. It will be merged with `app.config` file as default value.
### `nuxt`
## appId
For multi-app projects, the unique id of the Nuxt application.
Defaults to `nuxt-app`.
- **Type**: `string`
- **Default:** `"nuxt-app"`
## build
Shared build configuration.
### `analyze`
Nuxt allows visualizing your bundles and how to optimize them.
Set to `true` to enable bundle analysis, or pass an object with options: [for webpack](https://github.com/webpack-contrib/webpack-bundle-analyzer#options-for-plugin){rel="nofollow"} or [for vite](https://github.com/btd/rollup-plugin-visualizer#options){rel="nofollow"}.
- **Type**: `object`
- **Default**
```json
{
"template": "treemap",
"projectRoot": "/<rootDir>",
"filename": "/<rootDir>/.nuxt/analyze/{name}.html"
}
```
**Example**:
```js
analyze: {
analyzerMode: 'static'
}
```
### `templates`
It is recommended to use `addTemplate` from `@nuxt/kit` instead of this option.
- **Type**: `array`
**Example**:
```js
templates: [
{
src: '~/modules/support/plugin.js', // `src` can be absolute or relative
dst: 'support.js', // `dst` is relative to project `.nuxt` dir
}
]
```
### `transpile`
If you want to transpile specific dependencies with Babel, you can add them here. Each item in transpile can be a package name, a function, a string or regex object matching the dependency's file name.
You can also use a function to conditionally transpile. The function will receive an object ({ isDev, isServer, isClient, isModern, isLegacy }).
- **Type**: `array`
**Example**:
```js
transpile: [({ isLegacy }) => isLegacy && 'ky']
```
## buildDir
Define the directory where your built Nuxt files will be placed.
Many tools assume that `.nuxt` is a hidden directory (because it starts with a `.`). If that is a problem, you can use this option to prevent that.
- **Type**: `string`
- **Default:** `"/<rootDir>/.nuxt"`
**Example**:
```js
export default {
buildDir: 'nuxt-build'
}
```
## buildId
A unique identifier matching the build. This may contain the hash of the current state of the project.
- **Type**: `string`
- **Default:** `"9adf8915-ab29-4ac2-9832-80aabe2d6725"`
## builder
The builder to use for bundling the Vue part of your application.
- **Type**: `string`
- **Default:** `"@nuxt/vite-builder"`
## compatibilityDate
Specify a compatibility date for your app.
This is used to control the behavior of presets in Nitro, Nuxt Image and other modules that may change behavior without a major version bump.
We plan to improve the tooling around this feature in the future.
## components
Configure Nuxt component auto-registration.
Any components in the directories configured here can be used throughout your pages, layouts (and other components) without needing to explicitly import them.
- **Type**: `object`
- **Default**
```json
{
"dirs": [
{
"path": "~/components/global",
"global": true
},
"~/components"
]
}
```
**See**: [`components/` directory documentation](https://nuxt.com/docs/guide/directory-structure/components){rel="nofollow"}
## css
You can define the CSS files/modules/libraries you want to set globally (included in every page).
Nuxt will automatically guess the file type by its extension and use the appropriate pre-processor. You will still need to install the required loader if you need to use them.
- **Type**: `array`
**Example**:
```js
css: [
// Load a Node.js module directly (here it's a Sass file).
'bulma',
// CSS file in the project
'~/assets/css/main.css',
// SCSS file in the project
'~/assets/css/main.scss'
]
```
## debug
Set to `true` to enable debug mode.
At the moment, it prints out hook names and timings on the server, and logs hook arguments as well in the browser.
You can also set this to an object to enable specific debug options.
- **Type**: `boolean`
- **Default:** `false`
## dev
Whether Nuxt is running in development mode.
Normally, you should not need to set this.
- **Type**: `boolean`
- **Default:** `false`
## devServer
### `cors`
Set CORS options for the dev server
#### `origin`
- **Type**: `array`
- **Default**
```json
[
{}
]
```
### `host`
Dev server listening host
### `https`
Whether to enable HTTPS.
- **Type**: `boolean`
- **Default:** `false`
**Example**:
```ts
export default defineNuxtConfig({
devServer: {
https: {
key: './server.key',
cert: './server.crt'
}
}
})
```
### `loadingTemplate`
Template to show a loading screen
- **Type**: `function`
### `port`
Dev server listening port
- **Type**: `number`
- **Default:** `3000`
### `url`
Listening dev server URL.
This should not be set directly as it will always be overridden by the dev server with the full URL (for module and internal use).
- **Type**: `string`
- **Default:** `"http://localhost:3000"`
## devServerHandlers
Nitro development-only server handlers.
- **Type**: `array`
**See**: [Nitro server routes documentation](https://nitro.unjs.io/guide/routing){rel="nofollow"}
## devtools
Enable Nuxt DevTools for development.
Breaking changes for devtools might not reflect on the version of Nuxt.
**See**: [Nuxt DevTools](https://devtools.nuxt.com/){rel="nofollow"} for more information.
## dir
Customize default directory structure used by Nuxt.
It is better to stick with defaults unless needed.
### `app`
- **Type**: `string`
- **Default:** `"app"`
### `assets`
The assets directory (aliased as `~assets` in your build).
- **Type**: `string`
- **Default:** `"assets"`
### `layouts`
The layouts directory, each file of which will be auto-registered as a Nuxt layout.
- **Type**: `string`
- **Default:** `"layouts"`
### `middleware`
The middleware directory, each file of which will be auto-registered as a Nuxt middleware.
- **Type**: `string`
- **Default:** `"middleware"`
### `modules`
The modules directory, each file in which will be auto-registered as a Nuxt module.
- **Type**: `string`
- **Default:** `"modules"`
### `pages`
The directory which will be processed to auto-generate your application page routes.
- **Type**: `string`
- **Default:** `"pages"`
### `plugins`
The plugins directory, each file of which will be auto-registered as a Nuxt plugin.
- **Type**: `string`
- **Default:** `"plugins"`
### `public`
The directory containing your static files, which will be directly accessible via the Nuxt server and copied across into your `dist` folder when your app is generated.
- **Type**: `string`
- **Default:** `"public"`
### `shared`
The shared directory. This directory is shared between the app and the server.
- **Type**: `string`
- **Default:** `"shared"`
### `static`
- **Type**: `string`
- **Default:** `"public"`
## esbuild
### `options`
Configure shared esbuild options used within Nuxt and passed to other builders, such as Vite or Webpack.
#### `jsxFactory`
- **Type**: `string`
- **Default:** `"h"`
#### `jsxFragment`
- **Type**: `string`
- **Default:** `"Fragment"`
#### `target`
- **Type**: `string`
- **Default:** `"esnext"`
#### `tsconfigRaw`
- **Type**: `object`
## experimental
### `appManifest`
Use app manifests to respect route rules on client-side.
- **Type**: `boolean`
- **Default:** `true`
### `asyncContext`
Enable native async context to be accessible for nested composables
- **Type**: `boolean`
- **Default:** `false`
**See**: [Nuxt PR #20918](https://github.com/nuxt/nuxt/pull/20918){rel="nofollow"}
### `asyncEntry`
Set to true to generate an async entry point for the Vue bundle (for module federation support).
- **Type**: `boolean`
- **Default:** `false`
### `browserDevtoolsTiming`
Enable timings for Nuxt application hooks in the performance panel of Chromium-based browsers.
This feature adds performance markers for Nuxt hooks, allowing you to track their execution time in the browser's Performance tab. This is particularly useful for debugging performance issues.
- **Type**: `boolean`
- **Default:** `false`
**Example**:
```ts
// nuxt.config.ts
export default defineNuxtConfig({
experimental: {
// Enable performance markers for Nuxt hooks in browser devtools
browserDevtoolsTiming: true
}
})
```
**See**: [PR #29922](https://github.com/nuxt/nuxt/pull/29922){rel="nofollow"}
**See**: [Chrome DevTools Performance API](https://developer.chrome.com/docs/devtools/performance/extension#tracks){rel="nofollow"}
### `buildCache`
Cache Nuxt/Nitro build artifacts based on a hash of the configuration and source files.
This only works for source files within `srcDir` and `serverDir` for the Vue/Nitro parts of your app.
- **Type**: `boolean`
- **Default:** `false`
### `checkOutdatedBuildInterval`
Set the time interval (in ms) to check for new builds. Disabled when `experimental.appManifest` is `false`.
Set to `false` to disable.
- **Type**: `number`
- **Default:** `3600000`
### `clientFallback`
Whether to enable the experimental `<NuxtClientFallback>` component for rendering content on the client if there's an error in SSR.
- **Type**: `boolean`
- **Default:** `false`
### `clientNodeCompat`
Automatically polyfill Node.js imports in the client build using `unenv`.
- **Type**: `boolean`
- **Default:** `false`
**See**: [unenv](https://github.com/unjs/unenv){rel="nofollow"}
### `compileTemplate`
Whether to use `lodash.template` to compile Nuxt templates.
This flag will be removed with the release of v4 and exists only for advance testing within Nuxt v3.12+ or in [the nightly release channel](https://nuxt.com/docs/guide/going-further/nightly-release-channel).
- **Type**: `boolean`
- **Default:** `true`
### `componentIslands`
Experimental component islands support with `<NuxtIsland>` and `.island.vue` files.
By default it is set to 'auto', which means it will be enabled only when there are islands, server components or server pages in your app.
- **Type**: `string`
- **Default:** `"auto"`
### `configSchema`
Config schema support
- **Type**: `boolean`
- **Default:** `true`
**See**: [Nuxt Issue #15592](https://github.com/nuxt/nuxt/issues/15592){rel="nofollow"}
### `cookieStore`
Enables CookieStore support to listen for cookie updates (if supported by the browser) and refresh `useCookie` ref values.
- **Type**: `boolean`
- **Default:** `true`
**See**: [CookieStore](https://developer.mozilla.org/en-US/docs/Web/API/CookieStore){rel="nofollow"}
### `crossOriginPrefetch`
Enable cross-origin prefetch using the Speculation Rules API.
- **Type**: `boolean`
- **Default:** `false`
### `debugModuleMutation`
Record mutations to `nuxt.options` in module context, helping to debug configuration changes made by modules during the Nuxt initialization phase.
When enabled, Nuxt will track which modules modify configuration options, making it easier to trace unexpected configuration changes.
- **Type**: `boolean`
- **Default:** `false`
**Example**:
```ts
// nuxt.config.ts
export default defineNuxtConfig({
experimental: {
// Enable tracking of config mutations by modules
debugModuleMutation: true
}
})
```
**See**: [PR #30555](https://github.com/nuxt/nuxt/pull/30555){rel="nofollow"}
### `decorators`
Enable to use experimental decorators in Nuxt and Nitro.
- **Type**: `boolean`
- **Default:** `false`
**See**: <https://github.com/tc39/proposal-decorators>{rel="nofollow"}
### `defaults`
This allows specifying the default options for core Nuxt components and composables.
These options will likely be moved elsewhere in the future, such as into `app.config` or into the `app/` directory.
#### `nuxtLink`
##### `componentName`
- **Type**: `string`
- **Default:** `"NuxtLink"`
##### `prefetch`
- **Type**: `boolean`
- **Default:** `true`
##### `prefetchOn`
###### `visibility`
- **Type**: `boolean`
- **Default:** `true`
#### `useAsyncData`
Options that apply to `useAsyncData` (and also therefore `useFetch`)
##### `deep`
- **Type**: `boolean`
- **Default:** `true`
##### `errorValue`
- **Type**: `string`
- **Default:** `"null"`
##### `value`
- **Type**: `string`
- **Default:** `"null"`
#### `useFetch`
### `emitRouteChunkError`
Emit `app:chunkError` hook when there is an error loading vite/webpack chunks.
By default, Nuxt will also perform a reload of the new route when a chunk fails to load when navigating to a new route (`automatic`).
Setting `automatic-immediate` will lead Nuxt to perform a reload of the current route right when a chunk fails to load (instead of waiting for navigation).
You can disable automatic handling by setting this to `false`, or handle chunk errors manually by setting it to `manual`.
- **Type**: `string`
- **Default:** `"automatic"`
**See**: [Nuxt PR #19038](https://github.com/nuxt/nuxt/pull/19038){rel="nofollow"}
### `externalVue`
Externalize `vue`, `@vue/*` and `vue-router` when building.
- **Type**: `boolean`
- **Default:** `true`
**See**: [Nuxt Issue #13632](https://github.com/nuxt/nuxt/issues/13632){rel="nofollow"}
### `extraPageMetaExtractionKeys`
Configure additional keys to extract from the page metadata when using `scanPageMeta`.
This allows modules to access additional metadata from the page metadata. It's recommended to augment the NuxtPage types with your keys.
- **Type**: `array`
### `headNext`
Use new experimental head optimisations:
- Add the capo.js head plugin in order to render tags in of the head in a more performant way. - Uses the hash hydration plugin to reduce initial hydration
- **Type**: `boolean`
- **Default:** `true`
**See**: [Nuxt Discussion #22632](https://github.com/nuxt/nuxt/discussions/22632){rel="nofollow"}
### `inlineRouteRules`
Allow defining `routeRules` directly within your `~/pages` directory using `defineRouteRules`.
Rules are converted (based on the path) and applied for server requests. For example, a rule defined in `~/pages/foo/bar.vue` will be applied to `/foo/bar` requests. A rule in `~/pages/foo/[id].vue` will be applied to `/foo/**` requests.
For more control, such as if you are using a custom `path` or `alias` set in the page's `definePageMeta`, you should set `routeRules` directly within your `nuxt.config`.
- **Type**: `boolean`
- **Default:** `false`
### `lazyHydration`
Enable automatic configuration of hydration strategies for `<Lazy>` components.
This feature intelligently determines when to hydrate lazy components based on visibility, idle time, or other triggers, improving performance by deferring hydration of components until they're needed.
- **Type**: `boolean`
- **Default:** `true`
**Example**:
```ts
// nuxt.config.ts
export default defineNuxtConfig({
experimental: {
lazyHydration: true // Enable smart hydration strategies for Lazy components
}
})
// In your Vue components
<template>
<Lazy>
<ExpensiveComponent />
</Lazy>
</template>
```
**See**: [PR #26468](https://github.com/nuxt/nuxt/pull/26468){rel="nofollow"}
### `localLayerAliases`
Resolve `~`, `~~`, `@` and `@@` aliases located within layers with respect to their layer source and root directories.
- **Type**: `boolean`
- **Default:** `true`
### `navigationRepaint`
Wait for a single animation frame before navigation, which gives an opportunity for the browser to repaint, acknowledging user interaction.
It can reduce INP when navigating on prerendered routes.
- **Type**: `boolean`
- **Default:** `true`
### `noVueServer`
Disable vue server renderer endpoint within nitro.
- **Type**: `boolean`
- **Default:** `false`
### `normalizeComponentNames`
Ensure that auto-generated Vue component names match the full component name you would use to auto-import the component.
- **Type**: `boolean`
- **Default:** `false`
### `payloadExtraction`
When this option is enabled (by default) payload of pages that are prerendered are extracted
- **Type**: `boolean`
- **Default:** `true`
### `polyfillVueUseHead`
Whether or not to add a compatibility layer for modules, plugins or user code relying on the old `@vueuse/head` API.
This is disabled to reduce the client-side bundle by \~0.5kb.
- **Type**: `boolean`
- **Default:** `false`
### `purgeCachedData`
Whether to clean up Nuxt static and asyncData caches on route navigation.
Nuxt will automatically purge cached data from `useAsyncData` and `nuxtApp.static.data`. This helps prevent memory leaks and ensures fresh data is loaded when needed, but it is possible to disable it.
- **Type**: `boolean`
- **Default:** `true`
**Example**:
```ts
// nuxt.config.ts
export default defineNuxtConfig({
experimental: {
// Disable automatic cache cleanup (default is true)
purgeCachedData: false
}
})
```
**See**: [PR #31379](https://github.com/nuxt/nuxt/pull/31379){rel="nofollow"}
### `relativeWatchPaths`
Whether to provide relative paths in the `builder:watch` hook.
This flag will be removed with the release of v4 and exists only for advance testing within Nuxt v3.12+ or in [the nightly release channel](https://nuxt.com/docs/guide/going-further/nightly-release-channel).
- **Type**: `boolean`
- **Default:** `true`
### `renderJsonPayloads`
Render JSON payloads with support for revivifying complex types.
- **Type**: `boolean`
- **Default:** `true`
### `resetAsyncDataToUndefined`
Whether `clear` and `clearNuxtData` should reset async data to its *default* value or update it to `null`/`undefined`.
- **Type**: `boolean`
- **Default:** `true`
### `respectNoSSRHeader`
Allow disabling Nuxt SSR responses by setting the `x-nuxt-no-ssr` header.
- **Type**: `boolean`
- **Default:** `false`
### `restoreState`
Whether to restore Nuxt app state from `sessionStorage` when reloading the page after a chunk error or manual `reloadNuxtApp()` call.
To avoid hydration errors, it will be applied only after the Vue app has been mounted, meaning there may be a flicker on initial load.
Consider carefully before enabling this as it can cause unexpected behavior, and consider providing explicit keys to `useState` as auto-generated keys may not match across builds.
- **Type**: `boolean`
- **Default:** `false`
### `scanPageMeta`
Allow exposing some route metadata defined in `definePageMeta` at build-time to modules (alias, name, path, redirect).
This only works with static or strings/arrays rather than variables or conditional assignment.
- **Type**: `boolean`
- **Default:** `true`
**See**: [Nuxt Issues #24770](https://github.com/nuxt/nuxt/issues/24770){rel="nofollow"}
### `sharedPrerenderData`
Automatically share payload *data* between pages that are prerendered. This can result in a significant performance improvement when prerendering sites that use `useAsyncData` or `useFetch` and fetch the same data in different pages.
It is particularly important when enabling this feature to make sure that any unique key of your data is always resolvable to the same data. For example, if you are using `useAsyncData` to fetch data related to a particular page, you should provide a key that uniquely matches that data. (`useFetch` should do this automatically for you.)
- **Type**: `boolean`
- **Default:** `false`
**Example**:
```ts
// This would be unsafe in a dynamic page (e.g. `[slug].vue`) because the route slug makes a difference
// to the data fetched, but Nuxt can't know that because it's not reflected in the key.
const route = useRoute()
const { data } = await useAsyncData(async () => {
return await $fetch(`/api/my-page/${route.params.slug}`)
})
// Instead, you should use a key that uniquely identifies the data fetched.
const { data } = await useAsyncData(route.params.slug, async () => {
return await $fetch(`/api/my-page/${route.params.slug}`)
})
```
### `spaLoadingTemplateLocation`
Keep showing the spa-loading-template until suspense\:resolve
- **Type**: `string`
- **Default:** `"within"`
**See**: [Nuxt Issues #24770](https://github.com/nuxt/nuxt/issues/21721){rel="nofollow"}
### `templateImportResolution`
Disable resolving imports into Nuxt templates from the path of the module that added the template.
By default, Nuxt attempts to resolve imports in templates relative to the module that added them. Setting this to `false` disables this behavior, which may be useful if you're experiencing resolution conflicts in certain environments.
- **Type**: `boolean`
- **Default:** `true`
**Example**:
```ts
// nuxt.config.ts
export default defineNuxtConfig({
experimental: {
// Disable template import resolution from module path
templateImportResolution: false
}
})
```
**See**: [PR #31175](https://github.com/nuxt/nuxt/pull/31175){rel="nofollow"}
### `templateRouteInjection`
By default the route object returned by the auto-imported `useRoute()` composable is kept in sync with the current page in view in `<NuxtPage>`. This is not true for `vue-router`'s exported `useRoute` or for the default `$route` object available in your Vue templates.
By enabling this option a mixin will be injected to keep the `$route` template object in sync with Nuxt's managed `useRoute()`.
- **Type**: `boolean`
- **Default:** `true`
### `templateUtils`
Whether to provide a legacy `templateUtils` object (with `serialize`, `importName` and `importSources`) when compiling Nuxt templates.
This flag will be removed with the release of v4 and exists only for advance testing within Nuxt v3.12+ or in [the nightly release channel](https://nuxt.com/docs/guide/going-further/nightly-release-channel).
- **Type**: `boolean`
- **Default:** `true`
### `treeshakeClientOnly`
Tree shakes contents of client-only components from server bundle.
- **Type**: `boolean`
- **Default:** `true`
**See**: [Nuxt PR #5750](https://github.com/nuxt/framework/pull/5750){rel="nofollow"}
### `typedPages`
Enable the new experimental typed router using [unplugin-vue-router](https://github.com/posva/unplugin-vue-router){rel="nofollow"}.
- **Type**: `boolean`
- **Default:** `false`
### `viewTransition`
Enable View Transition API integration with client-side router.
- **Type**: `boolean`
- **Default:** `false`
**See**: [View Transitions API](https://developer.chrome.com/docs/web-platform/view-transitions){rel="nofollow"}
### `watcher`
Set an alternative watcher that will be used as the watching service for Nuxt.
Nuxt uses 'chokidar-granular' if your source directory is the same as your root directory . This will ignore top-level directories (like `node_modules` and `.git`) that are excluded from watching.
You can set this instead to `parcel` to use `@parcel/watcher`, which may improve performance in large projects or on Windows platforms.
You can also set this to `chokidar` to watch all files in your source directory.
- **Type**: `string`
- **Default:** `"chokidar"`
**See**: [chokidar](https://github.com/paulmillr/chokidar){rel="nofollow"}
**See**: [@parcel/watcher](https://github.com/parcel-bundler/watcher){rel="nofollow"}
### `writeEarlyHints`
Write early hints when using node server.
- **Type**: `boolean`
- **Default:** `false`
::callout
**Note**: nginx does not support 103 Early hints in the current version.
::
## extends
Extend project from multiple local or remote sources.
Value should be either a string or array of strings pointing to source directories or config path relative to current config.
You can use `github:`, `gh:` `gitlab:` or `bitbucket:`
**See**: [`c12` docs on extending config layers](https://github.com/unjs/c12#extending-config-layer-from-remote-sources){rel="nofollow"}
**See**: [`giget` documentation](https://github.com/unjs/giget){rel="nofollow"}
## extensions
The extensions that should be resolved by the Nuxt resolver.
- **Type**: `array`
- **Default**
```json
[
".js",
".jsx",
".mjs",
".ts",
".tsx",
".vue"
]
```
## features
Some features of Nuxt are available on an opt-in basis, or can be disabled based on your needs.
### `devLogs`
Stream server logs to the client as you are developing. These logs can be handled in the `dev:ssr-logs` hook.
If set to `silent`, the logs will not be printed to the browser console.
- **Type**: `boolean`
- **Default:** `false`
### `inlineStyles`
Inline styles when rendering HTML (currently vite only).
You can also pass a function that receives the path of a Vue component and returns a boolean indicating whether to inline the styles for that component.
- **Type**: `boolean`
- **Default:** `true`
### `noScripts`
Turn off rendering of Nuxt scripts and JS resource hints. You can also disable scripts more granularly within `routeRules`.
- **Type**: `boolean`
- **Default:** `false`
## future
`future` is for early opting-in to new features that will become default in a future (possibly major) version of the framework.
### `compatibilityVersion`
Enable early access to Nuxt v4 features or flags.
Setting `compatibilityVersion` to `4` changes defaults throughout your Nuxt configuration, but you can granularly re-enable Nuxt v3 behaviour when testing (see example). Please file issues if so, so that we can address in Nuxt or in the ecosystem.
- **Type**: `number`
- **Default:** `3`
**Example**:
```ts
export default defineNuxtConfig({
future: {
compatibilityVersion: 4,
},
// To re-enable _all_ Nuxt v3 behaviour, set the following options:
srcDir: '.',
dir: {
app: 'app'
},
experimental: {
compileTemplate: true,
templateUtils: true,
relativeWatchPaths: true,
resetAsyncDataToUndefined: true,
defaults: {
useAsyncData: {
deep: true
}
}
},
unhead: {
renderSSRHeadOptions: {
omitLineBreaks: false
}
}
})
```
### `multiApp`
This enables early access to the experimental multi-app support.
- **Type**: `boolean`
- **Default:** `false`
**See**: [Nuxt Issue #21635](https://github.com/nuxt/nuxt/issues/21635){rel="nofollow"}
### `typescriptBundlerResolution`
This enables 'Bundler' module resolution mode for TypeScript, which is the recommended setting for frameworks like Nuxt and Vite.
It improves type support when using modern libraries with `exports`.
You can set it to false to use the legacy 'Node' mode, which is the default for TypeScript.
- **Type**: `boolean`
- **Default:** `true`
**See**: [TypeScript PR implementing `bundler` module resolution](https://github.com/microsoft/TypeScript/pull/51669){rel="nofollow"}
## generate
### `exclude`
This option is no longer used. Instead, use `nitro.prerender.ignore`.
- **Type**: `array`
### `routes`
The routes to generate.
If you are using the crawler, this will be only the starting point for route generation. This is often necessary when using dynamic routes.
It is preferred to use `nitro.prerender.routes`.
- **Type**: `array`
**Example**:
```js
routes: ['/users/1', '/users/2', '/users/3']
```
## hooks
Hooks are listeners to Nuxt events that are typically used in modules, but are also available in `nuxt.config`.
Internally, hooks follow a naming pattern using colons (e.g., build\:done).
For ease of configuration, you can also structure them as an hierarchical object in `nuxt.config` (as below).
**Example**:
```js
import fs from 'node:fs'
import path from 'node:path'
export default {
hooks: {
build: {
done(builder) {
const extraFilePath = path.join(
builder.nuxt.options.buildDir,
'extra-file'
)
fs.writeFileSync(extraFilePath, 'Something extra')
}
}
}
}
```
## ignore
More customizable than `ignorePrefix`: all files matching glob patterns specified inside the `ignore` array will be ignored in building.
- **Type**: `array`
- **Default**
```json
[
"**/*.stories.{js,cts,mts,ts,jsx,tsx}",
"**/*.{spec,test}.{js,cts,mts,ts,jsx,tsx}",
"**/*.d.{cts,mts,ts}",
"**/.{pnpm-store,vercel,netlify,output,git,cache,data}",
"**/*.sock",
".nuxt/analyze",
".nuxt",
"**/-*.*"
]
```
## ignoreOptions
Pass options directly to `node-ignore` (which is used by Nuxt to ignore files).
**See**: [node-ignore](https://github.com/kaelzhang/node-ignore){rel="nofollow"}
**Example**:
```js
ignoreOptions: {
ignorecase: false
}
```
## ignorePrefix
Any file in `pages/`, `layouts/`, `middleware/`, and `public/` directories will be ignored during the build process if its filename starts with the prefix specified by `ignorePrefix`. This is intended to prevent certain files from being processed or served in the built application. By default, the `ignorePrefix` is set to '-', ignoring any files starting with '-'.
- **Type**: `string`
- **Default:** `"-"`
## imports
Configure how Nuxt auto-imports composables into your application.
**See**: [Nuxt documentation](https://nuxt.com/docs/guide/directory-structure/composables){rel="nofollow"}
### `dirs`
An array of custom directories that will be auto-imported. Note that this option will not override the default directories (\~/composables, \~/utils).
- **Type**: `array`
**Example**:
```js
imports: {
// Auto-import pinia stores defined in `~/stores`
dirs: ['stores']
}
```
### `global`
- **Type**: `boolean`
- **Default:** `false`
### `scan`
Whether to scan your `composables/` and `utils/` directories for composables to auto-import. Auto-imports registered by Nuxt or other modules, such as imports from `vue` or `nuxt`, will still be enabled.
- **Type**: `boolean`
- **Default:** `true`
## logLevel
Log level when building logs.
Defaults to 'silent' when running in CI or when a TTY is not available. This option is then used as 'silent' in Vite and 'none' in Webpack
- **Type**: `string`
- **Default:** `"info"`
## modules
Modules are Nuxt extensions which can extend its core functionality and add endless integrations.
Each module is either a string (which can refer to a package, or be a path to a file), a tuple with the module as first string and the options as a second object, or an inline module function.
Nuxt tries to resolve each item in the modules array using node require path (in `node_modules`) and then will be resolved from project `srcDir` if `~` alias is used.
- **Type**: `array`
::callout
**Note**: Modules are executed sequentially so the order is important. First, the modules defined in `nuxt.config.ts` are loaded. Then, modules found in the `modules/`
directory are executed, and they load in alphabetical order.
::
**Example**:
```js
modules: [
// Using package name
'@nuxtjs/axios',
// Relative to your project srcDir
'~/modules/awesome.js',
// Providing options
['@nuxtjs/google-analytics', { ua: 'X1234567' }],
// Inline definition
function () {}
]
```
## modulesDir
Used to set the modules directories for path resolving (for example, webpack's `resolveLoading`, `nodeExternals` and `postcss`).
The configuration path is relative to `options.rootDir` (default is current working directory).
Setting this field may be necessary if your project is organized as a yarn workspace-styled mono-repository.
- **Type**: `array`
- **Default**
```json
[
"/<rootDir>/node_modules"
]
```
**Example**:
```js
export default {
modulesDir: ['../../node_modules']
}
```
## nitro
Configuration for Nitro.
**See**: [Nitro configuration docs](https://nitro.unjs.io/config/){rel="nofollow"}
### `routeRules`
- **Type**: `object`
### `runtimeConfig`
- **Type**: `object`
- **Default**
```json
{
"public": {},
"app": {
"buildId": "9adf8915-ab29-4ac2-9832-80aabe2d6725",
"baseURL": "/",
"buildAssetsDir": "/_nuxt/",
"cdnURL": ""
},
"nitro": {
"envPrefix": "NUXT_"
}
}
```
## optimization
Build time optimization configuration.
### `asyncTransforms`
Options passed directly to the transformer from `unctx` that preserves async context after `await`.
#### `asyncFunctions`
- **Type**: `array`
- **Default**
```json
[
"defineNuxtPlugin",
"defineNuxtRouteMiddleware"
]
```
#### `objectDefinitions`
##### `defineNuxtComponent`
- **Type**: `array`
- **Default**
```json
[
"asyncData",
"setup"
]
```
##### `defineNuxtPlugin`
- **Type**: `array`
- **Default**
```json
[
"setup"
]
```
##### `definePageMeta`
- **Type**: `array`
- **Default**
```json
[
"middleware",
"validate"
]
```
### `keyedComposables`
Functions to inject a key for.
As long as the number of arguments passed to the function is less than `argumentLength`, an additional magic string will be injected that can be used to deduplicate requests between server and client. You will need to take steps to handle this additional key.
The key will be unique based on the location of the function being invoked within the file.
- **Type**: `array`
- **Default**
```json
[
{
"name": "callOnce",
"argumentLength": 3
},
{
"name": "defineNuxtComponent",
"argumentLength": 2
},
{
"name": "useState",
"argumentLength": 2
},
{
"name": "useFetch",
"argumentLength": 3
},
{
"name": "useAsyncData",
"argumentLength": 3
},
{
"name": "useLazyAsyncData",
"argumentLength": 3
},
{
"name": "useLazyFetch",
"argumentLength": 3
}
]
```
### `treeShake`
Tree shake code from specific builds.
#### `composables`
Tree shake composables from the server or client builds.
**Example**:
```js
treeShake: { client: { myPackage: ['useServerOnlyComposable'] } }
```
##### `client`
- **Type**: `object`
- **Default**
```json
{
"vue": [
"onRenderTracked",
"onRenderTriggered",
"onServerPrefetch"
],
"#app": [
"definePayloadReducer",
"definePageMeta",
"onPrehydrate"
]
}
```
##### `server`
- **Type**: `object`
- **Default**
```json
{
"vue": [
"onMounted",
"onUpdated",
"onUnmounted",
"onBeforeMount",
"onBeforeUpdate",
"onBeforeUnmount",
"onRenderTracked",
"onRenderTriggered",
"onActivated",
"onDeactivated"
],
"#app": [
"definePayloadReviver",
"definePageMeta"
]
}
```
## pages
Whether to use the vue-router integration in Nuxt 3. If you do not provide a value it will be enabled if you have a `pages/` directory in your source folder.
Additionally, you can provide a glob pattern or an array of patterns to scan only certain files for pages.
**Example**:
```js
pages: {
pattern: ['**\/*\/*.vue', '!**\/*.spec.*'],
}
```
## plugins
An array of nuxt app plugins.
Each plugin can be a string (which can be an absolute or relative path to a file). If it ends with `.client` or `.server` then it will be automatically loaded only in the appropriate context.
It can also be an object with `src` and `mode` keys.
- **Type**: `array`
::callout
**Note**: Plugins are also auto-registered from the `~/plugins` directory
and these plugins do not need to be listed in `nuxt.config` unless you
need to customize their order. All plugins are deduplicated by their src path.
::
**See**: [`plugins/` directory documentation](https://nuxt.com/docs/guide/directory-structure/plugins){rel="nofollow"}
**Example**:
```js
plugins: [
'~/plugins/foo.client.js', // only in client side
'~/plugins/bar.server.js', // only in server side
'~/plugins/baz.js', // both client & server
{ src: '~/plugins/both-sides.js' },
{ src: '~/plugins/client-only.js', mode: 'client' }, // only on client side
{ src: '~/plugins/server-only.js', mode: 'server' } // only on server side
]
```
## postcss
### `order`
A strategy for ordering PostCSS plugins.
- **Type**: `function`
### `plugins`
Options for configuring PostCSS plugins.
**See**: [PostCSS docs](https://postcss.org/){rel="nofollow"}
#### `autoprefixer`
Plugin to parse CSS and add vendor prefixes to CSS rules.
**See**: [`autoprefixer`](https://github.com/postcss/autoprefixer){rel="nofollow"}
#### `cssnano`
- **Type**: `object`
**See**: [`cssnano` configuration options](https://cssnano.github.io/cssnano/docs/config-file/#configuration-options){rel="nofollow"}
## rootDir
Define the root directory of your application.
This property can be overwritten (for example, running `nuxt ./my-app/` will set the `rootDir` to the absolute path of `./my-app/` from the current/working directory.
It is normally not needed to configure this option.
- **Type**: `string`
- **Default:** `"/<rootDir>"`
## routeRules
Global route options applied to matching server routes.
**Experimental**: This is an experimental feature and API may change in the future.
**See**: [Nitro route rules documentation](https://nitro.unjs.io/config/#routerules){rel="nofollow"}
## router
### `options`
Additional router options passed to `vue-router`. On top of the options for `vue-router`, Nuxt offers additional options to customize the router (see below).
::callout
**Note**: Only JSON serializable options should be passed by Nuxt config.
For more control, you can use `app/router.options.ts` file.
::
**See**: [Vue Router documentation](https://router.vuejs.org/api/interfaces/routeroptions.html){rel="nofollow"}.
#### `hashMode`
You can enable hash history in SPA mode. In this mode, router uses a hash character (#) before the actual URL that is internally passed. When enabled, the **URL is never sent to the server** and **SSR is not supported**.
- **Type**: `boolean`
- **Default:** `false`
**Default**: false
#### `scrollBehaviorType`
Customize the scroll behavior for hash links.
- **Type**: `string`
- **Default:** `"auto"`
**Default**: 'auto'
## runtimeConfig
Runtime config allows passing dynamic config and environment variables to the Nuxt app context.
The value of this object is accessible from server only using `useRuntimeConfig`.
It mainly should hold *private* configuration which is not exposed on the frontend. This could include a reference to your API secret tokens.
Anything under `public` and `app` will be exposed to the frontend as well.
Values are automatically replaced by matching env variables at runtime, e.g. setting an environment variable `NUXT_API_KEY=my-api-key NUXT_PUBLIC_BASE_URL=/foo/` would overwrite the two values in the example below.
- **Type**: `object`
- **Default**
```json
{
"public": {},
"app": {
"buildId": "9adf8915-ab29-4ac2-9832-80aabe2d6725",
"baseURL": "/",
"buildAssetsDir": "/_nuxt/",
"cdnURL": ""
}
}
```
**Example**:
```js
export default {
runtimeConfig: {
apiKey: '', // Default to an empty string, automatically set at runtime using process.env.NUXT_API_KEY
public: {
baseURL: '' // Exposed to the frontend as well.
}
}
}
```
## serverDir
Define the server directory of your Nuxt application, where Nitro routes, middleware and plugins are kept.
If a relative path is specified, it will be relative to your `rootDir`.
- **Type**: `string`
- **Default:** `"/<srcDir>/server"`
## serverHandlers
Nitro server handlers.
Each handler accepts the following options:
- handler: The path to the file defining the handler. - route: The route under which the handler is available. This follows the conventions of [rou3](https://github.com/unjs/rou3){rel="nofollow"}. - method: The HTTP method of requests that should be handled. - middleware: Specifies whether it is a middleware handler. - lazy: Specifies whether to use lazy loading to import the handler.
- **Type**: `array`
**See**: [`server/` directory documentation](https://nuxt.com/docs/guide/directory-structure/server){rel="nofollow"}
::callout
**Note**: Files from `server/api`, `server/middleware` and `server/routes` will be automatically registered by Nuxt.
::
**Example**:
```js
serverHandlers: [
{ route: '/path/foo/**:name', handler: '~/server/foohandler.ts' }
]
```
## sourcemap
Configures whether and how sourcemaps are generated for server and/or client bundles.
If set to a single boolean, that value applies to both server and client. Additionally, the `'hidden'` option is also available for both server and client.
Available options for both client and server: - `true`: Generates sourcemaps and includes source references in the final bundle. - `false`: Does not generate any sourcemaps. - `'hidden'`: Generates sourcemaps but does not include references in the final bundle.
- **Type**: `object`
- **Default**
```json
{
"server": true,
"client": false
}
```
## spaLoadingTemplate
Boolean or a path to an HTML file with the contents of which will be inserted into any HTML page rendered with `ssr: false`.
- If it is unset, it will use `~/app/spa-loading-template.html` file in one of your layers, if it exists. - If it is false, no SPA loading indicator will be loaded. - If true, Nuxt will look for `~/app/spa-loading-template.html` file in one of your layers, or a
default Nuxt image will be used.
Some good sources for spinners are [SpinKit](https://github.com/tobiasahlin/SpinKit){rel="nofollow"} or [SVG Spinners](https://icones.js.org/collection/svg-spinners){rel="nofollow"}.
- **Default:** `null`
**Example**: \~/app/spa-loading-template.html
```html
<!-- https://github.com/barelyhuman/snips/blob/dev/pages/css-loader.md -->
<div class="loader"></div>
<style>
.loader {
display: block;
position: fixed;
z-index: 1031;
top: 50%;
left: 50%;
transform: translate(-50%, -50%);
width: 18px;
height: 18px;
box-sizing: border-box;
border: solid 2px transparent;
border-top-color: #000;
border-left-color: #000;
border-bottom-color: #efefef;
border-right-color: #efefef;
border-radius: 50%;
-webkit-animation: loader 400ms linear infinite;
animation: loader 400ms linear infinite;
}
@-webkit-keyframes loader {
0% {
-webkit-transform: translate(-50%, -50%) rotate(0deg);
}
100% {
-webkit-transform: translate(-50%, -50%) rotate(360deg);
}
}
@keyframes loader {
0% {
transform: translate(-50%, -50%) rotate(0deg);
}
100% {
transform: translate(-50%, -50%) rotate(360deg);
}
}
</style>
```
## srcDir
Define the source directory of your Nuxt application.
If a relative path is specified, it will be relative to the `rootDir`.
- **Type**: `string`
- **Default:** `"/<srcDir>"`
**Example**:
```js
export default {
srcDir: 'src/'
}
```
This would work with the following folder structure:
```bash
-| app/
---| node_modules/
---| nuxt.config.js
---| package.json
---| src/
------| assets/
------| components/
------| layouts/
------| middleware/
------| pages/
------| plugins/
------| public/
------| store/
------| server/
------| app.config.ts
------| app.vue
------| error.vue
```
## ssr
Whether to enable rendering of HTML - either dynamically (in server mode) or at generate time. If set to `false` generated pages will have no content.
- **Type**: `boolean`
- **Default:** `true`
## telemetry
Manually disable nuxt telemetry.
**See**: [Nuxt Telemetry](https://github.com/nuxt/telemetry){rel="nofollow"} for more information.
## test
Whether your app is being unit tested.
- **Type**: `boolean`
- **Default:** `false`
## theme
Extend project from a local or remote source.
Value should be a string pointing to source directory or config path relative to current config.
You can use `github:`, `gitlab:`, `bitbucket:` or `https://` to extend from a remote git repository.
- **Type**: `string`
## typescript
Configuration for Nuxt's TypeScript integration.
### `builder`
Which builder types to include for your project.
By default Nuxt infers this based on your `builder` option (defaulting to 'vite') but you can either turn off builder environment types (with `false`) to handle this fully yourself, or opt for a 'shared' option.
The 'shared' option is advised for module authors, who will want to support multiple possible builders.
- **Default:** `null`
### `hoist`
Modules to generate deep aliases for within `compilerOptions.paths`. This does not yet support subpaths. It may be necessary when using Nuxt within a pnpm monorepo with `shamefully-hoist=false`.
- **Type**: `array`
- **Default**
```json
[
"nitropack/types",
"nitropack/runtime",
"nitropack",
"defu",
"h3",
"consola",
"ofetch",
"@unhead/vue",
"@nuxt/devtools",
"vue",
"@vue/runtime-core",
"@vue/compiler-sfc",
"vue-router",
"vue-router/auto-routes",
"unplugin-vue-router/client",
"@nuxt/schema",
"nuxt"
]
```
### `includeWorkspace`
Include parent workspace in the Nuxt project. Mostly useful for themes and module authors.
- **Type**: `boolean`
- **Default:** `false`
### `shim`
Generate a `*.vue` shim.
We recommend instead letting the [official Vue extension](https://marketplace.visualstudio.com/items?itemName=Vue.volar){rel="nofollow"} generate accurate types for your components.
Note that you may wish to set this to `true` if you are using other libraries, such as ESLint, that are unable to understand the type of `.vue` files.
- **Type**: `boolean`
- **Default:** `false`
### `strict`
TypeScript comes with certain checks to give you more safety and analysis of your program. Once you’ve converted your codebase to TypeScript, you can start enabling these checks for greater safety. [Read More](https://www.typescriptlang.org/docs/handbook/migrating-from-javascript.html#getting-stricter-checks){rel="nofollow"}
- **Type**: `boolean`
- **Default:** `true`
### `tsConfig`
You can extend generated `.nuxt/tsconfig.json` using this option.
### `typeCheck`
Enable build-time type checking.
If set to true, this will type check in development. You can restrict this to build-time type checking by setting it to `build`. Requires to install `typescript` and `vue-tsc` as dev dependencies.
- **Type**: `boolean`
- **Default:** `false`
**See**: [Nuxt TypeScript docs](https://nuxt.com/docs/guide/concepts/typescript){rel="nofollow"}
## unhead
An object that allows us to configure the `unhead` nuxt module.
### `legacy`
Enable the legacy compatibility mode for `unhead` module. This applies the following changes: - Disables Capo.js sorting - Adds the `DeprecationsPlugin`: supports `hid`, `vmid`, `children`, `body` - Adds the `PromisesPlugin`: supports promises as input
- **Type**: `boolean`
- **Default:** `false`
**See**: [`unhead` migration documentation](https://unhead.unjs.io/docs/typescript/head/guides/get-started/migration){rel="nofollow"}
**Example**:
```ts
export default defineNuxtConfig({
unhead: {
legacy: true
})
```
### `renderSSRHeadOptions`
An object that will be passed to `renderSSRHead` to customize the output.
- **Type**: `object`
- **Default**
```json
{
"omitLineBreaks": false
}
```
**Example**:
```ts
export default defineNuxtConfig({
unhead: {
renderSSRHeadOptions: {
omitLineBreaks: true
}
})
```
## vite
Configuration that will be passed directly to Vite.
**See**: [Vite configuration docs](https://vite.dev/config){rel="nofollow"} for more information.
Please note that not all vite options are supported in Nuxt.
### `build`
#### `assetsDir`
- **Type**: `string`
- **Default:** `"_nuxt/"`
#### `emptyOutDir`
- **Type**: `boolean`
- **Default:** `false`
### `cacheDir`
- **Type**: `string`
- **Default:** `"/<rootDir>/node_modules/.cache/vite"`
### `clearScreen`
- **Type**: `boolean`
- **Default:** `true`
### `define`
- **Type**: `object`
- **Default**
```json
{
"__VUE_PROD_HYDRATION_MISMATCH_DETAILS__": false,
"process.dev": false,
"import.meta.dev": false,
"process.test": false,
"import.meta.test": false
}
```
### `esbuild`
- **Type**: `object`
- **Default**
```json
{
"target": "esnext",
"jsxFactory": "h",
"jsxFragment": "Fragment",
"tsconfigRaw": {}
}
```
### `mode`
- **Type**: `string`
- **Default:** `"production"`
### `optimizeDeps`
#### `esbuildOptions`
- **Type**: `object`
- **Default**
```json
{
"target": "esnext",
"jsxFactory": "h",
"jsxFragment": "Fragment",
"tsconfigRaw": {}
}
```
#### `exclude`
- **Type**: `array`
- **Default**
```json
[
"vue-demi"
]
```
### `publicDir`
### `resolve`
#### `extensions`
- **Type**: `array`
- **Default**
```json
[
".mjs",
".js",
".ts",
".jsx",
".tsx",
".json",
".vue"
]
```
### `root`
- **Type**: `string`
- **Default:** `"/<srcDir>"`
### `server`
#### `fs`
##### `allow`
- **Type**: `array`
- **Default**
```json
[
"/<rootDir>/.nuxt",
"/<srcDir>",
"/<rootDir>",
"/<workspaceDir>",
"/<rootDir>/node_modules"
]
```
### `vue`
#### `features`
##### `propsDestructure`
- **Type**: `boolean`
- **Default:** `true`
#### `isProduction`
- **Type**: `boolean`
- **Default:** `true`
#### `script`
##### `hoistStatic`
#### `template`
##### `compilerOptions`
- **Type**: `object`
##### `transformAssetUrls`
- **Type**: `object`
- **Default**
```json
{
"video": [
"src",
"poster"
],
"source": [
"src"
],
"img": [
"src"
],
"image": [
"xlink:href",
"href"
],
"use": [
"xlink:href",
"href"
]
}
```
### `vueJsx`
- **Type**: `object`
- **Default**
```json
{
"isCustomElement": {
"$schema": {
"title": "",
"description": "",
"tags": []
}
}
}
```
## vue
Vue.js config
### `compilerOptions`
Options for the Vue compiler that will be passed at build time.
**See**: [Vue documentation](https://vuejs.org/api/application.html#app-config-compileroptions){rel="nofollow"}
### `config`
It is possible to pass configure the Vue app globally. Only serializable options may be set in your `nuxt.config`. All other options should be set at runtime in a Nuxt plugin..
**See**: [Vue app config documentation](https://vuejs.org/api/application.html#app-config){rel="nofollow"}
### `propsDestructure`
Enable reactive destructure for `defineProps`
- **Type**: `boolean`
- **Default:** `true`
### `runtimeCompiler`
Include Vue compiler in runtime bundle.
- **Type**: `boolean`
- **Default:** `false`
### `transformAssetUrls`
#### `image`
- **Type**: `array`
- **Default**
```json
[
"xlink:href",
"href"
]
```
#### `img`
- **Type**: `array`
- **Default**
```json
[
"src"
]
```
#### `source`
- **Type**: `array`
- **Default**
```json
[
"src"
]
```
#### `use`
- **Type**: `array`
- **Default**
```json
[
"xlink:href",
"href"
]
```
#### `video`
- **Type**: `array`
- **Default**
```json
[
"src",
"poster"
]
```
## watch
The watch property lets you define patterns that will restart the Nuxt dev server when changed.
It is an array of strings or regular expressions. Strings should be either absolute paths or relative to the `srcDir` (and the `srcDir` of any layers). Regular expressions will be matched against the path relative to the project `srcDir` (and the `srcDir` of any layers).
- **Type**: `array`
## watchers
The watchers property lets you overwrite watchers configuration in your `nuxt.config`.
### `chokidar`
Options to pass directly to `chokidar`.
**See**: [chokidar](https://github.com/paulmillr/chokidar#api){rel="nofollow"}
#### `ignoreInitial`
- **Type**: `boolean`
- **Default:** `true`
#### `ignorePermissionErrors`
- **Type**: `boolean`
- **Default:** `true`
### `rewatchOnRawEvents`
An array of event types, which, when received, will cause the watcher to restart.
### `webpack`
`watchOptions` to pass directly to webpack.
**See**: [webpack@4 watch options](https://v4.webpack.js.org/configuration/watch/#watchoptions){rel="nofollow"}.
#### `aggregateTimeout`
- **Type**: `number`
- **Default:** `1000`
## webpack
### `aggressiveCodeRemoval`
Hard-replaces `typeof process`, `typeof window` and `typeof document` to tree-shake bundle.
- **Type**: `boolean`
- **Default:** `false`
### `analyze`
Nuxt uses `webpack-bundle-analyzer` to visualize your bundles and how to optimize them.
Set to `true` to enable bundle analysis, or pass an object with options: [for webpack](https://github.com/webpack-contrib/webpack-bundle-analyzer#options-for-plugin){rel="nofollow"} or [for vite](https://github.com/btd/rollup-plugin-visualizer#options){rel="nofollow"}.
- **Type**: `object`
- **Default**
```json
{
"template": "treemap",
"projectRoot": "/<rootDir>",
"filename": "/<rootDir>/.nuxt/analyze/{name}.html"
}
```
**Example**:
```js
analyze: {
analyzerMode: 'static'
}
```
### `cssSourceMap`
Enables CSS source map support (defaults to `true` in development).
- **Type**: `boolean`
- **Default:** `false`
### `devMiddleware`
See [webpack-dev-middleware](https://github.com/webpack/webpack-dev-middleware){rel="nofollow"} for available options.
#### `stats`
- **Type**: `string`
- **Default:** `"none"`
### `experiments`
Configure [webpack experiments](https://webpack.js.org/configuration/experiments/){rel="nofollow"}
### `extractCSS`
Enables Common CSS Extraction.
Using [mini-css-extract-plugin](https://github.com/webpack-contrib/mini-css-extract-plugin){rel="nofollow"} under the hood, your CSS will be extracted into separate files, usually one per component. This allows caching your CSS and JavaScript separately.
- **Type**: `boolean`
- **Default:** `true`
**Example**:
```js
export default {
webpack: {
extractCSS: true,
// or
extractCSS: {
ignoreOrder: true
}
}
}
```
**Example**:
```js
export default {
webpack: {
extractCSS: true,
optimization: {
splitChunks: {
cacheGroups: {
styles: {
name: 'styles',
test: /\.(css|vue)$/,
chunks: 'all',
enforce: true
}
}
}
}
}
}
```
### `filenames`
Customize bundle filenames.
To understand a bit more about the use of manifests, take a look at [webpack documentation](https://webpack.js.org/guides/code-splitting/){rel="nofollow"}.
::callout
**Note**: Be careful when using non-hashed based filenames in production
as most browsers will cache the asset and not detect the changes on first load.
::
**Example**:
```js
filenames: {
chunk: ({ isDev }) => (isDev ? '[name].js' : '[id].[contenthash].js')
}
```
#### `app`
- **Type**: `function`
#### `chunk`
- **Type**: `function`
#### `css`
- **Type**: `function`
#### `font`
- **Type**: `function`
#### `img`
- **Type**: `function`
#### `video`
- **Type**: `function`
### `friendlyErrors`
Set to `false` to disable the overlay provided by [FriendlyErrorsWebpackPlugin](https://github.com/nuxt/friendly-errors-webpack-plugin){rel="nofollow"}.
- **Type**: `boolean`
- **Default:** `true`
### `hotMiddleware`
See [webpack-hot-middleware](https://github.com/webpack-contrib/webpack-hot-middleware){rel="nofollow"} for available options.
### `loaders`
Customize the options of Nuxt's integrated webpack loaders.
#### `css`
See [css-loader](https://github.com/webpack-contrib/css-loader){rel="nofollow"} for available options.
##### `esModule`
- **Type**: `boolean`
- **Default:** `false`
##### `importLoaders`
- **Type**: `number`
- **Default:** `0`
##### `url`
###### `filter`
- **Type**: `function`
#### `cssModules`
See [css-loader](https://github.com/webpack-contrib/css-loader){rel="nofollow"} for available options.
##### `esModule`
- **Type**: `boolean`
- **Default:** `false`
##### `importLoaders`
- **Type**: `number`
- **Default:** `0`
##### `modules`
###### `localIdentName`
- **Type**: `string`
- **Default:** `"[local]_[hash:base64:5]"`
##### `url`
###### `filter`
- **Type**: `function`
#### `esbuild`
- **Type**: `object`
- **Default**
```json
{
"target": "esnext",
"jsxFactory": "h",
"jsxFragment": "Fragment",
"tsconfigRaw": {}
}
```
**See**: [esbuild loader](https://github.com/esbuild-kit/esbuild-loader){rel="nofollow"}
#### `file`
**See**: [`file-loader` Options](https://github.com/webpack-contrib/file-loader#options){rel="nofollow"}
**Default**:
```ts
{ esModule: false }
```
##### `esModule`
- **Type**: `boolean`
- **Default:** `false`
##### `limit`
- **Type**: `number`
- **Default:** `1000`
#### `fontUrl`
**See**: [`file-loader` Options](https://github.com/webpack-contrib/file-loader#options){rel="nofollow"}
**Default**:
```ts
{ esModule: false }
```
##### `esModule`
- **Type**: `boolean`
- **Default:** `false`
##### `limit`
- **Type**: `number`
- **Default:** `1000`
#### `imgUrl`
**See**: [`file-loader` Options](https://github.com/webpack-contrib/file-loader#options){rel="nofollow"}
**Default**:
```ts
{ esModule: false }
```
##### `esModule`
- **Type**: `boolean`
- **Default:** `false`
##### `limit`
- **Type**: `number`
- **Default:** `1000`
#### `less`
- **Default**
```json
{
"sourceMap": false
}
```
**See**: [`less-loader` Options](https://github.com/webpack-contrib/less-loader#options){rel="nofollow"}
#### `pugPlain`
**See**: [`pug` options](https://pugjs.org/api/reference.html#options){rel="nofollow"}
#### `sass`
**See**: [`sass-loader` Options](https://github.com/webpack-contrib/sass-loader#options){rel="nofollow"}
**Default**:
```ts
{
sassOptions: {
indentedSyntax: true
}
}
```
##### `sassOptions`
###### `indentedSyntax`
- **Type**: `boolean`
- **Default:** `true`
#### `scss`
- **Default**
```json
{
"sourceMap": false
}
```
**See**: [`sass-loader` Options](https://github.com/webpack-contrib/sass-loader#options){rel="nofollow"}
#### `stylus`
- **Default**
```json
{
"sourceMap": false
}
```
**See**: [`stylus-loader` Options](https://github.com/webpack-contrib/stylus-loader#options){rel="nofollow"}
#### `vue`
See [vue-loader](https://github.com/vuejs/vue-loader){rel="nofollow"} for available options.
##### `compilerOptions`
- **Type**: `object`
##### `propsDestructure`
- **Type**: `boolean`
- **Default:** `true`
##### `transformAssetUrls`
- **Type**: `object`
- **Default**
```json
{
"video": [
"src",
"poster"
],
"source": [
"src"
],
"img": [
"src"
],
"image": [
"xlink:href",
"href"
],
"use": [
"xlink:href",
"href"
]
}
```
#### `vueStyle`
- **Default**
```json
{
"sourceMap": false
}
```
### `optimization`
Configure [webpack optimization](https://webpack.js.org/configuration/optimization/){rel="nofollow"}.
#### `minimize`
Set minimize to `false` to disable all minimizers. (It is disabled in development by default).
- **Type**: `boolean`
- **Default:** `true`
#### `minimizer`
You can set minimizer to a customized array of plugins.
#### `runtimeChunk`
- **Type**: `string`
- **Default:** `"single"`
#### `splitChunks`
##### `automaticNameDelimiter`
- **Type**: `string`
- **Default:** `"/"`
##### `cacheGroups`
##### `chunks`
- **Type**: `string`
- **Default:** `"all"`
### `optimizeCSS`
OptimizeCSSAssets plugin options.
Defaults to true when `extractCSS` is enabled.
- **Type**: `boolean`
- **Default:** `false`
**See**: [css-minimizer-webpack-plugin documentation](https://github.com/webpack-contrib/css-minimizer-webpack-plugin){rel="nofollow"}.
### `plugins`
Add webpack plugins.
- **Type**: `array`
**Example**:
```js
import webpack from 'webpack'
import { version } from './package.json'
// ...
plugins: [
new webpack.DefinePlugin({
'process.VERSION': version
})
]
```
### `postcss`
Customize PostCSS Loader. same options as [`postcss-loader` options](https://github.com/webpack-contrib/postcss-loader#options){rel="nofollow"}
#### `postcssOptions`
##### `plugins`
- **Type**: `object`
- **Default**
```json
{
"autoprefixer": {},
"cssnano": {}
}
```
### `profile`
Enable the profiler in webpackbar.
It is normally enabled by CLI argument `--profile`.
- **Type**: `boolean`
- **Default:** `false`
**See**: [webpackbar](https://github.com/unjs/webpackbar#profile){rel="nofollow"}.
### `serverURLPolyfill`
The polyfill library to load to provide URL and URLSearchParams.
Defaults to `'url'` ([see package](https://www.npmjs.com/package/url){rel="nofollow"}).
- **Type**: `string`
- **Default:** `"url"`
### `warningIgnoreFilters`
Filters to hide build warnings.
- **Type**: `array`
## workspaceDir
Define the workspace directory of your application.
Often this is used when in a monorepo setup. Nuxt will attempt to detect your workspace directory automatically, but you can override it here.
It is normally not needed to configure this option.
- **Type**: `string`
- **Default:** `"/<workspaceDir>"`
# Nuxt API Reference
::card-group
:::card
---
icon: i-lucide-box
title: Components
to: https://nuxt.com/docs/api/components/client-only
---
Explore Nuxt built-in components for pages, layouts, head, and more.
:::
:::card
---
icon: i-lucide-arrow-left-right
title: Composables
to: https://nuxt.com/docs/api/composables/use-app-config
---
Discover Nuxt composable functions for data-fetching, head management and more.
:::
:::card
---
icon: i-lucide-square-function
title: Utils
to: https://nuxt.com/docs/api/utils/dollarfetch
---
Learn about Nuxt utility functions for navigation, error handling and more.
:::
:::card
---
icon: i-lucide-square-terminal
title: Commands
to: https://nuxt.com/docs/api/commands/add
---
List of Nuxt CLI commands to init, analyze, build, and preview your application.
:::
:::card
---
icon: i-lucide-package
title: Nuxt Kit
to: https://nuxt.com/docs/api/kit/modules
---
Understand Nuxt Kit utilities to create modules and control Nuxt.
:::
:::card
---
icon: i-lucide-brain
title: Advanced
to: https://nuxt.com/docs/api/advanced/hooks
---
Go deep in Nuxt internals with Nuxt lifecycle hooks.
:::
:::card
---
icon: i-lucide-cog
title: Nuxt Configuration
to: https://nuxt.com/docs/api/nuxt-config
---
Explore all Nuxt configuration options to customize your application.
:::
::
# Hello World
::read-more{to="https://nuxt.com/docs/getting-started/introduction"}
::
::sandbox
---
branch: main
dir: examples/hello-world
file: app.vue
repo: nuxt/examples
---
::
# Auto Imports
Example of the auto-imports feature in Nuxt with:
- Vue components in the `components/` directory are auto-imported and can be used directly in your templates.
- Vue composables in the `composables/` directory are auto-imported and can be used directly in your templates and JS/TS files.
- JS/TS variables and functions in the `utils/` directory are auto-imported and can be used directly in your templates and JS/TS files.
::read-more{to="https://nuxt.com/docs/guide/directory-structure/components"}
::
::read-more{to="https://nuxt.com/docs/guide/directory-structure/composables"}
::
::read-more{to="https://nuxt.com/docs/guide/directory-structure/utils"}
::
::sandbox
---
branch: main
dir: examples/features/auto-imports
file: app.vue
repo: nuxt/examples
---
::
# Data Fetching
::read-more{to="https://nuxt.com/docs/getting-started/data-fetching"}
::
::read-more{to="https://nuxt.com/docs/guide/directory-structure/server"}
::
::sandbox
---
branch: main
dir: examples/features/data-fetching
file: app.vue
repo: nuxt/examples
---
::
# State Management
::read-more{to="https://nuxt.com/docs/getting-started/state-management"}
::
::read-more{to="https://nuxt.com/docs/api/composables/use-state"}
::
::sandbox
---
branch: main
dir: examples/features/state-management
file: app.vue
repo: nuxt/examples
---
::
# Meta Tags
::read-more{to="https://nuxt.com/docs/getting-started/seo-meta"}
::
::sandbox
---
branch: main
dir: examples/features/meta-tags/
file: app.vue
repo: nuxt/examples
---
::
# Layouts
::read-more{to="https://nuxt.com/docs/getting-started/views#layouts"}
::
::read-more{to="https://nuxt.com/docs/guide/directory-structure/layouts"}
::
::sandbox
---
branch: main
dir: examples/features/layouts
file: pages/index.vue
repo: nuxt/examples
---
::
# Middleware
::read-more{to="https://nuxt.com/docs/guide/directory-structure/middleware"}
::
::sandbox
---
branch: main
dir: examples/routing/middleware
file: app.vue
repo: nuxt/examples
---
::
# Pages
::read-more{to="https://nuxt.com/docs/guide/directory-structure/pages"}
::
::sandbox
---
branch: main
dir: examples/routing/pages
file: app.vue
repo: nuxt/examples
---
::
# Universal Router
::sandbox
---
branch: main
dir: examples/routing/universal-router
file: app.vue
repo: nuxt/examples
---
::
# Layers
This example shows how to use the `extends` key in `nuxt.config.ts` to use the `base/` directory as a base Nuxt application, and use its components, composables or config and override them if necessary.
::read-more{to="https://nuxt.com/docs/getting-started/layers"}
::
::sandbox
---
branch: main
dir: examples/advanced/config-extends
file: nuxt.config.ts
repo: nuxt/examples
---
::
# Error Handling
::read-more{to="https://nuxt.com/docs/getting-started/error-handling"}
::
::sandbox
---
branch: main
dir: examples/advanced/error-handling
file: app.vue
repo: nuxt/examples
---
::
# JSX / TSX
::read-more
---
icon: i-simple-icons-vuedotjs
target: _blank
to: https://vuejs.org/guide/extras/render-function.html#jsx-tsx
---
::
::sandbox
---
branch: main
dir: examples/advanced/jsx
file: app.vue
repo: nuxt/examples
---
::
# Locale
::callout{icon="i-ph-info-duotone"}
You can right-click to "View Page Source" and see that Nuxt renders the correct date in SSR based on the visitor's locale.
::
::sandbox
---
branch: main
dir: examples/advanced/locale
file: app.vue
repo: nuxt/examples
---
::
# Module Extend Pages
::read-more{to="https://nuxt.com/docs/guide/going-further/modules"}
::
::sandbox
---
branch: main
dir: examples/advanced/module-extend-pages
file: pages/index.vue
repo: nuxt/examples
---
::
# Teleport
Vue 3 provides the [`<Teleport>` component](https://vuejs.org/guide/built-ins/teleport.html){rel="nofollow"} which allows content to be rendered elsewhere in the DOM, outside of the Vue application.
This example shows how to use the `<Teleport>` with client-side and server-side rendering.
::read-more{to="https://nuxt.com/docs/api/components/teleports"}
::
::sandbox
---
branch: main
dir: examples/advanced/teleport
file: app.vue
repo: nuxt/examples
---
::
# Testing
::read-more{to="https://nuxt.com/docs/getting-started/testing"}
::
::sandbox
---
branch: main
dir: examples/advanced/testing
file: app.vue
repo: nuxt/examples
---
::
# useCookie
::read-more{to="https://nuxt.com/docs/api/composables/use-cookie"}
::
::sandbox
---
branch: main
dir: examples/advanced/use-cookie
file: app.vue
repo: nuxt/examples
---
::
# Use Custom Fetch Composable
::read-more{to="https://nuxt.com/docs/guide/recipes/custom-usefetch"}
::
::sandbox
---
branch: main
dir: examples/advanced/use-custom-fetch-composable
file: composables/useCustomFetch.ts
repo: nuxt/examples
---
::
# WASM
::sandbox
---
branch: main
dir: examples/experimental/wasm
file: app.vue
repo: nuxt/examples
---
::
# Getting Help
At some point, you may find that there's an issue you need some help with.
But don't worry! We're a friendly community of developers and we'd love to help.
## "I can't figure out how to (...)."
You've read through these docs and you think it should be possible, but it's not clear how. The best thing is to [open a GitHub Discussion](https://github.com/nuxt/nuxt/discussions){rel="nofollow"}.
Please don't feel embarrassed about asking a question that you think is easy - we've all been there! ❤️
Everyone you'll encounter is helping out because they care, not because they are paid to do so. The kindest thing to do is make it easy for them to help you. Here are some ideas:
- *Explain what your objective is, not just the problem you're facing.* "I need to ensure my form inputs are accessible, so I'm trying to get the ids to match between server and client."
- *Make sure you've first read the docs and used your favorite search engine*. Let people know by saying something like "I've Googled for 'nuxt script setup' but I couldn't find code examples anywhere."
- *Explain what you've tried.* Tell people the kind of solutions you've experimented with, and why. Often this can make people's advice more relevant to your situation.
- *Share your code.* People probably won't be able to help if they just see an error message or a screenshot - but that all changes if you share your code in a copy/pasteable format - preferably in the form of a minimal reproduction like a CodeSandbox.
And finally, just ask the question! There's no need to [ask permission to ask a question](https://dontasktoask.com){rel="nofollow"} or [wait for someone to reply to your 'hello'](https://www.nohello.com){rel="nofollow"}. If you do, you might not get a response because people are waiting for the whole question before engaging.
## "Could there be a bug?"
Something isn't working the way that the docs say that it should. You're not sure if it's a bug. You've searched through the [open issues](https://github.com/nuxt/nuxt/issues){rel="nofollow"} and [discussions](https://github.com/nuxt/nuxt/discussions){rel="nofollow"} but you can't find anything. (if there is a closed issue, please create a new one)
We recommend taking a look at [how to report bugs](https://nuxt.com/docs/community/reporting-bugs). Nuxt is still in active development, and every issue helps make it better.
## "I need professional help"
If the community couldn't provide the help you need in the time-frame you have, NuxtLabs offers professional support with the [Nuxt Experts](https://nuxt.com/enterprise/support){rel="nofollow"}.
The objective of the Nuxt Expert is to provide support to the Vue ecosystem, while also creating freelance opportunities for those contributing to open-source solutions, thus helping to maintain the sustainability of the ecosystem.
The Nuxt experts are Vue, Nuxt and Vite chosen contributors providing professional support and consulting services.
# Reporting Bugs
Try as we might, we will never completely eliminate bugs.
Even if you can't fix the underlying code, reporting a bug well can enable someone else with a bit more familiarity with the codebase to spot a pattern or make a quick fix.
Here are a few key steps.
## Is It Really a Bug?
Consider if you're looking to get help with something, or whether you think there's a bug with Nuxt itself. If it's the former, we'd love to help you - but the best way to do that is through [asking for help](https://nuxt.com/docs/community/getting-help) rather than reporting a bug.
## Search the Issues
Search through the [open issues](https://github.com/nuxt/nuxt/issues){rel="nofollow"} and [discussions](https://github.com/nuxt/nuxt/discussions){rel="nofollow"} first. If you find anything that seems like the same bug, it's much better to comment on an existing thread than create a duplicate.
## Create a Minimal Reproduction
It's important to be able to reproduce the bug reliably - in a minimal way and apart from the rest of your project. This narrows down what could be causing the issue and makes it possible for someone not only to find the cause, but also to test a potential solution.
Start with the Nuxt sandbox and add the **minimum** amount of code necessary to reproduce the bug you're experiencing.
::note
If your issue concerns Vue or Vite, please try to reproduce it first with the Vue SSR starter.
::
**Nuxt**:
::card-group
:::card
---
icon: i-simple-icons-stackblitz
target: _blank
title: Nuxt on StackBlitz
to: https://nuxt.new/s/v3
---
:::
:::card
---
icon: i-simple-icons-codesandbox
target: _blank
title: Nuxt on CodeSandbox
to: https://nuxt.new/c/v3
---
:::
::
**Vue**:
::card-group
:::card
---
icon: i-simple-icons-stackblitz
target: _blank
title: Vue SSR on StackBlitz
to: https://stackblitz.com/github/nuxt-contrib/vue3-ssr-starter/tree/main?terminal=dev
---
:::
:::card
---
icon: i-simple-icons-codesandbox
target: _blank
title: Vue SSR on CodeSandbox
to: https://codesandbox.io/s/github/nuxt-contrib/vue3-ssr-starter/main
---
:::
:::card
---
icon: i-simple-icons-github
target: _blank
title: Vue SSR Template on GitHub
to: https://github.com/nuxt-contrib/vue3-ssr-starter/generate
---
:::
::
Once you've reproduced the issue, remove as much code from your reproduction as you can (while still recreating the bug). The time spent making the reproduction as minimal as possible will make a huge difference to whoever sets out to fix the issue.
## Figure Out What the Cause Might Be
With a Nuxt project, there are lots of moving pieces - from [Nuxt modules](https://nuxt.com/modules) to [other JavaScript libraries](https://www.npmjs.com){rel="nofollow"}. Try to report the bug at the most relevant and specific place. That will likely be the Nuxt module causing an issue, or the upstream library that Nuxt is depending on.
# Contribution
There is a range of different ways you might be able to contribute to the Nuxt ecosystem.
## Ecosystem
The Nuxt ecosystem includes many different projects and organizations:
- [nuxt/](https://github.com/nuxt){rel="nofollow"} - core repositories for the Nuxt framework itself. [**nuxt/nuxt**](https://github.com/nuxt/nuxt){rel="nofollow"} contains the Nuxt framework (both versions 2 and 3).
- [nuxt-modules/](https://github.com/nuxt-modules){rel="nofollow"} - community-contributed and maintained modules and libraries. There is a [process to migrate a module](https://nuxt.com/docs/guide/going-further/modules/#joining-nuxt-modules-and-nuxtjs) to `nuxt-modules`. While these modules have individual maintainers, they are not dependent on a single person.
- [unjs/](https://github.com/unjs){rel="nofollow"} - many of these libraries are used throughout the Nuxt ecosystem. They are designed to be universal libraries that are framework- and environment-agnostic. We welcome contributions and usage by other frameworks and projects.
## How To Contribute
### Triage Issues and Help Out in Discussions
Check out the issues and discussions for the project you want to help. For example, here are [the issues board](https://github.com/nuxt/nuxt/issues){rel="nofollow"} and [discussions](https://github.com/nuxt/nuxt/discussions){rel="nofollow"} for Nuxt. Helping other users, sharing workarounds, creating reproductions, or even poking into a bug a little bit and sharing your findings makes a huge difference.
### Creating an Issue
Thank you for taking the time to create an issue! ❤️
- **Reporting bugs**: Check out [our guide](https://nuxt.com/docs/community/reporting-bugs) for some things to do before opening an issue.
- **Feature requests**: Check that there is not an existing issue or discussion covering the scope of the feature you have in mind. If the feature is to another part of the Nuxt ecosystem (such as a module), please consider raising a feature request there first. If the feature you have in mind is general or the API is not entirely clear, consider opening a discussion in the **Ideas** section to discuss with the community first.
We'll do our best to follow our [internal issue decision making flowchart](https://mermaid.live/view#pako\:eNqFlE1v2zAMhv8K4UuToslhx2Bo0TZt12Edhm7YMCAXWqJtorLk6qOpkfS_j7KdfpyWQ-BQr8mHL6nsCuU0FauiMm6rGvQRfq03FuRzvvvTYIQHthpcBT_ugQNwPHuZjheLxf4i1VDx8x4udrf5EBCOQvSsYg4ffS79KS9pmX9QALTgyid2KYB7Ih-4bmKWbDk2YB0E1gRUVaRi-FDmmjAmT3u4nB3DmoNKIUA1BsGSohA49jnVMQhHbDh_EZQUImyxh-gAtfaiG-KWSJ-N8nt6YtpCdgEeE5rXPOdav5YwWJIJU7zrvNADV9C7JBIyIC07Wxupkx3LFQ5vCkguRno5f9fP2qnUko0Y2dk9rGdvHAa9IIhVGlCp5FFNPN-ce4DKeXBd53xMliOLp9IZtyORQVsnrGm-WJzejtUu5fFqdr5FGQ3bLslYvGthjZbJTLpReZG5_lLYw7XQ_CbPVT92ws9gnEJj-v84dk-PiaXnmF1XGAaPsOsMKywNvYmG80ZohV8k4wDR9_N3KN_dHm5mh1lnkM5FsYzRfNiTvJoT5gnQsl6uxjqXLhkNQ9syHJ0UZZ8ERUIlNShr6N8gZDEliR-ow7QZa0fhY4LoHLRo-8N7ZxPwjRj5ZZYXpvOSNs9v3Jjs8NXB4ets92xan3zydXZHvj64lKMayh4-gZC1bjASW2ipLeWuzIuToiXfImu5rbucclMIc0ubYiWPGv3DptjYF9Fhiu5nb1Wxij7RSZE6jZHWjLXHtlhVaIJESXN0_m68_sO_wMs_oO9gyg){rel="nofollow"} when responding to issues.
### Send a Pull Request
We always welcome pull requests! ❤️
#### Before You Start
Before you fix a bug, we recommend that you check whether **there's an issue that describes it**, as it's possible it's a documentation issue or that there is some context that would be helpful to know.
If you're working on a feature, then we ask that you **open a feature request issue first** to discuss with the maintainers whether the feature is desired - and the design of those features. This helps save time for both the maintainers and the contributors and means that features can be shipped faster. The issue **should be confirmed** by a framework team member before building out a feature in a pull request.
For typo fixes, it's recommended to batch multiple typo fixes into one pull request to maintain a cleaner commit history.
For bigger changes to Nuxt itself, we recommend that you first [create a Nuxt module](https://nuxt.com/#create-a-module) and implement the feature there. This allows for quick proof-of-concept. You can then [create an RFC](https://nuxt.com/#make-an-rfc) in the form of a discussion. As users adopt it and you gather feedback, it can then be refined and either added to Nuxt core or continue as a standalone module.
#### Commit Conventions
We use [Conventional Commits](https://www.conventionalcommits.org){rel="nofollow"} for commit messages, which [allows a changelog to be auto-generated](https://github.com/unjs/changelogen){rel="nofollow"} based on the commits. Please read the guide through if you aren't familiar with it already.
Note that `fix:` and `feat:` are for **actual code changes** (that might affect logic). For typo or document changes, use `docs:` or `chore:` instead:
- ~~`fix: typo`~~ -> `docs: fix typo`
If you are working in a project with a monorepo, like `nuxt/nuxt`, ensure that you specify the main scope of your commit in brackets. For example: `feat(nuxi): add 'do-magic' command`.
#### Making the Pull Request
If you don't know how to send a pull request, we recommend reading [the guide](https://docs.github.com/en/pull-requests/collaborating-with-pull-requests/proposing-changes-to-your-work-with-pull-requests/creating-a-pull-request){rel="nofollow"}.
When sending a pull request, make sure your PR's title also follows the [Commit Convention](https://nuxt.com/#commit-conventions).
If your PR fixes or resolves existing issues, please make sure you mention them in the PR description.
It's ok to have multiple commits in a single PR; you don't need to rebase or force push for your changes as we will use `Squash and Merge` to squash the commits into one commit when merging.
We do not add any commit hooks to allow for quick commits. But before you make a pull request, you should ensure that any lint/test scripts are passing.
In general, please also make sure that there are no *unrelated* changes in a PR. For example, if your editor has made any changes to whitespace or formatting elsewhere in a file that you edited, please revert these so it is more obvious what your PR changes. And please avoid including multiple unrelated features or fixes in a single PR. If it is possible to separate them, it is better to have multiple PRs to review and merge separately. In general, a PR should do *one thing only*.
#### Once You've Made a Pull Request
Once you've made a pull request, we'll do our best to review it promptly.
If we assign it to a maintainer, then that means that person will take special care to review it and implement any changes that may be required.
If we request changes on a PR, please ignore the red text! It doesn't mean we think it's a bad PR - it's just a way of easily telling the status of a list of pull requests at a glance.
If we mark a PR as 'pending', that means we likely have another task to do in reviewing the PR - it's an internal note-to-self, and not necessarily a reflection on whether the PR is a good idea or not. We will do our best to explain via a comment the reason for the pending status.
We'll do our best to follow [our PR decision making flowchart](https://mermaid.live/view#pako\:eNp9VE1v2kAQ_SsjXzBSEqlALlaUisSh0ACK2l4qcVm8Y9hi7672Iwly-O-ZtYPt5FAOCHbee_PmzdpVlCmOURLlhXrJ9sw4-JNuJNBnWs1UQafIQVjrERyWumAOv58-AJeXt29_0b7BXbWwwL0uRPa1vlZvcB_fF8oiMMmB2QM4BXkt3UoON7Lh3LWaDz2SVkK6QGt7DHvw0CKt5sxCKaQoWQEGtVHcZ04oGdw04LTVngW_LHOeFcURGGz97mw6PSv-iJdsi0UCA4nI7SfNwc3W3JZit3eQ1SZFDlKB15yswQ2MgbOjbYeatY3n8bcr-IWlekYYaJRcyB04I9gOB1CEfkF5dAVTzmFAtnqn4-bUYAiMMmHZgWhNPRhgus5mW2BATxq0NkIZ4Y4NbNjzE2ZchBzcHmGLe_ZMSKCcyRXyLrVFa_5n_PBK2xKy3kk9eOjULUdltk6C8kI-7NFDr8f4EVGDoqlp-wa4sJm3ltIMIuZ_mTQXJyTSkQZtunPqsKxShV9GKdkBYe1fHXjpbcjlvONlO9Kqx_M7YHmOmav_luxfE5zKwVs09hM5DLSupgYDlr5flDkwo7ykixKG-xDsUly1LZ-uY32dgDc7lG7YqwbNp0msJwmIUivjWFtfd-xRrEcJ7Omydz37qFplHOtxEp4GskI2qB5dRCWakglOz3oV8JuITJa4iRL6yZk5bKKNPBGOead-H2UWJc54vIiaW53SPgwrz4fIhVNm1bw76lfI6R2_MW21){rel="nofollow"} when responding and reviewing to pull requests.
### Create a Module
If you've built something with Nuxt that's cool, why not [extract it into a module](https://nuxt.com/docs/guide/going-further/modules), so it can be shared with others? We have [many excellent modules already](https://nuxt.com/modules), but there's always room for more.
If you need help while building it, feel free to [check in with us](https://nuxt.com/docs/community/getting-help).
### Make an RFC
We highly recommend [creating a module](https://nuxt.com/#create-a-module) first to test out big new features and gain community adoption.
If you have done this already, or it's not appropriate to create a new module, then please start by creating a new discussion. Make sure it explains your thinking as clearly as possible. Include code examples or function signatures for new APIs. Reference existing issues or pain points with examples.
If we think this should be an RFC, we'll change the category to RFC and broadcast it more widely for feedback.
An RFC will then move through the following stages:
- `rfc: active` - currently open for comment
- `rfc: approved` - approved by the Nuxt team
- `rfc: ready to implement` - an issue has been created and assigned to implement
- `rfc: shipped` - implemented
- `rfc: archived` - not approved, but archived for future reference
### Conventions Across Ecosystem
The following conventions are *required* within the `nuxt/` organization and recommended for other maintainers in the ecosystem.
#### Module Conventions
Modules should follow the [Nuxt module template](https://github.com/nuxt/starter/tree/module){rel="nofollow"}. See [module guide](https://nuxt.com/docs/guide/going-further/modules) for more information.
#### Use Core `unjs/` Libraries
We recommend the following libraries which are used throughout the ecosystem:
- [pathe](https://github.com/unjs/pathe){rel="nofollow"} - universal path utilities (replacement for node `path`)
- [ufo](https://github.com/unjs/ufo){rel="nofollow"} - URL parsing and joining utilities
- [unbuild](https://github.com/unjs/unbuild){rel="nofollow"} - rollup-powered build system
- ... check out the rest of the [unjs/](https://github.com/unjs){rel="nofollow"} organization for many more!
#### Use ESM Syntax and Default to `type: module`
Most of the Nuxt ecosystem can consume ESM directly. In general we advocate that you avoid using CJS-specific code, such as `__dirname` and `require` statements. You can [read more about ESM](https://nuxt.com/docs/guide/concepts/esm).
#### What's Corepack
[Corepack](https://nodejs.org/api/corepack.html){rel="nofollow"} makes sure you are using the correct version for package manager when you run corresponding commands. Projects might have `packageManager` field in their `package.json`.
Under projects with configuration as shown below, Corepack will install `v7.5.0` of `pnpm` (if you don't have it already) and use it to run your commands.
```jsonc [package.json]
{
"packageManager": "pnpm@7.5.0"
}
```
#### Use ESLint
We use [ESLint](https://eslint.org){rel="nofollow"} for both linting and formatting with [`@nuxt/eslint`](https://github.com/nuxt/eslint){rel="nofollow"}.
##### IDE Setup
We recommend using [VS Code](https://code.visualstudio.com){rel="nofollow"} along with the [ESLint extension](https://marketplace.visualstudio.com/items?itemName=dbaeumer.vscode-eslint){rel="nofollow"}. If you would like, you can enable auto-fix and formatting when you save the code you are editing:
```json [settings.json]
{
"editor.codeActionsOnSave": {
"source.fixAll": "never",
"source.fixAll.eslint": "explicit"
}
}
```
#### No Prettier
Since ESLint is already configured to format the code, there is no need to duplicate the functionality with Prettier. To format the code, you can run `yarn lint --fix`, `pnpm lint --fix`, or `bun run lint --fix` or referring the [ESLint section](https://nuxt.com/#use-eslint) for IDE Setup.
If you have Prettier installed in your editor, we recommend you disable it when working on the project to avoid conflict.
#### Package Manager
We recommend `pnpm` as a package manager for modules, libraries and apps.
It is important to enable Corepack to ensure you are on the same version of the package manager as the project. Corepack is built-in to new node versions for seamless package manager integration.
To enable it, run
```bash [Terminal]
corepack enable
```
You only need to do this one time, after Node.js is installed on your computer.
## Documentation Style Guide
Documentation is an essential part of Nuxt. We aim to be an intuitive framework - and a big part of that is making sure that both the developer experience and the docs are perfect across the ecosystem. 👌
Here are some tips that may help improve your documentation:
- Avoid subjective words like *simply*, *just*, *obviously...* when possible.
:br
Keep in mind your readers can have different backgrounds and experiences. Therefore, these words don't convey meaning and can be harmful.
:caution[Simply make sure the function returns a promise.]{icon="i-lucide-circle-x"}
:tip[Make sure the function returns a [promise](https://developer.mozilla.org/en-US/docs/Web/JavaScript/Reference/Global_Objects/Promise){rel="nofollow"}.]{icon="i-lucide-circle-check"}
- Prefer [active voice](https://developers.google.com/tech-writing/one/active-voice){rel="nofollow"}.
:caution[An error will be thrown by Nuxt.]{icon="i-lucide-circle-x"}
:tip[Nuxt will throw an error.]{icon="i-lucide-circle-check"}
::read-more
---
to: https://nuxt.com/docs/community/framework-contribution#documentation-guide
---
Learn how to contribute to the documentation.
::
# Framework
Once you've read the [general contribution guide](https://nuxt.com/docs/community/contribution), here are some specific points to make about contributions to the [`nuxt/nuxt`](https://github.com/nuxt/nuxt){rel="nofollow"} repository.
## Monorepo Guide
- `packages/kit`: Toolkit for authoring Nuxt Modules, published as [`@nuxt/kit`](https://npmjs.com/package/@nuxt/kit){rel="nofollow"}.
- `packages/nuxt`: The core of Nuxt, published as [`nuxt`](https://npmjs.com/package/nuxt){rel="nofollow"}.
- `packages/schema`: Cross-version Nuxt typedefs and defaults, published as [`@nuxt/schema`](https://npmjs.com/package/@nuxt/schema){rel="nofollow"}.
- `packages/rspack`: The [Rspack](https://rspack.dev){rel="nofollow"} bundler for Nuxt, published as [`@nuxt/rspack-builder`](https://npmjs.com/package/@nuxt/rspack-builder){rel="nofollow"}.
- `packages/vite`: The [Vite](https://vite.dev){rel="nofollow"} bundler for Nuxt, published as [`@nuxt/vite-builder`](https://npmjs.com/package/@nuxt/vite-builder){rel="nofollow"}.
- `packages/webpack`: The [webpack](https://webpack.js.org){rel="nofollow"} bundler for Nuxt, published as [`@nuxt/webpack-builder`](https://npmjs.com/package/@nuxt/webpack-builder){rel="nofollow"}.
## Setup
To contribute to Nuxt, you need to set up a local environment.
1. [Fork](https://help.github.com/articles/fork-a-repo){rel="nofollow"} the [`nuxt/nuxt`](https://github.com/nuxt/nuxt){rel="nofollow"} repository to your own GitHub account and then [clone](https://help.github.com/articles/cloning-a-repository){rel="nofollow"} it to your local device.
2. Ensure using the latest [Node.js](https://nodejs.org/en){rel="nofollow"} (20.x)
3. Enable [Corepack](https://github.com/nodejs/corepack){rel="nofollow"} to have `pnpm` and `yarn`
```bash [Terminal]
corepack enable
```
4. Run `pnpm install --frozen-lockfile` to Install the dependencies with pnpm:
```bash [Terminal]
pnpm install --frozen-lockfile
```
:note[If you are adding a dependency, please use `pnpm add`. :br
The `pnpm-lock.yaml` file is the source of truth for all Nuxt dependencies.]
5. Activate the passive development system
```bash [Terminal]
pnpm dev:prepare
```
6. Check out a branch where you can work and commit your changes:
```bash [Terminal]
git checkout -b my-new-branch
```
Then, test your changes against the [playground](https://nuxt.com/#playground) and [test](https://nuxt.com/#testing) your changes before submitting a pull request.
### Playground
While working on a pull request, you will likely want to check if your changes are working correctly.
You can modify the example app in `playground/`, and run:
```bash [Terminal]
pnpm dev
```
::important
Please make sure not to commit it to your branch, but it could be helpful to add some example code to your PR description. This can help reviewers and other Nuxt users understand the feature you've built in-depth.
::
### Testing
Every new feature should have a corresponding unit test (if possible). The `test/` directory in this repository is currently a work in progress, but do your best to create a new test following the example of what's already there.
Before creating a PR or marking it as ready-to-review, ensure that all tests pass by running:
```bash [Terminal]
pnpm test
```
### Linting
You might have noticed already that we use ESLint to enforce a coding standard.
Before committing your changes, to verify that the code style is correct, run:
```bash [Terminal]
pnpm lint
```
::note
You can use `pnpm lint --fix` to fix most of the style changes. :br
If there are still errors left, you must correct them manually.
::
### Documentation
If you are adding a new feature or refactoring or changing the behavior of Nuxt in any other manner, you'll likely want to document the changes. Please include any changes to the docs in the same PR. You don't have to write documentation up on the first commit (but please do so as soon as your pull request is mature enough).
::important
Make sure to make changes according to the [Documentation Style Guide](https://nuxt.com/docs/community/contribution#documentation-style-guide).
::
### Final Checklist
When submitting your PR, there is a simple template that you have to fill out. Please tick all appropriate "answers" in the checklists.
## Documentation Guide
If you spot an area where we can improve documentation or error messages, please do open a PR - even if it's just to fix a typo!
::important
Make sure to make changes according to the [Documentation Style Guide](https://nuxt.com/docs/community/contribution#documentation-style-guide).
::
### Quick Edits
If you spot a typo or want to rephrase a sentence, you can click on the **Edit this page** link located on the right aside in the **Community** section.
Make the change directly in the GitHub interface and open a Pull Request.
### Longer Edits
The documentation content is inside the `docs/` directory of the [nuxt/nuxt](https://github.com/nuxt/nuxt){rel="nofollow"} repository and written in markdown.
::note
To preview the docs locally, follow the steps on [nuxt/nuxt.com](https://github.com/nuxt/nuxt.com){rel="nofollow"} repository.
::
::note
We recommend that you install the [MDC extension](https://marketplace.visualstudio.com/items?itemName=Nuxt.mdc){rel="nofollow"} for VS Code.
::
### Linting Docs
Documentation is linted using [MarkdownLint](https://github.com/DavidAnson/markdownlint){rel="nofollow"} and [case police](https://github.com/antfu/case-police){rel="nofollow"} to keep the documentation cohesive.
```bash [Terminal]
pnpm lint:docs
```
::note
You can also run `pnpm lint:docs:fix` to highlight and resolve any lint issues.
::
### Open a PR
Please make sure your PR title adheres to the [conventional commits](https://www.conventionalcommits.org){rel="nofollow"} guidelines.
```bash [Example of PR title]
docs: update the section about the nuxt.config.ts file
```
# Roadmap
::read-more{to="https://nuxt.com/blog"}
See our blog for the latest framework and ecosystem announcements.
::
## Status Reports
::read-more
---
icon: i-simple-icons-github
target: _blank
to: https://github.com/nuxt/nuxt/issues/13653
---
Documentation Progress
::
::read-more
---
icon: i-simple-icons-github
target: _blank
to: https://github.com/nuxt/nuxt/discussions/16119
---
Rendering Optimizations: Today and Tomorrow
::
::read-more
---
icon: i-simple-icons-github
target: _blank
to: https://github.com/nuxt/image/discussions/563
---
Nuxt Image: Performance and Status
::
## Roadmap
In roadmap below are some features we are planning or working on at the moment.
::tip
Check [Discussions](https://github.com/nuxt/nuxt/discussions){rel="nofollow"} and [RFCs](https://github.com/nuxt/nuxt/discussions/categories/rfcs){rel="nofollow"} for more upcoming features and ideas.
::
| Milestone | Expected date | Notes | Description |
| ------------ | ------------- | ---------------------------------------------------------------------------------------------------------------------------------------------------------------------------- | ----------------------------------------------------------------------------------------------------------------------------------------------------------------------- |
| SEO & PWA | 2024 | [nuxt/nuxt#18395](https://github.com/nuxt/nuxt/discussions/18395){rel="nofollow"} | Migrating from [nuxt-community/pwa-module](https://github.com/nuxt-community/pwa-module){rel="nofollow"} for built-in SEO utils and service worker support |
| Assets | 2024 | [nuxt/nuxt#22012](https://github.com/nuxt/nuxt/discussions/22012){rel="nofollow"} | Allow developers and modules to handle loading third-party assets. |
| Translations | - | [nuxt/translations#4](https://github.com/nuxt/translations/discussions/4){rel="nofollow"} ([request access](https://github.com/nuxt/nuxt/discussions/16054){rel="nofollow"}) | A collaborative project for a stable translation process for Nuxt docs. Currently pending for ideas and documentation tooling support (content v2 with remote sources). |
## Core Modules Roadmap
In addition to the Nuxt framework, there are modules that are vital for the ecosystem. Their status will be updated below.
| Module | Status | Nuxt Support | Repository | Description |
| --------------------------------------------------- | ----------- | ------------ | --------------------------------------------------------------- | ------------------------------------------------------------------------------------------------------------------------------------------------------------------------------------ |
| [Scripts](https://scripts.nuxt.com){rel="nofollow"} | Public Beta | 3.x | [nuxt/scripts](https://github.com/nuxt/scripts){rel="nofollow"} | Easy 3rd party script management. |
| Auth Utils | Planned | 3.x | `nuxt/auth-utils` to be announced | The temporary repository [atinux/nuxt-auth-utils](https://github.com/atinux/nuxt-auth-utils){rel="nofollow"} is available while awaiting its official integration into Nuxt via RFC. |
| A11y | Planned | 3.x | `nuxt/a11y` to be announced | Accessibility hinting and utilities [nuxt/nuxt#23255](https://github.com/nuxt/nuxt/issues/23255){rel="nofollow"} |
| Hints | Planned | 3.x | `nuxt/hints` to be announced | Guidance and suggestions for enhancing development practices. |
## Release Cycle
Since January 2023, we've adopted a consistent release cycle for Nuxt, following [semver](https://semver.org){rel="nofollow"}. We aim for major framework releases every year, with an expectation of patch releases every week or so and minor releases every month or so. They should never contain breaking changes except within options clearly marked as `experimental`.
### Ongoing Support for Nuxt
Going forward from v3, we commit to support each major version of Nuxt for a minimum of a year after the last release, and to providing an upgrade path for current users at that point.
### Current Packages
The current active version of [Nuxt](https://nuxt.com){rel="nofollow"} is **v3** which is available as `nuxt` on npm with the `latest` tag.
Nuxt 2 is in maintenance mode and is available on npm with the `2x` tag. It will reach End of Life (EOL) on June 30, 2024.
Each active version has its own nightly releases which are generated automatically. For more about enabling the Nuxt nightly release channel, see [the nightly release channel docs](https://nuxt.com/docs/guide/going-further/nightly-release-channel).
| Release | | Initial release | End Of Life | Docs |
| --------------------- | ------------------------------------------------------------------------------------------------------------------------------------------------- | ----------------------------------------------- | ----------- | ------------------------------------------------------- |
| **4.x** (scheduled) | | approximately 1 month after release of nitro v3 | | |
| **3.x** (stable) | [{className="not-prose"}](https://npmjs.com/package/nuxt) | 2022-11-16 | TBA | [nuxt.com](https://nuxt.com/docs) |
| **2.x** (unsupported) | [{className="not-prose"}](https://www.npmjs.com/package/nuxt?activeTab=versions) | 2018-09-21 | 2024-06-30 | [v2.nuxt.com](https://v2.nuxt.com/docs){rel="nofollow"} |
| **1.x** (unsupported) | [{className="not-prose"}](https://www.npmjs.com/package/nuxt?activeTab=versions) | 2018-01-08 | 2019-09-21 | |
### Support Status
| Status | Description |
| ----------- | ----------------------------------------------------------------------------- |
| Unsupported | This version is not maintained any more and will not receive security patches |
| Maintenance | This version will only receive security patches |
| Stable | This version is being developed for and will receive security patches |
| Development | This version could be unstable |
| Scheduled | This version does not exist yet but is planned |
# Releases
::card-group
:::card
---
ui:
icon:
base: text-black dark:text-white
icon: i-simple-icons-github
target: _blank
title: nuxt/nuxt
to: https://github.com/nuxt/nuxt/releases
---
Nuxt framework releases.
:::
:::card
---
ui:
icon:
base: text-black dark:text-white
icon: i-simple-icons-github
target: _blank
title: nuxt/cli
to: https://github.com/nuxt/cli/releases
---
Nuxt CLI (`nuxi`) releases.
:::
:::card
---
ui:
icon:
base: text-black dark:text-white
icon: i-simple-icons-github
target: _blank
title: nuxt/content
to: https://github.com/nuxt/content/releases
---
Nuxt Content releases.
:::
:::card
---
ui:
icon:
base: text-black dark:text-white
icon: i-simple-icons-github
target: _blank
title: nuxt/devtools
to: https://github.com/nuxt/devtools/releases
---
Nuxt DevTools releases.
:::
:::card
---
ui:
icon:
base: text-black dark:text-white
icon: i-simple-icons-github
target: _blank
title: nuxt/fonts
to: https://github.com/nuxt/fonts/releases
---
Nuxt Fonts releases.
:::
:::card
---
ui:
icon:
base: text-black dark:text-white
icon: i-simple-icons-github
target: _blank
title: nuxt/image
to: https://github.com/nuxt/image/releases
---
Nuxt Image releases.
:::
:::card
---
ui:
icon:
base: text-black dark:text-white
icon: i-simple-icons-github
target: _blank
title: nuxt/scripts
to: https://github.com/nuxt/scripts/releases
---
Nuxt Scripts releases.
:::
:::card
---
ui:
icon:
base: text-black dark:text-white
icon: i-simple-icons-github
target: _blank
title: nuxt/ui
to: https://github.com/nuxt/ui/releases
---
Nuxt UI releases.
:::
::
::read-more
---
icon: i-simple-icons-github
target: _blank
to: https://github.com/nuxt
---
Discover the `nuxt` organization on GitHub
::
# Overview
::note
If you're starting a fresh Nuxt 3 project, please skip this section and go to [Nuxt 3 Installation](https://nuxt.com/docs/getting-started/introduction).
::
::warning
Nuxt Bridge provides identical features to Nuxt 3 ([docs](https://nuxt.com/docs/guide/concepts/auto-imports)) but there are some limitations, notably that [`useAsyncData`](https://nuxt.com/docs/api/composables/use-async-data) and [`useFetch`](https://nuxt.com/docs/api/composables/use-fetch) composables are not available. Please read the rest of this page for details.
::
Bridge is a forward-compatibility layer that allows you to experience many of the new Nuxt 3 features by simply installing and enabling a Nuxt module.
Using Nuxt Bridge, you can make sure your project is (almost) ready for Nuxt 3 and you can gradually proceed with the transition to Nuxt 3.
## First Step
### Upgrade Nuxt 2
Make sure your dev server (`nuxt dev`) isn't running, remove any package lock files (`package-lock.json` and `yarn.lock`), and install the latest Nuxt 2 version:
```diff [package.json]
- "nuxt": "^2.16.3"
+ "nuxt": "^2.17.3"
```
Then, reinstall your dependencies:
::code-group{sync="pm"}
```bash [npm]
npm install
```
```bash [yarn]
yarn install
```
```bash [pnpm]
pnpm install
```
```bash [bun]
bun install
```
::
::note
Once the installation is complete, make sure both development and production builds are working as expected before proceeding.
::
### Install Nuxt Bridge
Install `@nuxt/bridge` and `nuxi` as development dependencies:
::code-group{sync="pm"}
```bash [npm]
npm install -D @nuxt/bridge nuxi
```
```bash [yarn]
yarn add --dev @nuxt/bridge nuxi
```
```bash [pnpm]
pnpm add -D @nuxt/bridge nuxi
```
```bash [bun]
bun add -D @nuxt/bridge nuxi
```
::
### Update `nuxt.config`
Please make sure to avoid any CommonJS syntax such as `module.exports`, `require` or `require.resolve` in your config file. It will soon be deprecated and unsupported.
You can use static `import`, dynamic `import()` and `export default` instead. Using TypeScript by renaming to [`nuxt.config.ts`](https://nuxt.com/docs/guide/directory-structure/nuxt-config) is also possible and recommended.
```ts [nuxt.config.ts]
import { defineNuxtConfig } from '@nuxt/bridge'
export default defineNuxtConfig({
bridge: false
})
```
### Update Commands
The `nuxt` command should now be changed to the `nuxt2` command.
```diff
{
"scripts": {
- "dev": "nuxt",
+ "dev": "nuxt2",
- "build": "nuxt build",
+ "build": "nuxt2 build",
- "start": "nuxt start",
+ "start": "nuxt2 start"
}
}
```
Try running `nuxt2` once here. You will see that the application works as before.
(If 'bridge' is set to false, your application will operate without any changes as before.)
## Upgrade Steps
With Nuxt Bridge, the migration to Nuxt 3 can proceed in steps.
The below `Upgrade Steps` does not need to be done all at once.
- [TypeScript](https://nuxt.com/docs/bridge/typescript)
- [Migrate Legacy Composition API](https://nuxt.com/docs/bridge/bridge-composition-api)
- [Plugins and Middleware](https://nuxt.com/docs/bridge/plugins-and-middleware)
- [Migrate New Composition API](https://nuxt.com/docs/bridge/nuxt3-compatible-api)
- [Meta Tags](https://nuxt.com/docs/bridge/meta)
- [Runtime Config](https://nuxt.com/docs/bridge/runtime-config)
- [Nitro](https://nuxt.com/docs/bridge/nitro)
- [Vite](https://nuxt.com/docs/bridge/vite)
## Migrate from CommonJS to ESM
Nuxt 3 natively supports TypeScript and ECMAScript Modules. Please check [Native ES Modules](https://nuxt.com/docs/guide/concepts/esm) for more info and upgrading.
# Configuration
## Feature Flags
You can optionally disable some features from bridge or opt-in to less stable ones. In normal circumstances, it is always best to stick with defaults!
You can check [bridge/src/module.ts](https://github.com/nuxt/bridge/blob/main/packages/bridge/src/module.ts){rel="nofollow"} for latest defaults.
```ts [nuxt.config.ts]
import { defineNuxtConfig } from '@nuxt/bridge'
export default defineNuxtConfig({
bridge: {
// -- Opt-in features --
// Use Vite as the bundler instead of webpack 4
// vite: true,
// Enable Nuxt 3 compatible useHead
// meta: true,
// Enable definePageMeta macro
// macros: {
// pageMeta: true
// },
// Enable transpiling TypeScript with esbuild
// typescript: {
// esbuild: true
// },
// -- Default features --
// Use legacy server instead of Nitro
// nitro: false,
// Disable Nuxt 3 compatible `nuxtApp` interface
// app: false,
// Disable Composition API support
// capi: false,
// ... or just disable legacy Composition API support
// capi: {
// legacy: false
// },
// Do not transpile modules
// transpile: false,
// Disable <script setup> support
// scriptSetup: false,
// Disable composables auto importing
// imports: false,
// Do not warn about module incompatibilities
// constraints: false
},
vite: {
// Config for Vite
}
})
```
## Migration of each option
### router.base
```diff
export default defineNuxtConfig({
- router: {
- base: '/my-app/'
- }
+ app: {
+ baseURL: '/my-app/'
+ }
})
```
### build.publicPath
```diff
export default defineNuxtConfig({
- build: {
- publicPath: 'https://my-cdn.net'
- }
+ app: {
+ cdnURL: 'https://my-cdn.net'
+ }
})
```
# TypeScript
## Remove Modules
- Remove `@nuxt/typescript-build`: Bridge enables same functionality
- Remove `@nuxt/typescript-runtime` and `nuxt-ts`: Nuxt 2 has built-in runtime support
### Set `bridge.typescript`
```ts
import { defineNuxtConfig } from '@nuxt/bridge'
export default defineNuxtConfig({
bridge: {
typescript: true,
nitro: false // If migration to Nitro is complete, set to true
}
})
```
## Update `tsconfig.json`
If you are using TypeScript, you can edit your `tsconfig.json` to benefit from auto-generated Nuxt types:
```diff [tsconfig.json]
{
+ "extends": "./.nuxt/tsconfig.json",
"compilerOptions": {
...
}
}
```
::note
As `.nuxt/tsconfig.json` is generated and not checked into version control, you'll need to generate that file before running your tests. Add `nuxi prepare` as a step before your tests, otherwise you'll see `TS5083: Cannot read file '~/.nuxt/tsconfig.json'`
::
::note
Keep in mind that all options extended from `./.nuxt/tsconfig.json` will be overwritten by the options defined in your `tsconfig.json`.
Overwriting options such as `"compilerOptions.paths"` with your own configuration will lead TypeScript to not factor in the module resolutions from `./.nuxt/tsconfig.json`. This can lead to module resolutions such as `#imports` not being recognized.
In case you need to extend options provided by `./.nuxt/tsconfig.json` further, you can use the `alias` property within your `nuxt.config`. `nuxi` will pick them up and extend `./.nuxt/tsconfig.json` accordingly.
::
# Legacy Composition API
Nuxt Bridge provides access to Composition API syntax. It is specifically designed to be aligned with Nuxt 3. Because of this, there are a few extra steps to take when enabling Nuxt Bridge, if you have been using the Composition API previously.
## Remove Modules
- Remove `@vue/composition-api` from your dependencies.
- Remove `@nuxtjs/composition-api` from your dependencies (and from your modules in `nuxt.config`).
## Using `@vue/composition-api`
If you have been using just `@vue/composition-api` and not `@nuxtjs/composition-api`, then things are very straightforward.
1. First, remove the plugin where you are manually registering the Composition API. Nuxt Bridge will handle this for you.
```diff
- import Vue from 'vue'
- import VueCompositionApi from '@vue/composition-api'
-
- Vue.use(VueCompositionApi)
```
2. Otherwise, there is nothing you need to do. However, if you want, you can remove your explicit imports from `@vue/composition-api` and rely on Nuxt Bridge auto-importing them for you.
## Migrating from `@nuxtjs/composition-api`
Nuxt Bridge implements the Composition API slightly differently from `@nuxtjs/composition-api` and provides different composables (designed to be aligned with the composables that Nuxt 3 provides).
Because some composables have been removed and don't yet have a replacement, this will be a slightly more complicated process.
### Remove `@nuxtjs/composition-api/module` from your buildModules
You don't have to immediately update your imports yet - Nuxt Bridge will automatically provide a 'shim' for most imports you currently have, to give you time to migrate to the new, Nuxt 3-compatible composables, with the following exceptions:
- `withContext` has been removed. See [below](https://nuxt.com/docs/bridge/nuxt3-compatible-api#usecontext-and-withcontext).
- `useStatic` has been removed. There is no current replacement. Feel free to raise a discussion if you have a use case for this.
- `reqRef` and `reqSsrRef`, which were deprecated, have now been removed entirely. Follow the instructions below regarding [ssrRef](https://nuxt.com/docs/bridge/nuxt3-compatible-api#ssrref-and-shallowssrref) to replace this.
### Set `bridge.capi`
```ts
import { defineNuxtConfig } from '@nuxt/bridge'
export default defineNuxtConfig({
bridge: {
capi: true,
nitro: false // If migration to Nitro is complete, set to true
}
})
```
For each other composable you are using from `@nuxtjs/composition-api`, follow the steps below.
### useFetch
`$fetchState` and `$fetch` have been removed.
```diff
const {
- $fetch,
- $fetchState,
+ fetch,
+ fetchState,
} = useFetch(() => { posts.value = await $fetch('/api/posts') })
```
### `defineNuxtMiddleware`
This was a type-helper stub function that is now removed.
Remove the `defineNuxtMiddleware` wrapper:
```diff
- import { defineNuxtMiddleware } from '@nuxtjs/composition-api`
- export default defineNuxtMiddleware((ctx) => {})
+ export default (ctx) => {}
```
For typescript support, you can use `@nuxt/types`:
```ts
import type { Middleware } from '@nuxt/types'
export default <Middleware> function (ctx) { }
```
### `defineNuxtPlugin`
This was a type-helper stub function that is now removed.
You may also keep using Nuxt 2-style plugins, by removing the function (as with [defineNuxtMiddleware](https://nuxt.com/#definenuxtmiddleware)).
Remove the `defineNuxtPlugin` wrapper:
```diff
- import { defineNuxtPlugin } from '@nuxtjs/composition-api'
- export default defineNuxtPlugin((ctx, inject) => {})
+ export default (ctx, inject) => {}
```
For typescript support, you can use `@nuxt/types`:
```ts
import type { Plugin } from '@nuxt/types'
export default <Plugin> function (ctx, inject) {}
```
::warning
While this example is valid, Nuxt 3 introduces a new defineNuxtPlugin function that has a slightly different signature.
::
::read-more{link="/docs/guide/directory-structure/plugins#creating-plugins"}
::
### `useRouter` and `useRoute`
Nuxt Bridge provides direct replacements for these composables via [`useRouter`](https://nuxt.com/docs/api/composables/use-router) and `useRoute`.
The only key difference is that [`useRoute`](https://nuxt.com/docs/api/composables/use-route) no longer returns a computed property.
```diff
- import { useRouter, useRoute } from '@nuxtjs/composition-api'
const router = useRouter()
const route = useRoute()
- console.log(route.value.path)
+ console.log(route.path)
```
# Plugins and Middleware
## New Plugins Format
You can now migrate to the Nuxt 3 plugins API, which is slightly different in format from Nuxt 2.
Plugins now take only one argument (`nuxtApp`). You can find out more in [the docs](https://nuxt.com/docs/guide/directory-structure/plugins).
```js [plugins/hello.ts]
export default defineNuxtPlugin(nuxtApp => {
nuxtApp.provide('injected', () => 'my injected function')
// now available on `nuxtApp.$injected`
})
```
::note
If you want to use the new Nuxt composables (such as [`useNuxtApp`](https://nuxt.com/docs/api/composables/use-nuxt-app) or `useRuntimeConfig`) within your plugins, you will need to use the `defineNuxtPlugin` helper for those plugins.
::
::warning
Although a compatibility interface is provided via `nuxtApp.vueApp` you should avoid registering plugins, directives, mixins or components this way without adding your own logic to ensure they are not installed more than once, or this may cause a memory leak.
::
## New Middleware Format
You can now migrate to the Nuxt 3 middleware API, which is slightly different in format from Nuxt 2.
Middleware now take only two argument (`to`, `from`). You can find out more in [the docs](https://nuxt.com/docs/guide/directory-structure/middleware).
```ts twoslash
export default defineNuxtRouteMiddleware((to) => {
if (to.path !== '/') {
return navigateTo('/')
}
})
```
::important
Use of `defineNuxtRouteMiddleware` is not supported outside of the middleware directory.
::
## definePageMeta
You can also use [`definePageMeta`](https://nuxt.com/docs/api/utils/define-page-meta) in Nuxt Bridge.
You can be enabled with the `macros.pageMeta` option in your configuration file
```ts [nuxt.config.ts]
import { defineNuxtConfig } from '@nuxt/bridge'
export default defineNuxtConfig({
bridge: {
macros: {
pageMeta: true
}
}
})
```
::note
But only for `middleware` and `layout`.
::
# New Composition API
By migrating from `@nuxtjs/composition-api` to the Nuxt 3 compatible API, there will be less rewriting when migrating to Nuxt 3.
## `ssrRef` and `shallowSsrRef`
These two functions have been replaced with a new composable that works very similarly under the hood: `useState`.
The key differences are that you must provide a *key* for this state (which Nuxt generated automatically for `ssrRef` and `shallowSsrRef`), and that it can only be called within a Nuxt 3 plugin (which is defined by `defineNuxtPlugin`) or a component instance. (In other words, you cannot use [`useState`](https://nuxt.com/docs/api/composables/use-state) with a global/ambient context, because of the danger of shared state across requests.)
```diff
- import { ssrRef } from '@nuxtjs/composition-api'
- const ref1 = ssrRef('initialData')
- const ref2 = ssrRef(() => 'factory function')
+ const ref1 = useState('ref1-key', () => 'initialData')
+ const ref2 = useState('ref2-key', () => 'factory function')
// accessing the state
console.log(ref1.value)
```
Because the state is keyed, you can access the same state from multiple locations, as long as you are using the same key.
You can read more about how to use this composable in [the Nuxt 3 docs](https://nuxt.com/docs/api/composables/use-state).
## `ssrPromise`
This function has been removed, and you will need to find an alternative implementation if you were using it. If you have a use case for `ssrPromise`, please let us know via a discussion.
## `onGlobalSetup`
This function has been removed, but its use cases can be met by using [`useNuxtApp`](https://nuxt.com/docs/api/composables/use-nuxt-app) or [`useState`](https://nuxt.com/docs/api/composables/use-state) within `defineNuxtPlugin`. You can also run any custom code within the `setup()` function of a layout.
```diff
- import { onGlobalSetup } from '@nuxtjs/composition-api'
- export default () => {
- onGlobalSetup(() => {
+ export default defineNuxtPlugin((nuxtApp) => {
+ nuxtApp.hook('vue:setup', () => {
// ...
})
- }
+ })
```
## `useStore`
In order to access Vuex store instance, you can use `useNuxtApp().$store`.
```diff
- import { useStore } from '@nuxtjs/composition-api`
+ const { $store } = useNuxtApp()
```
## `useContext` and `withContext`
You can access injected helpers using `useNuxtApp`.
```diff
- import { useContext } from '@nuxtjs/composition-api`
+ const { $axios } = useNuxtApp()
```
::note
`useNuxtApp()` also provides a key called `nuxt2Context` which contains all the same properties you would normally access from Nuxt 2 context, but it's advised *not* to use this directly, as it won't exist in Nuxt 3. Instead, see if there is another way to access what you need. (If not, please raise a feature request or discussion.)
::
## `wrapProperty`
This helper function is not provided any more but you can replace it with the following code:
```js
const wrapProperty = (property, makeComputed = true) => () => {
const vm = getCurrentInstance().proxy
return makeComputed ? computed(() => vm[property]) : vm[property]
}
```
## `useAsync` and `useFetch`
These two composables can be replaced with `useLazyAsyncData` and `useLazyFetch`, which are documented [in the Nuxt 3 docs](https://nuxt.com/docs/getting-started/data-fetching). Just like the previous `@nuxtjs/composition-api` composables, these composables do not block route navigation on the client-side (hence the 'lazy' part of the name).
::important
Note that the API is entirely different, despite similar sounding names. Importantly, you should not attempt to change the value of other variables outside the composable (as you may have been doing with the previous `useFetch`).
::
::warning
The `useLazyFetch` must have been configured for [Nitro](https://nuxt.com/docs/bridge/nitro).
::
Migrating to the new composables from `useAsync`:
```diff
<script setup>
- import { useAsync } from '@nuxtjs/composition-api'
- const posts = useAsync(() => $fetch('/api/posts'))
+ const { data: posts } = useLazyAsyncData('posts', () => $fetch('/api/posts'))
+ // or, more simply!
+ const { data: posts } = useLazyFetch('/api/posts')
</script>
```
Migrating to the new composables from `useFetch`:
```diff
<script setup>
- import { useFetch } from '@nuxtjs/composition-api'
- const posts = ref([])
- const { fetch } = useFetch(() => { posts.value = await $fetch('/api/posts') })
+ const { data: posts, refresh } = useLazyAsyncData('posts', () => $fetch('/api/posts'))
+ // or, more simply!
+ const { data: posts, refresh } = useLazyFetch('/api/posts')
function updatePosts() {
- return fetch()
+ return refresh()
}
</script>
```
### `useMeta`
In order to interact with `vue-meta`, you may use `useNuxt2Meta`, which will work in Nuxt Bridge (but not Nuxt 3) and will allow you to manipulate your meta tags in a `vue-meta`-compatible way.
```diff
<script setup>
- import { useMeta } from '@nuxtjs/composition-api'
useNuxt2Meta({
title: 'My Nuxt App',
})
</script>
```
You can also pass in computed values or refs, and the meta values will be updated reactively:
```ts
<script setup>
const title = ref('my title')
useNuxt2Meta({
title,
})
title.value = 'new title'
</script>
```
::note
Be careful not to use both `useNuxt2Meta()` and the Options API `head()` within the same component, as behavior may be unpredictable.
::
Nuxt Bridge also provides a Nuxt 3-compatible meta implementation that can be accessed with the [`useHead`](https://nuxt.com/docs/api/composables/use-head) composable.
```diff
<script setup>
- import { useMeta } from '@nuxtjs/composition-api'
useHead({
title: 'My Nuxt App',
})
</script>
```
You will also need to enable it explicitly in your `nuxt.config`:
```js
import { defineNuxtConfig } from '@nuxt/bridge'
export default defineNuxtConfig({
bridge: {
meta: true
}
})
```
This [`useHead`](https://nuxt.com/docs/api/composables/use-head) composable uses `@unhead/vue` under the hood (rather than `vue-meta`) to manipulate your `<head>`. Accordingly, it is recommended not to use both the native Nuxt 2 `head()` properties as well as [`useHead`](https://nuxt.com/docs/api/composables/use-head) , as they may conflict.
For more information on how to use this composable, see [the Nuxt 3 docs](https://nuxt.com/docs/getting-started/seo-meta).
### Explicit Imports
Nuxt exposes every auto-import with the `#imports` alias that can be used to make the import explicit if needed:
```vue
<script setup lang="ts">
import { ref, computed } from '#imports'
const count = ref(1)
const double = computed(() => count.value * 2)
</script>
```
### Disabling Auto-imports
If you want to disable auto-importing composables and utilities, you can set `imports.autoImport` to `false` in the `nuxt.config` file.
```ts [nuxt.config.ts]
export default defineNuxtConfig({
imports: {
autoImport: false
}
})
```
This will disable auto-imports completely but it's still possible to use [explicit imports](https://nuxt.com/#explicit-imports) from `#imports`.
# Meta Tags
If you need to access the component state with `head`, you should migrate to using [`useHead`](https://nuxt.com/docs/api/composables/use-head) .
If you need to use the Options API, there is a `head()` method you can use when you use `defineNuxtComponent`.
## Migration
### Set `bridge.meta`
```js
import { defineNuxtConfig } from '@nuxt/bridge'
export default defineNuxtConfig({
bridge: {
meta: true,
nitro: false // If migration to Nitro is complete, set to true
}
})
```
### Update head properties
In your `nuxt.config`, rename `head` to `meta`. (Note that objects no longer have a `hid` key for deduplication.)
::code-group
```ts [Nuxt 2]
export default {
head: {
titleTemplate: '%s - Nuxt',
meta: [
{ charset: 'utf-8' },
{ name: 'viewport', content: 'width=device-width, initial-scale=1' },
{ hid: 'description', name: 'description', content: 'Meta description' }
]
}
}
```
```ts [Nuxt 3]
export default defineNuxtConfig({
app: {
head: {
titleTemplate: '%s - Nuxt',
meta: [
{ charset: 'utf-8' },
{ name: 'viewport', content: 'width=device-width, initial-scale=1' },
{ name: 'description', content: 'Meta description' }
]
}
}
})
```
::
## `useHead` Composables
Nuxt Bridge provides a new Nuxt 3 meta API that can be accessed with a new [`useHead`](https://nuxt.com/docs/api/composables/use-head) composable.
```vue
<script setup lang="ts">
useHead({
title: 'My Nuxt App',
})
</script>
```
::tip
This [`useHead`](https://nuxt.com/docs/api/composables/use-head) composable uses `@unhead/vue` under the hood (rather than `vue-meta`) to manipulate your `<head>`.
::
::warning
We recommend not using the native Nuxt 2 `head()` properties in addition to [`useHead`](https://nuxt.com/docs/api/composables/use-head) , as they may conflict.
::
For more information on how to use this composable, see [the docs](https://nuxt.com/docs/getting-started/seo-meta).
## Options API
```vue
<script>
// if using options API `head` method you must use `defineNuxtComponent`
export default defineNuxtComponent({
head (nuxtApp) {
// `head` receives the nuxt app but cannot access the component instance
return {
meta: [{
name: 'description',
content: 'This is my page description.'
}]
}
}
})
</script>
```
::warning
Possible breaking change: `head` receives the nuxt app but cannot access the component instance. If the code in your `head` tries to access the data object through `this` or `this.$data`, you will need to migrate to the `useHead` composable.
::
## Title Template
If you want to use a function (for full control), then this cannot be set in your nuxt.config, and it is recommended instead to set it within your `/layouts` directory.
```vue [layouts/default.vue]
<script setup lang="ts">
useHead({
titleTemplate: (titleChunk) => {
return titleChunk ? `${titleChunk} - Site Title` : 'Site Title';
}
})
</script>
```
# Runtime Config
::warning
When using `runtimeConfig` option, [nitro](https://nuxt.com/docs/bridge/nitro) must have been configured.
::
## Update Runtime Config
Nuxt 3 approaches runtime config differently than Nuxt 2, using a new combined `runtimeConfig` option.
First, you'll need to combine your `publicRuntimeConfig` and `privateRuntimeConfig` properties into a new one called `runtimeConfig`, with the public config within a key called `public`.
```diff
// nuxt.config.js
- privateRuntimeConfig: {
- apiKey: process.env.NUXT_API_KEY || 'super-secret-key'
- },
- publicRuntimeConfig: {
- websiteURL: 'https://public-data.com'
- }
+ runtimeConfig: {
+ apiKey: process.env.NUXT_API_KEY || 'super-secret-key',
+ public: {
+ websiteURL: 'https://public-data.com'
+ }
+ }
```
This also means that when you need to access public runtime config, it's behind a property called `public`. If you use public runtime config, you'll need to update your code.
```diff
// MyWidget.vue
- <div>Website: {{ $config.websiteURL }}</div>
+ <div>Website: {{ $config.public.websiteURL }}</div>
```
# Nitro
## Remove Modules
- Remove `@nuxt/nitro`: Bridge injects same functionality
## Update Config
```ts [nuxt.config.ts]
import { defineNuxtConfig } from '@nuxt/bridge'
export default defineNuxtConfig({
bridge: {
nitro: true
}
})
```
## Update Your Scripts
You will also need to update your scripts within your `package.json` to reflect the fact that Nuxt will now produce a Nitro server as build output.
### Install Nuxi
Install `nuxi` as a development dependency:
::code-group{sync="pm"}
```bash [npm]
npm install -D nuxi
```
```bash [yarn]
yarn add --dev nuxi
```
```bash [pnpm]
pnpm add -D nuxi
```
```bash [bun]
bun add -D nuxi
```
::
### Nuxi
Nuxt 3 introduced the new Nuxt CLI command [`nuxi`](https://nuxt.com/docs/api/commands/add). Update your scripts as follows to leverage the better support from Nuxt Bridge:
```diff
{
"scripts": {
- "dev": "nuxt",
+ "dev": "nuxi dev",
- "build": "nuxt build",
+ "build": "nuxi build",
- "start": "nuxt start",
+ "start": "nuxi preview"
}
}
```
::tip
If `nitro: false`, use the `nuxt2` command.
::
### Static Target
If you have set `target: 'static'` in your `nuxt.config` then you need to ensure that you update your build script to be `nuxi generate`.
```json [package.json]
{
"scripts": {
"build": "nuxi generate"
}
}
```
### Server Target
For all other situations, you can use the `nuxi build` command.
```json [package.json]
{
"scripts": {
"build": "nuxi build",
"start": "nuxi preview"
}
}
```
## Exclude Built Nitro Folder From Git
Add the folder `.output` to the `.gitignore` file.
## Ensure Everything Goes Well
✔️ Try with `nuxi dev` and `nuxi build` (or `nuxi generate`) to see if everything goes well.
# Vite
::warning
When using `vite`, [nitro](https://nuxt.com/docs/bridge/nitro) must have been configured.
::
## Remove Modules
- Remove `nuxt-vite`: Bridge enables same functionality
## Update Config
```ts [nuxt.config.ts]
import { defineNuxtConfig } from '@nuxt/bridge'
export default defineNuxtConfig({
bridge: {
vite: true,
nitro: true
}
})
```
## Configuration
```ts [nuxt.config.ts]
import { defineNuxtConfig } from '@nuxt/bridge'
export default defineNuxtConfig({
vite: {
// Config for Vite
}
})
```
# Overview
There are significant changes when migrating a Nuxt 2 app to Nuxt 3, although you can expect migration to become more straightforward as we move toward a stable release.
::note
This migration guide is under progress to align with the development of Nuxt 3.
::
Some of these significant changes include:
1. Moving from Vue 2 to Vue 3, including defaulting to the Composition API and script setup.
2. Moving from webpack 4 and Babel to Vite or webpack 5 and esbuild.
3. Moving from a runtime Nuxt dependency to a minimal, standalone server compiled with nitropack.
::tip
If you need to remain on Nuxt 2, but want to benefit from Nuxt 3 features in Nuxt 2, you can alternatively check out [how to get started with Bridge](https://nuxt.com/docs/bridge/overview).
::
## Next Steps
- Learn about differences in [configuration](https://nuxt.com/docs/migration/configuration)
# Build Tooling
We use the following build tools by default:
- [Vite](https://vite.dev){rel="nofollow"} or [webpack](https://webpack.js.org){rel="nofollow"}
- [Rollup](https://rollupjs.org){rel="nofollow"}
- [PostCSS](https://postcss.org){rel="nofollow"}
- [esbuild](https://esbuild.github.io){rel="nofollow"}
For this reason, most of your previous `build` configuration in `nuxt.config` will now be ignored, including any custom babel configuration.
If you need to configure any of Nuxt's build tools, you can do so in your `nuxt.config`, using the new top-level `vite`, `webpack` and `postcss` keys.
In addition, Nuxt ships with TypeScript support.
::read-more{to="https://nuxt.com/docs/guide/concepts/typescript"}
::
## Steps
1. Remove `@nuxt/typescript-build` and `@nuxt/typescript-runtime` from your dependencies and modules.
2. Remove any unused babel dependencies from your project.
3. Remove any explicit core-js dependencies.
4. Migrate `require` to `import`.
# Server
In a built Nuxt 3 application, there is no runtime Nuxt dependency. That means your site will be highly performant, and ultra-slim. But it also means you can no longer hook into runtime Nuxt server hooks.
::read-more{to="https://nuxt.com/docs/guide/concepts/server-engine"}
::
## Steps
1. Remove the `render` key in your `nuxt.config`.
2. Any files in `~/server/api` and `~/server/middleware` will be automatically registered; you can remove them from your `serverMiddleware` array.
3. Update any other items in your `serverMiddleware` array to point to files or npm packages directly, rather than using inline functions.
::read-more{to="https://nuxt.com/docs/guide/directory-structure/server"}
::
::read-more
---
to: https://nuxt.com/docs/guide/going-further/hooks#server-hooks-runtime
---
::
# Configuration
## `nuxt.config`
The starting point for your Nuxt app remains your `nuxt.config` file.
::note
Nuxt configuration will be loaded using [`unjs/jiti`](https://github.com/unjs/jiti){rel="nofollow"} and [`unjs/c12`](https://github.com/unjs/c12){rel="nofollow"}.
::
### Migration
1. You should migrate to the new `defineNuxtConfig` function that provides a typed configuration schema.
:code-group[```ts \[Nuxt 2\]
export default {
// ...
}
``````ts \[Nuxt 3\]
export default defineNuxtConfig({
// ...
})
```]
2. If you were using `router.extendRoutes` you can migrate to the new `pages:extend` hook:
:code-group[```ts \[Nuxt 2\]
export default {
router: {
extendRoutes (routes) {
//
}
}
}
``````ts \[Nuxt 3\]
export default defineNuxtConfig({
hooks: {
'pages:extend' (routes) {
//
}
}
})
```]
3. If you were using `router.routeNameSplitter` you can achieve same result by updating route name generation logic in the new `pages:extend` hook:
:code-group[```ts \[Nuxt 2\]
export default {
router: {
routeNameSplitter: '/'
}
}
``````ts \[Nuxt 3\]
import { createResolver } from '@nuxt/kit'
export default defineNuxtConfig({
hooks: {
'pages:extend' (routes) {
const routeNameSplitter = '/'
const root = createResolver(import.meta.url).resolve('./pages')
function updateName(routes) {
if (!routes) return
for (const route of routes) {
const relativePath = route.file.substring(root.length + 1)
route.name = relativePath.slice(0, -4).replace(/\/index$/, '').replace(/\//g, routeNameSplitter)
updateName(route.children)
}
}
updateName(routes)
},
},
})
```]
#### ESM Syntax
Nuxt 3 is an [ESM native framework](https://nuxt.com/docs/guide/concepts/esm). Although [`unjs/jiti`](https://github.com/unjs/jiti){rel="nofollow"} provides semi compatibility when loading `nuxt.config` file, avoid any usage of `require` and `module.exports` in this file.
1. Change `module.exports` to `export default`
2. Change `const lib = require('lib')` to `import lib from 'lib'`
#### Async Configuration
In order to make Nuxt loading behavior more predictable, async config syntax is deprecated. Consider using Nuxt hooks for async operations.
#### Dotenv
Nuxt has built-in support for loading `.env` files. Avoid directly importing it from `nuxt.config`.
## Modules
Nuxt and Nuxt Modules are now build-time-only.
### Migration
1. Move all your `buildModules` into `modules`.
2. Check for Nuxt 3 compatibility of modules.
3. If you have any local modules pointing to a directory you should update this to point to the entry file:
```diff
export default defineNuxtConfig({
modules: [
- '~/modules/my-module'
+ '~/modules/my-module/index'
]
})
```
::tip
If you are a module author, you can check out [more information about module compatibility](https://nuxt.com/docs/migration/module-authors) and [our module author guide](https://nuxt.com/docs/guide/going-further/modules).
::
## Directory Changes
The `static/` (for storing static assets) has been renamed to `public/`. You can either rename your `static` directory to `public`, or keep the name by setting `dir.public` in your `nuxt.config`.
::read-more{to="https://nuxt.com/docs/guide/directory-structure/public"}
::
## TypeScript
It will be much easier to migrate your application if you use Nuxt's TypeScript integration. This does not mean you need to write your application in TypeScript, just that Nuxt will provide automatic type hints for your editor.
You can read more about Nuxt's TypeScript support [in the docs](https://nuxt.com/docs/guide/concepts/typescript).
::note
Nuxt can type-check your app using [`vue-tsc`](https://github.com/vuejs/language-tools/tree/master/packages/tsc){rel="nofollow"} with `nuxi typecheck` command.
::
### Migration
1. Create a `tsconfig.json` with the following content:
```json
{
"extends": "./.nuxt/tsconfig.json"
}
```
2. Run `npx nuxi prepare` to generate `.nuxt/tsconfig.json`.
3. Install Volar following the instructions in the [docs](https://nuxt.com/docs/getting-started/introduction#prerequisites).
## Vue Changes
There are a number of changes to what is recommended Vue best practice, as well as a number of breaking changes between Vue 2 and 3.
It is recommended to read the [Vue 3 migration guide](https://v3-migration.vuejs.org){rel="nofollow"} and in particular the [breaking changes list](https://v3-migration.vuejs.org/breaking-changes){rel="nofollow"}.
It is not currently possible to use the [Vue 3 migration build](https://v3-migration.vuejs.org/migration-build.html){rel="nofollow"} with Nuxt 3.
## Vuex
Nuxt no longer provides a Vuex integration. Instead, the official Vue recommendation is to use `pinia`, which has built-in Nuxt support via a [Nuxt module](https://pinia.vuejs.org/ssr/nuxt.html){rel="nofollow"}. [Find out more about pinia here](https://pinia.vuejs.org){rel="nofollow"}.
A simple way to provide global state management with pinia would be:
Install the [`@pinia/nuxt`](https://nuxt.com/modules/pinia) module:
```bash [Terminal]
yarn add pinia @pinia/nuxt
```
Enable the module in your nuxt configuration:
```ts [nuxt.config.ts]
import { defineNuxtConfig } from 'nuxt/config';
export default defineNuxtConfig({
modules: ['@pinia/nuxt']
})
```
Create a `store` folder at the root of your application:
```ts [store/index.ts]
import { defineStore } from 'pinia'
export const useMainStore = defineStore('main', {
state: () => ({
counter: 0,
}),
actions: {
increment() {
// `this` is the store instance
this.counter++
},
},
})
```
Create a [plugin](https://nuxt.com/docs/guide/directory-structure/plugins) file to globalize your store:
```ts [plugins/pinia.ts]
import { useMainStore } from '~/store'
export default defineNuxtPlugin(({ $pinia }) => {
return {
provide: {
store: useMainStore($pinia)
}
}
})
```
If you want to keep using Vuex, you can manually migrate to Vuex 4 following [these steps](https://vuex.vuejs.org/guide/migrating-to-4-0-from-3-x.html){rel="nofollow"}.
Once it's done you will need to add the following plugin to your Nuxt app:
```ts [plugins/vuex.ts]
import store from '~/store'
export default defineNuxtPlugin(nuxtApp => {
nuxtApp.vueApp.use(store);
})
```
For larger apps, this migration can entail a lot of work. If updating Vuex still creates roadblocks, you may want to use the community module: [nuxt3-vuex-module](https://github.com/vedmant/nuxt3-vuex#nuxt3-vuex-module){rel="nofollow"}, which should work out of the box.
# Modules
## Module Compatibility
Nuxt 3 has a basic backward compatibility layer for Nuxt 2 modules using `@nuxt/kit` auto wrappers. But there are usually steps to follow to make modules compatible with Nuxt 3 and sometimes, using Nuxt Bridge is required for cross-version compatibility.
We have prepared a [Dedicated Guide](https://nuxt.com/docs/guide/going-further/modules) for authoring Nuxt 3 ready modules using `@nuxt/kit`. Currently best migration path is to follow it and rewrite your modules. Rest of this guide includes preparation steps if you prefer to avoid a full rewrite yet making modules compatible with Nuxt 3.
::tip{icon="i-lucide-puzzle" to="https://nuxt.com/modules"}
Explore Nuxt 3 compatible modules.
::
### Plugin Compatibility
Nuxt 3 plugins are **not** fully backward compatible with Nuxt 2.
::read-more{to="https://nuxt.com/docs/guide/directory-structure/plugins"}
::
### Vue Compatibility
Plugins or components using the Composition API need exclusive Vue 2 or Vue 3 support.
By using [vue-demi](https://github.com/vueuse/vue-demi){rel="nofollow"} they should be compatible with both Nuxt 2 and 3.
## Module Migration
When Nuxt 3 users add your module, you will not have access to the module container (`this.*`) so you will need to use utilities from `@nuxt/kit` to access the container functionality.
### Test with `@nuxt/bridge`
Migrating to `@nuxt/bridge` is the first and most important step for supporting Nuxt 3.
If you have a fixture or example in your module, add `@nuxt/bridge` package to its config (see [example](https://nuxt.com/docs/bridge/overview#update-nuxtconfig))
### Migrate from CommonJS to ESM
Nuxt 3 natively supports TypeScript and ECMAScript Modules. Please check [Native ES Modules](https://nuxt.com/docs/guide/concepts/esm) for more info and upgrading.
### Ensure Plugins Default Export
If you inject a Nuxt plugin that does not have `export default` (such as global Vue plugins), ensure you add `export default () => { }` to the end of it.
::code-group
```js [Before]
// ~/plugins/vuelidate.js
import Vue from 'vue'
import Vuelidate from 'vuelidate'
Vue.use(Vuelidate)
```
```js [After]
// ~/plugins/vuelidate.js
import Vue from 'vue'
import Vuelidate from 'vuelidate'
Vue.use(Vuelidate)
export default () => { }
```
::
### Avoid Runtime Modules
With Nuxt 3, Nuxt is now a build-time-only dependency, which means that modules shouldn't attempt to hook into the Nuxt runtime.
Your module should work even if it's only added to [`buildModules`](https://nuxt.com/docs/api/nuxt-config#runtimeconfig) (instead of `modules`). For example:
- Avoid updating `process.env` within a Nuxt module and reading by a Nuxt plugin; use [`runtimeConfig`](https://nuxt.com/docs/api/nuxt-config#runtimeconfig) instead.
- (\*) Avoid depending on runtime hooks like `vue-renderer:*` for production
- (\*) Avoid adding `serverMiddleware` by importing them inside the module. Instead, add them by referencing a file path so that they are independent of the module's context
(\*) Unless it is for `nuxt dev` purpose only and guarded with `if (nuxt.options.dev) { }`.
::tip
Continue reading about Nuxt 3 modules in the [Modules Author Guide](https://nuxt.com/docs/guide/going-further/modules).
::
### Use TypeScript (Optional)
While it is not essential, most of the Nuxt ecosystem is shifting to use TypeScript, so it is highly recommended to consider migration.
::tip
You can start migration by renaming `.js` files, to `.ts`. TypeScript is designed to be progressive!
::
::tip
You can use TypeScript syntax for Nuxt 2 and 3 modules and plugins without any extra dependencies.
::
# Auto Imports
::note
In the rest of the migration documentation, you will notice that key Nuxt and Vue utilities do not have explicit imports. This is not a typo; Nuxt will automatically import them for you, and you should get full type hinting if you have followed [the instructions](https://nuxt.com/docs/migration/configuration#typescript) to use Nuxt's TypeScript support.
::
[Read more about auto imports](https://nuxt.com/docs/guide/concepts/auto-imports)
## Migration
1. If you have been using `@nuxt/components` in Nuxt 2, you can remove `components: true` in your `nuxt.config`. If you had a more complex setup, then note that the component options have changed somewhat. See the [components documentation](https://nuxt.com/docs/guide/directory-structure/components) for more information.
::tip
You can look at `.nuxt/types/components.d.ts` and `.nuxt/types/imports.d.ts` to see how Nuxt has resolved your components and composable auto-imports.
::
# Meta Tags
Nuxt 3 provides several different ways to manage your meta tags:
1. Through your `nuxt.config`.
2. Through the [`useHead`](https://nuxt.com/docs/api/composables/use-head) [composable](https://nuxt.com/docs/getting-started/seo-meta)
3. Through [global meta components](https://nuxt.com/docs/getting-started/seo-meta)
You can customize `title`, `titleTemplate`, `base`, `script`, `noscript`, `style`, `meta`, `link`, `htmlAttrs` and `bodyAttrs`.
::tip
Nuxt currently uses [`Unhead`](https://github.com/unjs/unhead){rel="nofollow"} to manage your meta tags, but implementation details may change.
::
::read-more{to="https://nuxt.com/docs/getting-started/seo-meta"}
::
## Migration
1. In your `nuxt.config`, rename `head` to `meta`. Consider moving this shared meta configuration into your `app.vue` instead. (Note that objects no longer have a `hid` key for deduplication.)
2. If you need to access the component state with `head`, you should migrate to using [`useHead`](https://nuxt.com/docs/api/composables/use-head) . You might also consider using the built-in meta-components.
3. If you need to use the Options API, there is a `head()` method you can use when you use `defineNuxtComponent`.
### useHead
::code-group
```vue [Nuxt 2]
<script>
export default {
data: () => ({
title: 'My App',
description: 'My App Description'
})
head () {
return {
title: this.title,
meta: [{
hid: 'description',
name: 'description',
content: this.description
}]
}
}
}
</script>
```
```vue [Nuxt 3]
<script setup lang="ts">
const title = ref('My App')
const description = ref('My App Description')
// This will be reactive when you change title/description above
useHead({
title,
meta: [{
name: 'description',
content: description
}]
})
</script>
```
::
### Meta-components
Nuxt 3 also provides meta components that you can use to accomplish the same task. While these components look similar to HTML tags, they are provided by Nuxt and have similar functionality.
::code-group
```vue [Nuxt 2]
<script>
export default {
head () {
return {
title: 'My App',
meta: [{
hid: 'description',
name: 'description',
content: 'My App Description'
}]
}
}
}
</script>
```
```vue [Nuxt 3]
<template>
<div>
<Head>
<Title>My App</Title>
<Meta name="description" content="My app description"/>
</Head>
<!-- -->
</div>
</template>
```
::
::important
1. Make sure you use capital letters for these component names to distinguish them from native HTML elements (`<Title>` rather than `<title>`).
2. You can place these components anywhere in your template for your page.
::
### Options API
```vue [Nuxt 3 (Options API)]
<script>
// if using options API `head` method you must use `defineNuxtComponent`
export default defineNuxtComponent({
head (nuxtApp) {
// `head` receives the nuxt app but cannot access the component instance
return {
meta: [{
name: 'description',
content: 'This is my page description.'
}]
}
}
})
</script>
```
# Plugins and Middleware
## Plugins
Plugins now have a different format, and take only one argument (`nuxtApp`).
::code-group
```js [Nuxt 2]
export default (ctx, inject) => {
inject('injected', () => 'my injected function')
})
```
```ts [Nuxt 3]
export default defineNuxtPlugin(nuxtApp => {
// now available on `nuxtApp.$injected`
nuxtApp.provide('injected', () => 'my injected function')
// You can alternatively use this format, which comes with automatic type support
return {
provide: {
injected: () => 'my injected function'
}
}
})
```
::
::read-more{to="https://nuxt.com/docs/guide/directory-structure/plugins"}
::
::read-more{to="https://nuxt.com/docs/api/composables/use-nuxt-app"}
Read more about the format of `nuxtApp`.
::
### Migration
1. Migrate your plugins to use the `defineNuxtPlugin` helper function.
2. Remove any entries in your `nuxt.config` plugins array that are located in your `plugins/` folder. All files in this directory at the top level (and any index files in any subdirectories) will be automatically registered. Instead of setting `mode` to `client` or `server`, you can indicate this in the file name. For example, `~/plugins/my-plugin.client.ts` will only be loaded on client-side.
## Route Middleware
Route middleware has a different format.
::code-group
```js [Nuxt 2]
export default function ({ store, redirect }) {
// If the user is not authenticated
if (!store.state.authenticated) {
return redirect('/login')
}
}
```
```ts [Nuxt 3]
export default defineNuxtRouteMiddleware((to, from) => {
const auth = useState('auth')
if (!auth.value.authenticated) {
return navigateTo('/login')
}
})
```
::
Much like Nuxt 2, route middleware placed in your `~/middleware` folder is automatically registered. You can then specify it by name in a component. However, this is done with `definePageMeta` rather than as a component option.
`navigateTo` is one of a number of route helper functions.
::read-more{to="https://nuxt.com/docs/guide/directory-structure/middleware"}
::
### Migration
1. Migrate your route middleware to use the `defineNuxtRouteMiddleware` helper function.
2. Any global middleware (such as in your `nuxt.config`) can be placed in your `~/middleware` folder with a `.global` extension, for example `~/middleware/auth.global.ts`.
# Pages and Layouts
## `app.vue`
Nuxt 3 provides a central entry point to your app via `~/app.vue`.
::note
If you don't have an `app.vue` file in your source directory, Nuxt will use its own default version.
::
This file is a great place to put any custom code that needs to be run once when your app starts up, as well as any components that are present on every page of your app. For example, if you only have one layout, you can move this to `app.vue` instead.
::read-more{to="https://nuxt.com/docs/guide/directory-structure/app"}
::
::link-example{to="https://nuxt.com/docs/examples/hello-world"}
::
### Migration
Consider creating an `app.vue` file and including any logic that needs to run once at the top-level of your app. You can check out [an example here](https://nuxt.com/docs/guide/directory-structure/app).
## Layouts
If you are using layouts in your app for multiple pages, there is only a slight change required.
In Nuxt 2, the `<Nuxt>` component is used within a layout to render the current page. In Nuxt 3, layouts use slots instead, so you will have to replace that component with a `<slot />`. This also allows advanced use cases with named and scoped slots. [Read more about layouts](https://nuxt.com/docs/guide/directory-structure/layouts).
You will also need to change how you define the layout used by a page using the `definePageMeta` compiler macro. Layouts will be kebab-cased. So `layouts/customLayout.vue` becomes `custom-layout` when referenced in your page.
### Migration
1. Replace `<Nuxt />` with `<slot />`
```diff [layouts/custom.vue]
<template>
<div id="app-layout">
<main>
- <Nuxt />
+ <slot />
</main>
</div>
</template>
```
2. Use [`definePageMeta`](https://nuxt.com/docs/api/utils/define-page-meta) to select the layout used by your page.
```diff [pages/index.vue]
+ <script setup>
+ definePageMeta({
+ layout: 'custom'
+ })
- <script>
- export default {
- layout: 'custom'
- }
</script>
```
3. Move `~/layouts/_error.vue` to `~/error.vue`. See [the error handling docs](https://nuxt.com/docs/getting-started/error-handling). If you want to ensure that this page uses a layout, you can use [`<NuxtLayout>`](https://nuxt.com/docs/guide/directory-structure/layouts) directly within `error.vue`:
```vue [error.vue]
<template>
<div>
<NuxtLayout name="default">
<!-- -->
</NuxtLayout>
</div>
</template>
```
## Pages
Nuxt 3 ships with an optional `vue-router` integration triggered by the existence of a [`pages/`](https://nuxt.com/docs/guide/directory-structure/pages) directory in your source directory. If you only have a single page, you may consider instead moving it to `app.vue` for a lighter build.
### Dynamic Routes
The format for defining dynamic routes in Nuxt 3 is slightly different from Nuxt 2, so you may need to rename some of the files within `pages/`.
1. Where you previously used `_id` to define a dynamic route parameter you now use `[id]`.
2. Where you previously used `_.vue` to define a catch-all route, you now use `[...slug].vue`.
### Nested Routes
In Nuxt 2, you will have defined any nested routes (with parent and child components) using `<Nuxt>` and `<NuxtChild>`. In Nuxt 3, these have been replaced with a single `<NuxtPage>` component.
### Page Keys and Keep-alive Props
If you were passing a custom page key or keep-alive props to `<Nuxt>`, you will now use `definePageMeta` to set these options.
::read-more
---
to: https://nuxt.com/docs/guide/directory-structure/pages#special-metadata
---
::
### Page and Layout Transitions
If you have been defining transitions for your page or layout directly in your component options, you will now need to use `definePageMeta` to set the transition. Since Vue 3, [-enter and -leave CSS classes have been renamed](https://v3-migration.vuejs.org/breaking-changes/transition.html){rel="nofollow"}. The `style` prop from `<Nuxt>` no longer applies to transition when used on `<slot>`, so move the styles to your `-active` class.
::read-more{to="https://nuxt.com/docs/getting-started/transitions"}
::
### Migration
1. Rename any pages with dynamic parameters to match the new format.
2. Update `<Nuxt>` and `<NuxtChild>` to be `<NuxtPage>`.
3. If you're using the Composition API, you can also migrate `this.$route` and `this.$router` to use [`useRoute`](https://nuxt.com/docs/api/composables/use-route) and [`useRouter`](https://nuxt.com/docs/api/composables/use-router) composables.
#### Example: Dynamic Routes
::code-group
```text [Nuxt 2]
- URL: /users
- Page: /pages/users/index.vue
- URL: /users/some-user-name
- Page: /pages/users/_user.vue
- Usage: params.user
- URL: /users/some-user-name/edit
- Page: /pages/users/_user/edit.vue
- Usage: params.user
- URL: /users/anything-else
- Page: /pages/users/_.vue
- Usage: params.pathMatch
```
```text [Nuxt 3]
- URL: /users
- Page: /pages/users/index.vue
- URL: /users/some-user-name
- Page: /pages/users/[user].vue
- Usage: params.user
- URL: /users/some-user-name/edit
- Page: /pages/users/[user]/edit.vue
- Usage: params.user
- URL: /users/anything-else
- Page: /pages/users/[...slug].vue
- Usage: params.slug
```
::
#### Example: Nested Routes and `definePageMeta`
::code-group
```vue [Nuxt 2]
<template>
<div>
<NuxtChild keep-alive :keep-alive-props="{ exclude: ['modal'] }" :nuxt-child-key="$route.slug" />
</div>
</template>
<script>
export default {
transition: 'page' // or { name: 'page' }
}
</script>
```
```vue [Nuxt 3]
<template>
<div>
<NuxtPage />
</div>
</template>
<script setup lang="ts">
// This compiler macro works in both <script> and <script setup>
definePageMeta({
// you can also pass a string or a computed property
key: route => route.slug,
transition: {
name: 'page',
},
keepalive: {
exclude: ['modal']
},
})
</script>
```
::
## `<NuxtLink>` Component
Most of the syntax and functionality are the same for the global [NuxtLink](https://nuxt.com/docs/api/components/nuxt-link) component. If you have been using the shortcut `<NLink>` format, you should update this to use `<NuxtLink>`.
`<NuxtLink>` is now a drop-in replacement for *all* links, even external ones. You can read more about it, and how to extend it to provide your own link component.
::read-more{to="https://nuxt.com/docs/api/components/nuxt-link"}
::
## Programmatic Navigation
When migrating from Nuxt 2 to Nuxt 3, you will have to update how you programmatically navigate your users. In Nuxt 2, you had access to the underlying Vue Router with `this.$router`. In Nuxt 3, you can use the `navigateTo()` utility method which allows you to pass a route and parameters to Vue Router.
::warning
Ensure to always `await` on [`navigateTo`](https://nuxt.com/docs/api/utils/navigate-to) or chain its result by returning from functions.
::
::code-group
```vue [Nuxt 2]
<script>
export default {
methods: {
navigate(){
this.$router.push({
path: '/search',
query: {
name: 'first name',
type: '1'
}
})
}
}
}
</script>
```
```vue [Nuxt 3]
<script setup lang="ts">
function navigate(){
return navigateTo({
path: '/search',
query: {
name: 'first name',
type: '1'
}
})
}
</script>
```
::
# Component Options
## `asyncData` and `fetch`
Nuxt 3 provides new options for [fetching data from an API](https://nuxt.com/docs/getting-started/data-fetching).
### Isomorphic Fetch
In Nuxt 2 you might use `@nuxtjs/axios` or `@nuxt/http` to fetch your data - or just the polyfilled global `fetch`.
In Nuxt 3 you can use a globally available `fetch` method that has the same API as [the Fetch API](https://developer.mozilla.org/en-US/docs/Web/API/Fetch_API/Using_Fetch){rel="nofollow"} or [`$fetch`](https://nuxt.com/docs/api/utils/dollarfetch) method which is using [unjs/ofetch](https://github.com/unjs/ofetch){rel="nofollow"}. It has a number of benefits, including:
1. It will handle 'smartly' making [direct API calls](https://nuxt.com/docs/guide/concepts/server-engine#direct-api-calls) if it's running on the server, or making a client-side call to your API if it's running on the client. (It can also handle calling third-party APIs.)
2. Plus, it comes with convenience features including automatically parsing responses and stringifying data.
You can read more [about direct API calls](https://nuxt.com/docs/guide/concepts/server-engine#direct-api-calls) or [fetching data](https://nuxt.com/docs/getting-started/data-fetching).
### Composables
Nuxt 3 provides new composables for fetching data: [`useAsyncData`](https://nuxt.com/docs/api/composables/use-async-data) and `useFetch`. They each have 'lazy' variants (`useLazyAsyncData` and `useLazyFetch`), which do not block client-side navigation.
In Nuxt 2, you'd fetch your data in your component using a syntax similar to:
```ts
export default {
async asyncData({ params, $http }) {
const post = await $http.$get(`https://api.nuxtjs.dev/posts/${params.id}`)
return { post }
},
// or alternatively
fetch () {
this.post = await $http.$get(`https://api.nuxtjs.dev/posts/${params.id}`)
}
}
```
Within your methods and templates, you could use the `post` variable similar how you'd use any other piece of data provided by your component.
With Nuxt 3, you can perform this data fetching using composables in your `setup()` method or `<script setup>` tag:
```vue
<script setup lang="ts">
// Define params wherever, through `defineProps()`, `useRoute()`, etc.
const { data: post, refresh } = await useAsyncData('post', () => $fetch(`https://api.nuxtjs.dev/posts/${params.id}`) )
// Or instead - useFetch is a convenience wrapper around useAsyncData when you're just performing a simple fetch
const { data: post, refresh } = await useFetch(`https://api.nuxtjs.dev/posts/${params.id}`)
</script>
```
You can now use `post` inside of your Nuxt 3 template, or call `refresh` to update the data.
::note
Despite the names, [`useFetch`](https://nuxt.com/docs/api/composables/use-fetch) is not a direct replacement of the `fetch()` hook. Rather, [`useAsyncData`](https://nuxt.com/docs/api/composables/use-async-data) replaces both hooks and is more customizable; it can do more than simply fetching data from an endpoint. [`useFetch`](https://nuxt.com/docs/api/composables/use-fetch) is a convenience wrapper around [`useAsyncData`](https://nuxt.com/docs/api/composables/use-async-data) for simply fetching data from an endpoint.
::
### Migration
1. Replace the `asyncData` hook with [`useAsyncData`](https://nuxt.com/docs/api/composables/use-async-data) or [`useFetch`](https://nuxt.com/docs/api/composables/use-fetch) in your page/component.
2. Replace the `fetch` hook with [`useAsyncData`](https://nuxt.com/docs/api/composables/use-async-data) or [`useFetch`](https://nuxt.com/docs/api/composables/use-fetch) in your component.
## `head`
::read-more{to="https://nuxt.com/docs/migration/meta"}
::
## `key`
You can now define a key within the [`definePageMeta`](https://nuxt.com/docs/api/utils/define-page-meta) compiler macro.
```diff [pages/index.vue]
- <script>
- export default {
- key: 'index'
- // or a method
- // key: route => route.fullPath
- }
+ <script setup>
+ definePageMeta({
+ key: 'index'
+ // or a method
+ // key: route => route.fullPath
+ })
</script>
```
## `layout`
::read-more{to="https://nuxt.com/docs/migration/pages-and-layouts"}
::
## `loading`
This feature is not yet supported in Nuxt 3.
## `middleware`
::read-more{to="https://nuxt.com/docs/migration/plugins-and-middleware"}
::
## `scrollToTop`
This feature is not yet supported in Nuxt 3. If you want to overwrite the default scroll behavior of `vue-router`, you can do so in `~/app/router.options.ts` (see [docs](https://nuxt.com/docs/guide/recipes/custom-routing#router-options)) for more info.
Similar to `key`, specify it within the [`definePageMeta`](https://nuxt.com/docs/api/utils/define-page-meta) compiler macro.
```diff [pages/index.vue]
- <script>
- export default {
- scrollToTop: false
- }
+ <script setup>
+ definePageMeta({
+ scrollToTop: false
+ })
</script>
```
## `transition`
::read-more{to="https://nuxt.com/docs/getting-started/transitions"}
::
## `validate`
The validate hook in Nuxt 3 only accepts a single argument, the `route`. Just as in Nuxt 2, you can return a boolean value. If you return false and another match can't be found, this will mean a 404. You can also directly return an object with `statusCode`/`statusMessage` to respond immediately with an error (other matches will not be checked).
```diff [pages/users/[id\\].vue]
- <script>
- export default {
- async validate({ params }) {
- return /^\d+$/.test(params.id)
- }
- }
+ <script setup>
+ definePageMeta({
+ validate: async (route) => {
+ const nuxtApp = useNuxtApp()
+ return /^\d+$/.test(route.params.id)
+ }
+ })
</script>
```
## `watchQuery`
This is not supported in Nuxt 3. Instead, you can directly use a watcher to trigger refetching data.
```vue [pages/users/[id\\].vue]
<script setup lang="ts">
const route = useRoute()
const { data, refresh } = await useFetch('/api/user')
watch(() => route.query, () => refresh())
</script>
```
# Runtime Config
If you wish to reference environment variables within your Nuxt 3 app, you will need to use runtime config.
When referencing these variables within your components, you will have to use the [`useRuntimeConfig`](https://nuxt.com/docs/api/composables/use-runtime-config) composable in your setup method (or Nuxt plugin).
In the `server/` portion of your app, you can use [`useRuntimeConfig`](https://nuxt.com/docs/api/composables/use-runtime-config) without any import.
::read-more{to="https://nuxt.com/docs/guide/going-further/runtime-config"}
::
## Migration
1. Add any environment variables that you use in your app to the `runtimeConfig` property of the `nuxt.config` file.
2. Migrate `process.env` to [`useRuntimeConfig`](https://nuxt.com/docs/api/composables/use-runtime-config) throughout the Vue part of your app.
::code-group
```ts [nuxt.config.ts]
export default defineNuxtConfig({
runtimeConfig: {
// Private config that is only available on the server
apiSecret: '123',
// Config within public will be also exposed to the client
public: {
apiBase: '/api'
}
},
})
```
```vue [pages/index.vue]
<script setup lang="ts">
const config = useRuntimeConfig()
// instead of process.env you will now access config.public.apiBase
console.log(config.public.apiBase)
</script>
```
```ts [server/api/hello.ts]
export default defineEventhandler((event) => {
const config = useRuntimeConfig(event)
// In server, you can now access config.apiSecret, in addition to config.public
console.log(config.apiSecret)
console.log(config.public.apiBase)
})
```
```ini [.env]
# Runtime config values are automatically replaced by matching environment variables at runtime
NUXT_API_SECRET=api_secret_token
NUXT_PUBLIC_API_BASE=https://nuxtjs.org
```
::
# Nuxt Docs
This repository contains the documentation of Nuxt hosted on <https://nuxt.com/docs>{rel="nofollow"}
## Contributing
Have a look at <https://github.com/nuxt/nuxt.com>{rel="nofollow"} to run the website locally.
# Announcing Nuxt 3.0 stable
We are thrilled to announce the first stable version of Nuxt 3.0.0 ✨
Nuxt 3 is a modern rewrite of the Nuxt framework based on [Vite](https://vitejs.dev/){rel="nofollow"}, [Vue3](https://vuejs.org/){rel="nofollow"}, and [Nitro](https://nitro.unjs.io/){rel="nofollow"} with first-class TypeScript support and the result of more than two years of research, community feedback, innovation, and experiment to make a pleasant full-stack Developer Experience for Vue development to everyone.
[Read More In the Documentation](https://nuxt.com/docs/getting-started/introduction)
## API Stability
Nuxt 3.0.0 comes with a stable, production-ready API and 50+ [supported modules](https://nuxt.com/modules) built using [Nuxt Kit](https://nuxt.com/docs/guide/going-further/modules) by the community and Nuxt team.
All composables, filesystem conventions, and configurations are guaranteed to be backward compatible with Nuxt 3.0.0. Due to the nature of the meta-frameworks, some changes happen when we upgrade the underlying dependencies (vite, rollup, and nitropack). Thanks to the new Nuxt Kit and Schema tools, such upgrades will be backward compatible as long as you are using documented features. Kit and Schema also guarantee better future compatibility. This makes it faster for us to iterate and plan the next major versions of Nuxt.
## The browser and Node.js support
Nuxt 3 officially supports evergreen browsers only. The "core browser set" is what we (And [web.dev](http://web.dev){rel="nofollow"} team) believe most developers need to support most of the time in the absence of specific constraints. It takes into account [usage numbers](https://caniuse.com/usage-table){rel="nofollow"}, developer expectations, and [existing support in](https://make.wordpress.org/core/handbook/best-practices/browser-support/){rel="nofollow"} [the ecosystem](https://angular.io/guide/browser-support){rel="nofollow"}. The core browser set targets the **2 most recent major versions** of Chrome, Firefox, and Edge on a monthly basis and Safari on a yearly basis.
On the server side, Nuxt 3 supports Node.js 14, 16, 18, and 19 at the moment. We encourage everyone to use the latest LTS releases of Node.js, we push them once **widely adopted by major deployment platforms**. This means we keep supporting Node.js versions as long as they are supported by the Node.js team on a rolling basis in non-major releases of Nuxt. Since 14.x is being end-of-life soon, we highly encourage you to update to the latest 18.x whenever possible.
## We Love Community
Nuxt wouldn’t be possible today without an amazing community making amazing modules, feedback, and contributions every day. Check our [Community Documentation](https://nuxt.com/docs/community/getting-help){rel="nofollow"} to be involved!
## To the Future
Releasing Nuxt 3 is a big milestone for us and opens a future-proof basis for new ideas and trust for the users to build their enterprise projects with Nuxt 3.
Server Component Islands, WebSocket layer, new Deployment presets, improved CLI and DevTools and Testing infra are a few to mention. Keep an eye on the [roadmap page](https://nuxt.com/docs/community/roadmap){rel="nofollow"} and [GitHub discussions](https://github.com/nuxt/nuxt/discussions){rel="nofollow"} for updates.
NuxtLabs is working on [new product](https://nuxt.studio){rel="nofollow"} and solutions on top of Nuxt 3 at the time of writing this article.
Stay tuned for more exciting news and Happy Nuxting 💚
# Nuxt 3.3
## ✨ Local module development DX
We've landed a raft of changes to enable local modules and improve DX.
We now auto-scan your [`~/modules`](https://nuxt.com/docs/guide/directory-structure/modules) folder and register top level files there as modules in your project ([#19394](https://github.com/nuxt/nuxt/pull/19394){rel="nofollow"}).
When these files are changed, we'll automatically restart the nuxt server.
```diff
export default defineNuxtConfig({
modules: [
'@nuxtjs/tailwindcss',
- '~/modules/purge-comments'
]
})
```
We also now expose `nuxt/kit` for easy access to kit composables in your local project without having to install `@nuxt/kit` ([#19422](https://github.com/nuxt/nuxt/pull/19422){rel="nofollow"}).
[Read the documentation about local modules](https://nuxt.com/docs/guide/directory-structure/modules).
## ♻️ Restarting Nuxt
You can add files to the `watch` array to automatically restart the server ([#19530](https://github.com/nuxt/nuxt/pull/19530){rel="nofollow"}). This is likely to be particularly useful for module authors. You can also trigger a restart of the Nuxt server with the new `restart` hook ([#19084](https://github.com/nuxt/nuxt/pull/19084){rel="nofollow"}).
## 🔥 Performance improvements
We've increased static asset maxAge to 1 year as a matter of best practice ([#19335](https://github.com/nuxt/nuxt/pull/19335){rel="nofollow"}), and support tree-shaking more of your build ([#19508](https://github.com/nuxt/nuxt/pull/19508){rel="nofollow"}).
{className="rounded-lg,border,border-gray-700"}
We also now support preloading [`<NuxtLink>`](https://nuxt.com/docs/api/components/nuxt-link) with a route in object-syntax ([#19120](https://github.com/nuxt/nuxt/pull/19120){rel="nofollow"}):
```html
<NuxtLink :to="{ name: 'home', query: { year: '2023' } }">Home</NuxtLink>
```
We also track how long it takes each module you use to perform its setup, and warn if it takes too long. You can see all these values by running your dev server with `DEBUG=1` ([#18648](https://github.com/nuxt/nuxt/pull/18648){rel="nofollow"}).
```sh
DEBUG=1 npx nuxt dev
ℹ Module pages took 1.5ms to setup.
ℹ Module meta took 3.15ms to setup
ℹ Module components took 4.5ms to setup.
...
```
You can also opt-in to some of Nuxt's internal optimisations by configuring composables to be treeshaken in a particular environment ([#19383](https://github.com/nuxt/nuxt/pull/19383){rel="nofollow"}) or to have magic keys automatically injected ([#19490](https://github.com/nuxt/nuxt/pull/19490){rel="nofollow"}).
## 🐛 Error handling
We now handle chunk errors by default ([#19086](https://github.com/nuxt/nuxt/pull/19086){rel="nofollow"}), meaning if your site updates with a redeploy, **we automatically handle reloading it on navigation**.
To disable this behavior, set `experimental.emitRouteChunkError` option to `'manual'` and handle it yourself with the new [`reloadNuxtApp`](https://nuxt.com/docs/api/utils/reload-nuxt-app){rel="nofollow"} composable. Learn more how we implemented in our [chunk-reload.client.ts plugin](https://github.com/nuxt/nuxt/blob/main/packages/nuxt/src/app/plugins/chunk-reload.client.ts){rel="nofollow"}.
You can also set `experimental.restoreState` to preserve some of your app state across reloads:
```ts [nuxt.config.ts]
defineNuxtConfig({
experimental: {
restoreState: true
}
})
```
We also have a new experimental error handling component: [`<NuxtClientFallback>`](https://nuxt.com/docs/api/components/nuxt-client-fallback) ([#8216](https://github.com/nuxt/framework/pull/8216){rel="nofollow"}) which can capture errors rendering on server, replace them with fallback content, and granularly trigger rerendering the part with an error on the client. This can be enabled with `experimental.clientFallback` - feedback very welcome!
## ⚡️ Head improvements
We've migrated to use [unhead](https://github.com/unjs/unhead){rel="nofollow"} directly ([#19519](https://github.com/nuxt/nuxt/pull/19519){rel="nofollow"}) - and automatically tree-shake server-only head composables like `useServerHead` from your client build ([#19576](https://github.com/nuxt/nuxt/pull/19576){rel="nofollow"}), meaning you can have great SEO without needing to include meta tag logic that's relevant only for crawlers in your client build.
There's also a new [`useHeadSafe`](https://nuxt.com/docs/api/composables/use-head-safe) composable that handles sanitising untrusted user input ([#19548](https://github.com/nuxt/nuxt/pull/19548){rel="nofollow"}).
## 🪵 Better logging in browser DevTools
Working with the Chrome DevTools team, we've landed a couple of features across the unjs + Nuxt ecosystem meaning we now have first-class support for hiding Nuxt internal stack traces from logs in your (Chromium-based, for now) browser [#19243](https://github.com/nuxt/nuxt/pull/19243){rel="nofollow"}. We also landed a couple of improvements with stacktraces involving Nuxt hooks ([unjs/hookable#69](https://github.com/unjs/hookable/pull/69){rel="nofollow"} and [unjs/hookable#68](https://github.com/unjs/hookable/pull/68){rel="nofollow"}) implementing [`console.createTask`](https://developer.chrome.com/blog/devtools-modern-web-debugging/#linked-stack-traces){rel="nofollow"}.
| Before | After |
| ------------------------------------------------------------------------------------------------------------------------------------------------------- | ------------------------------------------------------------------------------------------------------------------------------------------------------ |
| 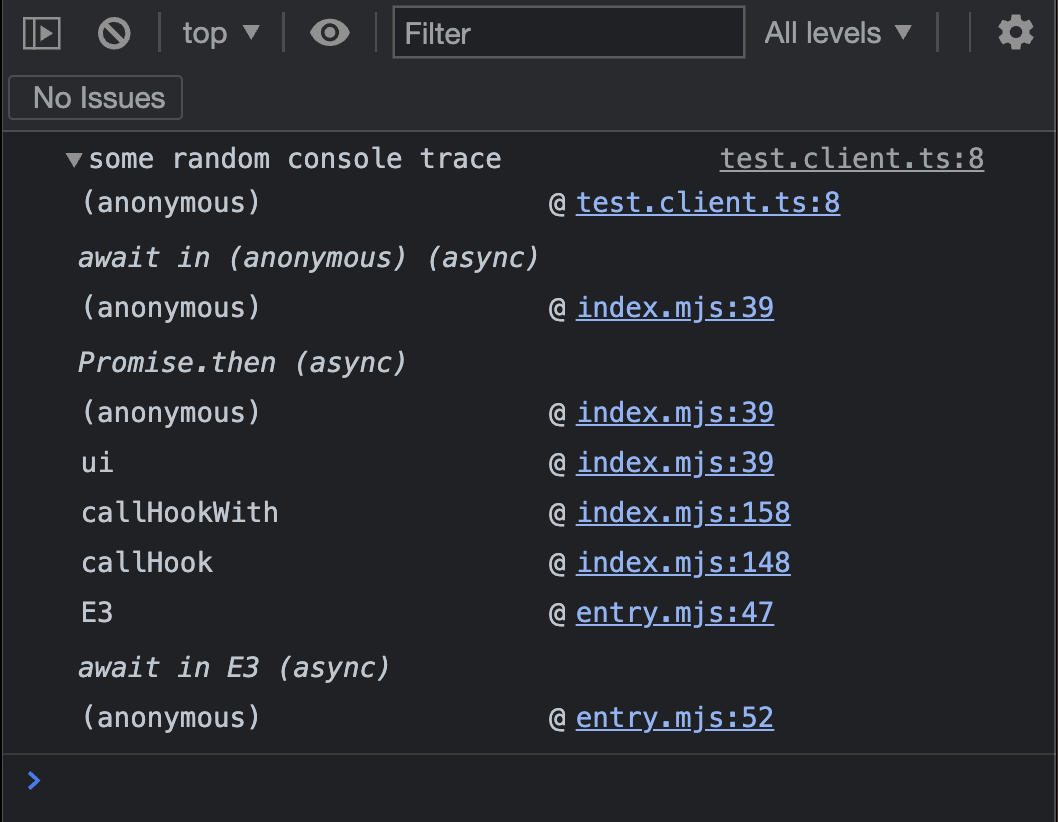{width="529"} | {width="534"} |
## 💪 Type improvements
Types for server API routes are now more correct - with non-serialisable types stripped out of the return type ([unjs/nitro#1002](https://github.com/unjs/nitro/pull/1002){rel="nofollow"}).
We also now type more of `NuxtApp` and correctly type unknown injections for greater type-safety ([#19643](https://github.com/nuxt/nuxt/pull/19643){rel="nofollow"}).
And if you were struggling with correct types when using `transform` + `default` with Nuxt data fetching composables, fear no more - we now infer the types correctly ([#19487](https://github.com/nuxt/nuxt/pull/19487){rel="nofollow"}).
## ⚗️ Nitro enhancements
This release comes with Nitro v2.3, which brings lots of improvements of its own. Check out [the release](https://github.com/unjs/nitro/releases/tag/v2.3.0){rel="nofollow"} for more info.
We now support [`useAppConfig`](https://nuxt.com/docs/api/composables/use-app-config) in nitro server routes ([#19489](https://github.com/nuxt/nuxt/pull/19489){rel="nofollow"}) - a long-awaited change. Now [`useAppConfig`](https://nuxt.com/docs/api/composables/use-app-config) is consistently available throughout your app for non-runtime configuration from layers, modules, etc.
We've also added a `nitro:build:public-assets` hook to allow modifying assets output from nitro's prerender/build phase ([#19638](https://github.com/nuxt/nuxt/pull/19638){rel="nofollow"}).
## 🛠️ Build changes
As part of moving towards [first-class support for PNP and pnpm support without `--shamefully-hoist`](https://github.com/nuxt/nuxt/issues/14146){rel="nofollow"}, we've dropped support for some internal (deprecated) utilities using CJS resolve patterns ([#19537](https://github.com/nuxt/nuxt/pull/19537){rel="nofollow"} and [#19608](https://github.com/nuxt/nuxt/pull/19608){rel="nofollow"}).
We also now resolve dependencies like `nuxt`, `@nuxt/kit` and more using ESM search-paths. We'll be keeping a close eye on this.
We're also preparing the groundwork for support of new TypeScript Node16 module resolution ([#19606](https://github.com/nuxt/nuxt/issues/19606){rel="nofollow"}), and as part of this have changed the format of our runtime output (using `.js` instead of `.mjs` extensions, providing `types` fields for subpath exports, and more).
## 🗺️ Custom config schema (advanced)
We've been testing out an experimental feature to allow modules and users to extend the Nuxt config schema ([#15592](https://github.com/nuxt/nuxt/issues/15592){rel="nofollow"}), and we've now enabled this by default ([#19172](https://github.com/nuxt/nuxt/pull/19172){rel="nofollow"}). We expect this will be particularly useful for module and layer/theme authors, and should result in some nicer DX for their users.
## Changelog
See the full changelog by [comparing the changes](https://github.com/nuxt/nuxt/compare/v3.2.3...v3.3.0){rel="nofollow"} or checkout the [release on GitHub](https://github.com/nuxt/nuxt/releases/tag/v3.3.0){rel="nofollow"}.
We would like to thank all the 28 contributors who helped on this release 💚
# Nuxt 3.4
## 🪄 View Transitions API Support
::article-video{cloudinary="v1681229056/nuxt3/nuxt-view-transitions_cruvma"}
::
You can check a demo on <https://nuxt-view-transitions.surge.sh>{rel="nofollow"} and the [source on StackBlitz](https://stackblitz.com/edit/nuxt-view-transitions){rel="nofollow"}.
You may have noticed that Chromium-based browsers now ship a new web platform API: the [**View Transitions API**](https://developer.chrome.com/docs/web-platform/view-transitions/){rel="nofollow"}. This is an exciting new ability for native browser transitions which (among other things) have the ability to transition between unrelated elements on different pages.
Nuxt now ships with an experimental implementation, which will be under active development during the v3.4 release cycle. See the known issues in the [linked PR](https://github.com/nuxt/nuxt/pull/20092){rel="nofollow"}.
```ts
export default defineNuxtConfig({
experimental: {
viewTransition: true
}
})
```
## ✨ Payload Enhancements
We've merged a **[significant change to how Nuxt handles payloads](https://github.com/nuxt/nuxt/pull/19205){rel="nofollow"}** (under an experimental flag). Payloads are used to send data from the server to the client when doing server-side rendering and avoid double data-fetching during the hydration phase.
```ts [nuxt.config.ts]
export default defineNuxtConfig({
experimental: {
renderJsonPayloads: true
}
})
```
With this new option enabled, this now means that **various rich JS types are supported out-of-the-box**: regular expressions, dates, Map and Set and BigInt as well as NuxtError - and Vue-specific objects like `ref`, `reactive`, `shallowRef` and `shallowReactive`.
You can find [an example](https://github.com/nuxt/nuxt/blob/main/test/fixtures/basic/pages/json-payload.vue){rel="nofollow"} in our test suite.
This is all possible due to [Rich-Harris/devalue#58](https://github.com/Rich-Harris/devalue/pull/58){rel="nofollow"}. For a long time, Nuxt has been using our own fork of devalue owing to issues serialising Errors and other non-POJO objects, but we now have transitioned back to the original.
You can even register your own custom types with a new object-syntax Nuxt plugin:
```ts [plugins/custom-payload-type.ts]
export default definePayloadPlugin(() => {
definePayloadReducer('BlinkingText', data => data === '<original-blink>' && '_')
definePayloadReviver('BlinkingText', () => '<revivified-blink>')
})
```
You can read more about how this works [here](https://github.com/rich-harris/devalue#custom-types){rel="nofollow"}.
**Note**: this only affects payloads of the Nuxt app, that is, data stored within `useState`, returned from `useAsyncData` or manually injected via `nuxtApp.payload`. It does not affect data fetched from Nitro server routes via `$fetch` or `useFetch` although this is one area I am keen to explore further.
Preliminary testing shows a significant speed-up: **25% faster in total server response time** for a very minimal app with a large JSON payload, but I'd urge you to run your own tests and share the results with us.
As mentioned, we're merging this behind a flag so we can test this broadly and gather feedback on the new approach. The most significant potential change is that the payload is now no longer available on `window.__NUXT__` immediately. Instead, we now need to initialise the Nuxt app to parse the payload so any code that accesses `__NUXT__` will need to be run in a plugin or later in the Nuxt app lifecycle. Please feel free to raise an issue if you foresee or encounter issues in your projects.
## 🎁 Object-syntax Nuxt plugins
We now support object-syntax Nuxt plugins for better control over plugin *order* and easier registration of hooks.
```ts [plugins/my-plugin.ts]
export default defineNuxtPlugin({
name: 'my-plugin',
enforce: 'pre', // or 'post'
async setup (nuxtApp) {
// this is the equivalent of a normal functional plugin
},
hooks: {
// You can directly register Nuxt app hooks here
'app:created'() {
const nuxtApp = useNuxtApp()
//
}
}
})
```
In future we plan to enable build optimizations based on the metadata you pass in your Nuxt plugins.
## 🛠️ Easier Devtools Configuration
It's even easier to enable Nuxt DevTools in your project: just set `devtools: true` in your `nuxt.config` file to enable devtools.
```js [nuxt.config.ts]
export default defineNuxtConfig({
devtools: true
})
```
If it's not already installed, Nuxt will prompt to install it locally. This means you no longer need to have Nuxt DevTools enabled globally.
**Note**: the DevTools is still experimental and under active development, so do be prepared for occasional unexpected behaviour, and please report issues directly to <https://github.com/nuxt/devtools>{rel="nofollow"} 🙏
## 📚 Layers Improvements
We now support [transforming `~`/`~~`/`@`/`@@` aliases within layers](https://github.com/nuxt/nuxt/pull/19986){rel="nofollow"}, meaning you now no longer need to use relative paths when importing within layers.
This should mean it is much easier to use a 'normal' Nuxt project as a [layer](https://nuxt.com/docs/getting-started/layers#layers){rel="nofollow"} without needing to specially write it as one.
## 🧸 Better Context Transforms
We [now transform certain keys](https://github.com/nuxt/nuxt/pull/20182){rel="nofollow"} of `definePageMeta` and `defineNuxtComponent` which means you should have fewer issues with a missing Nuxt instance. This includes support accessing the Nuxt instance after an `await` within `asyncData` and `setup` functions for those still using the Options API. And you no longer need to wrap `middleware` and `validate` with `defineNuxtRouteMiddleware` when using async functions.
## ♻️ Ecosystem Updates
As usual, this release will pull in upstream improvements, including the new [Consola v3](https://github.com/unjs/consola){rel="nofollow"} and [Nitropack v2.3.3](https://github.com/unjs/nitro){rel="nofollow"} (a new minor is expected shortly).
## 🚨 'Breaking fixes'
We've also taken the opportunity to do some cleanup in this minor release.
1. Previously it was possible to pass the `x-nuxt-no-ssr` header (undocumented) to force SPA rendering. We've now disabled this behaviour by default but you can get it back by setting `experimental.respectNoSSRHeader` to true. Alternatively, you can set `event.context.nuxt.noSSR` on the server to force SPA rendering.
2. We've [removed the (deprecated) `#head` alias](https://github.com/nuxt/nuxt/pull/20111){rel="nofollow"} and also disabled the [polyfill for `@vueuse/head` behaviour](https://github.com/nuxt/nuxt/pull/20131){rel="nofollow"} by default. (It can still be enabled with `experimental.polyfillVueUseHead`.)
3. We've [removed the (deprecated) `experimental.viteNode` option](https://github.com/nuxt/nuxt/pull/20112){rel="nofollow"}. It can be configured instead with `vite.devBundler`.
4. We've [deprecated accessing public runtime config without the `public` key](https://github.com/nuxt/nuxt/pull/20082){rel="nofollow"}. This was an undocument compatibility measure with Nuxt 2 and we plan to remove it entirely in v3.5.
5. To fix a bug with our vue-router integration, we now generate a slightly different path matching syntax. If you were relying on the exact path generated, have a look at <https://github.com/nuxt/nuxt/pull/19902>{rel="nofollow"} for more information.
## ✅ Upgrading
As usual, our recommendation for upgrading is to run:
```sh
npx nuxi upgrade --force
```
This will refresh your lockfile as well, and ensures that you pull in updates from other dependencies that Nuxt relies on, particularly in the unjs ecosystem.
# Nuxt 3.5
## ⚡️ Vue 3.3 released
Vue 3.3 has been released, with lots of exciting features, particularly around type support.
- new `defineOptions` macro
- 'generic' components
- typed slots and using external types in defineProps
- ... and more
This also brings a significant improvement to data fetching when navigating between nested pages ([#20777](https://github.com/nuxt/nuxt/pull/20777){rel="nofollow"}), thanks to [@antfu](https://github.com/antfu){rel="nofollow"} and [@baiwusanyu-c](https://github.com/baiwusanyu-c){rel="nofollow"}.
Read **[the full release announcement](https://blog.vuejs.org/posts/vue-3-3){rel="nofollow"}** for more details.
### 🙌 Nitropack v2.4
We've been working on lots of improvements to Nitro and these have landed already in Nitro v2.4 - you may already have this upgrade, which contains a lot of bug fixes, updates to the module worker format for Cloudflare, Vercel KV support and more.
One note: if you're deploying to Vercel or Netlify and want to benefit from incremental static regeneration, you should now update your route rules:
```diff
routeRules: {
-- '/blog/**': { swr: 3000 },
++ '/blog/**': { isr: 3000 },
}
```
Read **[the full release notes](https://github.com/unjs/nitro/releases/tag/v2.4.0){rel="nofollow"}**.
### 💖 Rich JSON payloads
**Rich JSON payload serialisation** is now enabled by default ([#19205](https://github.com/nuxt/nuxt/pull/19205){rel="nofollow"}, [#20770](https://github.com/nuxt/nuxt/pull/20770){rel="nofollow"}). This is both faster and allows serialising complex objects in the payload passed from the Nuxt server to client (and also when extracting payload data for prerendered sites).
This now means that **various rich JS types are supported out-of-the-box**: regular expressions, dates, Map and Set and BigInt as well as NuxtError - and Vue-specific objects like `ref`, `reactive`, `shallowRef` and `shallowReactive`.
You can find [an example](https://github.com/nuxt/nuxt/blob/main/test/fixtures/basic/pages/json-payload.vue){rel="nofollow"} in our test suite.
This is all possible due to [Rich-Harris/devalue#58](https://github.com/Rich-Harris/devalue/pull/58){rel="nofollow"}. For a long time, Nuxt has been using our own fork of devalue owing to issues serialising Errors and other non-POJO objects, but we now have transitioned back to the original.
You can even register your own custom types with a new object-syntax Nuxt plugin:
```ts [plugins/custom-payload-type.ts]
export default definePayloadPlugin(() => {
definePayloadReducer('BlinkingText', data => data === '<original-blink>' && '_')
definePayloadReviver('BlinkingText', () => '<revivified-blink>')
})
```
You can read more about how this works [here](https://github.com/rich-harris/devalue#custom-types){rel="nofollow"}.
## 🛝 Interactive server components
This feature should be considered highly experimental, but thanks to some great work from @huang-julien we now support interactive content within server components via *slots* ([#20284](https://github.com/nuxt/nuxt/pull/20284){rel="nofollow"}).
You can follow the server component roadmap at [#19772](https://github.com/nuxt/nuxt/issues/19772){rel="nofollow"}.
## ⏰ Environment config
You can now configure fully typed, per-environment overrides in your `nuxt.config`:
```js
export default defineNuxtConfig({
$production: {
routeRules: {
'/**': { isr: true }
}
},
$development: {
//
}
})
```
If you're authoring layers, you can also use the `$meta` key to provide metadata that you or the consumers of your layer might use.
Read more [about per-environment overrides](https://github.com/nuxt/nuxt/pull/20329){rel="nofollow"}.
## 💪 Fully typed pages
You can benefit from fully typed routing within your Nuxt app via this experimental integration with [unplugin-vue-router](https://github.com/posva/unplugin-vue-router){rel="nofollow"} - thanks to some great work from [@posva](https://github.com/posva){rel="nofollow"}!
Out of the box, this will enable typed usage of [`navigateTo`](https://nuxt.com/docs/api/utils/navigate-to), [`<NuxtLink>`](https://nuxt.com/docs/api/components/nuxt-link), `router.push()` and more.
You can even get typed params within a page by using `const route = useRoute('route-name')`{className="language-ts shiki shiki-themes material-theme-lighter material-theme-lighter material-theme-palenight" lang="ts"}.
Enable this feature directly in your `nuxt.config`:
```ts [nuxt.config.ts]
export default defineNuxtConfig({
experimental: {
typedPages: true
}
})
```
## 🔎 'Bundler' module resolution
We now have full support within Nuxt for the `bundler` strategy of [module resolution](https://www.typescriptlang.org/docs/handbook/module-resolution.html){rel="nofollow"}.
We would recommend adopting this if possible. It has type support for subpath exports, for example, but more exactly matches the behaviour of build tools like Vite and Nuxt than `Node16` resolution.
```ts [nuxt.config.ts]
export default defineNuxtConfig({
typescript: {
tsConfig: {
compilerOptions: {
moduleResolution: 'bundler'
}
}
}
})
```
This turns on TypeScript's ability to 'follow' Node subpath exports. For example, if a library has a subpath export like `mylib/path` that is mapped to `mylib/dist/path.mjs` then the types for this can be pulled in from `mylib/dist/path.d.ts` rather than requiring the library author to create `mylib/path.d.ts`.
## ⚗️ Separate server types
We plan to improve clarity within your IDE between the 'nitro' and 'vue' part of your app, we've shipped the first part of this via a separate generated `tsconfig.json` for your [`~/server`](https://nuxt.com/docs/guide/directory-structure/server) directory ([#20559](https://github.com/nuxt/nuxt/pull/20559){rel="nofollow"}).
You can use by adding an additional `~/server/tsconfig.json` with the following content:
```json
{
"extends": "../.nuxt/tsconfig.server.json"
}
```
Although right now these values won't be respected when type checking (`nuxi typecheck`), you should get better type hints in your IDE.
## 💀 Deprecations
Although we have not typed or documented the `build.extend` hook from Nuxt 2, we have been calling it within the webpack builder. We are now explicitly deprecating this and will remove it in a future minor version.
## ✅ Upgrading
As usual, our recommendation for upgrading is to run:
```sh
npx nuxi upgrade --force
```
This will refresh your lockfile as well, and ensures that you pull in updates from other dependencies that Nuxt relies on, particularly in the unjs ecosystem.
## 📃 Full changelog
Read the full release note on <https://github.com/nuxt/nuxt/releases/tag/v3.5.0>{rel="nofollow"}
# Nuxt 3.6
## {height="36" style="display:inline" vAlign="center" width="36"} SPA loading indicator
If your site is served with `ssr: false` or you have disabled server-rendering on some of your pages, you might be particularly interested in the new [built-in SPA loading indicator](https://github.com/nuxt/nuxt/pull/21640){rel="nofollow"}.
You can now place an HTML file in `~/app/spa-loading-template.html` with some HTML you would like to use to render a loading screen that will be rendered until your app is hydrated on these pages.
👉 **By default an animated Nuxt icon is rendered**. You can completely disable this indicator by setting `spaLoadingTemplate: false` in your nuxt configuration file.
## ⚡️ Performance improvements
The first thing that happens when your app is hydrated is that your plugins run, and so we now perform [build-time optimisations on your plugins](https://github.com/nuxt/nuxt/pull/21611){rel="nofollow"}, meaning they do not need to be normalised or reordered at runtime.
We also include your error component JS in your main entrypoint, meaning that if an error occurs when a user has no connectivity, you can still handle it with your `~/error.vue`. (This also should decrease your total bundle size.)
👉 Compared to Nuxt 3.5.3, the minimal client bundle has decreased by \~0.7kB. Let's keep this up!
## 🔥 Fully static server components
It has been possible to use server components on static pages, but until now they would increase the payload size of your application. That is no longer true. We now store [rendered server components as separate files, which are preloaded before navigation](https://github.com/nuxt/nuxt/pull/21461){rel="nofollow"}.
👉 **This does rely on the new, richer JSON payload format**, so make sure you have not disabled this by setting `experimental.renderJsonPayloads` to false.
## 🎨 Better style inlining
If you're monitoring your metrics closely and have not turned off `experimental.inlineSSRStyles`, you should see more CSS inlined in your page, and a significantly external CSS file. We're now [better at deduplicating global CSS](https://github.com/nuxt/nuxt/pull/21573){rel="nofollow"}, particularly added by libraries like tailwind or unocss.
## 🎬 Animation controls
To give you more fine-grained control over your page/layout components, for example to create custom transitions with GSAP or other libraries, we now allow you to set [`pageRef` on `<NuxtPage>`](https://github.com/nuxt/nuxt/pull/19403){rel="nofollow"} and [`layoutRef` on `<NuxtLayout>`](https://github.com/nuxt/nuxt/pull/19465){rel="nofollow"}. These will get passed through to the underlying DOM elements.
## ✨ Automatic 'static' preset detection
Up to now, running `nuxt generate` produced the same output on every deployment provider, but with Nuxt 3.6 we now enable [static provider presets](https://github.com/nuxt/nuxt/pull/21655){rel="nofollow"} automatically. That means if you are deploying a static build (produced with `nuxt generate`) to a supported provider (currently vercel and netlify with cloudflare and github pages coming soon) we'll prerender your pages with special support for that provider.
This means we can configure any route rules (redirects/headers/etc) that do not require a server function. So you should get the best of both worlds when deploying a site that doesn't require runtime SSR. It also unblocks use of [Nuxt Image](https://github.com/nuxt/image){rel="nofollow"} on Vercel (with more potential for automatic provider integration coming soon).
## 💪 Increased type safety
We now have better support for server-specific `#imports` and augmentations if you are using the new `~/server/tsconfig.json` we shipped in Nuxt 3.5. So when importing from `#imports` in your server directory, you'll get IDE auto-completion for the right import locations in Nitro, and won't see Vue auto-imports like `useFetch` that are unavailable within your server routes.
You should now also have [type support for runtime Nitro hooks](https://github.com/nuxt/nuxt/pull/21666){rel="nofollow"}.
Finally, we have [removed more locations where objects had a default `any` type](https://github.com/nuxt/nuxt/pull/21700){rel="nofollow"}. This should improve type safety within Nuxt in a number of locations where unspecified types fell back to any:
- `RuntimeConfig`
- `PageMeta`
- `NuxtApp['payload']` (accessible now from `NuxtPayload` interface)
- `ModuleMeta`
You can find out more about how to [update your code](https://github.com/nuxt/nuxt/pull/21700){rel="nofollow"} if this affects you in the original PR.
## ⚗️ Nitro 2.5 built-in
This release ships with new Nitro 2.5, which has a [whole list of exciting improvements](https://github.com/unjs/nitro/releases/tag/v2.5.0){rel="nofollow"} that are worth checking out.
Of particular note is experimental support for streaming, which is also enabled by a [couple of changes](https://github.com/nuxt/nuxt/pull/21665){rel="nofollow"} in Nuxt itself.
## 🛠️ New tools for module authors
This release brings a number of utilities for modules authors to easily [add type templates](https://github.com/nuxt/nuxt/pull/21331){rel="nofollow"} and [assert compatibility](https://github.com/nuxt/nuxt/pull/21246){rel="nofollow"} with a given version of *another* module.
In addition, this release will finally unlock a new `nuxt/module-builder` mode that should improve type support for module authors. If you're a module author, you might consider following [these migration steps](https://github.com/nuxt/starter/pull/392){rel="nofollow"} to try it out in the coming days.
## ✅ Upgrading
As usual, our recommendation for upgrading is to run:
```sh
npx nuxi upgrade --force
```
This will refresh your lockfile as well, and ensures that you pull in updates from other dependencies that Nuxt relies on, particularly in the unjs ecosystem.
## 📃 Full changelog
Read the full release notes on <https://github.com/nuxt/nuxt/releases/tag/v3.6.0>{rel="nofollow"}
# Nuxt on the Edge
## Introduction
In September 2017, Cloudflare [introduced Cloudflare Workers](https://blog.cloudflare.com/introducing-cloudflare-workers/){rel="nofollow"}, giving the ability to run JavaScript on their [edge network](https://www.cloudflare.com/network/){rel="nofollow"}. This means your code will deploy on the entire edge network in over a hundred locations worldwide in about 30 seconds. This technology allows you to focus on writing your application close to your users, wherever they are in the world (\~50ms latency).
The worker's runtime is not the same as Node.js or the Browser, it executes the code using V8, the JavaScript engine developed by Google Chrome. Until now, what you could run on their platform were small scripts running on the edge before hitting your server to increase the performance or add some logic based on request headers, for example.
In November 2020, while working on Nuxt 3, **we made the bet to run Nuxt in-production on edge runtimes / V8 isolates**.
It unlocks the ability to server-render pages in \~50ms from all over the world when using a platform like CloudFlare Workers, without having to deal with servers, load balancers and caching, for about [$0.3 per million requests](https://developers.cloudflare.com/workers/platform/pricing/){rel="nofollow"}. As of today, new platforms are coming to let run apps on V8 isolates such as Deno Deploy.
::note
**2024 update:** I released [NuxtHub](https://hub.nuxt.com){rel="nofollow"} to let you build full-stack applications with Nuxt on the edge, on your Cloudflare account with zero configuration. It includes a database, blob storage, KV, remote storage and more.
::
## The Challenge
In order to make Nuxt run in workers, we had to rewrite some parts of Nuxt to be environmentally agnostic (runs in Node.js, Browser or V8).
We started with our server and created [unjs/h3](http://github.com/unjs/h3){rel="nofollow"}: a minimal http framework built for high performance and portability. It replaces [Connect](https://github.com/senchalabs/connect){rel="nofollow"} we used in Nuxt 2 but has compatibility with it so you can keep using Connect/Express middleware. In the workers, for each incoming request, it starts Nuxt in production, sends the request to it and sends back the response.
In Nuxt 2, the duration to start the server in production in memory (also named cold start) was about \~300ms, because we had to load all the dependencies of your server and application in order to handle the request.
By working on h3, we decided to code-split each handler attached to the server and lazy-load them only when requested. When you start Nuxt 3, we only load h3 in memory and the corresponding handlers. When a request comes in, we load the handler corresponding to the route and execute it.
:video{controls poster="https://res.cloudinary.com/nuxt/video/upload/v1689236511/nuxt3/nuxt3-server-performance.jpg" src="https://res.cloudinary.com/nuxt/video/upload/v1689236511/nuxt3/nuxt3-server-performance.mp4"}
By adopting this approach, **we reduced the cold start from \~300ms to \~2ms**.
We had another challenge in order to run Nuxt on the edge: the production bundle size. This includes the server, Vue app and Node.js dependencies combined. Cloudflare workers currently have a limit of 1MB (free plan) and 5MB ($5 per month plan) for the worker size.
In order to achieve this, we created [unjs/nitro](https://nitro.unjs.io/){rel="nofollow"}, our server engine, when running the `nuxt build` command, it bundles your whole project and includes all dependencies into the final output. It uses [Rollup](https://rollupjs.org/){rel="nofollow"} and [vercel/nft](https://github.com/vercel/nft){rel="nofollow"} to trace only the code used by the `node_modules` to remove unnecessary code. **The total size of the generated output for a basic Nuxt 3 application is about 700kB gzip.**
Lastly, to provide the same developer experience between development (Node.js) and production on Cloudflare (Edge runtime), we created [unjs/unenv](https://github.com/unjs/unenv){rel="nofollow"}: a library to convert JavaScript code to run everywhere (platform agnostic) by mocking or adding polyfills for known dependencies.
**At Nuxt, we believe that you should have the freedom to choose the hosting provider that fits you best.**
This is why you can deploy a Nuxt application with edge-side rendering on:
- [NuxtHub](https://hub.nuxt.com){rel="nofollow"}
- [Cloudflare Page](https://nitro.unjs.io/deploy/providers/cloudflare#cloudflare-pages){rel="nofollow"}
- [Deno Deploy](https://nitro.unjs.io/deploy/providers/deno-deploy){rel="nofollow"}
- [Vercel Edge Functions](https://nitro.unjs.io/deploy/providers/vercel#vercel-edge-functions){rel="nofollow"} (using CloudFlare Workers under the hood)
- [Netlify Edge Functions](https://nitro.unjs.io/deploy/providers/netlify#netlify-edge-functions){rel="nofollow"} (using Deno under the hood)
We also support many other deployment providers, including [static hosting](https://nuxt.com/docs/getting-started/deployment#static-hosting) or [traditional Node.js serverless and server hosts](https://nuxt.com/docs/getting-started/deployment#nodejs-server).
## Pushing Full-stack Capabilities
Now that we have Nuxt running on edge runtime, we can do more than render a Vue application. Thanks to the [server directory](https://nuxt.com/docs/guide/directory-structure/server), creating an API route is a TypeScript file away.
To add the `/api/hello` route, create a `server/api/hello.ts` file:
```ts [server/api/hello.ts]
export default defineEventHandler((event) => {
return {
hello: 'world'
}
})
```
You can now universally call this API in your pages and components:
```vue [pages/index.vue]
<script setup>
const { data } = await useFetch('/api/hello')
</script>
<template>
<pre>{{ data }}</pre>
</template>
```
One important thing to note when we created [useFetch](https://nuxt.com/docs/api/composables/use-fetch) and [$fetch](https://nuxt.com/docs/api/utils/dollarfetch) is that during server-side rendering, if you call your API routes, it will emulate the request and call the function code directly: **avoiding an HTTP request and reducing page’s rendering time**.
In terms of developer experience, you will notice that when creating server files, the Nuxt server keeps running without rebuilding the Vue app. **This is because Nuxt 3 supports Hot Module Replacement (HMR) when creating API and server routes.**
Furthermore, by leveraging Object Relational Mapping (ORM) like [drizzle-orm](https://orm.drizzle.team/){rel="nofollow"}, developers can connect Edge & Serverless databases such as [D1](https://developers.cloudflare.com/d1/){rel="nofollow"}, [Turso](https://turso.tech/){rel="nofollow"}, [Neon](https://neon.tech){rel="nofollow"}, [Planetscale](https://planetscale.com/){rel="nofollow"} and more.
I created [Atidone](https://todos.nuxt.dev/){rel="nofollow"}, an open source demo to showcase a full-stack application with authentication and a database running on the edge. The source code is available on GitHub under the MIT license at [atinux/atidone](https://github.com/atinux/atidone){rel="nofollow"}.
## Conclusion
We are excited about edge-side rendering and what it unlocks. Our team at Nuxt can’t wait to see what you will build on top of this!
Feel free to join our [Discord server](https://discord.com/invite/nuxt){rel="nofollow"} or mention [@nuxt\_js](https://x.com/nuxt_js){rel="nofollow"} on Twitter to share your work.
# Nuxt 3.7
### 🐣 A New CLI
We've refactored `nuxi` using [unjs/citty](http://github.com/unjs/citty){rel="nofollow"} and this marks the first Nuxt release that depends on the new version, safely in its own repository. We have grand plans for this - check out some of the features + roadmap discussions in [nuxt/cli](https://github.com/nuxt/cli){rel="nofollow"} and please feel free to contribute!
- [**Project Goals**](https://github.com/nuxt/cli/discussions/3)
- [Feedbacks and Ideas](https://github.com/nuxt/cli/discussions/4)
- [The journey of Nuxt CLI Generations](https://github.com/nuxt/cli/discussions/7)
Nuxi is now decoupled from the main `nuxt` version - we plan to iterate and release nuxi more quickly in future so you can expect new things coming soon!
### 🕸️ Native Web Streams and `Response`
With improvements in [unjs/h3](https://github.com/unjs/h3){rel="nofollow"} and [unjs/nitro](https://github.com/unjs/nitro){rel="nofollow"}, it's now possible to directly return a `Response` object from server routes, meaning it's *also* possible to return and handle streams natively in Nuxt.
👉 Check out the full detail in the [unjs/h3](https://github.com/unjs/h3/releases){rel="nofollow"} and [unjs/nitro](https://github.com/unjs/nitro/releases){rel="nofollow"} release notes.
### 🔥 HTML Rendering Optimisations
This release comes with a couple of improvements in rendering HTML responses from the server. We now determine whether to preload/prefetch resources at build time (so you can customise this in the `build:manifest` hook). We also now manage rendering the HTML for them directly in `unhead` ([#22179](https://github.com/nuxt/nuxt/pull/22179){rel="nofollow"}), which means you can configure the *order* for `<link>`, `<meta>`, `<script>`, `<style>`, and more. And - in our preliminary testing - it's even faster!
It's possible to opt-in to upcoming head improvements with the `experimental.headNext` flag. This currently includes a new ordering algorithm based on [capo.js](https://github.com/rviscomi/capo.js){rel="nofollow"} ([#22431](https://github.com/nuxt/nuxt/pull/22431){rel="nofollow"}) and allows enabling future optimisations as they are released in `unhead`:
```ts
export default defineNuxtConfig({
experimental: {
headNext: true
}
})
```
We'd love your thoughts - you can respond with any issues/feedback in [this discussion](https://github.com/nuxt/nuxt/discussions/22632){rel="nofollow"}.
### 🛠️ Build Environment Shortcuts
In your Nuxt config you can now use `$client` and `$server` shortcuts to easily define configuration that is specific to just the Vite client/server ([#22302](https://github.com/nuxt/nuxt/pull/22302){rel="nofollow"}) or webpack client/server ([#22304](https://github.com/nuxt/nuxt/pull/22304){rel="nofollow"}) builds. This previously was only possible with the `vite:extendConfig` and `webpack:config` hooks.
For example:
```ts
export default defineNuxtConfig({
vite: {
$client: {
build: {
rollupOptions: {
output: {
chunkFileNames: '_nuxt/[hash].js',
assetFileNames: '_nuxt/[hash][extname]',
entryFileNames: '_nuxt/[hash].js'
}
}
}
}
}
})
```
### ⚡️ Vite 4.4
We've chosen to unpin Vite from minor versions, meaning whenever Vite releases a new feature version you can opt-in straight away. Vite 4.4 brings a lot of exciting things, including experimental Lightning CSS support - and much more!
👉 Check out the [Vite release notes](https://github.com/vitejs/vite/blob/main/packages/vite/CHANGELOG.md#440-2023-07-06){rel="nofollow"} for more.
### 💪 TypeScript Updates
We now use purely relative paths in the generated `tsconfig.json` instead of setting a `baseUrl`. This means better support for dev environments like docker images where the absolute path may not match your IDE ([#22410](https://github.com/nuxt/nuxt/pull/22410){rel="nofollow"}).
We also set a couple of additional compiler flag defaults to match Vite/TS recommendations ([#22468](https://github.com/nuxt/nuxt/pull/22468){rel="nofollow"}).
Plus, you should now get type hinted access to layouts in `setPageLayout` and also in `<NuxtLayout name>` ([#22363](https://github.com/nuxt/nuxt/pull/22362){rel="nofollow"}).
### 🦄 Async Context support
If you've ever got an issue with 'Nuxt context unavailable' this might be one for you. We now support native async context for Bun and Node under an experimental flag, in both Nuxt and Nitro ([#20918](https://github.com/nuxt/nuxt/pull/20918){rel="nofollow"}).
This enables using Nuxt composables on the server *without* needing to ensure they are being called directly in a setup function. It also allows the same in Nitro, with a new `useEvent()` utility that is usable in server routes.
To try it out, you can enable `experimental.asyncContext`:
```ts
export default defineNuxtConfig({
experimental: {
asyncContext: true
}
})
```
### 👓 Watcher Updates
We've fixed a couple of issues with watchers, meaning that you should need to restart your server less often - and you should see a significant performance increase if you are using layers.
### ⚗️ Nitro 2.6
There lots more exciting features coming directly from Nitro 2.6, including smaller, lighter servers and new persistent data storage in a `.data` directory.
👉 Read more in [the full release article](https://unjs.io/blog/2023-08-25-nitro-2.6){rel="nofollow"}.
## ✅ Upgrading
As usual, our recommendation for upgrading is to run:
```sh
npx nuxi upgrade --force
```
This will refresh your lockfile as well, and ensures that you pull in updates from other dependencies that Nuxt relies on, particularly in the [unjs](https://github.com/unjs){rel="nofollow"} ecosystem.
## 📃 Full changelog
Read the full release notes on <https://github.com/nuxt/nuxt/releases/tag/v3.7.0>{rel="nofollow"}
# A New Website
Nuxt.com is the main entry point when you want to learn Nuxt. With **more than 300k visitors every month**, it was time to give it a new look and feel.
## New Design
We are back to the original colors of Nuxt, with a navy background (`#020420`) and its signature shiny green (`#00DC82`).
:nuxt-img{alt="Nuxt Website Screenshot" className="rounded-lg,border,border-gray-700" height="497" src="https://nuxt.com/assets/blog/website/nuxt-website.png" width="832"}
::read-more{icon="i-lucide-palette" to="https://nuxt.com/design-kit"}
Discover the **Nuxt Design Kit** as well as our **Logo History**.
::
We wanted to achieve a consistent design across all our official documentations:
::div{className="grid,sm:grid-cols-2,gap-4"}
:::nuxt-link
---
className:
- hover:border-transparent
target: _blank
to: https://image.nuxt.com
---
:nuxt-img{alt="Nuxt Image" className="m-0,border,rounded-md,border-gray-700" height="255" src="https://nuxt.com/assets/blog/website/nuxt-image.png" width="408"}
:::
:::nuxt-link
---
className:
- hover:border-transparent
target: _blank
to: https://content.nuxt.com
---
:nuxt-img{alt="Nuxt Content" className="m-0,border,rounded-md,border-gray-700" height="255" src="https://nuxt.com/assets/blog/website/nuxt-content.png" width="408"}
:::
:::nuxt-link
---
className:
- hover:border-transparent
target: _blank
to: https://devtools.nuxt.com
---
:nuxt-img{alt="Nuxt DevTools" className="m-0,border,rounded-md,border-gray-700" height="255" src="https://nuxt.com/assets/blog/website/nuxt-devtools.png" width="408"}
:::
:::nuxt-link
---
className:
- hover:border-transparent
target: _blank
to: https://ui.nuxt.com
---
:nuxt-img{alt="Nuxt UI" className="m-0,border,rounded-md,border-gray-700" height="255" src="https://nuxt.com/assets/blog/website/nuxt-ui.png" width="408"}
:::
::
We really love this new design and hope you do too. **This is only the first step toward many improvements coming to the website.**
## Improved Navigation
From now on, you can easily jump between the five main documentation categories:
:video{controls className="rounded,dark:border,dark:border-gray-700" controls="true" poster="https://res.cloudinary.com/nuxt/video/upload/v1697548111/nuxt3/nuxt-website-docs-nav.jpg"}
On the right side, you can see the table of contents as well as community shortcuts: Edit this page, Chat on Discord, etc.
:video{controls className="rounded,dark:border,dark:border-gray-700" controls="true" poster="https://res.cloudinary.com/nuxt/video/upload/v1697549697/nuxt3/nuxt-website-docs-aside.jpg"}
## Source Code Buttons
When looking at Nuxt built-in [components](https://nuxt.com/docs/api/components), [composables](https://nuxt.com/docs/api/composables), [utils](https://nuxt.com/docs/api/utils), [commands](https://nuxt.com/docs/api/commands) and [kit utilities](https://nuxt.com/docs/api/kit), you can now jump to the source code by clicking on the :u-button[Source]{color="gray" icon="i-simple-icons-github" size="xs"} button.
:nuxt-img{alt="Nuxt Source Code Button" className="border,rounded,border-gray-700" height="343" src="https://nuxt.com/assets/blog/website/nuxt-website-source-button.png" width="818"}
::read-more{to="https://nuxt.com/docs/api/components/nuxt-link"}
Checkout an example on `<NuxtLink>` documentation page.
::
## Improved Search Feature
You may notice a new modal when hitting `` ``. We leverage the Nuxt UI [`<CommandPalette>`](https://ui.nuxt.com/components/command-palette){rel="nofollow"} components combined with Nuxt Content data (search & navigation) to provide a better search experience.
With the command palette, you can:
- Jump to a page
- Search in the documentation
- Search a module
- Switch the color mode
We plan to add more commands soon.
:video{controls className="rounded,dark:border,dark:border-gray-700" controls="true" poster="https://res.cloudinary.com/nuxt/video/upload/v1697550571/nuxt3/nuxt-website-search.jpg"}
## Migration to Nuxt UI
The new website is powered by [Nuxt UI](https://ui.nuxt.com){rel="nofollow"}, our UI library tailored made for Nuxt and built on top of [Tailwind CSS](https://tailwindcss.com){rel="nofollow"} & [Headless UI](https://headlessui.com/){rel="nofollow"}.
The website also uses [Nuxt UI Pro](https://ui.nuxt.com/pro){rel="nofollow"}, a set of premium components built on top of Nuxt UI to create beautiful & responsive Nuxt applications in minutes.
It includes components such as `<UHeader>`, `<UFooter>`, `<ULandingHero>`, `<ULandingCard>` and more.
::note
We plan to launch the full documentation of Nuxt UI Pro at the end of October. If you cannot wait and want early access, you can already [purchase a license](https://ui.nuxt.com/pro/purchase){rel="nofollow"} now and get access to our private repository on GitHub.
::
This [migration](https://github.com/nuxt/nuxt.com/pull/1365){rel="nofollow"} was a great opportunity to improve Nuxt UI & UI Pro and fix some bugs, as well as a difference of [+9,004]{className="text-(--ui-primary)"} / [-23,113]{className="text-(--ui-error)"} lines of code changed.
::read-more
---
icon: i-simple-icons-nuxtdotjs
target: _blank
to: https://ui.nuxt.com
---
Read more about **Nuxt UI**.
::
## Open Graph Images
We are big fans of having a custom image when we share a link on social media. That's why we have added OG images on all our documentation pages.
Example of the [Installation page](https://nuxt.com/docs/getting-started/installation):
{className="border,rounded,border-gray-700" height="630" width="1200"}
::read-more
---
target: _blank
to: https://nuxtseo.com/og-image/getting-started/installation
---
Discover the **Nuxt OG Image** module.
::
## Available on GitHub
We are proud to announce that the website is **now open source** and available on GitHub.
::read-more
---
color: gray
icon: i-simple-icons-github
target: _blank
to: https://github.com/nuxt/nuxt.com
---
Check out `nuxt/nuxt.com` on GitHub.
::
## What's next?
This new website is the beginning of upcoming changes we are planing, some of them are:
- Team & Contributors pages
- Integrations page to showcase all the possibilities with Nuxt: Hosting, CMS, Database, etc.
- Templates page (currently [nuxt.new](https://nuxt.new){rel="nofollow"}) to list official and community starters
- And more...
**We are looking forward to your feedback on [Twitter](https://x.com/nuxt_js){rel="nofollow"}, [Discord](https://discord.com/invite/nuxt){rel="nofollow"} or [GitHub](https://github.com/nuxt/nuxt.com){rel="nofollow"}**.
Thank you for reading this blog post, and happy Nuxting 🤟
# Nuxt 3.8
### 💻 CLI Improvements
Just to remind you, we're now using [the new Nuxt CLI](https://github.com/nuxt/cli){rel="nofollow"} which is now versioned separately.
::tip
You can now install a module with `nuxi module add <module-name>`
::
::note{icon="i-lucide-rocket"}
We now share the same port with the Vite websocket, meaning better support for docker containers in development.
::
::read-more
---
color: gray
icon: i-simple-icons-github
target: _blank
to: https://github.com/nuxt/cli/releases/tag/v3.9.0
---
Read the Nuxt CLI `v3.9.0` release notes.
::
### ✨ Built-in Nuxt DevTools
Nuxt DevTools v1.0.0 is out and we now think it's ready to be shipped as a direct dependency of Nuxt.
::read-more
---
color: gray
icon: i-simple-icons-github
to: https://nuxt.com/blog/nuxt-devtools-v1-0
---
Check out Nuxt DevTools v1.0 announcement.
::
### 📸 Nuxt Image Auto-install
[`<NuxtImg>`](https://nuxt.com/docs/api/components/nuxt-img) and [`<NuxtPicture>`](https://nuxt.com/docs/api/components/nuxt-picture) first-class built-in components.
We now auto-installing `@nuxt/image` the first time that they are used ([#23717](https://github.com/nuxt/nuxt/pull/23717){rel="nofollow"}).
:video{controls className="rounded,dark:border,dark:border-gray-700" controls="true" poster="https://res.cloudinary.com/nuxt/video/upload/v1697721767/nuxt3/nuxt-image-auto-install_uqkptq.jpg"}
::tip
We advise using [`@nuxt/image`](https://image.nuxt.com){rel="nofollow"} if you're using images in your site; it can apply optimisations to make your site more performant.
::
### 📂 Deeper Layout Scanning
::caution
This is a behaviour change so do take care with this one.
::
We now support scanning layouts within subfolders in [`~/layouts`](https://nuxt.com/docs/guide/directory-structure/layouts) in the same way as we do with [`~/components`](https://nuxt.com/docs/guide/directory-structure/components).
| File | Layout name |
| -------------------------------- | ----------------- |
| \~/layouts/desktop/default.vue | 'desktop-default' |
| \~/layouts/desktop-base/base.vue | 'desktop-base' |
| \~/layouts/desktop/index.vue | 'desktop' |
::read-more
---
to: https://nuxt.com/docs/guide/directory-structure/layouts#named-layout
---
Read more about **Named Layouts**.
::
### 📊 App Manifest
We now support a built-in app manifest (see [PR #21641](https://github.com/nuxt/nuxt/pull/21641){rel="nofollow"}), which generates a manifest at `/_nuxt/builds/meta/<buildId>.json`.
It enables loading payloads **only for prerendered routes**, if a site is generated with `nuxt generate`, preventing 404s in the console.
It also enables **client-side route rules**. Only `redirect` route rules is supported for now; they will now redirect when performing client-side navigation.
::code-group
```ts [nuxt.config.ts]
export default defineNuxtConfig({
routeRules: {
'/about': { redirect: '/about-us' }
}
})
```
```vue [pages/index.vue]
<template>
<div>
<!-- Will be redirected to /about-us on client-side -->
<NuxtLink to="/about">About</NuxtLink>
</div>
</template>
```
::
::tip{icon="i-lucide-rocket"}
The app manifest also enables future enhancements including detection of a new deployment by checking `/_nuxt/builds/latest.json`.
::
::note
You can **opt-on from this behaviour if you need to** by setting `experimental.appManifest` to `false` in your `nuxt.config` file.
::
### 🤝 Scope and Context Improvements
We now define a 'scope' for Nuxt composables executed in plugins ([#23667](https://github.com/nuxt/nuxt/pull/23667){rel="nofollow"}), which allows running synchronous cleanup before navigating away from your site, using the Vue [`onScopeDispose`](https://vuejs.org/api/reactivity-advanced.html#onscopedispose){rel="nofollow"} lifecycle method.
::note
This should fix an edge case with cookies ([#23697](https://github.com/nuxt/nuxt/pull/23697){rel="nofollow"}) and also improves memory management such as Pinia stores ([#23650](https://github.com/nuxt/nuxt/issues/23650){rel="nofollow"}).
::
::read-more
---
icon: i-simple-icons-vuedotjs
target: _blank
to: https://vuejs.org/api/reactivity-advanced.html#effectscope
---
Read more about Vue effect scopes.
::
We also now support [**native async context**](https://nodejs.org/api/async_context.html){rel="nofollow"} for the *Vue composition API* ([#23526](https://github.com/nuxt/nuxt/pull/23526){rel="nofollow"}). In case you're unaware, we support native async context on Node and Bun, enabled with [`experimental.asyncContext`](https://nuxt.com/docs/guide/going-further/experimental-features#asynccontext).
If you experience issues with `Nuxt instance unavailable`, enabling this option may solve your issues:
```ts [nuxt.config.ts]
export default defineNuxtConfig({
experimental: {
asyncContext: true
}
})
```
::note
Once we have cross-runtime support, we will enable it by default.
::
### 🔗 NuxtLink Defaults
You can define your own [`<NuxtLink>`](https://nuxt.com/docs/api/components/nuxt-link) components with the [`defineNuxtLink`](https://nuxt.com/docs/api/components/nuxt-link#definenuxtlink-signature) utility.
Today, you can cutomize the options for the built-in [`<NuxtLink>`](https://nuxt.com/docs/api/components/nuxt-link), directly in your `nuxt.config` file ([#23724](https://github.com/nuxt/nuxt/pull/23724){rel="nofollow"}).
This can enable you to enforce trailing slash behaviour across your entire site, for example:
```ts [nuxt.config.ts]
export default defineNuxtConfig({
experimental: {
defaults: {
nuxtLink: {
activeClass: 'nuxt-link-active',
trailingSlash: 'append'
}
}
}
})
```
### ⚡️ Data Fetching Improvements
We have two very significant new features for [`useAsyncData`](https://nuxt.com/docs/api/composables/use-async-data) and [`useFetch`](https://nuxt.com/docs/api/composables/use-fetch):
1. You can now set `deep: false` to prevent deep reactivity on the `data` object returned from these composables ([#23600](https://github.com/nuxt/nuxt/pull/23600){rel="nofollow"}). It should be a performance improvement if you are returning large arrays or objects. The object will still update when refetched; it just won't trigger reactive effects if you change a property deep within the `data`.
2. You can now use the `getCachedData` option to handle custom caching for these composables ([#20747](https://github.com/nuxt/nuxt/pull/20747){rel="nofollow"})
```vue [pages/index.vue]
<script setup>
const nuxtApp = useNuxtApp()
const { data } = await useAsyncData(() => { /* fetcher */ }, {
// this will not refetch if the key exists in the payload
getCachedData: key => nuxtApp.payload.static[key] ?? nuxtApp.payload.data[key]
})
</script>
```
::video-accordion
---
title: Watch the video from Alexander Lichter about Client-side caching with
getCachedData.
video-id: aQPR0xn-MMk
---
::
We also support configuring some default values for these composables in an app-wide way ([#23725](https://github.com/nuxt/nuxt/pull/20747){rel="nofollow"}):
```ts [nuxt.config.ts]
export default defineNuxtConfig({
experimental: {
defaults: {
useAsyncData: {
deep: false
},
useFetch: {
retry: false,
retryDelay: 100,
retryStatusCodes: [500],
timeout: 100
}
}
}
})
```
### 🔢 Layer Improvements
We now more carefully load layer plugins ([#22889](https://github.com/nuxt/nuxt/pull/22889){rel="nofollow"} and [#23148](https://github.com/nuxt/nuxt/pull/23148){rel="nofollow"}) and middleware ([#22925](https://github.com/nuxt/nuxt/pull/22925){rel="nofollow"} and [#23552](https://github.com/nuxt/nuxt/pull/23552){rel="nofollow"}) in the order of the layers, always loading your own plugins and middleware last. This should mean you can rely on utilities that layers may inject.
And probably one of the most significant changes - if you are using remote layers we now clone these within your [`node_modules/`](https://nuxt.com/docs/guide/directory-structure/node_modules) folder ([#109](https://github.com/unjs/c12/pull/109){rel="nofollow"}) so layers can use dependencies with your project. See [`c12` release notes](https://github.com/unjs/c12/releases/tag/v1.5.1){rel="nofollow"} for full details.
::tip{icon="i-lucide-check-circle"}
We've also added a test suite to cover these layer resolution changes.
::
### 😴 Nightly Release Channel
Every commit to the `main` branch of Nuxt is automatically deployed to a new release, for easier testing before releases. We've renamed this from the 'edge release channel' to the 'nightly release channel' to avoid confusion with *edge deployments*. And probably also with Microsoft Edge (though I haven't heard that anyone was confused with that one!)
- `nuxt3` is now `nuxt-nightly`
- `nuxi-edge` is now `nuxi-nightly`
- `@nuxt/kit-edge` is now `@nuxt/kit-nightly`
- ... and so on.
::read-more
---
to: https://nuxt.com/docs/guide/going-further/nightly-release-channel#nightly-release-channel
---
Read more about the **Nighly Release Channel**.
::
### ⚗️ Nitro v2.7
Nitro v2.7 has been released with lots of improvements and bug fixes.
::tip{icon="i-lucide-rocket"}
🔥 One of the most significant is that we now save **40% of bundle size in production** by using native `fetch` supported in Node 18+ ([#1724](https://github.com/unjs/nitro/pull/1724){rel="nofollow"}). So if possible, we'd recommend you update your Node version to at least 18.
::
::read-more
---
color: gray
icon: i-simple-icons-github
target: _blank
to: https://github.com/unjs/nitro/releases/tag/v2.7.0
---
Check out Nitro v2.7 release note.
::
### 💪 Type Import Changes
::warning
This is likely to need code changes in your project.
::
Vue requires that type imports be explicit (so that the Vue compiler can correctly optimise and resolve type imports for props and so on). See [core Vue `tsconfig.json`](https://github.com/vuejs/tsconfig/blob/main/tsconfig.json#L30-L33){rel="nofollow"}.
We've therefore taken the decision to turn on `verbatimModuleSyntax` by default in Nuxt projects, which will throw a type error if types are imported without an explicit `type` import. To resolve it you will need to update your imports:
```diff
- import { someFunction, SomeOptions } from 'some-library'
+ import { someFunction } from 'some-library'
+ import type { SomeOptions } from 'some-library'
```
You may also encounter modules in the Nuxt ecosystem that need to be updated; please open an issue for those modules. I'm also very happy to help if you're encountering any problems with this, if you're a module author. Just tag me and I'll take a look.
If for whatever reason you need to undo this change in your project you can set the following configuration:
```ts [nuxt.config.ts]
export default defineNuxtConfig({
typescript: {
tsConfig: {
compilerOptions: {
verbatimModuleSyntax: false
}
}
}
})
```
However, we'd recommend only doing that temporarily, as Vue does need this option to be set for best results.
## ✅ Upgrading
As usual, our recommendation for upgrading is to run:
```sh
npx nuxi upgrade
```
## Full Release Notes
::read-more
---
color: gray
icon: i-simple-icons-github
to: https://github.com/nuxt/nuxt/releases/tag/v3.8.0
---
Read the full release notes of Nuxt `v3.8.0`.
::
Thank you for reading this far! We hope you enjoy the new release. Please do let us know if you have any feedback or issues.
**Happy Nuxting ✨**
# Nuxt DevTools v1.0
We are thrilled to announce the release of [Nuxt DevTools v1.0](https://github.com/nuxt/devtools){rel="nofollow"}! 🎉
::tip
Since this release, Nuxt DevTools is now enabled with [Nuxt v3.8](https://nuxt.com/blog/v3-8) and onwards by default. Generally available to all Nuxt projects!
::
You can start playing with it by upgrading to the latest Nuxt, and press `Shift + Option + D` (macOS) or `Shift + Alt + D` (Windows) in your browser to open the DevTools. By default the floating panel is hidden to reduce the distraction. You can enable it inside Nuxt DevTools settings page, or explicitly enabled it in your config:
```ts [nuxt.config.ts]
export default defineNuxtConfig({
devtools: {
enabled: true
}
})
```
## The Reasons We Built Nuxt DevTools
Over the recent years, there has been an increasing focus on Developer Experience (DX). Tools and frameworks have been striving to improve the DX. Along the way, Nuxt introduced many innovative features and conventions to make your day-to-day development easier and more efficient.
For example, [file-based routing](https://nuxt.com/docs/guide/directory-structure/pages), [layout system](https://nuxt.com/docs/guide/directory-structure/layouts), [plugins](https://nuxt.com/docs/guide/directory-structure/plugins), [route middleware](https://nuxt.com/docs/guide/directory-structure/middleware), [composables auto-import](https://nuxt.com/docs/guide/concepts/auto-imports), [file-based server APIs](https://nitro.unjs.io/guide/routing){rel="nofollow"}, [powerful module system](https://nuxt.com/modules) and many more.
{className="border,border-gray-200,dark:border-gray-700,rounded-lg"}
Nuxt is capable of creating various range of applications, from simple hobby projects to large scale applications, from simple client-rendered single-page applications to hybrid rendered sites with serverless functions on edge, etc. We provide those features and conventions to make it easier to support all those use cases and scenarios.
### The Problem
Out of all these benefits of having a powerful framework, we have to made some trade-offs. Sometimes, we have to sacrifice a bit of the transparency of the underlying implementation to make things easier to use.
{className="border,border-gray-200,dark:border-gray-700,rounded-lg"}
Conventional abstractions are great things to transfer implementation complexity and make things easier to get more focus when building. On the other hand, they can also add extra burden for users to learn and understand what's going on under the hood. Leading also to implicitness, like where a auto-imported component is from, or how many modules is using a certain component, etc. It can also make things hard to debug.
Trade-offs are inevitable. Generally we believe those trade-offs are worth it, as they would help organizing users' codebase and make it easier to maintain in the long run. In the meantime, we also want to compensate the transparency we lost by providing a tool to help you understand what's going on under the hood and make the learning curve smoother.
That's where Nuxt DevTools comes in! We [first introduced it](https://nuxt.com/blog/introducing-nuxt-devtools) in February 2023 to experiment with the idea. After a few months of exploration and development, from surprisingly positive feedbacks from the community, this idea has been proven to be useful and we decided to make it a core part of your Nuxt development experience.
## Features
[Nuxt DevTools](https://github.com/nuxt/devtools){rel="nofollow"} is a set of visual tools to help you understand your Nuxt app and improve the developer experience even further. It's created to provide better transparency between Nuxt and your app, find performance bottlenecks and help you manage your app and configuration.
### In App DevTools
From the overview, Nuxt DevTools is an in-app DevTools that lives alongside your app. It will show up as a floating panel that you can click to open.
::article-video{cloudinary="v1700132388/devtools/0-intro_ilgwel"}
::
We believe this is a better approach than the traditional browser extension DevTools, as it's:
- **Works across all browsers**, and even on mobile devices! - The capability of browser extension DevTools are limited by the APIs each browsers provides, and also maintain multiple extensions would require a lot of effort. This approach would allow us to focus more on the functionality and features, while having it accessible to users on any browsers and devices.
- **Build tools integrations** - Tranditionally browser extension DevTools are only able to access the runtime context of your app and have no access to the build tools. Having the DevTools comes with Nuxt, allows us to communicate with the build tools and provide much more insights and features.
- **Avoid layout shifts** - Having the DevTools as a floating panel would avoid the layout shifts when toggling the DevTools.
### Pages View
To help improving the implicitness of file-based routing, we introduced the Pages View in DevTools. It lists all the pages that have been registered in your app, that you can easily test and navigate between them.
::article-video{cloudinary="v1700132393/devtools/1-pages_kkbecx"}
::
### Components View
The Components tab shows all the components you are using in your app and where they are from. You can also search for them and go to the source code.
It also provides a graph view that show the relationship between components. You can filter the components to see the dependencies of a specific component. This could help to identify unintended dependencies and improve the performance and bundle size of pages.
::article-video{cloudinary="v1700132398/devtools/2-components_paj0uv"}
::
### Composables View
Composables view shows all the auto-imported composables registered to Nuxt. You can see which files are importing them, and where they are from. Some entries can also provide short descriptions and documentation links.
::article-video{cloudinary="v1700132395/devtools/3-imports_qhahdf"}
::
### Modules Management
The Modules tab shows all the modules that are registered in your app, with the links to their documentations and repositories.
We also provide the ability for you to search for and explore the modules from the community. And install them with a single click!
::article-video{cloudinary="v1700132389/devtools/4-modules_v5ha5u"}
::
### Static Assets Management
The Assets tab shows all the static assets under your `public` directory. It supports previewing images, videos, fonts, PDFs, and other files, that you can easily copy the URL or code snippet to use in your app. You may also drag and drop files to upload them directly from Nuxt DevTools.
::article-video{cloudinary="v1700132394/devtools/5-assets_mpzyrs"}
::
### Runtime Configs Editor
The Runtime Configs tab shows the runtime configs of your app and provides an interactive editor for you to play with different values.
::article-video{cloudinary="v1700132393/devtools/6-runtime-configs_fzlrik"}
::
### Payload Editor
Similar to the Runtime Configs Editor, the Payload Editor allows you to edit the payload from composables like [`useState`](https://nuxt.com/docs/api/composables/use-state) and [`useFetch`](https://nuxt.com/docs/api/composables/use-fetch) to see what have been passed from server to client on server-side rendering.
::article-video{cloudinary="v1700132389/devtools/7-payload_nfzobp"}
::
### Open Graph Preview
[Open Graph](https://ogp.me/){rel="nofollow"} plays an important role in social media sharing as well as [SEO](https://en.wikipedia.org/wiki/Search_engine_optimization){rel="nofollow"}. In the traditional workflow, we usually need to first deploy our app to check if the Open Graph is working as expected on various social media platforms. With the Open Graph Preview, you can now preview the Open Graph in DevTools and update it live with an instant feedback loop.
We also help you check the Open Graph tags in your app and provide suggestions to improve them. You can copy the generated code snippet and paste it to your routes to fix them in one go.
::article-video{cloudinary="v1700132390/devtools/8-open-graph_hjawen"}
::
### Plugins Overview
Plugins Overview list all the [plugins](https://nuxt.com/docs/guide/directory-structure/plugins) registered in your app. As the plugins are executed in the runtime before your app renders, it's important to keep plugins performant and avoid blocking the rendering. We provide the execution time of each plugin and the total time of all plugins, so you can better identify the potential performance bottlenecks.
::article-video{cloudinary="v1700132390/devtools/9-plugins_bhcobr"}
::
### Timeline
Timeline is a tool for you to check when and how each composable been called. Different from browser DevTools' performance tools, this tab only check the high-level composables combining with other events like route navigration, which is closer to day-to-day use. It also records the arguments and return values of each call, so you can better understand what's going on under the hood.
::warning
As of November 2023, the Timeline is still an experimental feature that requires manually opt-in.
::
::article-video{cloudinary="v1700132392/devtools/10-timeline_zeei5s"}
::
### Production Build Analyzer
While Nuxt DevTools is mostly focused on providing development tools, sometimes we might want to know how chunks are composed in production. The Build Analyzer allows you to fire up a production build and analyze the chunks and modules at any time and see how they are bundled. You can also do multiple builds on different branches to compare how your refactoring/changes affect the bundle size, etc.
::article-video{cloudinary="v1700132394/devtools/11-build-analyze_f3wx6q"}
::
### Server API Playground
Nuxt provides a very convenient way to create server API functions with the [server routes](https://nuxt.com/docs/guide/directory-structure/server#server-routes). Since in Nuxt we have that information, we are able to provide a playground for you to test and debug your server API functions, similar to tools like Postman. We list all the server APIs available in your app automatically. And we execute those functions **within the same context of your app**, so you don't need to manually set them up in external tools. As always, we also have code snippets for you to copy and paste into your app.
::article-video{cloudinary="v1700132388/devtools/12-server-api_owjyjg"}
::
### Embedded Full-feature VS Code
Thanks to the flexibility of our DevTools approach, we can leverage the power of the modern web to embed a full-featured VS Code right in the DevTools. In that VS Code, you can sign in to your account and synchronize your settings, and all the extensions just work as your normal VS Code client. This allows you to quickly edit your code without leaving your browser.
::article-video{cloudinary="v1700132395/devtools/13-vscode_je5x0m"}
::
### Component Inspector
The Inspector allows you to inspect the DOM tree and see which component is rendering it. Click to go to your editor for the specific line. Making it much easier to make changes without the requirement of understanding the project structure thoroughly.
::article-video{cloudinary="v1700132391/devtools/0-inspector_fuxmr7"}
::
### Split Screens
In the recent releases, we introduced a split screen feature, that allows you to open two tabs side-by-side.
::article-video{cloudinary="v1700132391/devtools/0-split-view_mdeiie"}
::
### UI Customization
In DevTools setting, we provide a few options for you to customize the tabs you want to see, and the layout of the DevTools.
::article-video{cloudinary="v1700132391/devtools/0-settings_weflmu"}
::
## Ecosystem
In Nuxt, we value the ecosystem a lot. Similar to how Nuxt modules enhance Nuxt core, we also designed Nuxt DevTools to be highly extensible, allowing modules to provide additional features and integrations.
### Community Modules
We are proud to see the community has already started to build modules for Nuxt DevTools. Here are some of them:
[Vitest module](https://nuxt.com/modules/vitest){rel="nofollow"} provides Vitest UI for tests running with the same pipeline as your Nuxt app. Made it easier to debug your tests alongside your app.
::article-video{cloudinary="v1700132393/devtools/99-vitest_wwikpc"}
::
[VueUse module](https://nuxt.com/modules/vueuse) provides a search page for available composables and see their documentation.
::article-video{cloudinary="v1700132390/devtools/99-vueuse_simsfj"}
::
[SiteMap module](https://nuxt.com/modules/sitemap) provides an interactive editor for you to manage your sitemap.
::article-video{cloudinary="v1700132390/devtools/99-sitemap_xpsfek"}
::
[TailwindCSS module](https://nuxt.com/modules/tailwindcss) provides the Tailwind Config Viewer for you to check what's available based on your config.
::article-video{cloudinary="v1700132388/devtools/99-tailwind_dgiodc"}
::
[UnoCSS module](https://nuxt.com/modules/unocss) provides an interactive inspector to see how each module contributes to the final CSS.
::article-video{cloudinary="v1700132394/devtools/99-unocss_xvii5x"}
::
[Storybook module](https://nuxt.com/modules/storybook) provides a Storybook UI for your components.
::article-video{cloudinary="v1700132388/devtools/99-storybook_ifxt4r"}
::
And they are just a few of them! We are looking forward to see more modules coming to Nuxt DevTools!
### Projects Inspired by Nuxt DevTools
In the meantime, we are also flattered that other frameworks are starting to build their own DevTools inspired by Nuxt DevTools:
- [`webfansplz/vite-plugin-vue-devtools`](https://github.com/webfansplz/vite-plugin-vue-devtools){rel="nofollow"} - A Nuxt DevTools port to support DevTools for Vite + Vue 3 apps.
- [`pheno-agency/vite-plugin-devtools`](https://github.com/pheno-agency/vite-plugin-devtools){rel="nofollow"} - An experiment on building framework-agnostic DevTools for Vite.
- [Modern.js DevTools](https://github.com/Asuka109/modern.js/tree/dev/modernjs-devtools/packages/devtools/plugin){rel="nofollow"} - In App DevTools for Modern.js
- [Qwik DevTools](https://github.com/QwikDev/devtools){rel="nofollow"} - DevTools for Qwik
We are working closely with the maintainers of those projects to see how we can bring the experience of DevTools to the next level.
## What's Next
Nuxt DevTools just reached v1.0, but t doesn't mean we are done. There are still a lot of things we want to explore and improve. Here are some of the ideas we are considering:
- Nuxt Accessibility Integration - We are building an a11y integration for Nuxt ([#23255](https://github.com/nuxt/nuxt/issues/23255){rel="nofollow"}). We'll build a dedicated view in Nuxt DevTools for you to check the accessibility hints interactively.
- Vue DevTools Integration - We are working with the Vue team to bring the Vue DevTools experience to a shared tool that works for both browser extensions and in-app DevTools like `vite-plugin-vue-devtools` and Nuxt DevTools.
- [Let us know your ideas/suggestions!](https://github.com/nuxt/devtools/discussions/29){rel="nofollow"}
## The Future
We are excited to see how Nuxt DevTools can help you build better apps and improve your developer experience. Going forward, we are imagining something bigger than Nuxt DevTools itself. We believe that having such framework-specific DevTools is the way onwards to provide even better developer experience. We also see there are many parts of such tools can actually be shared and reused across tools. We came up with the idea of the DevTools Kit.
### DevTools Kit
DevTools Kit is an idea of the universal protocol that is still in the early brainstorming phase. We imagine that in the best world, each feature of the DevTools should be **composable, extensible, and collaborative**. Meta-frameworks could build their own features for their specific needs, while the common web-related tools could be shared and collaborated on between different frameworks.
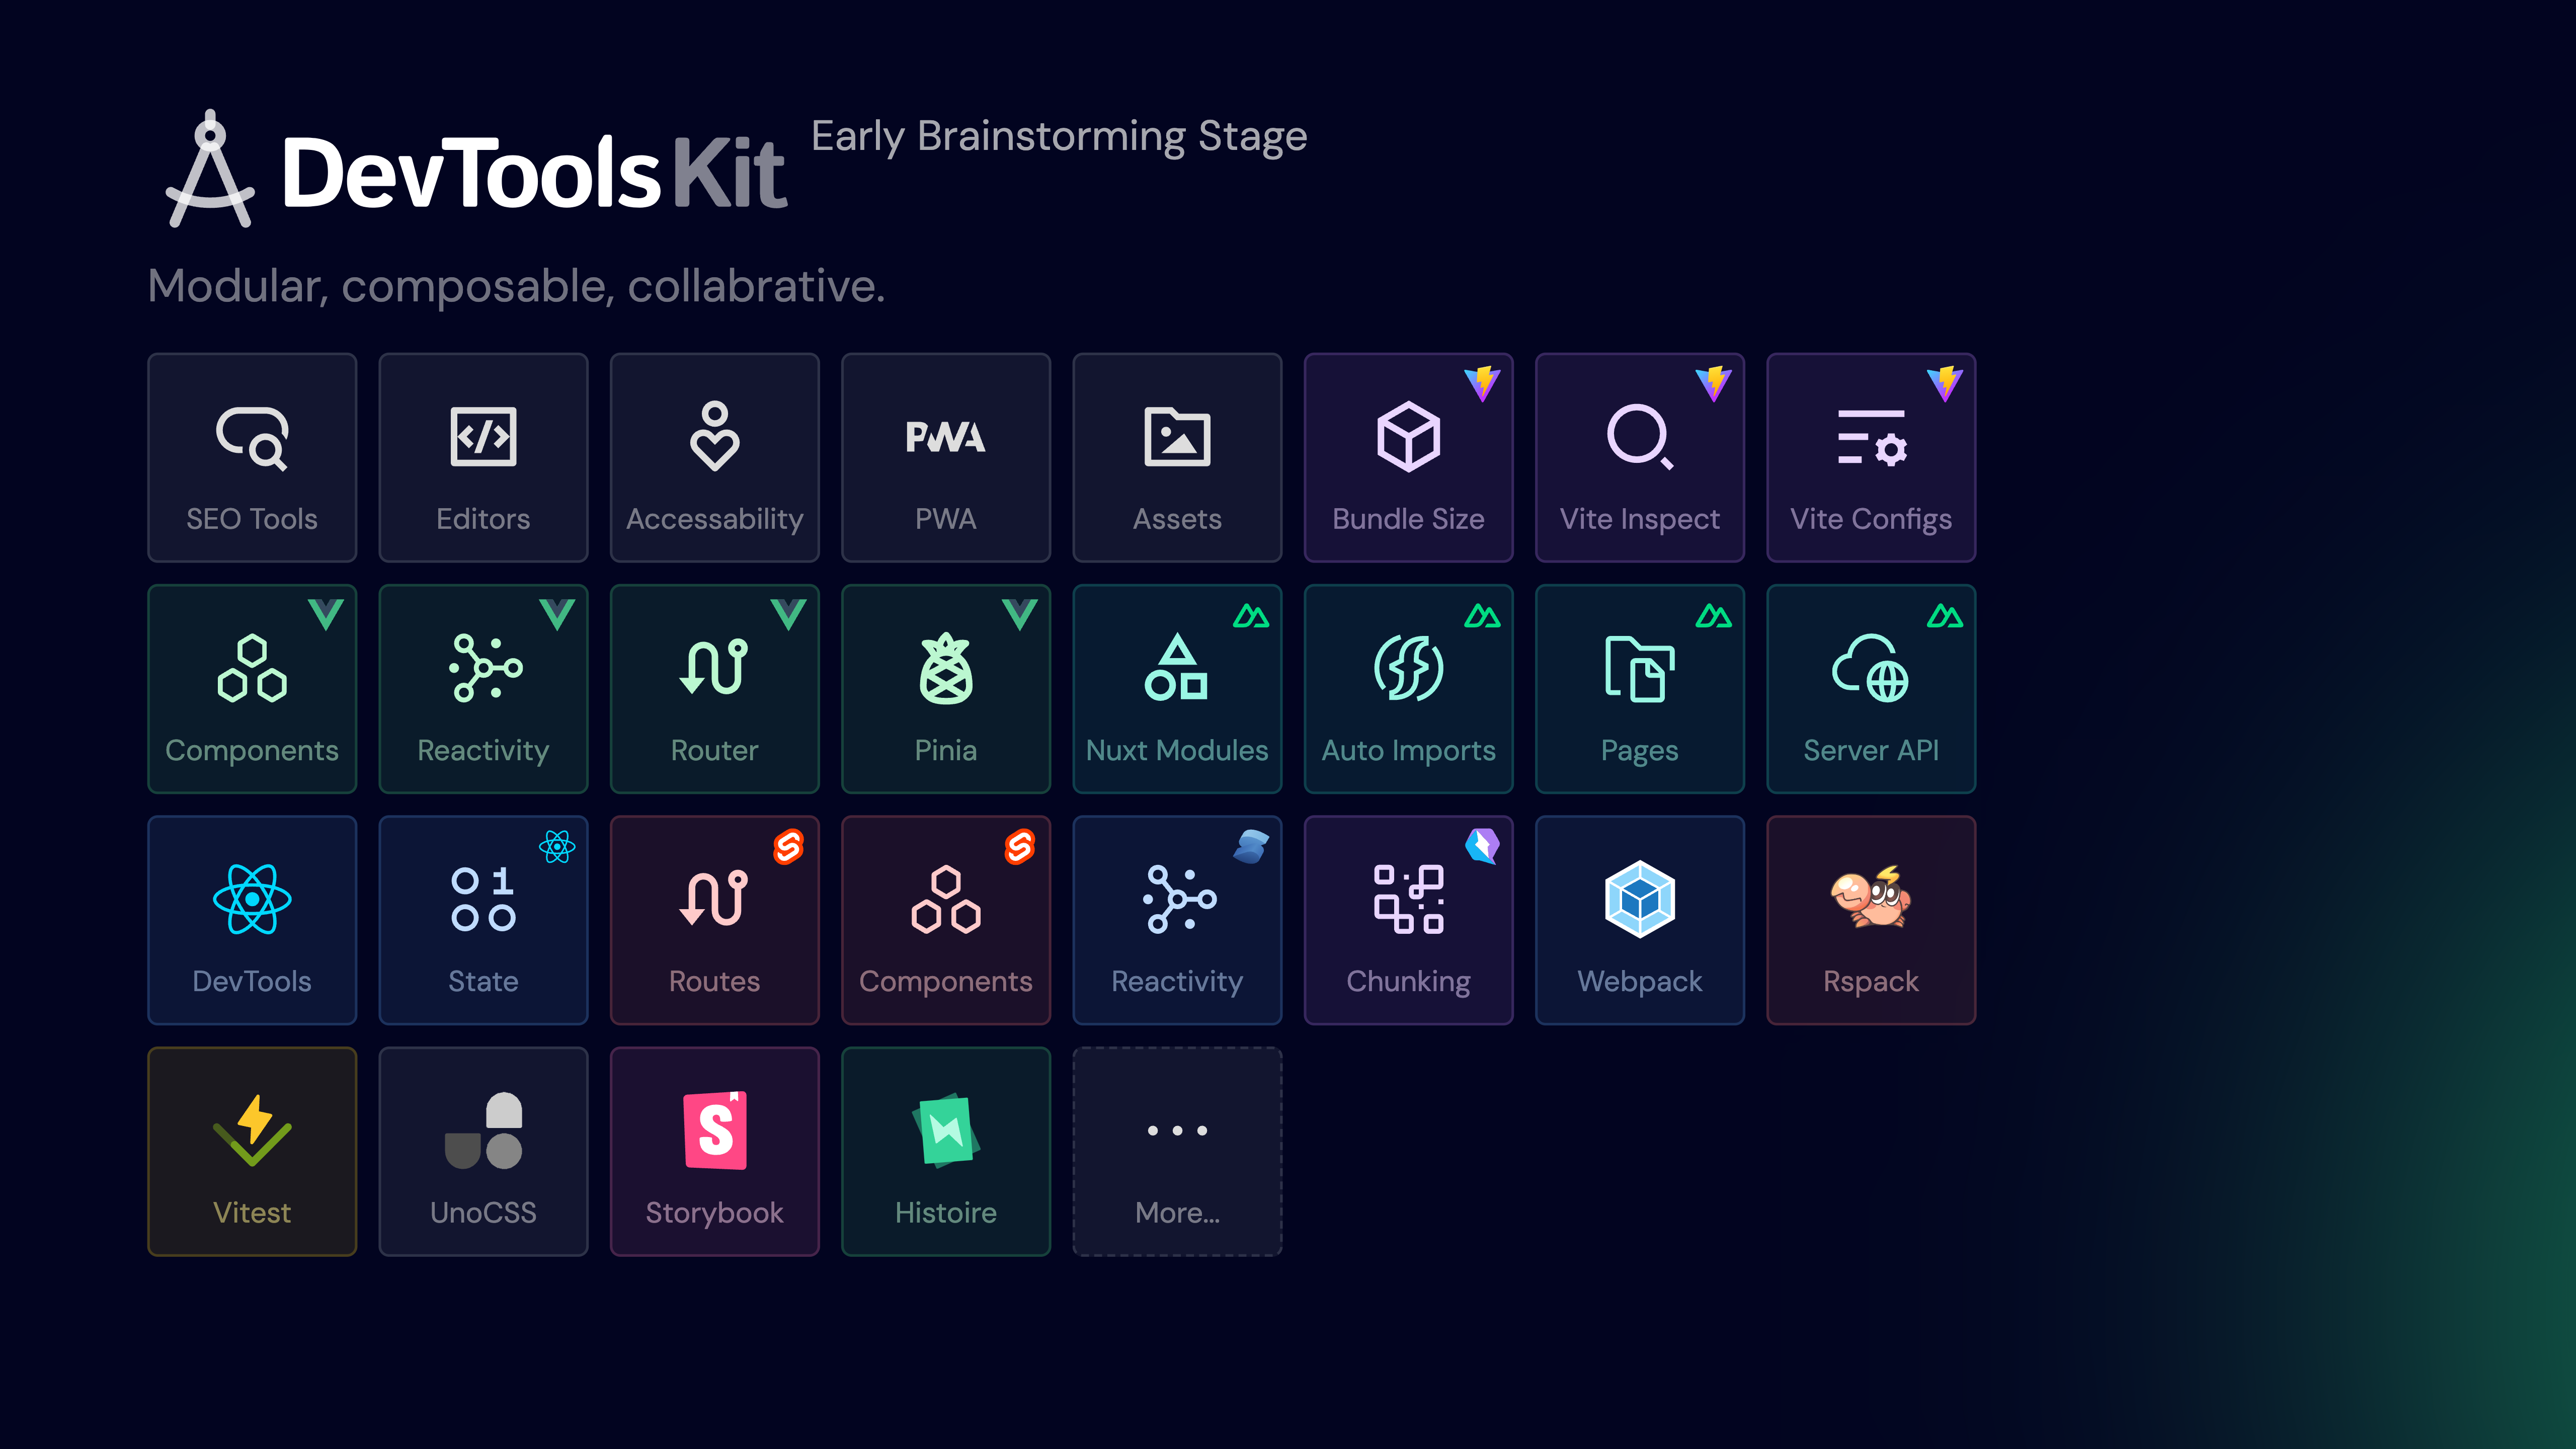{className="border,border-gray-200,dark:border-gray-700,rounded-lg"}
Imagine we could have all these features, each as a standalone package. We could have general web-related tools like SEO, Accessibility, PWA, Static Assets, etc. Then low-level build tools related, like Vite build analyzer, Vite Inspector, or Webpack visualizer, etc. And finally, we could have framework and meta-framework specific tools like Vue Components view, or Nuxt Server API Playground, etc.
{className="border,border-gray-200,dark:border-gray-700,rounded-lg"}
{className="border,border-gray-200,dark:border-gray-700,rounded-lg"}
At that time, Vue DevTools would be a composition of common web features and Vue-specific features. And Nuxt DevTools would essentially be a composition of the features above, inherit all features from Vue DevTools, and add Nuxt specific features on top of it.
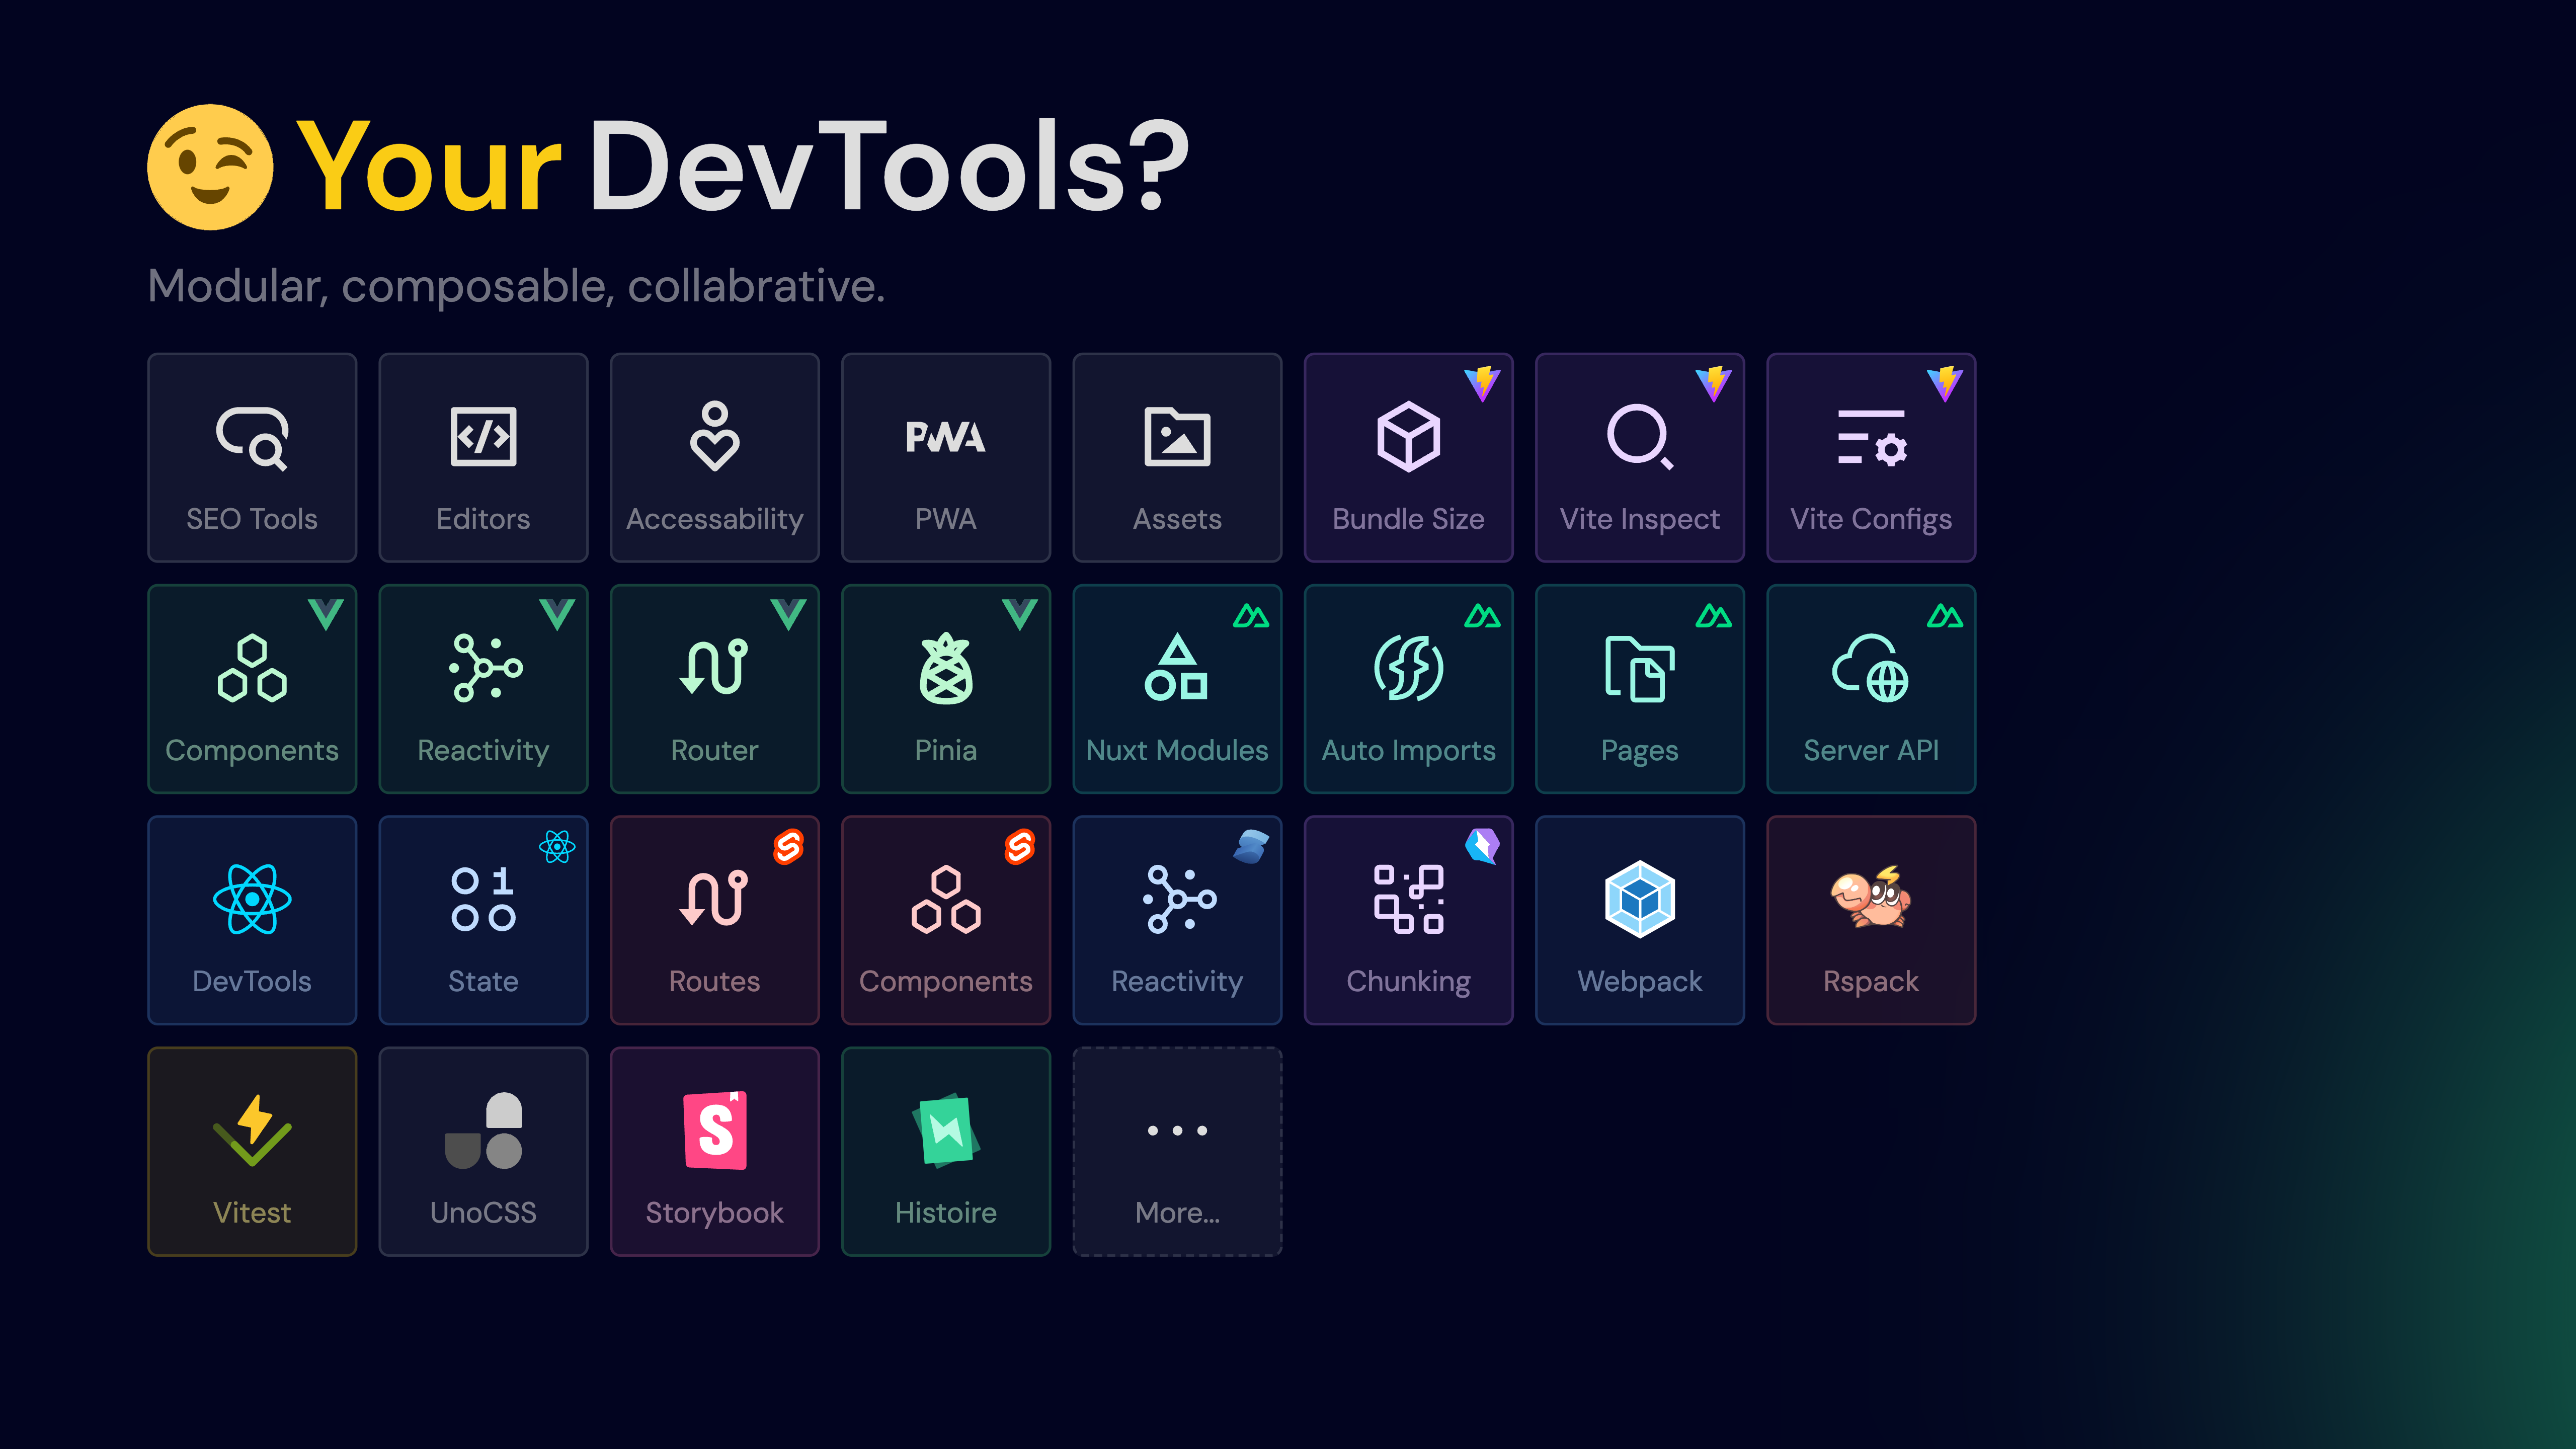{className="border,border-gray-200,dark:border-gray-700,rounded-lg"}
It would even be possible to compose your own DevTools as you like.
That said, we are still thinking about and discussing the details of the DevTools Kit. Stay tuned for more updates!
## Conclusion
We hope you enjoy the new Nuxt DevTools experience! We are looking forward to seeing how it can help you build better apps and improve your developer experience. If you have any ideas or suggestions, feel free to let us know in the [Ideas & Suggestions](https://github.com/nuxt/devtools/discussions/29){rel="nofollow"} discussion.
Thank you for your support and happy hacking! 🚀
# Nuxt 3.9
A very merry Christmas to you and yours from all Nuxters involved in this release! 🎁🎄
We have lots of features packed into v3.9 and can't wait for you to try them out.
### ⚡️ Vite 5
This release comes with Vite 5 and Rollup 4 support. Module authors may need to check to ensure that any vite plugins you're creating are compatible with these latest releases.
This comes with a whole host of great improvements and bug fixes - check out [the Vite changelog](https://vitejs.dev/guide/migration.html#migration-from-v4){rel="nofollow"} for more info.
### ✨ Vue 3.4 ready
This release is tested with the latest Vue 3.4 release candidate, and has the necessary configuration to take advantage of [new features in Vue 3.4](https://blog.vuejs.org/posts/vue-3-4){rel="nofollow"}, including debugging hydration errors in production (just set `debug: true`) in your Nuxt config.
👉 To take advantage, just update your `vue` version once v3.4 is released, or try out the release candidate today:
```json [package.json]
{
"dependencies": {
"nuxt": "3.9.0",
"vue": "3.4.0-rc.1",
"vue-router": "latest"
}
}
```
### 🏝️ Interactive Server Components
This is a highly-experimental update, but it's now possible to play around with interactive components within Nuxt server components. You'll need to enable this new feature additionally to component islands:
```ts [nuxt.config.ts]
export default defineNuxtConfig({
experimental: {
componentIslands: {
selectiveClient: true
}
}
})
```
Now, within a server component, you can specify components to hydrate by using the `nuxt-client` directive:
```vue [components/SomeComponent.server.vue]
<NuxtLink :to="/" nuxt-client />
```
We're pretty excited about this one - so do let us know how you're using it! 🙏
### 🔥 Automatic Server Optimisations
We now use Vite's new AST-aware 'define' to perform more accurate replacements on server-side code, meaning code like this will no longer throw an error:
```vue [app.vue]
<script setup lang="ts">
if (document) {
console.log(document.querySelector('div'))
}
</script>
```
This hasn't been possible until now because we haven't wanted to run the risk of accidentally replacing normal words like `document` within non-JS parts of your apps. But Vite's new `define` functionality is powered by `esbuild` and is syntax-aware, so we feel confident in enabling this functionality. Nevertheless, you can opt out if you need to:
```ts [nuxt.config.ts]
export default defineNuxtConfig({
hooks: {
'vite:extendConfig' (config) {
delete config.define!.document
}
}
})
```
### 🚦 Granular Loading API
We now have a new hook-based system for [`<NuxtLoadingIndicator>`](https://nuxt.com/docs/api/components/nuxt-loading-indicator), including a `useLoadingIndicator` composable that lets you control/stop/start the loading state. You can also hook into `page:loading:start` and `page:loading:end` if you prefer.
::tip
You can read more [in the docs](https://nuxt.com/docs/api/composables/use-loading-indicator) and in the original PR ([#24010](https://github.com/nuxt/nuxt/pull/24010){rel="nofollow"}).
::
### 🏁 Run single events in `callOnce`
Sometimes you only want to run code once, no matter how many times you load a page - and you don't want to run it again on the client if it ran on the server.
For this, we have a new utility: [`callOnce`](https://nuxt.com/docs/api/utils/call-once) ([#24787](https://github.com/nuxt/nuxt/pull/24787){rel="nofollow"}).
```vue [app.vue]
<script setup>
const websiteConfig = useState('config')
await callOnce(async () => {
console.log('This will only be logged once')
websiteConfig.value = await $fetch('https://my-cms.com/api/website-config')
})
</script>
```
Note that this utility is context-aware so it *must* be called in component setup function or Nuxt plugin, as with other Nuxt composables.
::read-more{to="https://nuxt.com/docs/api/utils/call-once"}
::
### 🚨 Error Types
For a while now, errors returned by `useAsyncData` and `useFetch` have been typed pretty generically as `Error`. We've significantly improved the type possibilities for them to make them more accurate in terms of what you'll actually receive. (We normalise errors with the `h3` `createError` utility under the hood, so they can be serialised from server to client, for example.)
We've tried to implement the type change in a backwards compatible way, but you might notice that you need to update the generic if you're manually configuring the generics for these composables. See ([#24396](https://github.com/nuxt/nuxt/pull/24396){rel="nofollow"}) for more information, and do let us know if you experience any issues.
### 🔥 Schema Performance
We've taken some time in this release to make some minor performance improvements, so you should notice some things are a bit faster. This is an ongoing project and we have ideas for improving initial load time of the Nuxt dev server.
## ✅ Upgrading
As usual, our recommendation for upgrading is to run:
```sh
npx nuxi upgrade
```
## Full Release Notes
::read-more
---
icon: i-simple-icons-github
to: https://github.com/nuxt/nuxt/releases/tag/v3.9.0
---
Read the full release notes of Nuxt `v3.9.0`.
::
Thank you for reading this far! We hope you enjoy the new release. Please do let us know if you have any feedback or issues.
**Happy Nuxting ✨**
# Nuxt: A vision for 2023
This past year has been an exciting one. Looking into the new year, there is a lot we have planned as a team and we'd love to share it with you. ✨
This past year has been an exciting one, with the release of Nuxt 3 and Nitro and the launch of the new [nuxt.com](http://nuxt.com/){rel="nofollow"} website. It's been the culmination of years of work, and has not only resulted in a new major version of Nuxt, but a new Nuxt architecture, a full-stack server framework ([Nitro](https://nitro.unjs.io/){rel="nofollow"}), and a new GitHub organisation and ecosystem ([UnJS](https://github.com/unjs/){rel="nofollow"}).
Throughout that whole time, [Pooya Parsa](https://github.com/pi0){rel="nofollow"} has led the Nuxt team, putting in countless hours of work and thought into building Nuxt 3.
Now, at the start of 2023, he's handing over the helm of the Nuxt open-source work to me ([Daniel Roe](https://github.com/danielroe){rel="nofollow"}). Pooya will continue to be actively contributing to the Nuxt project and of course driving the development of UnJS ecosystem and Nitro project.
This is a real honour and I'm hugely pleased to be able to work with the rest of the team and the community to continue to drive Nuxt forward to be the intuitive way to build a web application using Vue. 😊
Looking into the new year, there is a lot we have planned as a team and we'd love to share it with you.
## Unifying Nuxt
One important change will be unifying Nuxt into a single repository.
As a complete rewrite of Nuxt 2, Nuxt 3 has been developed in a separate repository: `nuxt/framework`. Nuxt 3 even has its own documentation on [nuxt.com](http://nuxt.com/){rel="nofollow"}, versus the Nuxt 2 documentation on [v2.nuxt.com](https://v2.nuxt.com){rel="nofollow"}. In development, this helped us move faster but meant less attention on issues for Nuxt 2. It's also a bit confusing.
So in the coming days, we'll be unifying the Nuxt repos into a single repository, `nuxt/nuxt`. We'll transfer all issues and discussions across, of course, clearly labeling them as to which version of Nuxt they affect. This will also provide us an opportunity to close out issues and RFCs that we've resolved or implemented in Nuxt 3.
## New Website
This last year brought us the launch of [nuxt.com](http://nuxt.com/){rel="nofollow"} and the unveiling of Nuxt's [new logo](https://nuxt.com/design-kit).
{className="rounded-lg,border,border-gray-700"}
We'd like to make this website the central place for everything Nuxt. That includes:
- migrating Nuxt 2 documentation so there's a single website to check (with a version switcher)
- documentation for community modules (using multi-source to pull them from their own repositories)
- revamped [examples](https://nuxt.com/docs/examples/hello-world) that show off more real use cases, including authentication, monorepos and more
We have some other exciting plans for the website, but I don't want to reveal too much, other than to say that we'll also (of course!) be open-sourcing the website soon.
## Key Modules
The modules ecosystem is an incredibly powerful one, and we are grateful to all the module authors who extend Nuxt with so many features. Today we have more than 60 modules compatible with Nuxt 3. Our goal is to continue to empower module development as well as make sure that the most used modules in Nuxt 2 are updated or have a straightforward migration path.
The main priorities at the start of the year are `nuxt/image`, PWA and `nuxt/auth`.
We're also developing RFCs for `nuxt/font` and `nuxt/script` in conjunction with the Google Aurora team, which will make it much easier to apply best performance practices to your Nuxt apps. Watch this space!
## DX and Performance
We particularly care a lot about making Nuxt a joy to use, and we'd like to keep pushing the boundary of great developer experience, which we believe results in the best experience for users of the apps we write too.
In the coming months, there will be a continued focus on developer experience and performance. Expect to see Nuxt DevTools and CLI improvements for scaffolding - and more. On the performance side, Nuxt 3 + Nitro is a game-changer for speed, performance, and customisability, and we’ll be building on top of that to enable some amazing features. 🚀
## A New Release Cycle
It's important to know what's coming, and we're going to be spending some time making sure we communicate clearly about what's happening with Nuxt through regular updates like this one.
On top of that, we're planning a consistent release cycle, following [semver](https://semver.org/){rel="nofollow"}. We'll aim for major framework releases every year, with an expectation of patch releases every week or so and minor releases every month or so. They should never contain breaking changes except within options clearly marked as `experimental`.
One comment: We don't want there to be as big a gap (either in time or in breaking changes) between 3 -> 4 as there was between 2 -> 3, so, when the time comes for Nuxt 4, expect a much more gentle upgrade!
In the upcoming 3.1.0 release, you can already find a host of bug fixes as well as:
- experimental server-only components and a component island renderer
- Nitro 2, Vite 4 and Rollup 3 support
## Migrating to Nuxt 3
On December 31st, 2023, Vue 2 will reach End of Life (EOL), and with it Nuxt 2. Both Vue and Nuxt will continue being available and working for many people, but at the same time, many companies and users will want to transition to Nuxt 3 (and we'd encourage this!).
Part of our focus this year therefore will be supporting everyone who wants to migrate their apps to Nuxt 3. We'll also be working to backport key bug fixes and security fixes to Nuxt 2.
In addition, there is Nuxt Bridge. It was built as a module to bring features and bug fixes from Nuxt 3 back to Nuxt 2, although it has not yet been released in a stable version. We plan to stabilise and release it in the next month or so, but our main focus over the course of the year will be on helping people transition to Nuxt 3.
---
It’s a privilege to be part of this community, and we wish you a very Happy New Year! 💚
Daniel (on behalf of the whole Nuxt team)
# Nuxt 3.10
v3.10 comes quite close on the heels of v3.9, but it's packed with features and fixes. Here are a few highlights.
### ✨ Experimental shared `asyncData` when prerendering
When prerendering routes, we can end up refetching the same data over and over again. In Nuxt 2 it was possible to create a 'payload' which could be fetched once and then accessed in every page (and this is of course possible to do manually in Nuxt 3 - see [this article](https://roe.dev/blog/shared-data-nuxt-generate){rel="nofollow"}).
With [#24894](https://github.com/nuxt/nuxt/pull/24894){rel="nofollow"}, we are now able to do this automatically for you when prerendering your site. Your [`useAsyncData`](https://nuxt.com/docs/api/composables/use-async-data) and [`useFetch`](https://nuxt.com/docs/api/composables/use-fetch) calls will be deduplicated and cached between renders of your site.
```ts [nuxt.config.ts]
export defineNuxtConfig({
experimental: {
sharedPrerenderData: true
}
})
```
::important
It is particularly important to make sure that any unique key of your data is always resolvable to the same data. For example, if you are using `useAsyncData` to fetch data related to a particular page, you should provide a key that uniquely matches that data. (`useFetch` should do this automatically.)
::
::read-more
---
to: https://nuxt.com/docs/guide/going-further/experimental-features#sharedprerenderdata
---
::
### 🆔 SSR-safe accessible unique ID creation
We now ship a `useId` composable for generating SSR-safe unique IDs ([#23368](https://github.com/nuxt/nuxt/pull/23368){rel="nofollow"}). This allows creating more accessible interfaces in your app. For example:
```vue [components/MyForm.vue]
<script setup>
const emailId = useId()
const passwordId = useId()
</script>
<template>
<form>
<label :for="emailId">Email</label>
<input
:id="emailId"
name="email"
type="email"
>
<label :for="passwordId">Password</label>
<input
:id="passwordId"
name="password"
type="password"
>
</form>
</template>
```
### ✍️ Extending `app/router.options`
It's now possible for module authors to inject their own `router.options` files ([#24922](https://github.com/nuxt/nuxt/pull/24922){rel="nofollow"}). The new `pages:routerOptions` hook allows module authors to do things like add custom `scrollBehavior` or add runtime augmenting of routes.
::read-more
---
to: https://nuxt.com/docs/guide/going-further/custom-routing#router-options
---
::
### :icon{name="i-vscode-icons-file-type-node"} Client-side Node.js support
We now support (experimentally) polyfilling key Node.js built-ins ([#25028](https://github.com/nuxt/nuxt/pull/25028){rel="nofollow"}), just as we already do via Nitro on the server when deploying to non-Node environments.
That means that, within your client-side code, you can import directly from Node built-ins (`node:` and node imports are supported). However, nothing is globally injected for you, to avoid increasing your bundle size unnecessarily. You can either import them where needed.
```ts [some-file.ts]
import { Buffer } from 'node:buffer'
import process from 'node:process'
```
Or provide your own polyfill, for example, inside a Nuxt plugin.
```ts [plugins/node.client.ts]
import { Buffer } from 'node:buffer'
import process from 'node:process'
globalThis.Buffer = Buffer
globalThis.process = process
export default defineNuxtPlugin({})
```
This should make life easier for users who are working with libraries without proper browser support. However, because of the risk in increasing your bundle unnecessarily, we would strongly urge users **to choose other alternatives** if at all possible.
### 🍪 Better cookie reactivity
We now allow you to opt-in to using the [CookieStore](https://developer.mozilla.org/en-US/docs/Web/API/CookieStore){rel="nofollow"}. If browser support is present, this will then be used instead of a BroadcastChannel to update `useCookie` values reactively when the cookies are updated ([#25198](https://github.com/nuxt/nuxt/pull/25198){rel="nofollow"}).
This also comes paired with a new composable, `refreshCookie` which allows manually refreshing cookie values, such as after performing a request.
::read-more{to="https://nuxt.com/docs/api/utils/refresh-cookie"}
::
### 🏥 Detecting anti-patterns
In this release, we've also shipped a range of features to detect potential bugs and performance problems.
- We now will throw an error if `setInterval` is used on server ([#25259](https://github.com/nuxt/nuxt/pull/25259){rel="nofollow"}).
- We warn (in development only) if data fetch composables are used wrongly ([#25071](https://github.com/nuxt/nuxt/pull/25071){rel="nofollow"}), such as outside of a plugin or setup context.
- We warn (in development only) if you are not using `<NuxtPage />` but have the `vue-router` integration enabled ([#25490](https://github.com/nuxt/nuxt/pull/25490){rel="nofollow"}). (`<RouterView />` should not be used on its own.)
### 🧂 Granular view transitions support
It's now possible to control view transitions support on a per-page basis, using `definePageMeta` ([#25264](https://github.com/nuxt/nuxt/pull/25264){rel="nofollow"}).
You need to have experimental view transitions support enabled first:
```ts [nuxt.config.ts]
export default defineNuxtConfig({
experimental: {
viewTransition: true
},
app: {
// you can disable them globally if necessary (they are enabled by default)
viewTransition: false
}
})
```
And you can opt in/out granularly:
```vue [pages/index.vue]
<script setup lang="ts">
definePageMeta({
viewTransition: false
})
</script>
```
Finally, Nuxt will not apply View Transitions if the user's browser matches `prefers-reduced-motion: reduce` ([#22292](https://github.com/nuxt/nuxt/pull/22292){rel="nofollow"}). You can set `viewTransition: 'always'`; it will then be up to you to respect the user's preference.
### 🏗️ Build-time route metadata
It's now possible to access routing metadata defined in `definePageMeta` at build-time, allowing modules and hooks to modify and change these values ([#25210](https://github.com/nuxt/nuxt/pull/25210){rel="nofollow"}).
```ts [nuxt.config.ts]
export default defineNuxtConfig({
experimental: {
scanPageMeta: true
}
})
```
Please, experiment with this and let us know how it works for you. We hope to improve performance and enable this by default in a future release so modules like `@nuxtjs/i18n` and others can provide a deeper integration with routing options set in `definePageMeta`.
### 📦 Bundler module resolution
With [#24837](https://github.com/nuxt/nuxt/pull/24837){rel="nofollow"}, we are now opting in to the TypeScript `bundler` resolution which should more closely resemble the actual way that we resolve subpath imports for modules in Nuxt projects.
'Bundler' module resolution is [recommended by Vue](https://github.com/vuejs/tsconfig/blob/mainz/tsconfig.json#L24-L26){rel="nofollow"} and [by Vite](https://vitejs.dev/guide/performance.html#reduce-resolve-operations){rel="nofollow"}, but unfortunately there are still many packages that do not have the correct entries in their `package.json`.
As part of this, we opened 85 PRs across the ecosystem to test switching the default, and identified and fixed some issues.
If you need to switch off this behaviour, you can do so. However, please consider raising an issue (feel free to tag me in it) in the library or module's repo so it can be resolved at source.
```ts [nuxt.config.ts]
export default defineNuxtConfig({
future: {
typescriptBundlerResolution: false
}
})
```
## ✅ Upgrading
As usual, our recommendation for upgrading is to run:
```sh
npx nuxi upgrade --force
```
This will refresh your lockfile as well, and ensures that you pull in updates from other dependencies that Nuxt relies on, particularly in the unjs ecosystem.
## Full Release Notes
::read-more
---
icon: i-simple-icons-github
target: _blank
to: https://github.com/nuxt/nuxt/releases/tag/v3.10.0
---
Read the full release notes of Nuxt `v3.10.0`.
::
Thank you for reading this far! We hope you enjoy the new release. Please do let us know if you have any feedback or issues.
**Happy Nuxting ✨**
# The Evolution of Shiki v1.0
[Shiki](https://github.com/shikijs/shiki){rel="nofollow"} is a syntax highlighter that uses [TextMate grammars and themes](https://code.visualstudio.com/api/language-extensions/syntax-highlight-guide#textmate-grammars){rel="nofollow"}, the same engine that powers VS Code. It provides one of the most accurate and beautiful syntax highlighting for your code snippets. It was created by [Pine Wu](https://github.com/octref){rel="nofollow"} back in 2018, when he was part of the VS Code team. It started as an experiment to use [Oniguruma](https://github.com/microsoft/vscode-oniguruma){rel="nofollow"} to do syntax highlighting.
Different from existing syntax highlighters like [Prism](https://prismjs.com/){rel="nofollow"} and [Highlight.js](https://highlightjs.org/){rel="nofollow"} that designed to run in the browser, Shiki took a different approach by **highlighting ahead of time**. It ships the highlighted HTML to the client, producing accurate and beautiful syntax highlighting with **zero JavaScript**. It soon took off and became a very popular choice, especially for static site generators and documentation sites.
::collapsible{name="Shiki Example"}
For example, with the code snippet below:
```ts
export default defineNuxtConfig({
modules: [
'@nuxt/content',
],
})
```
Shiki will generate the following HTML:
```html
<pre class="shiki material-theme-palenight" style="background-color:#292D3E;color:#babed8" tabindex="0">
<code>
<span class="line"><span style="color:#89DDFF;font-style:italic">export</span><span style="color:#89DDFF;font-style:italic"> default</span><span style="color:#82AAFF"> defineNuxtConfig</span><span style="color:#BABED8">(</span><span style="color:#89DDFF">{</span></span>
<span class="line"><span style="color:#F07178"> modules</span><span style="color:#89DDFF">:</span><span style="color:#BABED8"> [</span></span>
<span class="line"><span style="color:#89DDFF"> '</span><span style="color:#C3E88D">@nuxt/content</span><span style="color:#89DDFF">'</span><span style="color:#89DDFF">,</span></span>
<span class="line"><span style="color:#BABED8"> ]</span><span style="color:#89DDFF">,</span></span>
<span class="line"><span style="color:#89DDFF">}</span><span style="color:#BABED8">)</span></span>
</code>
</pre>
```
It might look a bit overwhelming if you read it, but **this piece of HTML works everywhere without any JavaScript or CSS**. TextMate grammars has a very rich representation of the types of every token (TextMate scopes). Since Shiki flattens all the tokens into styled spans, it achieves accurate results that most traditional CSS-based highlighters have difficulties achieving.
::
While Shiki is awesome, it's still a library that is designed to run on Node.js. This means it is limited to highlighting static code only and would have trouble with dynamic code, because Shiki doesn't work in the browser. In addition, Shiki relies on the WASM binary of Oniguruma, as well as a bunch of heavy grammar and theme files in JSON. It uses Node.js filesystem and path resolution to load these files, which is not accessible in the browser.
To improve that situation, I [started this RFC](https://github.com/shikijs/shiki/issues/91){rel="nofollow"} that later landed with [this PR](https://github.com/shikijs/shiki/pull/109){rel="nofollow"} and shipped in Shiki v0.9. While it abstracted the file loading layer to use fetch or filesystem based on the environment, it's still quite complicated to use as you need to serve the grammars and theme files somewhere in your bundle or CDN manually, then call the `setCDN` method to tell Shiki where to load these files.
The solution is not perfect but at least it made it possible to run Shiki in the browser to highlight dynamic content. We have been using that approach since then - until the story of this article began.
## The Start
Nuxt is putting a lot effort in pushing the [web to the edge](https://nuxt.com/blog/nuxt-on-the-edge), making the web more accessible with lower latency and better performance. Like CDN servers, edge hosting services such as [CloudFlare Workers](https://workers.cloudflare.com/){rel="nofollow"} are deployed all over the world. Users get the content from the nearest edge server without the round trips to the origin server which could be thousands of miles away. With the awesome benefits it provides, it also comes with some trade-offs. For example, edge servers use a restricted runtime environment. CloudFlare Workers also does not support file system access and usually don't preserve the state between requests. While Shiki's main overhead is loading the grammars and themes upfront, that wouldn't work well in the edge environment.
It all started with a chat between [Sébastien](https://x.com/Atinux){rel="nofollow"} and me. We were trying to make [Nuxt Content](https://github.com/nuxt/content){rel="nofollow"} which uses Shiki to highlight the code blocks, to work on the edge.
{className="rounded-lg,shadow,max-w-[700px],border,dark:border-gray-700"}
I started the experiments by patching [`shiki-es`](https://github.com/pi0/shiki-es){rel="nofollow"} (a ESM build of Shiki by [Pooya Parsa](https://github.com/pi0){rel="nofollow"}) locally, to convert the grammars and themes files into [ECMAScript Module (ESM)](https://developer.mozilla.org/en-US/docs/Web/JavaScript/Guide/Modules){rel="nofollow"} so that it could be understood and bundled by the build tools. This was done to create the code bundle for CloudFlare Workers to consume without using the filesystem nor making network requests.
```ts [Before - Read JSON assets from filesystem]
import fs from 'fs/promises'
const cssGrammar = JSON.parse(await fs.readFile('../langs/css.json', 'utf-8'))
```
```ts [After - Using ESM import]
const cssGrammar = await import('../langs/css.mjs').then(m => m.default)
```
We need to wrap the JSON files into ESM as inline literal so that we can use [`import()`](https://developer.mozilla.org/en-US/docs/Web/JavaScript/Reference/Operators/import){rel="nofollow"} to dynamically import them. The difference is that `import()` is a standard JavaScript feature that works everywhere, while `fs.readFile` is a Node.js specific API that only works in Node.js. Having `import()` statically would also make bundlers like [Rollup](https://rollupjs.org/){rel="nofollow"} and [webpack](https://webpack.js.org/){rel="nofollow"} able to construct the module relationship graph and [emit the bundled code as chunks](https://rollupjs.org/tutorial/#code-splitting){rel="nofollow"}.
Then, I realized that it actually takes more than that to make it work on edge runtimes. Since bundlers expect imports to be resolvable at build time (meaning that in order to support all the languages and themes), we need to list all the import statements in every single grammar and theme file in the codebase. This would end up with a huge bundle size with a bunch of grammars and themes that you might not actually use. This problem is particularly important in the edge environment, where the bundle size is critical for performance.
So, we needed to figure out a better middle ground to make it work better.
## The Fork - Shikiji
Knowing this might fundamentally change the way Shiki works, and since we don't want to risk breaking the existing Shiki users with our experiments, I started a fork of Shiki called [Shikiji](https://github.com/antfu/shikiji){rel="nofollow"}. I rewrote the code from scratch while keeping the previous API design decisions in mind. The goal is to make Shiki runtime-agnostic, performant and efficient, like the philosophy we have at [UnJS](https://github.com/unjs){rel="nofollow"}.
To make that happen, we need to make Shikiji completely ESM-friendly, pure and [tree-shakable](https://developer.mozilla.org/en-US/docs/Glossary/Tree_shaking){rel="nofollow"}. This goes all the way up to the dependencies of Shiki such as [`vscode-oniguruma`](https://github.com/microsoft/vscode-oniguruma){rel="nofollow"} and [`vscode-textmate`](https://github.com/microsoft/vscode-textmate){rel="nofollow"}, which are provided in [Common JS (CJS)](https://requirejs.org/docs/commonjs.html){rel="nofollow"} format. `vscode-oniguruma` also contains a WASM binding generated by [`emscripten`](https://github.com/emscripten-core/emscripten){rel="nofollow"} that contains [dangling promises](https://github.com/typescript-eslint/typescript-eslint/blob/main/packages/eslint-plugin/docs/rules/no-floating-promises.md){rel="nofollow"} that will make CloudFlare Workers fail to finish the request. We ended up by embedding the WASM binary into a [base64 string](https://en.wikipedia.org/wiki/Base64){rel="nofollow"} and shipping it as an ES module, manually rewriting the WASM binding to avoid dangling promises, and [vendored `vscode-textmate`](https://github.com/shikijs/shiki/blob/main/CONTRIBUTING.md#clone){rel="nofollow"} to compile from its source code and produce the efficient ESM output.
The end result was very promising. We managed to get Shikiji working on any runtime environment, with even the possibility to [import it from CDN and run in the browser](https://shiki.style/guide/install#cdn-usage){rel="nofollow"} with a single line of code.
We also took the chance to improve the API and the internal architecture of Shiki. We switched from simple string concatenation to use [`hast`](https://github.com/syntax-tree/hast){rel="nofollow"}, creating an Abstract Syntax Tree (AST) for generating the HTML output. This opens up the possibility of exposing a [Transformers API](https://shiki.style/guide/transformers){rel="nofollow"} to allow users to modify the intermediate HAST and do many cool integrations that would be very hard to achieve previously.
Dark/Light mode support [was a frequently requested feature](https://github.com/shikijs/shiki/issues/33){rel="nofollow"}. Because of the static approach Shiki takes, it won't be possible to change the theme on the fly at rendering. The solution in the past was to generate the highlighted HTML twice, and toggle their visibility based on the user's preference - it wasn't efficient as it duplicate the payload, or used [CSS variables theme](https://github.com/shikijs/shiki/pull/212){rel="nofollow"} which lost the granular highlighting Shiki is great for. With the new architecture that Shikiji has, I took a step back and rethought the problem, and [came up with the idea](https://github.com/shikijs/shiki/issues/33#issuecomment-1676362336){rel="nofollow"} of breaking down the common tokens and merge multiple themes as inlined CSS variables, which provide efficient output while aligning with the Shiki's philosophy. You can learn more about it in [Shiki's documentation](https://shiki.style/guide/dual-themes){rel="nofollow"}.
To make the migration easier, we also created the [`shikiji-compat` compatibility layer](https://shikiji.netlify.app/guide/compat){rel="nofollow"}, which uses Shikiji's new foundation and provides backward compatibility API.
To get Shikiji to work on Cloudflare Workers, we had one last challenge as they don't support [initiating WASM instance](https://developer.mozilla.org/en-US/docs/WebAssembly/JavaScript_interface/instantiate_static){rel="nofollow"}s from inlined binary data. Instead it requires importing the static `.wasm` assets for security reasons. This means that our "All-in-ESM" approach does not work well on CloudFlare. This would require extra work for users to provide different WASM sources, which makes the experience more difficult than we intended. At this moment, [Pooya Parsa](https://github.com/pi0){rel="nofollow"} stepped in and made the universal layer [`unjs/unwasm`](https://github.com/unjs/unwasm){rel="nofollow"}, which supports the upcoming [WebAssembly/ES Module Integration](https://github.com/WebAssembly/esm-integration/tree/main/proposals/esm-integration){rel="nofollow"} proposal. It has been integrated into [Nitro to have automated WASM targets](https://github.com/unjs/nitro/pull/2037){rel="nofollow"}. We hope that `unwasm` will help developers to have a better experience when working with WASM.
Overall, the Shikiji rewrite works well. [Nuxt Content](https://github.com/nuxt/content){rel="nofollow"}, [VitePress](https://vitepress.dev/){rel="nofollow"} and [Astro](https://astro.build/){rel="nofollow"} have been migrated to it. The feedback we have received has also been very positive.
## Merging Back
I am a team member of Shiki and have helped to do releases from time to time. While [Pine](https://github.com/octref){rel="nofollow"} is the lead of Shiki, he was busy on other stuff and Shiki's iterations slowed down. During the experiments in Shikiji, I [proposed a few improvements](https://github.com/shikijs/shiki/issues/510){rel="nofollow"} that could help Shiki acquire a modern structure. While generally everyone agreed with that direction, there would have been quite a lot of work to do and no one started to work on that.
While we were happy to use Shikiji to solve the problems we had, we certainly didn't want to see the community split by two different versions of Shiki. After a call with Pine, we made the consensus to merge the two projects into one:
::read-more
---
color: purple
icon: i-octicon-git-merge-24
to: https://github.com/shikijs/shiki/pull/557
---
feat!: merge Shikiji back into Shiki for v1.0 [#557]{className="opacity-50"}
::
We are really happy to see that our work in Shikiji has been merged back to Shiki, that not only works for ourselves, but also benefits the entire community. With this merge, it **solves around 95% of the open issues** we have had in Shiki for years:
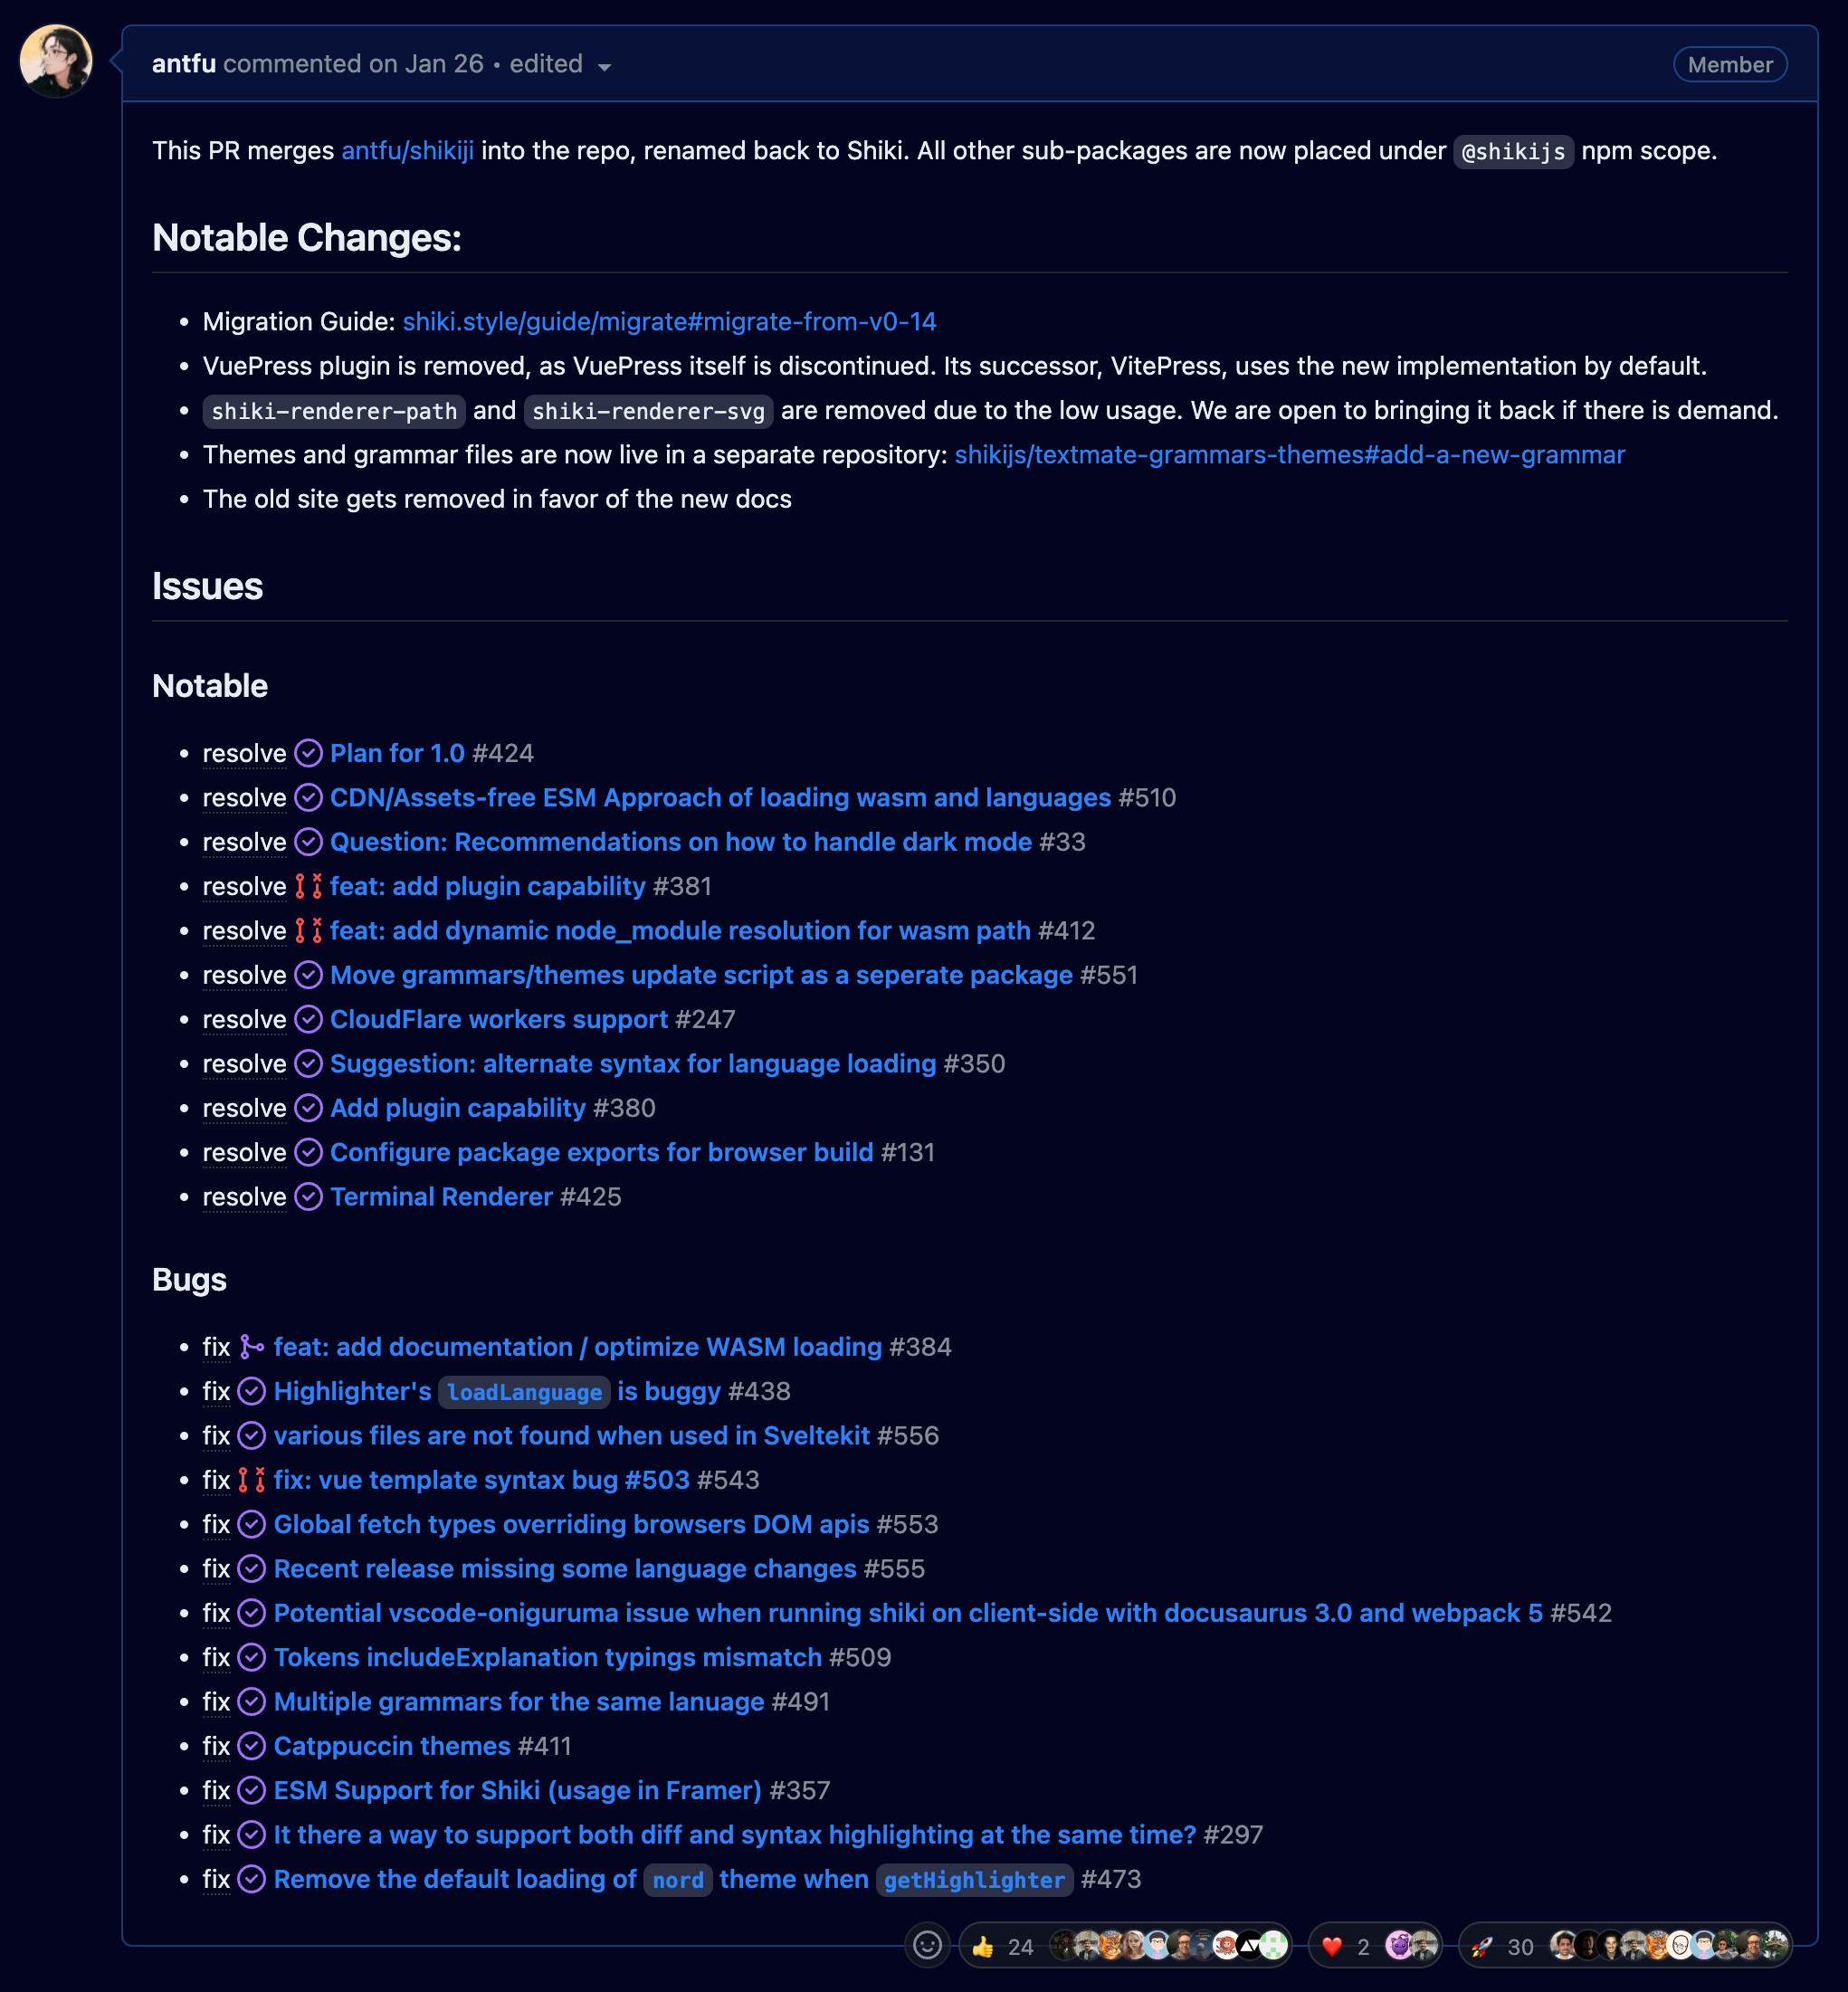{className="rounded-lg,shadow"}
Shiki now also got [a brand new documentation site](https://shiki.style/){rel="nofollow"} where you can also play it right in your browser (thanks to the agnostic approach!). Many frameworks now has built-in integration with Shiki, maybe you are already using it somewhere!
## Twoslash
[Twoslash](https://github.com/twoslashes/twoslash){rel="nofollow"} is an integration tool to retrieve type information from [TypeScript Language Services](https://github.com/microsoft/TypeScript/wiki/Using-the-Language-Service-API){rel="nofollow"} and generated to your code snippet. It essentially make your static code snippet to have hover type information similar to your VS Code editor. It's made by [Orta Therox](https://github.com/orta){rel="nofollow"} for the [TypeScript documentation site](https://github.com/microsoft/TypeScript-Website){rel="nofollow"}, there you can find [the original source code here](https://github.com/microsoft/TypeScript-Website/tree/v2/packages/ts-twoslasher){rel="nofollow"}. Orta also created the [Twoslash integration for Shiki v0.x versions](https://github.com/shikijs/twoslash){rel="nofollow"}. Back then, Shiki [did not have proper plugin system](https://github.com/shikijs/shiki/issues/380){rel="nofollow"}, that makes the `shiki-twoslash` had to be built as a wrapper over Shiki, make it a bit hard to set up as the existing Shiki integrations won't directly work with Twoslash.
We also took the chance to revise the Twoslash integrations when we were rewriting Shikiji, also a way to [dog-fooding](https://en.wikipedia.org/wiki/Eating_your_own_dog_food){rel="nofollow"} and verify the extensibility. With the new HAST internal, we are able to [integrate Twoslash as a transformer plugin](https://shiki.style/packages/twoslash){rel="nofollow"}, making it works everywhere that Shiki works and also in a composable way to be used with other transformers.
With this, we started to think that we could probably get Twoslash to work on [nuxt.com](https://nuxt.com), the website you are looking at. nuxt.com uses [Nuxt Content](https://github.com/nuxt/content){rel="nofollow"} under the hood, and different from other documentation tools like VitePress, one of the benefits Nuxt Content provides is that it's able to handle dynamic content and runs on the edge. Since Twoslash is relying on TypeScript as well as the giant types modules graph from your dependencies, that would be not ideal to ship all those things to the edge or browser. Sounds tricky, but challenge accepted!
We first come up of fetching the types on-demand from CDN, using the [Auto-Type-Acquisition](https://github.com/microsoft/TypeScript-Website/tree/v2/packages/ata){rel="nofollow"} technique that you will see on the [TypeScript playground](https://www.typescriptlang.org/play){rel="nofollow"}. We made the [`twoslash-cdn`](https://github.com/antfu/twoslash-cdn){rel="nofollow"} that allows Twoslash to run in any runtime. However, still, it sounds like not the most optimal solution, as it would still require to make many network requests that might defeat the purpose of running on the edge.
After a few iterations on the underlying tools (e.g. on [`@nuxtjs/mdc`](https://github.com/nuxt-modules/mdc/pull/129){rel="nofollow"}, the markdown compiler used by Nuxt Content), we managed to take the hybrid approach and made [`nuxt-content-twoslash`](https://github.com/antfu/nuxt-content-twoslash){rel="nofollow"} that runs Twoslash on build time and caches the results for edge rendering. This way we could avoid shipping any extra dependencies to the final bundle, but still have the rich interactive code snippets on the website:
```vue twoslash
<script setup>
// Try hover on identifiers below to see the types
const count = useState('counter', () => 0)
const double = computed(() => count.value * 2)
</script>
<template>
<button>Count is: {{ count }}</button>
<div>Double is: {{ double }}</div>
</template>
```
During that, we also took the chance to refactor [Twoslash](https://github.com/twoslashes/twoslash){rel="nofollow"} with Orta to have a more efficient and modern structure. It also allows us have [`twoslash-vue`](https://github.com/twoslashes/twoslash/tree/main/packages/twoslash-vue){rel="nofollow"} that provides the [Vue SFC](https://vuejs.org/guide/scaling-up/sfc.html){rel="nofollow"} support as you are playing above. It's powered by [Volar.js](https://github.com/volarjs/volar.js){rel="nofollow"} and [`vuejs/language-tools`](https://github.com/vuejs/language-tools){rel="nofollow"}. With Volar growing to be framework agnostic and frameworks to work together, we are looking forward to see such integrations to expand to more syntaxes like Astro and Svelte components files in the future.
## Integrations
If you want to give Shiki a try in your own website, here you can find some integrations that we have made:
- [Nuxt](https://shiki.style/packages/nuxt){rel="nofollow"}
- If using [Nuxt Content](https://content.nuxt.com/){rel="nofollow"}, Shiki is [build-in](https://content.nuxt.com/get-started/configuration#highlight){rel="nofollow"}. For Twoslash, you can add [`nuxt-content-twoslash`](https://github.com/antfu/nuxt-content-twoslash){rel="nofollow"} on top.
- If not, you can use [`nuxt-shiki`](https://github.com/pi0/nuxt-shiki){rel="nofollow"} to use Shiki as Vue component or composibles.
- [VitePress](https://shiki.style/packages/vitepress){rel="nofollow"}
- Shiki is [built-in](https://vitepress.dev/guide/markdown#syntax-highlighting-in-code-blocks){rel="nofollow"}. For Twoslash, you can use [`vitepress-twoslash`](https://shiki.style/packages/vitepress#twoslash){rel="nofollow"}.
- Low-level integrations - Shiki provides official integrations for markdown compilers:
- [`markdown-it`](https://shiki.style/packages/markdown-it){rel="nofollow"} - Plugin for [`markdown-it`](https://github.com/markdown-it/markdown-it){rel="nofollow"}
- [`rehype`](https://shiki.style/packages/rehype){rel="nofollow"} - Plugin for [`rehype`](https://github.com/rehypejs/rehype){rel="nofollow"}
Check out more integrations on [Shiki's Documentation](https://shiki.style/){rel="nofollow"}
## Conclusions
**Our mission at Nuxt is not only to make a better framework for developers, but also to make the entire frontend and web ecosystem a better place.** We are keeping pushing the boundaries and endorse the modern web standards and best practices. We hope you enjoy the new [Shiki](https://github.com/shikijs/shiki){rel="nofollow"}, [unwasm](https://github.com/unjs/unwasm){rel="nofollow"}, [Twoslash](https://github.com/twoslashes/twoslash){rel="nofollow"} and many other tools we made in the process of making Nuxt and the web better.
# Nuxt 3.11
This is possibly the last minor release before Nuxt v4, and so we've packed it full of features and improvements we hope will delight you! ✨
## 🪵 Better logging
When developing a Nuxt application and using `console.log` in your application, you may have noticed that these logs are not displayed in your browser console when refreshing the page (during server-side rendering). This can be frustrating, as it makes it difficult to debug your application. This is now a thing of the past!
Now, when you have server logs associated with a request, they will be bundled up and passed to the client and displayed in your browser console. [Asynchronous context](https://nodejs.org/docs/latest-v20.x/api/async_context.html){rel="nofollow"} is used to track and associate these logs with the request that triggered them. ([#25936](https://github.com/nuxt/nuxt/pull/25936){rel="nofollow"}).
For example, this code:
```vue [pages/index.vue]
<script setup>
console.log('Log from index page')
const { data } = await useAsyncData(() => {
console.log('Log inside useAsyncData')
return $fetch('/api/test')
})
</script>
```
will now log to your browser console when you refresh the page:
```bash
Log from index page
[ssr] Log inside useAsyncData
at pages/index.vue
```
👉 We also plan to support streaming of subsequent logs to the Nuxt DevTools in future.
We've also added a `dev:ssr-logs` hook (both in Nuxt and Nitro) which is called on server and client, allowing you to handle them yourself if you want to.
If you encounter any issues with this, it is possible to disable them - or prevent them from logging to your browser console.
```ts [nuxt.config.ts]
export default defineNuxtConfig({
features: {
devLogs: false
// or 'silent' to allow you to handle yourself with `dev:ssr-logs` hook
},
})
```
## 🎨 Preview mode
A new `usePreviewMode` composable aims to make it simple to use preview mode in your Nuxt app.
```ts [plugins/test.client.ts]
const { enabled, state } = usePreviewMode()
```
When preview mode is enabled, all your data fetching composables, like `useAsyncData` and `useFetch` will rerun, meaning any cached data in the payload will be bypassed.
::read-more{to="https://nuxt.com/docs/api/composables/use-preview-mode"}
::
## 💰 Cache-busting payloads
We now automatically cache-bust your payloads if you haven't disabled Nuxt's app manifest, meaning you shouldn't be stuck with outdated data after a deployment ([#26068](https://github.com/nuxt/nuxt/pull/26068){rel="nofollow"}).
## 👮♂️ Middleware `routeRules`
It's now possible to define middleware for page paths within the Vue app part of your application (that is, not your Nitro routes) ([#25841](https://github.com/nuxt/nuxt/pull/25841){rel="nofollow"}).
```ts [nuxt.config.ts]
export default defineNuxtConfig({
routeRules: {
'/admin/**': {
// or appMiddleware: 'auth'
appMiddleware: ['auth']
},
'/admin/login': {
// You can 'turn off' middleware that would otherwise run for a page
appMiddleware: {
auth: false
}
},
},
})
```
::read-more{to="https://nuxt.com/docs/guide/concepts/rendering#route-rules"}
::
## ⌫ New `clear` data fetching utility
Now, `useAsyncData` and `useFetch` expose a `clear` utility. This is a function that can be used to set `data` to undefined, set `error` to `null`, set `pending` to `false`, set `status` to `idle`, and mark any currently pending requests as cancelled. ([#26259](https://github.com/nuxt/nuxt/pull/26259){rel="nofollow"})
```vue
<script setup lang="ts">
const { data, clear } = await useFetch('/api/test')
const route = useRoute()
watch(() => route.path, (path) => {
if (path === '/') clear()
})
</script>
```
::read-more{to="https://nuxt.com/docs/getting-started/data-fetching"}
::
## 🕳️ New `#teleports` target
Nuxt now includes a new `<div id="teleports"></div>` element in your app within your `<body>` tag. It supports server-side teleports, meaning you can do this safely on the server:
```vue [app.vue]
<template>
<Teleport to="#teleports">
<span>
Something
</span>
</Teleport>
</template>
```
## 🚦 Loading indicator and transition controls
It's now possible to set custom timings for hiding the loading indicator, and forcing the `finish()` method if needed ([#25932](https://github.com/nuxt/nuxt/pull/25932){rel="nofollow"}).
There's also a new `page:view-transition:start` hook for hooking into the View Transitions API ([#26045](https://github.com/nuxt/nuxt/pull/26045){rel="nofollow"}) if you have that feature enabled.
## 🛍️ Server- and client-only pages
This release sees server- and client-only pages land in Nuxt! You can now add a `.server.vue` or `.client.vue` suffix to a page to get automatic handling of it.
**Client-only pages** will render entirely on the client-side, and skip server-rendering entirely, just as if the entire page was wrapped in `<ClientOnly>`. Use this responsibly. The flash of load on the client-side can be a bad user experience so make sure you really need to avoid server-side loading. Also consider using `<ClientOnly>` with a `fallback` slot to render a skeleton loader ([#25037](https://github.com/nuxt/nuxt/pull/25037){rel="nofollow"}).
⚗️ **Server-only pages** are even more useful because they enable you to integrate fully-server rendered HTML within client-side navigation. They will even be prefetched when links to them are in the viewport - so you will get instantaneous loading ([#24954](https://github.com/nuxt/nuxt/pull/24954){rel="nofollow"}).
## 🤠 Server component bonanza
When you are using server components, you can now use the `nuxt-client` attribute anywhere within your tree ([#25479](https://github.com/nuxt/nuxt/pull/25479){rel="nofollow"}).
```ts [nuxt.config.ts]
export default defineNuxtConfig({
experimental: {
componentIslands: {
selectiveClient: 'deep'
}
},
})
```
You can listen to an `@error` event from server components that will be triggered if there is any issue loading the component ([#25798](https://github.com/nuxt/nuxt/pull/25798){rel="nofollow"}).
Finally, server-only components are now smartly enabled when you have a server-only component or a server-only page within your project or any of its layers ([#26223](https://github.com/nuxt/nuxt/pull/26223){rel="nofollow"}).
::callout{type="warning"}
Server components remain experimental and their API may change, so be careful
before depending on implementation details.
::
## 🔥 Performance improvements
We've shipped a number of performance improvements, including only updating changed virtual templates ([#26250](https://github.com/nuxt/nuxt/pull/26250){rel="nofollow"}), using a 'layered' prerender cache ([#26104](https://github.com/nuxt/nuxt/pull/26104){rel="nofollow"}) that falls back to filesystem instead of keeping everything in memory when prerendering - and lots of other examples.
## 📂 Public assets handling
We have shipped a reimplementation of Vite's public asset handling, meaning that public assets in your `public/` directory or your layer directories are now resolved entirely by Nuxt ([#26163](https://github.com/nuxt/nuxt/pull/26163){rel="nofollow"}), so if you have added `nitro.publicAssets` directories with a custom prefix, these will now work.
## 📦 Chunk naming
We have changed the default `_nuxt/[name].[hash].js` file name pattern for your JS chunks. Now, we default to `_nuxt/[hash].js`. This is to avoid false positives by ad blockers triggering off your component or chunk names, which can be a very difficult issue to debug. ([#26203](https://github.com/nuxt/nuxt/pull/26203){rel="nofollow"})
You can easily configure this to revert to previous behaviour if you wish:
```ts [nuxt.config.ts]
export default defineNuxtConfig({
vite: {
$client: {
build: {
rollupOptions: {
output: {
chunkFileNames: '_nuxt/[name].[hash].js',
entryFileNames: '_nuxt/[name].[hash].js'
}
}
}
}
},
})
```
## 💪 Type fixes
Previously users with `shamefully-hoist=false` may have encountered issues with types not being resolved or working correctly. You may also have encountered problems with excessive type instantiation.
We now try to tell TypeScript about certain key types so they can be resolved even if deeply nested ([#26158](https://github.com/nuxt/nuxt/pull/26158){rel="nofollow"}).
There are a whole raft of other type fixes, including some regarding import types ([#26218](https://github.com/nuxt/nuxt/pull/26218){rel="nofollow"} and [#25965](https://github.com/nuxt/nuxt/pull/25965){rel="nofollow"}) and module typings ([#25548](https://github.com/nuxt/nuxt/pull/25548){rel="nofollow"}).
## ✅ Upgrading
As usual, our recommendation for upgrading Nuxt is to run:
```bash
nuxi upgrade --force
```
This will refresh your lockfile as well, and ensures that you pull in updates from other dependencies that Nuxt relies on, particularly in the unjs ecosystem.
## 👉 Full release notes
::read-more
---
icon: i-simple-icons-github
target: _blank
to: https://github.com/nuxt/nuxt/releases/tag/v3.11.0
---
Read the full release notes of Nuxt `v3.11.0`.
::
Thank you for reading this far! We hope you enjoy the new release. Please do let us know if you have any feedback or issues.
**Happy Nuxting ✨**
# Nuxt: Looking forward
## A Review of 2023 - Sébastien
In January 2023, Daniel set out [**Nuxt: A vision for 2023**](https://nuxt.com/blog/vision-2023). We achieved most of the goals we set out to accomplish. Some of them are missing and we will tackle them this year!
It was a productive year and the team shipped **9 minor releases**: from v3.1 to v3.9.
In the first 365 days, Nuxt 3 reached new milestones:
- :icon{name="i-lucide-star"}
**49,5K stars** on GitHub ([add yours](https://github.com/nuxt/nuxt){rel="nofollow"} 😊)
- :icon{name="i-lucide-download"}
**27M downloads** on npm
- :icon{name="i-lucide-user-plus"}
**612 contributors** on the [nuxt repository](https://github.com/nuxt/nuxt){rel="nofollow"}
- :icon{name="i-lucide-puzzle"}
**184 modules** created by **142 maintainers**
- :icon{name="i-lucide-circle-check"}
**2,423 closed issues**
- :icon{name="i-lucide-git-pull-request"}
**1,728 merged pull request**
- :icon{name="i-simple-icons-discord"}
**26,300 members** on [Discord](https://chat.nuxt.dev){rel="nofollow"}
End of October, Nuxt 3 downloads [surpassed Nuxt 2 downloads](https://x.com/Atinux/status/1731980841142669379){rel="nofollow"} 🚀.
The same month, we released [Nuxt Image 1.0](https://image.nuxt.com){rel="nofollow"} with Nuxt 3 support and new features to make sure your website stays performant when using Images. Nuxt now auto-installs it as soon as you start using the [`<NuxtImg>`](https://nuxt.com/docs/api/components/nuxt-img) or [`<NuxtPicture>`](https://nuxt.com/docs/api/components/nuxt-picture) component.
We shipped [Nuxt DevTools](https://nuxt.com/blog/nuxt-devtools-v1-0), leveling up the Developer Experience we can expect from a Web framework. I am happy to see that we inspired other frameworks to adopt a similar approach: [Vue DevTools](https://x.com/vuejs/status/1741032977919053865){rel="nofollow"}, [Next DevTools](https://x.com/xinyao27/status/1741447261132145133){rel="nofollow"}, [Remix DevTools](https://x.com/AlemTuzlak59192/status/1741903214860009539){rel="nofollow"}, [Vite Plugin DevTools](https://github.com/pheno-agency/vite-plugin-devtools){rel="nofollow"}, [Astro Dev Toolbar](https://x.com/n_moore/status/1732164645778071888){rel="nofollow"} and more.
After many months of building our UI library internally, [Benjamin Canac](https://github.com/benjamincanac){rel="nofollow"} open sourced [Nuxt UI](https://ui.nuxt.com){rel="nofollow"} to let you create websites at a faster pace with highly customizable components built with TailwindCSS.
[Nuxt Content](http://content.nuxt.com){rel="nofollow"} has had 10 minor releases with various improvements: from performance to the MDC syntax. We have some ongoing work to better support [edge rendering](https://nuxt.com/blog/nuxt-on-the-edge){rel="nofollow"} in the future. At the same time, the NuxtLabs team is working on [Nuxt Studio](https://nuxt.studio){rel="nofollow"} to let users edit Markdown files with a Notion-like editor while keeping your content inside your git repository.
## Looking forward into 2024 - Daniel
We are well into 2024, and this update is definitely overdue!
Here are a few thoughts on the direction that I'll be seeking to lead Nuxt in over the next year.
### Continued development and reimagination
I would love to see us continuing to adapt our best practices to the changing needs of the ecosystem, expand the boundaries of what good DX could be, and improve Nuxt.
I am really pleased at what we currently offer in Nuxt. But I would never want to rest on our laurels. We need to keep pursuing new possibilities that appear as the web platform develops. We've committed to [Baseline Compatibility](https://developer.mozilla.org/en-US/docs/Glossary/Baseline/Compatibility){rel="nofollow"} going forward (and are included in conversations about it with the [W3C WebDX Community Group](https://github.com/web-platform-dx/web-features){rel="nofollow"}).
We have some strategies to enable us to do this while also prioritising stability for our existing users, and recognising the scope of the Nuxt ecosystem.
1. In general we follow a pattern of **introducing a module or experimental feature** that can be disabled in testing while we gather feedback and confirm the direction and API of new features.
2. We have adopted the **ecosystem-ci pattern** of validating that our code changes in Nuxt don't break downstream projects unintentionally. If you maintain a well-tested module or library that depends on Nuxt, I'd welcome a PR adding your project to [nuxt/ecosystem-ci](https://github.com/nuxt/ecosystem-ci){rel="nofollow"}.
3. We plan to release a **pull-based test** that will allow you to configure your CI to test itself against the latest nightly version of Nuxt to provide early feedback on new Nuxt releases, rather than facing an issue when upgrading.
4. Finally, we have adopted a **push-based approach to updating existing projects**. When we identify breaking changes or improvements that can be rolled out to the ecosystem, we will proactively raise PRs to Nuxt modules (and, to a lesser extent, other open-source projects using Nuxt).
I hope this will allow us to continue to innovate and experiment with new features without sacrificing the stability and maintainability.
In particular, look for active development on the following:
- ✅ [nuxt/fonts](https://github.com/nuxt/fonts){rel="nofollow"} - working up to v1.0.0
- ✅ [nuxt/eslint](https://github.com/nuxt/eslint){rel="nofollow"} - working up to v1.0.0
- 🔥 [nuxt/scripts](https://github.com/nuxt/scripts){rel="nofollow"} - soon to be released
- 🚧 [nuxt/a11y](https://github.com/nuxt/a11y){rel="nofollow"} - coming soon!
- 🚧 [nuxt/auth](https://github.com/nuxt/auth){rel="nofollow"} - coming soon!
- 🚧 [nuxt/hints](https://github.com/nuxt/hints){rel="nofollow"} - coming soon!
### Sustainable open source
I want Nuxt to continue to be an independent, community-driven framework for the long term.
I'm really delighted to see successful businesses founded on Nuxt, and initiatives springing up around Nuxt that become [sponsors](https://nuxt.com/enterprise/sponsors) or otherwise giving back to the core framework, enabling ongoing Nuxt development.
Obviously, [NuxtLabs](https://nuxtlabs.com){rel="nofollow"} is the preeminent example of that. [Pooya Parsa](https://github.com/pi0){rel="nofollow"}, [Anthony Fu](https://github.com/antfu){rel="nofollow"} and I are all able to work full-time on open source thanks to their paid services around Nuxt: [Nuxt UI Pro](https://ui.nuxt.com/pro/getting-started){rel="nofollow"}, [Nuxt Experts](https://nuxt.com/enterprise/support), [Nuxt Studio](https://nuxt.studio/){rel="nofollow"} and [NuxtHub](https://hub.nuxt.com/){rel="nofollow"} (soon). They also [sponsor community members](https://github.com/orgs/nuxtlabs/sponsoring){rel="nofollow"} from Vue, Vite, UnJS, and Nuxt.
For me, keeping Nuxt independent and sustainable for the future requires an active and growing team and community. In the weeks ahead, I'll be announcing a broader 'Nuxt team' alongside the core team. This is about recognising the tireless work of the many people whose contributions are already making Nuxt what it is.
I would also love to see more of those team members or the wider community sponsored to work in the Nuxt ecosystem in the years ahead. If your company has benefited from Nuxt, please do consider sponsoring some of the developers working on Nuxt, whether they are team or wider community members.
### Friendly collaboration
From the beginning of our work on Nuxt 3, we have sought to extract out utilities, libraries and even frameworks that we benefit from so they can *also* benefit a much broader audience.
That's the origin of [UnJS](https://unjs.io/){rel="nofollow"}, of course, and it continues to thrive under the leadership of [Pooya Parsa](https://github.com/pi0){rel="nofollow"} (who is also a key member of the Nuxt core team).
We'd like to continue that attitude of friendly collaboration. Although building things ourselves or keeping them to ourselves might to be 'success', I don't have any time for zero-sum games. We will go further, both as a framework and as a web community, if we build *together*.
Equally, one of our core values is platform-independence (alongside deep platform *integration*). We support 90+ providers across deployment, testing, stories, KV and cache, databases, image CDNs and font hosts. That breadth of ecosystem is one that bears rich rewards and frees people up to make choices about which providers they use based on the value they bring. But it *also* means we are dependent on our community who use these different providers to help us keep these integrations up-to-date.
Nuxt isn't going anywhere, but we hope that the work we do collaboratively will last long beyond us.
### A welcoming community
Although it is easy to focus on technical excellence or the quality of developer experience, I am more encouraged to see the continued growth of the Nuxt ecosystem as a welcoming and friendly community.
I am incredibly grateful for the kind tone that prevails across [our community Discord](https://chat.nuxt.dev){rel="nofollow"}, on [Twitter](https://x.com/nuxt_js){rel="nofollow"}, and on [GitHub](https://github.com/nuxt/nuxt){rel="nofollow"}.
### What about Nuxt 4?
The JavaScript space is known for producing a new framework every week, which means there is a natural hype cycle.
But we are not aiming for hype with the continued development of Nuxt, which is part of why we have committed to regular release cycles:
- **major** framework releases every year
- **minor** releases every month or so
- **patch** releases every week or so
You can expect to see breaking changes shipped in major releases, with features shipped in our minor releases. That means we aren't holding features back for Nuxt 4; we'll ship those as regularly as we can in our 6-weekly minor release cycle.
Our aim is that Nuxt 4 is an opportunity for *thoughtful* breaking changes with either a straightforward migration path (ideally with automated processes) or the ability to opt-in to previous behaviour.
There are definitely lessons we as a team have learned form the transition from Nuxt 2 to 3, and I see Nuxt 4 as an opportunity for us to prove that major releases can be a good experience for users.
You can preview the changes we have in mind by browsing [our roadmap](https://github.com/orgs/nuxt/projects/8/views/4){rel="nofollow"} or checking through [the issues we've tagged for v4](https://github.com/nuxt/nuxt/issues?q=is\:issue+label:4.x){rel="nofollow"}. Feedback and wishes are very welcome as always!
#### Timetable
Our roadmap for Nuxt 4 is a little complex as we are also planning on major releases across the UnJS ecosystem.
Roughly speaking, we are aiming to have one more minor release for Nuxt v3 and Nitro v2, before beginning a [raft of major releases across the UnJS ecosystem of packages](https://github.com/unjs/community/discussions/4){rel="nofollow"} - culminating in Nuxt v4.
We are aiming to release **Nuxt v4 on or before June 14** (though obviously this is dependent on having enough time after Nitro's major release to be properly tested in the community, so be aware that this is not an exact date).
#### Ongoing Support
After the release of Nuxt v4, we will be providing **six months** of ongoing support and bug-fixes for Nuxt v3, which we expect will be more than ample to upgrade to v4 given our aim of a gentle upgrade path.
We hope you are as excited as we are about the pending release of Nuxt v4! 🎉
---
Finally, thank you so much for all your trust and support as we've been building Nuxt. I know I speak for the whole team when I say that it's such a privilege to be doing this alongside everyone in the Nuxt community! ❤️
Daniel (on behalf of the whole Nuxt team)
# Refreshed Nuxt ESLint Integrations
## TL;DR
We revamped our ESLint integrations to support ESLint v9 with the new flat config. Along the way, we have explored many new possibilities to make it more personalized, powerful, and with better developer experience.
You can run the following command to install the new [`@nuxt/eslint`](https://eslint.nuxt.com/packages/module){rel="nofollow"} module:
```bash [Terminal]
npx nuxi module add eslint
```
Continue reading the story or learn more with [the documentation](https://eslint.nuxt.com/packages/module){rel="nofollow"}.
## Background
[ESLint](https://eslint.org/){rel="nofollow"} has become an essential tool for today's web development. It helps you to catch errors and enforce a consistent coding style in your project. At Nuxt, we do our best to provide an out-of-the-box experience for ESLint, making it easy to use, configure and follow the best practices we recommend.
Since, both Nuxt and ESLint have evolved a lot. Historically, we ended up with [a few different packages and integrations for ESLint in Nuxt](https://eslint.nuxt.com/guide/faq#package-disambiguation){rel="nofollow"}, and it wasn't always obvious which one to use for what purpose. We have received a lot of feedback from our community.
To improve the situation and also make it future-proof, we recently refreshed our ESLint integrations to support [ESLint v9](https://eslint.org/blog/2024/04/eslint-v9.0.0-released/){rel="nofollow"} with the [flat config](https://eslint.org/docs/latest/use/configure/configuration-files){rel="nofollow"}. It opens up many more capabilities for customizing your ESLint setup, providing a more straightforward and unified experience.
## Nuxt ESLint Monorepo
We moved ESLint-related packages scattered across different repositories into a single monorepo: [`nuxt/eslint`](https://github.com/nuxt/eslint){rel="nofollow"}, with a dedicated new documentation site: [eslint.nuxt.com](https://eslint.nuxt.com/){rel="nofollow"}.
To help understand the differences between each package and what to use, we also have a [FAQ](https://eslint.nuxt.com/guide/faq){rel="nofollow"} page comparing them and explaining their scopes.
This monorepo now includes:
- `@nuxt/eslint` - The new, all-in-one ESLint module for Nuxt 3, supporting project-aware ESLint flat config and more.
- `@nuxt/eslint-config` - The unopinionated but customizable shared ESLint config for Nuxt 3. Supports both [the flat config format](https://eslint.org/docs/latest/use/configure/configuration-files){rel="nofollow"} and [the legacy format](https://eslint.org/docs/latest/use/configure/configuration-files-deprecated){rel="nofollow"}.
- `@nuxt/eslint-plugin` - The ESLint plugin for Nuxt 3 provides Nuxt-specific rules and configurations.
- Two packages for Nuxt 2 in maintenance mode.
## ESLint Flat Config
Before diving into new Nuxt integrations, let me introduce you to the concept of [ESLint flat config](https://eslint.org/docs/latest/use/configure/configuration-files){rel="nofollow"}.
Flat config is a configuration format introduced in ESLint `v8.21.0` as experimental, and became the default format in [ESLint v9](https://eslint.org/blog/2024/04/eslint-v9.0.0-released/){rel="nofollow"}.
A quick reference to differentiate:
- **Flat config**: `eslint.config.js` `eslint.config.mjs` etc.
- **Legacy config**: `.eslintrc` `.eslintrc.json` `.eslintrc.js` etc.
### Why Flat Config?
[This blog post from ESLint](https://eslint.org/blog/2022/08/new-config-system-part-1/){rel="nofollow"} explains the motivation behind the flat config system in detail. In short, the legacy `eslintrc` format was designed in the early time of JavaScript, when ES modules and modern JavaScript features were not yet standardized. Many implicit conventions involved, and the `extends` feature makes the final config result hard to understand and predict. Which also makes shared configs hard to maintain and debug.
```jsonc [.eslintrc]
{
"extends": [
// Solve from `import("@nuxtjs/eslint-config").then(mod => mod.default)`
"@nuxtjs",
// Solve from `import("eslint-config-vue").then(mod => mod.default.configs["vue3-recommended"])`
"plugin:vue/vue3-recommended",
],
"rules": {
// ...
}
}
```
The new flat config moves the plugins and configs resolution from ESLint's internal convention to the native ES module resolution. This in turn makes it more explicit and transparent, allowing you to even import it from other modules. Since the flat config is just a JavaScript module, it also opens the door for much more customization.
## Nuxt Presets for Flat Config
In the latest [`@nuxt/eslint-config` package](https://eslint.nuxt.com/packages/config#flat-config-format){rel="nofollow"}, we leverage the flexibility we have to provide a factory function that allows you to customize the config presets easily in a more high-level way. Here is an example of how you can use it:
```ts [eslint.config.js]
import { createConfigForNuxt } from '@nuxt/eslint-config/flat'
export default createConfigForNuxt()
```
`@nuxt/eslint-config` starts with an unopinionated base config, which means we only include rules for best practices of TypeScript, Vue and Nuxt, and leave the rest like code style, formatting, etc for you to decide. You can also run [Prettier](https://prettier.io/){rel="nofollow"} alongside for formatting with the defaults.
The config also allows you to opt-in to more opinionated features as needed. For example, if you want ESLint to take care of the formatting as well, you can turn it on by passing `features.stylistic` to the factory function (powered by [ESLint Stylistic](https://eslint.style/){rel="nofollow"}):
```ts [eslint.config.js]
import { createConfigForNuxt } from '@nuxt/eslint-config/flat'
export default createConfigForNuxt({
features: {
stylistic: true
}
})
```
Or tweak your preferences with an options object ([learn more with the options here](https://eslint.style/guide/config-presets#configuration-factory){rel="nofollow"}):
```ts [eslint.config.js]
import { createConfigForNuxt } from '@nuxt/eslint-config/flat'
export default createConfigForNuxt({
features: {
stylistic: {
semi: false,
indent: 2, // 4 or 'tab'
quotes: 'single',
// ... and more
}
}
})
```
And if you are [authoring a Nuxt Module](https://nuxt.com/docs/guide/going-further/modules){rel="nofollow"}, you can turn on `features.tooling` to enable the rules for the Nuxt module development:
```ts [eslint.config.js]
import { createConfigForNuxt } from '@nuxt/eslint-config/flat'
export default createConfigForNuxt({
features: {
tooling: true
}
})
```
...and so on. The factory function in flat config allows the presets to cover the complexity of the underlying ESLint configuration, and provide high-level and user-friendly abstractions for end users to customize. All this without requiring users to worry about the internal details.
While this approach offers you a Prettier-like experience with minimal configurations (because it's powered by ESLint), you still get the full flexibility to customize and override fine-grained rules and plugins as needed.
We also made a [`FlatConfigComposer`](https://github.com/antfu/eslint-flat-config-utils#composer){rel="nofollow"} utility from [`eslint-flat-config-utils`](https://github.com/antfu/eslint-flat-config-utils){rel="nofollow"} to make it even easier to override and extend the flat config. The factory function in `@nuxt/eslint-config/flat` returns a `FlatConfigComposer` instance:
```ts [eslint.config.js]
import { createConfigForNuxt } from '@nuxt/eslint-config/flat'
export default createConfigForNuxt({
// ...options for Nuxt integration
})
.append(
// ...append other flat config items
)
.prepend(
// ...prepend other flat config items before the base config
)
// override a specific config item based on their name
.override(
'nuxt/typescript', // specify the name of the target config, or index
{
rules: {
// ...override the rules
'@typescript-eslint/no-unsafe-assignment': 'off'
}
}
)
// an so on, operations are chainable
```
With this approach, we get the best of both worlds: the simplicity and high-level abstraction for easy to use, and the power for customization and fine-tuning.
## Nuxt ESLint Module
Taking this even further, we made the new, all-in-one [`@nuxt/eslint` module](https://eslint.nuxt.com/packages/module){rel="nofollow"} for Nuxt 3. It leverages Nuxt's context to generate project-aware and type-safe ESLint configurations for your project.
### Project-aware Rules
We know that Vue's Style Guide suggests the use of [multi-word names for components](https://vuejs.org/style-guide/rules-essential.html#use-multi-word-component-names){rel="nofollow"} to avoid conflicts with existing and future HTML elements. Thus, in [`eslint-plugin-vue`](https://github.com/vuejs/eslint-plugin-vue){rel="nofollow"}, we have the rule [`vue/multi-word-component-names`](https://eslint.vuejs.org/rules/multi-word-component-names.html){rel="nofollow"} enabled by default. It's a good practice to follow, but we know that in a Nuxt project, not all `.vue` files are registered as components. Files like `app.vue`, `pages/index.vue`, `layouts/default.vue`, etc. are not available as components in other Vue files, and the rule will be irrelevant to them.
Usually, we could turn off the rule for those files like:
```js [eslint.config.js]
export default [
{
files: ['*.vue'],
rules: {
'vue/multi-word-component-names': 'error'
}
},
{
files: ['app.vue', 'error.vue', 'pages/**/*.vue', 'layouts/**/*.vue'],
rules: {
// disable the rule for these files
'vue/multi-word-component-names': 'off'
}
}
]
```
It should work for the majority of the cases. However, we know that in Nuxt you can [customize the path for each directory](https://nuxt.com/docs/api/nuxt-config#dir){rel="nofollow"}, and [layers](https://nuxt.com/docs/getting-started/layers){rel="nofollow"} allow you to have multiple sources for each directory. This means the linter rules will be less accurate and potentially cause users extra effort to keep them aligned **manually**.
Similarly, we want to have [`vue/no-multiple-template-root`](https://eslint.vuejs.org/rules/no-multiple-template-root.html){rel="nofollow"} enabled only for `pages` and `layouts`, etc. As the cases grow, it becomes unrealistic to ask users to maintain the rules manually.
That's where the magic of `@nuxt/eslint` comes in! It leverages Nuxt's context to generate the configurations and rules specific to your project structure. Very similar to the [`.nuxt/tsconfig.json`](http://nuxt.com/docs/guide/concepts/typescript#auto-generated-types){rel="nofollow"} Nuxt provides, you now also have the project-aware `.nuxt/eslint.config.mjs` to extend from.
To use it, you can add the module to your Nuxt project:
```bash [Terminal]
npx nuxi module add eslint
```
### Config Inspector DevTools Integrations
During the migrations and research for the new flat config, I came up with the idea to make an interactive UI inspector for the flat config and make the configurations more transparent and easier to understand. We have integrated it into [Nuxt DevTools](https://github.com/nuxt/devtools){rel="nofollow"} when you have the `@nuxt/eslint` module installed so you easily access it whenever you need it.
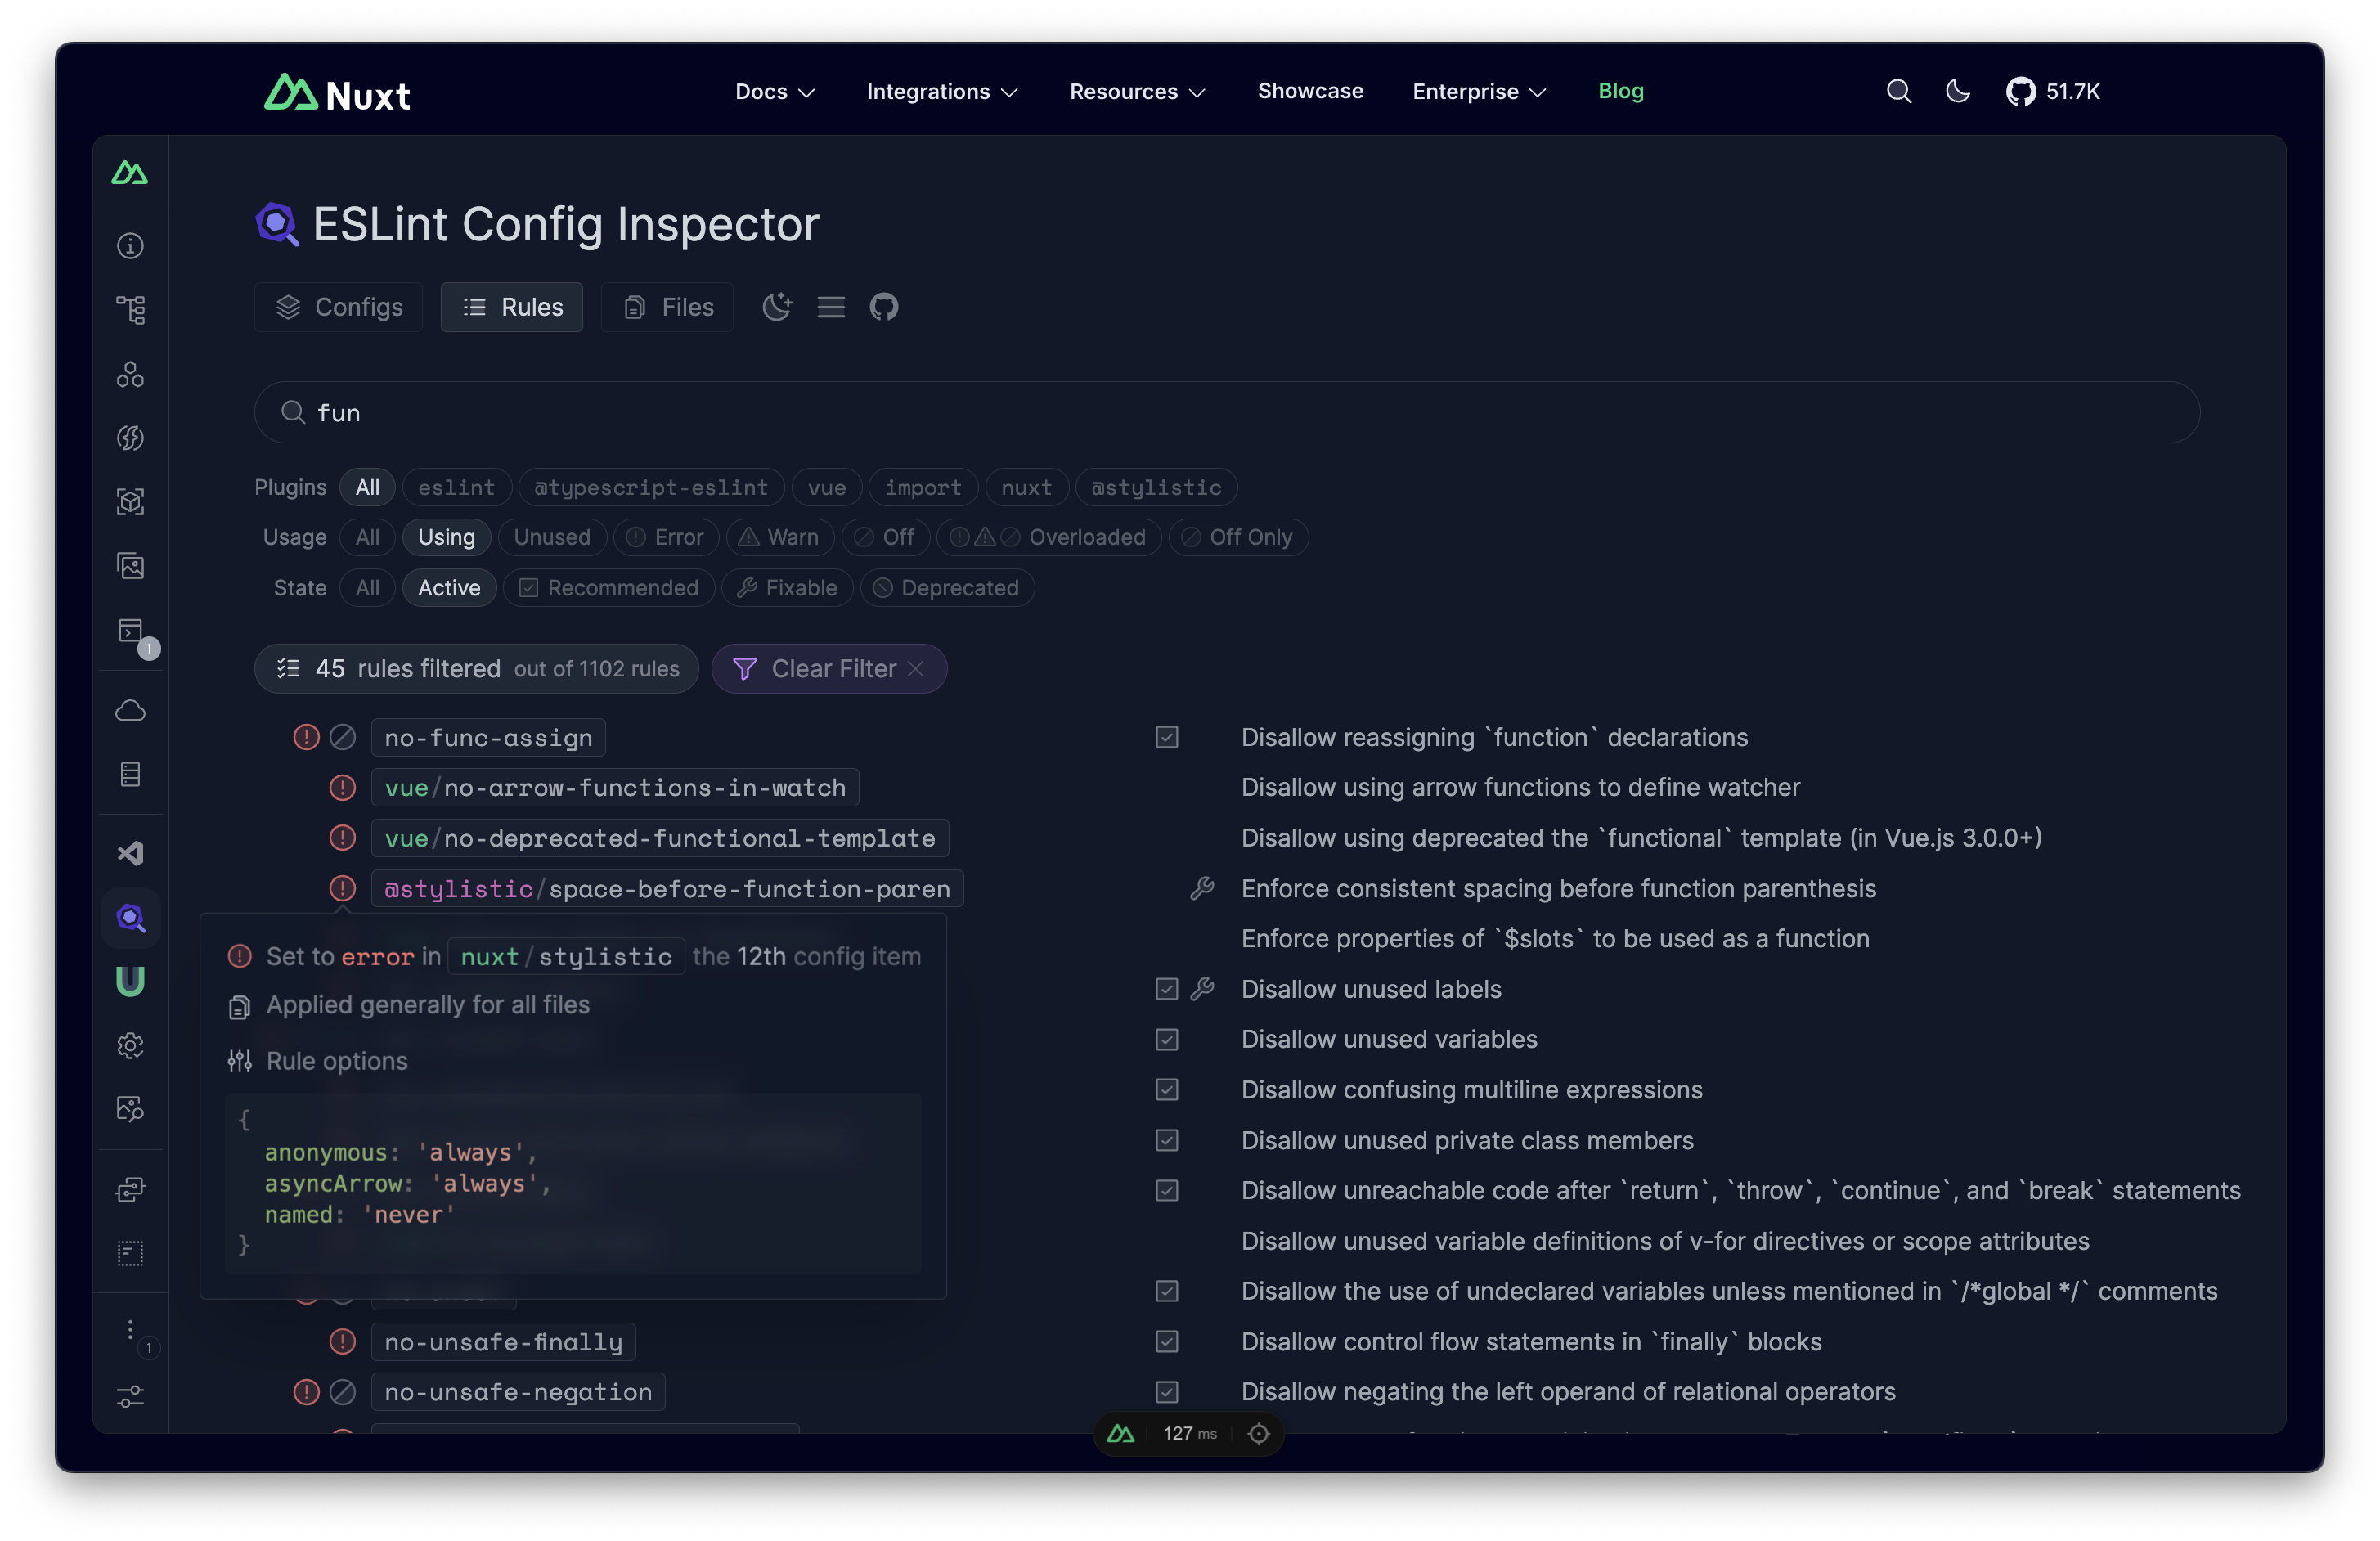
The inspector allows you to see the final resolved configurations, rules and plugins that have been enabled, and do quick matches to see how rules and configurations have applied to specific files. It's great for debugging and learning how ESLint works in your project.
We are delighted that the ESLint team also finds it useful and is interested in having it for the broader ESLint community. We later joined the effort and made it [the official ESLint Config Inspector](https://github.com/eslint/config-inspector){rel="nofollow"} (it's built with Nuxt, by the way). You can read [this announcement post](https://eslint.org/blog/2024/04/eslint-config-inspector/){rel="nofollow"} for more details.
### Type Generation for Rules
One of the main pain points of configuring ESLint was the leak of type information for the rules and configurations. It's hard to know what options are available for a specific rule, and it would require you to jump around the documentation for every rule to figure that out.
Thanks again for the new flat config being dynamic with so many possibilities. We figured out a new tool, [`eslint-typegen`](https://github.com/antfu/eslint-typegen){rel="nofollow"}, that we could generate the corresponding types from rules configuration schema for each rule **based on the actual plugins you are using**. This means it's a universal solution that works for any ESLint plugins, and the types are always accurate and up-to-date.
In the `@nuxt/eslint` module, this feature is integrated out-of-box, so that you will get this awesome experience right away:
### Dev Server Checker
With the new module, we took the chance to merge the [`@nuxtjs/eslint-module`](https://github.com/nuxt-modules/eslint){rel="nofollow"} and the dev server checker for ESLint into the new `@nuxt/eslint` module as an opt-in feature.
::note
You might not need this feature most of the time, as your editor integration should already provide ESLint diagnostics right in your editor. However, for some teams that work with different editors and want to ensure ESLint is always running, being able to run ESLint within the dev server might be helpful in some cases.
::
To enable it, you can set the `checker` option to `true` in the module options:
```ts [nuxt.config.ts]
export default defineNuxtConfig({
modules: [
'@nuxt/eslint'
],
eslint: {
checker: true // <---
}
})
```
Whenever you get some ESLint errors, you will see a warning in the console and the browser. To learn more about this feature, you can check the [documentation](https://eslint.nuxt.com/packages/module#dev-server-checker){rel="nofollow"}.
### Module Hooks
Since we are now in the Nuxt module with the codegen capabilities and the project-aware configurations, we can actually do a lot more interesting things with this. One is that we can allow modules to contribute to the ESLint configurations as well. Imagine that in the future, when you install a Nuxt module like `@nuxtjs/i18n` it can automatically enable specific ESLint rules for i18n-related files, or when you install something like `@pinia/nuxt` it can install the Pinia ESLint plugin to enforce the best practices for Pinia, etc.
As an experiment, we made a module [`nuxt-eslint-auto-explicit-import`](https://github.com/antfu/nuxt-eslint-auto-explicit-import){rel="nofollow"} that can do auto inserts for the auto-imports registered in your Nuxt project with a preconfigured ESLint preset. So that you can get the same nice developer experience with auto-imports on using APIs, but still have the auto-inserted explicit imports in your codebase.
This is still in the early stages, and we are still exploring the possibilities and best practices. But we are very excited about the potential and the opportunities it opens up. We will collaborate with the community to see how we can make the most out of it. If you have any ideas or feedback, please do not hesitate to share them with us!
## Ecosystem
At Nuxt, we care a lot about the ecosystem and the community as always. During our explorations to adopt the new flat config and improve the developer experience, we made quite a few tools to reach that goal. All of them are general-purposed and can be used outside of Nuxt:
- [`@eslint/config-inspector`](https://github.com/eslint/config-inspector){rel="nofollow"} - The official ESLint Config Inspector, provides interactive UI for your configs.
- [`eslint-typegen`](https://github.com/antfu/eslint-typegen){rel="nofollow"} - Generate TypeScript types for ESLint rules based on the actual plugins you are using.
- [`eslint-flat-config-utils`](https://github.com/antfu/eslint-flat-config-utils){rel="nofollow"} - Utilities for managing and composing ESLint flat configs.
We are committed to supporting the broader community and collaborating with developers to improve these tools and expand their possibilities. We are excited to see how these tools can benefit the ESLint ecosystem and contribute to the overall developer experience.
## The Future
::tip
The flat config format is still fairly new, and ESLint v9 was just released a couple of weeks ago. Plugins and the community are gradually catching up to the new format. It's still in the phase of exploration and experimentation.
::
Looking ahead, we are eager to see how the ESLint ecosystem will continue to evolve and how we can leverage new capabilities and possibilities to further enhance Nuxt's developer experience. We are dedicated to providing a seamless and powerful development environment for Nuxt users, and we will continue to explore new ideas and collaborate with the community to achieve this goal.
# Nuxt 3.12
We're on the road to the release of Nuxt 4, but we've not held back in Nuxt v3.12.
## 🚀 Testing Nuxt 4 changes
Nuxt 4 is on the horizon, and it's now possible to test out the behaviour changes that will be coming in the next major release ([#26925](https://github.com/nuxt/nuxt/pull/26925){rel="nofollow"}) by setting an option in your `nuxt.config` file:
```ts
export default defineNuxtConfig({
future: {
compatibilityVersion: 4,
},
})
```
As we've been merging PRs for Nuxt 4, we've been enabling them behind this flag. As much as possible we're aiming for backwards compatibility - our test matrix is running the same fixtures in both v3 and v4 compatibility mode.
There is a lot to say here, with 10+ different PRs and behaviour changes documented and testable, but for full details, including migration steps, see [the v4 upgrade documentation](https://nuxt.com/docs/getting-started/upgrade#testing-nuxt-4).
We'd be very grateful for early testing of what's coming in Nuxt 4! 🙏
## 📜 Nuxt Scripts auto-install
We've been gradually working to release [Nuxt Scripts](https://scripts.nuxt.com/){rel="nofollow"}. It's currently in public preview, but we're near a public release, so we've added some stubs for composables that (when used) will prompt installing the `@nuxt/scripts` module.
👉 Watch out for the launch - and an article explaining more!
## 🌈 Layer auto-registration and bugfixes
Just like `~/modules`, any layers within your project in the `~/layers` directory will now be automatically registered as layers in your project ([#27221](https://github.com/nuxt/nuxt/pull/27221){rel="nofollow"}).
We also now correctly load layer dependencies, which should resolve a range of issues with monorepos and git installations ([#27338](https://github.com/nuxt/nuxt/pull/27338){rel="nofollow"}).
## 🌐 Built-in accessibility improvements
We now have a built-in [`<NuxtRouteAnnouncer>`](https://nuxt.com/docs/api/components/nuxt-route-announcer) component and corresponding [`useRouteAnnouncer`](https://nuxt.com/docs/api/composables/use-route-announcer) composable, which will be added by default to new Nuxt templates going forward.
For full details, see [the original PR (#25741)](https://github.com/nuxt/nuxt/pull/25741){rel="nofollow"} and [documentation](https://nuxt.com/docs/api/components/nuxt-route-announcer).
We're continuing to work on `nuxt/a11y` - expect to hear more on that in future!
## 🔥 Performance improvements
We've landed some performance improvements as well, many of which are behind the `compatibilityVersion: 4` flag, such as a move away from deeply reactive asyncData payloads.
Significant improvements include deduplicating modules ([#27475](https://github.com/nuxt/nuxt/pull/27475){rel="nofollow"}) - which will apply mostly to layer users who specify modules in their layers. In one project, we saw 30s+ improvement in starting Nuxt.
We've also improved Vite dev server start up time by excluding common ESM dependencies from pre-bundling, and would suggest module authors consider doing the same ([#27372](https://github.com/nuxt/nuxt/pull/27372){rel="nofollow"}).
We improved chunk determinism, so sequential builds should be less likely to have *completely* different chunk hashes ([#27258](https://github.com/nuxt/nuxt/pull/27258){rel="nofollow"}).
And we tree shake more client-only composables from your server builds ([#27044](https://github.com/nuxt/nuxt/pull/27044){rel="nofollow"}), and have reduced the size of server component payloads ([#26863](https://github.com/nuxt/nuxt/pull/26863){rel="nofollow"}).
## 👨👩👧👦 Multi-app support
We've landed a couple of changes that take us toward a place of supporting multi-app natively in Nuxt, including a `multiApp` experimental flag ([#27291](https://github.com/nuxt/nuxt/pull/27291){rel="nofollow"}) and the ability to have multiple Nuxt app instances running in parallel at runtime ([#27068](https://github.com/nuxt/nuxt/pull/27068){rel="nofollow"}).
While it's not yet ready, please do follow along on [the tracker issue](https://github.com/nuxt/nuxt/issues/21635){rel="nofollow"}, and feel free to pitch in if this is interesting to you.
## ⛑️ DX wins
We now serialise more things in your dev server logs, including VNodes ([#27309](https://github.com/nuxt/nuxt/pull/27309){rel="nofollow"}) and [URLs](https://github.com/nuxt/nuxt/commit/a549b46e9){rel="nofollow"}. We also addressed a bug that could lead to a frozen dev server.
When accessing private runtime config in the browser, we now let you know with a more informative error message ([#26441](https://github.com/nuxt/nuxt/pull/26441){rel="nofollow"}).
## 🪨 Stabilising features
We've removed some experimental options that have been stabilised and which we feel no longer need to be configurable:
- `experimental.treeshakeClientOnly` (enabled by default since v3.0.0)
- `experimental.configSchema` (enabled by default since v3.3.0)
- `experimental.polyfillVueUseHead` (disabled since v3.4.0) - implementable in user-land with [plugin](https://github.com/nuxt/nuxt/blob/f209158352b09d1986aa320e29ff36353b91c358/packages/nuxt/src/head/runtime/plugins/vueuse-head-polyfill.ts#L10-L11){rel="nofollow"}
- `experimental.respectNoSSRHeader` (disabled since v3.4.0) - implementable in user-land with [server middleware](https://github.com/nuxt/nuxt/blob/c660b39447f0d5b8790c0826092638d321cd6821/packages/nuxt/src/core/runtime/nitro/no-ssr.ts#L8-L9){rel="nofollow"}
We've also enabled `scanPageMeta` by default ([#27134](https://github.com/nuxt/nuxt/pull/27134){rel="nofollow"}). This pulls out any page metadata in your `definePageMeta` macro, and makes it available to modules (like `@nuxtjs/i18n`) so they can augment it.
This unlocks much better module/typed routing integration, but has a potential performance cost - so please file an issue if you experience any problems.
## 💪 Type improvements
We now have support for typed `#fallback` slots in server components ([#27097](https://github.com/nuxt/nuxt/pull/27097){rel="nofollow"}).
We've also improved some defaults in your generated `tsconfig.json`, including setting `module: 'preserve'` if you have a locally installed TypeScript v5.4 version ([see docs](https://www.typescriptlang.org/tsconfig/#preserve){rel="nofollow"}) - see [#26667](https://github.com/nuxt/nuxt/pull/26667){rel="nofollow"}, [#27485](https://github.com/nuxt/nuxt/pull/27485){rel="nofollow"}.
## 📦 Module author/power user improvements
We have shipped a range of type improvements for module authors, including:
- support for typed module options in `installModule` ([#26744](https://github.com/nuxt/nuxt/pull/26744){rel="nofollow"})
- the option to specify compatibility with certain builders (vite/webpack) in module options ([#27022](https://github.com/nuxt/nuxt/pull/27022){rel="nofollow"})
- a new `onPrehydrate` hook for hooking into the browser hydration cycle ([#27037](https://github.com/nuxt/nuxt/pull/27037){rel="nofollow"})
- the ability to access and update *resolved* runtime configuration within modules, with new build-time `useRuntimeConfig` and `updateRuntimeConfig` utils ([#27117](https://github.com/nuxt/nuxt/pull/27117){rel="nofollow"})
## 🎨 Inlined UI templates
If you previously used `@nuxt/ui-templates` then it may be worth knowing that we have moved them from [a separate repository](https://github.com/nuxt/ui-templates){rel="nofollow"} into the [nuxt/nuxt](https://github.com/nuxt/nuxt){rel="nofollow"} monorepo. (This is purely a refactor rather than a change, although you can expect some new designs for Nuxt v4.)
## ✅ Upgrading
As usual, our recommendation for upgrading is to run:
```sh
npx nuxi@latest upgrade --force
```
This will refresh your lockfile as well, and ensures that you pull in updates from other dependencies that Nuxt relies on, particularly in the unjs ecosystem.
## Full Release Notes
::read-more
---
icon: i-simple-icons-github
target: _blank
to: https://github.com/nuxt/nuxt/releases/tag/v3.12.0
---
Read the full release notes of Nuxt `v3.12.0`.
::
A huge thank you to the 75+ Nuxt contributors and community members who have been part of this release. ❤️
Finally, thank you for reading this far! We hope you enjoy v3.12, and please do let us know if you have any feedback or issues. 🙏
**Happy Nuxting ✨**
# Introducing Nuxt Scripts
The Nuxt team, in collaboration with the [Chrome Aurora](https://developer.chrome.com/aurora){rel="nofollow"} team at Google, is excited to announce the public beta release of [Nuxt Scripts](https://scripts.nuxt.com){rel="nofollow"}.
Nuxt Scripts is a better way to work with third-party scripts, providing improved performance, privacy, security, and developer experience.
{className="border,border-gray-200,dark:border-gray-700,rounded-lg"}
## Getting to Nuxt Scripts
Over a year ago, Daniel published the initial [Nuxt Scripts RFC](https://github.com/nuxt/nuxt/discussions/22016){rel="nofollow"}. The RFC proposed a module that would "allow third-party scripts to be managed and optimized, following best practices for performant and compliant websites".
Having [personal experience](https://github.com/harlan-zw/nuxt-delay-hydration){rel="nofollow"} with solving performance issues related to third-party scripts, I knew how difficult these performance optimizations could be. Nonetheless, I was keen to tackle the problem and took over the project.
With the RFC as the seed of the idea, I started prototyping what it could [look like](https://github.com/nuxt/nuxt/discussions/22016#discussioncomment-6527001){rel="nofollow"} using [Unhead](https://unhead.unjs.io/){rel="nofollow"}.
Thinking about what I wanted to build exactly, I found that the real issue wasn't just how to load "optimized" third-party scripts but how to make working with third-party scripts a better experience overall.
## Why Build a Third-Party Script Module?
[94% of sites use at least one third-party provider](https://almanac.httparchive.org/en/2022/third-parties#prevalence){rel="nofollow"}, with the average site having [five third-party providers](https://docs.google.com/spreadsheets/d/1YqoRRsyiNsrEabVLu2nRU98JIG_0zLLuoQhC2nX8xbM/edit?gid=1428106498#gid=1428106498){rel="nofollow"}.
We know that third-party scripts aren't perfect; they [slow down the web](https://web.dev/articles/optimizing-content-efficiency-loading-third-party-javascript#){rel="nofollow"}, cause privacy and security issues, and are a pain to work with.
However, they are fundamentally useful and aren't going anywhere soon.
By exploring the issues with third-party scripts, we can see where improvements can be made.
### 😒 Developer Experience: A Full-Stack Headache
Let's walk through adding a third-party script to your Nuxt app using a fictional `tracker.js` script that adds a `track` function to the window.
We start by loading the script using `useHead`.
```ts
useHead({ script: [{ src: '/tracker.js', defer: true }] })
```
However, let's now try to get the script functionality working in our app.
The following steps are common when working with third-party scripts in Nuxt:
- Everything has to be wrapped for SSR safety.
- Flaky checks for if the script has loaded.
- Augmenting the window object for types.
::code-group
```vue [1: SSR Safety]
<script setup>
// ❌ Oops, window is not defined!
// 💡 The window can't be directly accessed if we use SSR in Nuxt.
// 👉 We need to make this SSR safe
window.track('page_view', useRoute().path)
</script>
```
```vue [2: Script Timing]
<script setup>
if (import.meta.client) {
// ❌ Oops, the script hasn't finished loading yet!
// 💡 A `defer` script may not be available while our Nuxt app hydrates.
// 👉 We need to wait for the script to be loaded
window.track('page_view', useRoute().path)
}
</script>
```
```vue [3: Broken types]
<script lang="ts" setup>
if (import.meta.client) {
useTimeoutFn(() => {
// ✅ It's working!
// ❌ Oops, types are broken.
// 💡 The `window` has strict types and nothing is defined yet.
// 👉 We need to manually augment the window
window.track('page_view', useRoute().path)
}, 1000 /* should be loaded in 1 second!? */)
}
</script>
```
```vue [4: It works?]
<script lang="ts" setup>
declare global {
interface Window {
track: (e: string, p: string) => void
}
}
if (import.meta.client) {
useTimeoutFn(() => {
// ✅ It's working and types are valid!
// ❌ Oops, ad-blockers, GDPR and duplicate scripts
// 💡 There's a lot of hidden complexity in third-party scripts
// 👉 We need a better API
window.track('page_view', useRoute().path)
}, 1000)
}
</script>
```
::
### 🐌 Performance: "Why can't I get 100 on Lighthouse?"
For a visitor to start interacting with your Nuxt site, the app bundle needs to be downloaded and Vue needs to hydrate the app instance.
Loading third-party scripts can interfere with this hydration process, even when using `async` or `defer`. This slows down the network and blocks the main thread, leading to a degraded user experience and poor [Core Web Vitals](https://web.dev/vitals/){rel="nofollow"}.
The [Chrome User Experience Report](https://developer.chrome.com/docs/crux){rel="nofollow"} shows Nuxt sites with numerous third-party resources typically have poorer [Interaction to Next Paint (INP)](https://web.dev/articles/inp){rel="nofollow"} and [Largest Contentful Paint (LCP)](https://web.dev/articles/lcp){rel="nofollow"} scores.
To see how third-party scripts degrade performance, we can look at the [Web Almanac 2022](https://almanac.httparchive.org/en/2022/third-parties#impact-on-performance){rel="nofollow"}. The report shows that the top 10 third-party scripts **average median blocking time is 1.4 seconds**.
### 🛡️ Privacy & Security: Do *no* evil?
Of the top 10,000 sites, 58% of them have third-party scripts that [exchange tracking IDs stored in external cookies](https://www3.cs.stonybrook.edu/~mikepo/papers/firstparty.www21.pdf){rel="nofollow"}, meaning they can track users across sites even with third-party cookies disabled.
While in many cases our hands are tied with the providers we use, we should try to minimize the amount of our end-users' data that we're leaking where possible.
When we do take on the privacy implications, it can then be difficult to accurately convey these in our privacy policies and build the consent management required to comply with regulations such as GDPR.
Security when using third-party scripts is also a concern. Third-party scripts are common attack vectors for malicious actors, most do not provide `integrity` hashes for their scripts, meaning they can be compromised and inject malicious code into your app at any time.
## What does Nuxt Scripts do about these issues?
### Composable: useScript
This composable sits between the `<script>` tag and the functionality added to `window.{thirdPartyKey}`.
For the `<script>` tag, the composable:
- Gives full visibility into the script's loading and error states
- Loads scripts as Nuxt is hydrating the app by default, for slightly better performance.
- Restricts `crossorigin` and `referrerpolicy` to improve privacy and security.
- Provides a way to [delay loading the script](https://scripts.nuxt.com/docs/guides/script-triggers){rel="nofollow"} until you need it.
For the scripts API, it:
- Provides full type-safety around the script's functions
- Adds a proxy layer allowing your app to run when the script functions in unsafe contexts (SSR, before the script is loaded, the script is blocked)
::code-group
```ts [hello.ts]
const { proxy, onLoaded } = useScript('/hello.js', {
trigger: 'onNuxtReady',
use() {
return window.helloWorld
}
})
onLoaded(({ greeting }) => {
// ✅ script is loaded! Hooks into Vue lifecycle
})
// ✅ OR use the proxy API - SSR friendly, called when script is loaded
proxy.greeting() // Hello, World!
declare global {
interface Window {
helloWorld: {
greeting: () => 'Hello World!'
}
}
}
```
```ts [hello.js]
window.helloWorld = {
greeting() {
console.log('Hello, World!')
}
}
```
::
### Script Registry
The [script registry](https://scripts.nuxt.com/scripts){rel="nofollow"} is a collection of first-party integrations for common third-party scripts. As of release, we support 21 scripts, with more to come.
{className="border,border-gray-200,dark:border-gray-700,rounded-lg"}
These registry scripts are fine-tuned wrappers around `useScript` with full type-safety, runtime validation of the script options (dev only) and environment variable support
For example, we can look at the [Fathom Analytics](https://scripts.nuxt.com/scripts/analytics/fathom-analytics){rel="nofollow"} script.
```ts
const { proxy } = useScriptFathomAnalytics({
// ✅ options are validated at runtime
site: undefined
})
// ✅ typed
proxy.trackPageview()
```
### Facade Components
The registry includes several [facade components](https://scripts.nuxt.com/docs/guides/facade-components){rel="nofollow"}, such as
[Google Maps](https://scripts.nuxt.com/scripts/content/google-maps){rel="nofollow"}, [YouTube](https://scripts.nuxt.com/scripts/content/youtube-player){rel="nofollow"} and [Intercom](https://scripts.nuxt.com/scripts/support/intercom){rel="nofollow"}.
Facade components are "fake" components that get hydrated when the third-party script loads. Facade components
have trade-offs but can drastically improve your performance. See the [What are Facade Components?](https://scripts.nuxt.com/docs/guides/facade-components#what-are-facade-components){rel="nofollow"}
guide for more information.
Nuxt Scripts provides facade components as accessible but headless, meaning they are not styled by default but add the necessary
a16y data.
::tabs
:::tabs-item{label="Output"}
::::youtube-demo
::::
:::
:::tabs-item{label="Input"}
```vue
<script setup lang="ts">
const isLoaded = ref(false)
const isPlaying = ref(false)
const video = ref()
function play() {
video.value?.player.playVideo()
}
function stateChange(state) {
isPlaying.value = state.data === 1
}
</script>
<template>
<ScriptYouTubePlayer ref="video" video-id="d_IFKP1Ofq0" @ready="isLoaded = true" @state-change="stateChange">
<template #awaitingLoad>
<div class="absolute left-1/2 top-1/2 transform -translate-x-1/2 -translate-y-1/2 h-[48px] w-[68px]">
<svg height="100%" version="1.1" viewBox="0 0 68 48" width="100%"><path d="M66.52,7.74c-0.78-2.93-2.49-5.41-5.42-6.19C55.79,.13,34,0,34,0S12.21,.13,6.9,1.55 C3.97,2.33,2.27,4.81,1.48,7.74C0.06,13.05,0,24,0,24s0.06,10.95,1.48,16.26c0.78,2.93,2.49,5.41,5.42,6.19 C12.21,47.87,34,48,34,48s21.79-0.13,27.1-1.55c2.93-0.78,4.64-3.26,5.42-6.19C67.94,34.95,68,24,68,24S67.94,13.05,66.52,7.74z" fill="#f00" /><path d="M 45,24 27,14 27,34" fill="#fff" /></svg>
</div>
</template>
</ScriptYouTubePlayer>
</template>
```
:::
::
### Consent Management & Element Event Triggers
The `useScript` composable gives you full control over how and when your scripts are loaded, by either providing a custom `trigger` or manually calling the `load()` function.
Building on top of this, Nuxt Scripts provides advanced triggers to make it even easier.
- [Consent Management](https://scripts.nuxt.com/docs/guides/consent){rel="nofollow"} - Load scripts only after the user has given consent such as with a cookie banner.
- [Element Event Triggers](https://scripts.nuxt.com/docs/guides/script-triggers#element-event-triggers){rel="nofollow"} - Load scripts based on user interactions such as scrolling, clicking, or form submissions.
```ts
const cookieConsentTrigger = useScriptTriggerConsent()
const { proxy } = useScript<{ greeting: () => void }>('/hello.js', {
// script will only be loaded once the consent has been accepted
trigger: cookieConsentTrigger
})
// ...
function acceptCookies() {
cookieConsentTrigger.accept()
}
// greeting() is queued until the user accepts cookies
proxy.greeting()
```
### Bundling Scripts
In many cases, we're loading third-party scripts from a domain that we don't control. This can lead to a number of issues:
- Privacy: The third-party script can track users across sites.
- Security: The third-party script can be compromised and inject malicious code.
- Performance: Extra DNS lookups will slow down the page load.
- Developer Experience: Consented scripts may be blocked by ad blockers.
To mitigate this, Nuxt Scripts provides a way to bundle third-party scripts into your public directory without any extra work.
```ts
useScript('https://cdn.jsdelivr.net/npm/js-confetti@latest/dist/js-confetti.browser.js', {
bundle: true,
})
```
The script will now be served from `/_scripts/{hash}` on your own domain.
## To be continued
As we saw, there are many opportunities to improve third-party scripts for developers and end-users.
The initial release of Nuxt Scripts has solved *some* of these issues, but there's still a lot of work ahead of us.
The next items on the roadmap are:
- [Add web worker support (Partytown)](https://github.com/nuxt/scripts/issues/182){rel="nofollow"}
- [More Live Chat Facade Components](https://github.com/nuxt/scripts/issues/44){rel="nofollow"}
- [Offload Scripts To Nuxt Server Proxy](https://github.com/nuxt/scripts/issues/87){rel="nofollow"}
- [Iframe Script Sandboxing](https://github.com/nuxt/scripts/issues/131){rel="nofollow"}
We'd love to have your contribution and support.
## Getting started
To get started with Nuxt Scripts, we've created a [tutorial](https://scripts.nuxt.com/docs/getting-started/confetti-tutorial){rel="nofollow"} to help you get up and running.
## Credits
- [Harlan Wilton - Nuxt](https://github.com/harlan-zw){rel="nofollow"} (author)
- [Julien Huang - Nuxt](https://github.com/huang-julien){rel="nofollow"} (contributor)
- [Daniel Roe - Nuxt](https://github.com/danielroe){rel="nofollow"} (contributor)
- [Chrome Aurora - Google](https://developer.chrome.com/aurora){rel="nofollow"} (contributor)
And a big thank you to the early contributors.
{className="border,border-gray-200,dark:border-gray-700,rounded-lg"}
# Nuxt 3.13
## 🏘️ Route Groups
We now support naming directories with parentheses/brackets to organise your routes without affecting the path.
For example:
```bash [Directory structure]
-| pages/
---| index.vue
---| (marketing)/
-----| about.vue
-----| contact.vue
```
This will produce `/`, `/about` and `/contact` pages in your app. The `marketing` group is ignored for purposes of your URL structure.
Read more in [the original PR](https://github.com/nuxt/nuxt/pull/28276){rel="nofollow"}.
## 🏝️ Islands and Head Metadata
It's now possible for server component islands to manipulate the head, such as by adding SEO metadata when rendering.
Read more in [#27987](https://github.com/nuxt/nuxt/pull/27987){rel="nofollow"}.
## 🪝 Custom Prefetch Triggers
We now support custom prefetch triggers for `NuxtLink` ([#27846](https://github.com/nuxt/nuxt/pull/27846){rel="nofollow"}).
For example:
```vue [pages/index.vue]
<template>
<div>
<NuxtLink prefetch-on="interaction">
This will prefetch when hovered or when it gains focus
</NuxtLink>
<!-- note that you probably don't want both enabled! -->
<NuxtLink :prefetch-on="{ visibility: true, interaction: true }">
This will prefetch when hovered/focus - or when it becomes visible
</NuxtLink>
</div>
</template>
```
It's also possible to enable/disable these globally for your app and override them per link.
For example:
```ts [nuxt.config.ts]
export default defineNuxtConfig({
experimental: {
defaults: {
nuxtLink: {
prefetch: true,
prefetchOn: { visibility: false, interaction: true }
}
}
}
})
```
## 🗺️ Better Server Source Maps
When running with `node --enable-source-maps`, you may have noticed that the source maps for the Vue files in your server build pointed to the Vite build output (something like `.nuxt/dist/server/_nuxt/index-O15BBwZ3.js`).
Now, even after your Nitro build, your server source maps will reference your original source files ([#28521](https://github.com/nuxt/nuxt/pull/28521){rel="nofollow"}).
Note that one of the easiest ways of improving your build performance is to turn off source maps if you aren't using them, which you can do easily in your `nuxt.config`:
```ts [nuxt.config.ts]
export default defineNuxtConfig({
sourcemap: {
server: false,
client: true,
},
})
```
## 🎁 New Features for Module Authors
In the run-up to Nuxt v4, we're working on adding some key functionality for module authors, including a new `isNuxtMajorVersion` utility where required ([#27579](https://github.com/nuxt/nuxt/pull/27579){rel="nofollow"}) and better inferred typing for merged module options using the new `defineNuxtModule().with()` method ([#27520](https://github.com/nuxt/nuxt/pull/27520){rel="nofollow"}).
## ✨ Improved Dev Warnings
We no longer warn when using data fetching composables in middleware ([#28604](https://github.com/nuxt/nuxt/pull/28604){rel="nofollow"}) and we warn when user components' names begin with Lazy ([#27838](https://github.com/nuxt/nuxt/pull/27838){rel="nofollow"}).
## 🚨 Vue TypeScript Changes
For a while, in the Vue ecosystem, we've been augmenting `@vue/runtime-core` to add custom properties and more to `vue`. However, this inadvertently breaks the types for projects that augment `vue` - which is now the officially recommended and documented way to augment these interfaces (for example, [ComponentCustomProperties](https://vuejs.org/api/utility-types.html#componentcustomproperties){rel="nofollow"}, [GlobalComponents](https://vuejs.org/guide/extras/web-components.html#web-components-and-typescript){rel="nofollow"} and [so on](https://vuejs.org/guide/typescript/options-api.html#augmenting-global-properties){rel="nofollow"}).
This means *all* libraries must update their code (or it will break the types of libraries that augment `vue` instead).
We've updated our types in Nuxt along these lines but you may experience issues with the latest `vue-router` when used with libraries which haven't yet done so.
Please create an issue with a reproduction - I'll happily help create a PR to resolve in the upstream library in question. Or you may be able to work around the issue by creating a `declarations.d.ts` in the root of your project with the following code ([credit](https://github.com/nuxt/nuxt/pull/28542#issuecomment-2293282891){rel="nofollow"} to [@BobbieGoede](https://github.com/BobbieGoede){rel="nofollow"}):
```ts [declarations.d.ts]
import type {
ComponentCustomOptions as _ComponentCustomOptions,
ComponentCustomProperties as _ComponentCustomProperties,
} from 'vue';
declare module '@vue/runtime-core' {
interface ComponentCustomProperties extends _ComponentCustomProperties {}
interface ComponentCustomOptions extends _ComponentCustomOptions {}
}
```
## ✅ Upgrading
As usual, our recommendation for upgrading is to run:
```sh
npx nuxi@latest upgrade --force
```
This will refresh your lockfile as well, and ensures that you pull in updates from other dependencies that Nuxt relies on, particularly in the unjs ecosystem.
## Full Release Notes
::read-more
---
icon: i-simple-icons-github
target: _blank
to: https://github.com/nuxt/nuxt/releases/tag/v3.13.0
---
Read the full release notes of Nuxt `v3.13.0`.
::
A huge thank you to everyone who's been a part of this release - you are the ones who make Nuxt possible. ❤️
Don't hesitate to let us know if you have any feedback or issues! 🙏
# Nuxt 3.14
Behind the scenes, a lot has been going on in preparation for the release of Nuxt v4 (particularly on the `unjs` side with preparations for Nitro v3!)
### ⚡️ Faster starts powered by `jiti`
Loading the nuxt config file, as well as modules and other build-time code, is now powered by `jiti` v2. You can see more about the release in the [jiti v2 release notes](https://github.com/unjs/jiti/releases/tag/v2.0.0){rel="nofollow"}, but one of the most important pieces is native node esm import (where possible), which should mean a faster start. ✨
### 📂 Shared folder for code and types shared with client/server
You should never import Vue app code in your nitro code (or the other way around). But this has meant a friction point when it comes to sharing types or utilities that *don't* rely on the nitro/vue contexts.
For this, we have a new `shared/` folder ([#28682](https://github.com/nuxt/nuxt/pull/28682){rel="nofollow"}). You can't import Vue or nitro code *into* files in this folder, but it produces auto-imports (if you're using `compatibilityVersion: 4`) which you can consume throughout the rest of your app.
If needed you can use the new `#shared` alias which points to this folder.
The shared folder is alongside your `server/` folder. (If you're using `compatibilityVersion: 4`, this means it's not inside your `app/` folder.)
### 🦀 `rspack` builder
We're excited to announce a new first-class Nuxt builder for `rspack`. It's still experimental but we've refactored the internal Nuxt virtual file system to use `unplugin` to make this possible.
Let us know if you like it - and feel free to raise any issues you experience with it.
👉 To try it out, you can use [this starter](https://github.com/danielroe/nuxt-rspack-starter){rel="nofollow"} - or just install `@nuxt/rspack-builder` and set `builder: 'rspack'` in your nuxt config file.
### ✨ New composables
We have new `useResponseHeader` and `useRuntimeHook` composables ([#27131](https://github.com/nuxt/nuxt/pull/27131){rel="nofollow"} and [#29741](https://github.com/nuxt/nuxt/pull/29741){rel="nofollow"}).
### 🔧 New module utilities
We now have a new `addServerTemplate` utility ([#29320](https://github.com/nuxt/nuxt/pull/29320){rel="nofollow"}) for adding virtual files for access inside nitro runtime routes.
### 🚧 v4 changes
We've merged some changes which only take effect with `compatibilityVersion: 4`, but which [you can opt-into earlier](https://nuxt.com/docs/getting-started/upgrade#testing-nuxt-4).
1. previously, if you had a component like `~/components/App/Header.vue` this would be visible in your devtools as `<Header>`. From v4 we ensure this is `<AppHeader>`, but it's opt-in to avoid breaking any manual `<KeepAlive>` you might have implemented. ([#28745](https://github.com/nuxt/nuxt/pull/28745){rel="nofollow"}).
2. Nuxt scans page metadata from your files, before calling `pages:extend`. But this has led to some confusing behaviour, as pages added at this point do not end up having their page metadata respected. So we now do not scan metadata before calling `pages:extend`. Instead, we have a new `pages:resolved` hook, which is called after `pages:extend`, after all pages have been augmented with their metadata. I'd recommend opting into this by setting `experimental.scanPageMeta` to `after-resolve`, as it solves a number of bugs.
## 🗺️ Roadmap to v3.15
They didn't quite make it in time for v3.14 but for the next minor release you can expect (among other things):
- auto-imported directives from modules ([#29203](https://github.com/nuxt/nuxt/pull/29203){rel="nofollow"})
- 'isolated' page renders ([#29366](https://github.com/nuxt/nuxt/pull/29366){rel="nofollow"})
- delayed hydration ([#26468](https://github.com/nuxt/nuxt/pull/26468){rel="nofollow"})
## ✅ Upgrading
As usual, our recommendation for upgrading is to run:
```sh
npx nuxi@latest upgrade --force
```
This will refresh your lockfile as well, and ensures that you pull in updates from other dependencies that Nuxt relies on, particularly in the unjs ecosystem.
## Full Release Notes
::read-more
---
icon: i-simple-icons-github
target: _blank
to: https://github.com/nuxt/nuxt/releases/tag/v3.14.0
---
Read the full release notes of Nuxt `v3.14.0`.
::
A huge thank you to everyone who's been a part of this release. We have exciting things in store with our next releases! ❤️
Don't hesitate to let us know if you have any feedback or issues! 🙏
# Introducing Nuxt Icon v1
Icons are essential to modern web interfaces. They simplify navigation, clarify functionality, and enhance visual appeal. However, implementing icons efficiently involves challenges like scalability, dynamic loading, and server-side rendering (SSR) compatibility.
To address these challenges, we developed **Nuxt Icon v1** — a versatile, modern solution tailored for Nuxt projects. By building on established icon rendering techniques and introducing novel approaches, Nuxt Icon bridges the gap between performance, usability, and flexibility.
In this post, we’ll explore the challenges of icon rendering, the evolution of icon solutions, and how Nuxt Icon combines the best aspects of these methods to offer a seamless experience for developers.
---
## Why Are Icons Challenging?
At first glance, icons seem simple - they are essentially just tiny image elements that enhance a user interface, providing visual cues and enhancing usability.
{className="border,border-gray-200,dark:border-gray-700,rounded-lg"}
However, from an engineering perspective, they pose several challenges. Ideal icons should be:
- **Colorable**: Adaptable to themes and color schemes.
- **Scalable**: Render crisply at various sizes and resolutions.
- **Manageable**: Icon sets can contain hundreds or thousands of icons.
- **Efficiently Bundled**: Minimize network requests.
- **Optimally Loaded**: Affect application performance and user experience.
- **Dynamic**: Support dynamic loading for user-generated or runtime-defined icons.
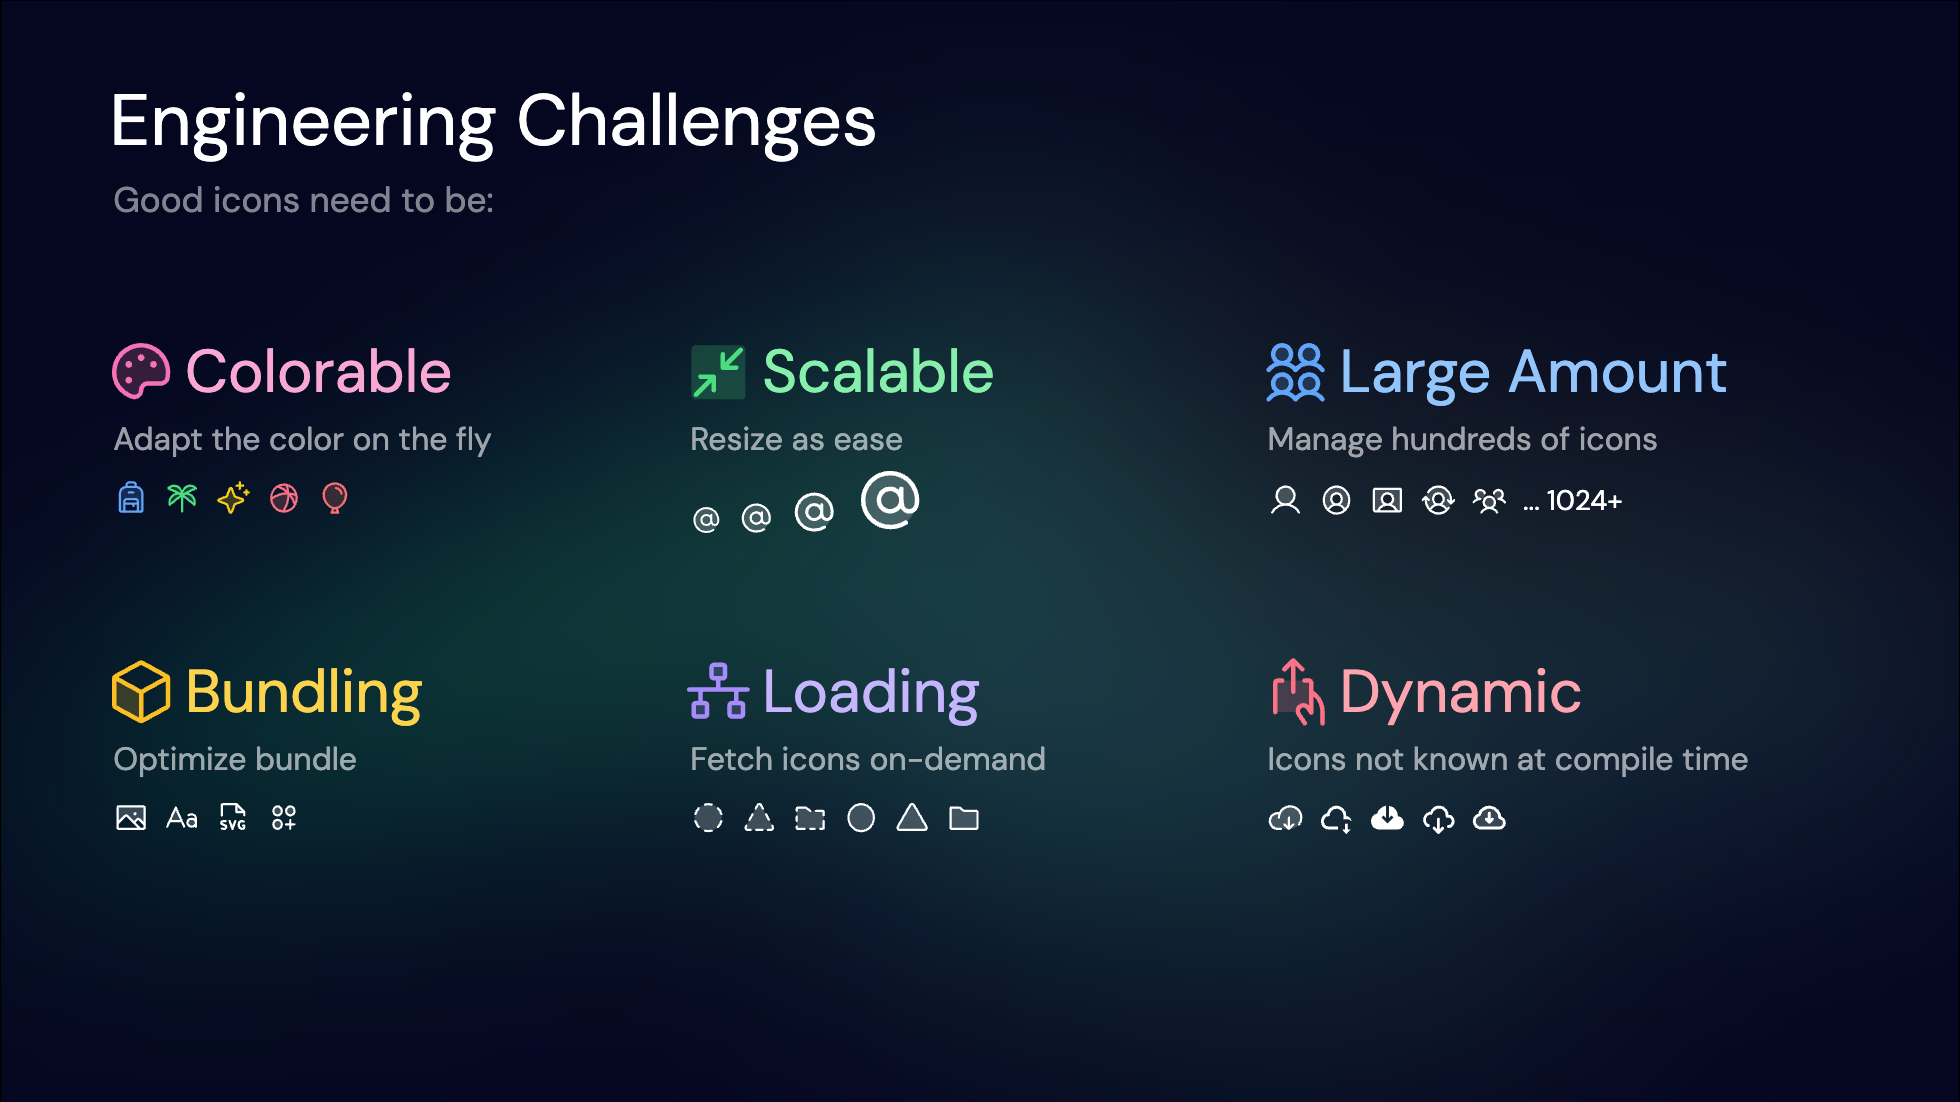{className="border,border-gray-200,dark:border-gray-700,rounded-lg"}
Meeting all these needs requires a carefully engineered solution that balances trade-offs. Let’s explore the evolution of icon solutions and how they address these challenges.
---
## A Journey Through Icon Solutions
Over the years, developers have experimented with various techniques to render icons efficiently. Let’s explore the evolution of these solutions and the challenges they faced.
### 1. `<img>` Tags: The Early Days
The most straightforward solution: using the `<img>` tag. This was the go-to method in the early days of the web.
You'd host your image assets and use an `<img>` tag to link to that image, specifying its width and height. It's simple, requires no setup or runtime dependencies, and works natively in browsers.
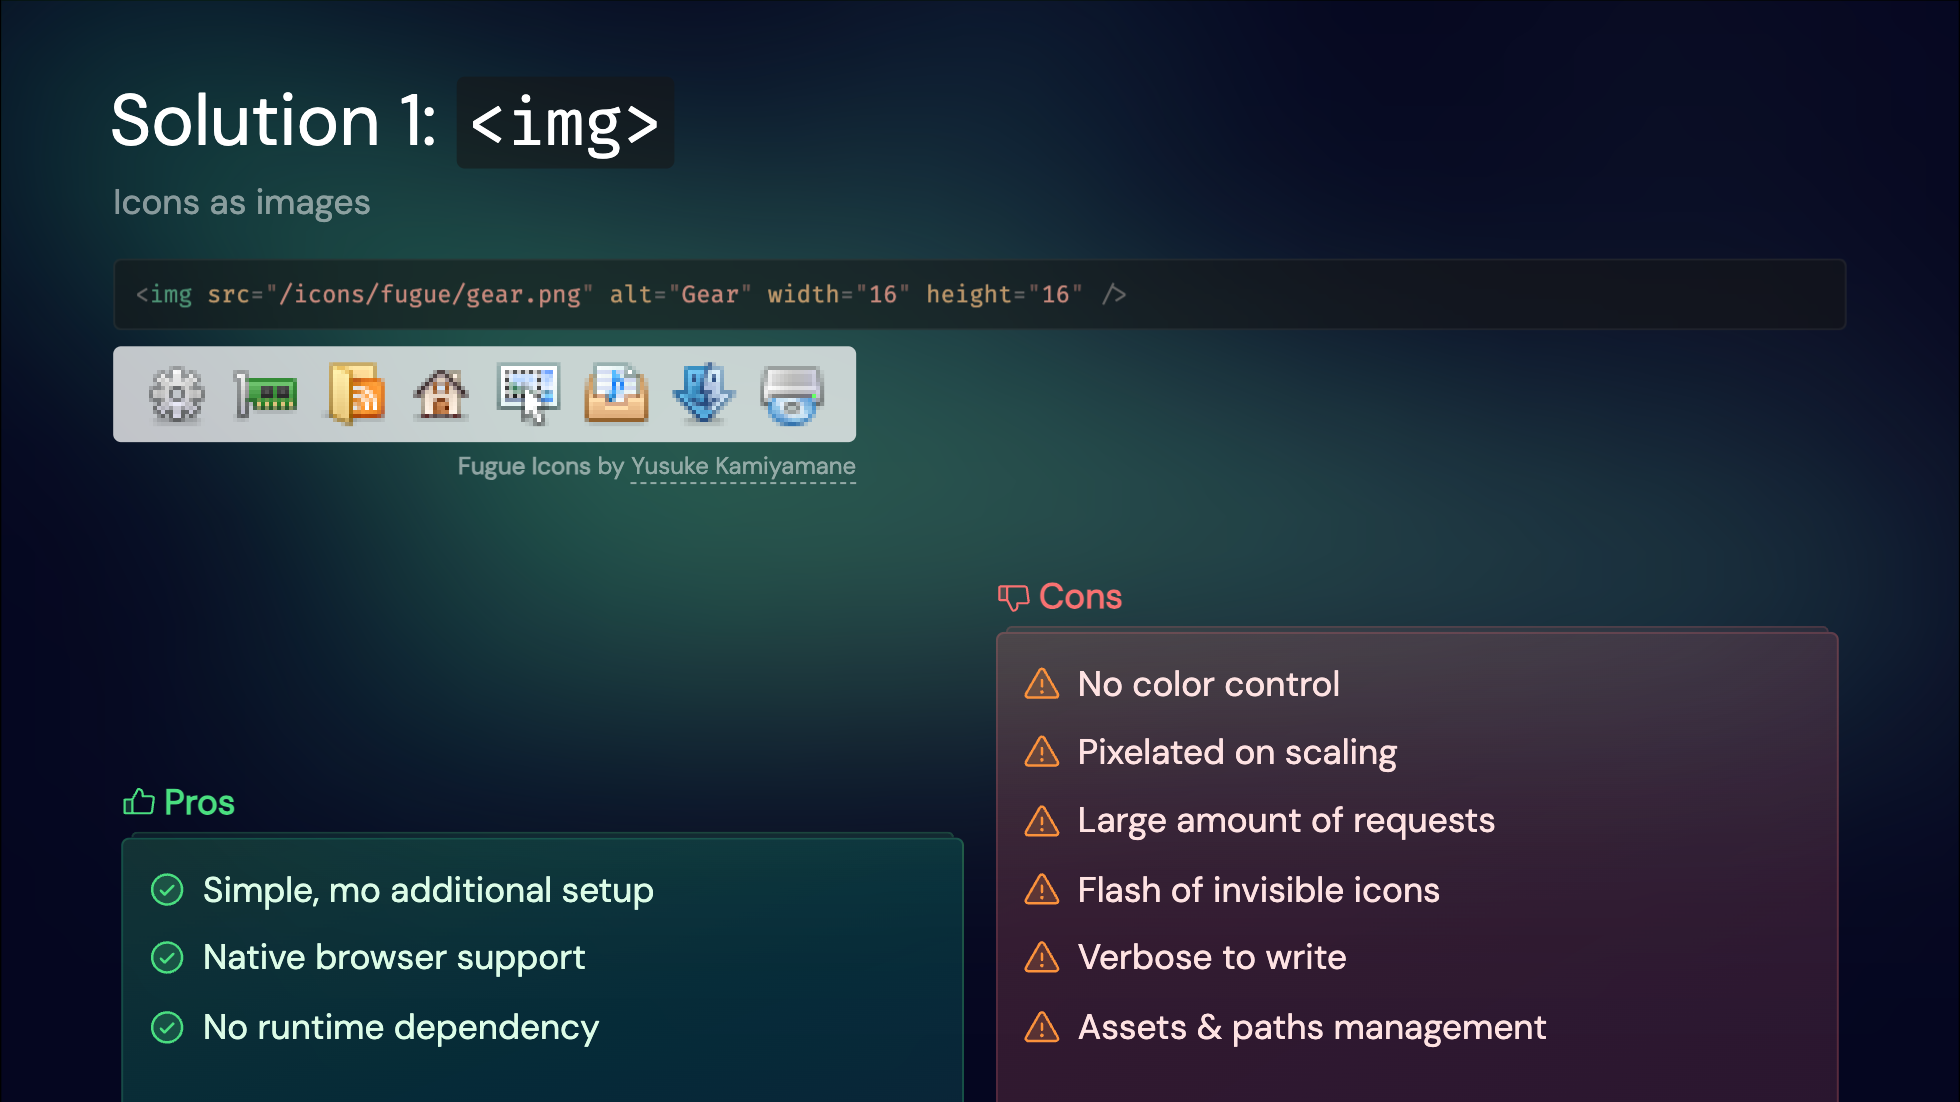{className="border,border-gray-200,dark:border-gray-700,rounded-lg"}
However, there are drawbacks. Images can become pixelated, lack color control, and don't scale well. Each icon being a separate image file results in many network requests, which could be slow, especially back in the days of HTTP 1.1. Before the image is downloaded, you might see a flash of invisible icons, which can hurt the user experience. Lastly, it's quite verbose to write, as you need to specify the full path of the image and manage the relative paths. It explains why this approach is rarely used on modern websites today.
---
### 2. Web Fonts: Icon Fonts
As the next step in icon evolution, web fonts emerged as a popular solution. Fonts are inherently vectorized and colorable, making them a natural fit for icons.
Iconset providers typically compile their icons into a special font file, assigning a unique Unicode character to each icon. This is accompanied by a CSS file that maps these Unicode values to specific icon classes.
The advantages of this approach are clear: it's easy to use, colorable, scalable, and requires only a single request to load all icons.
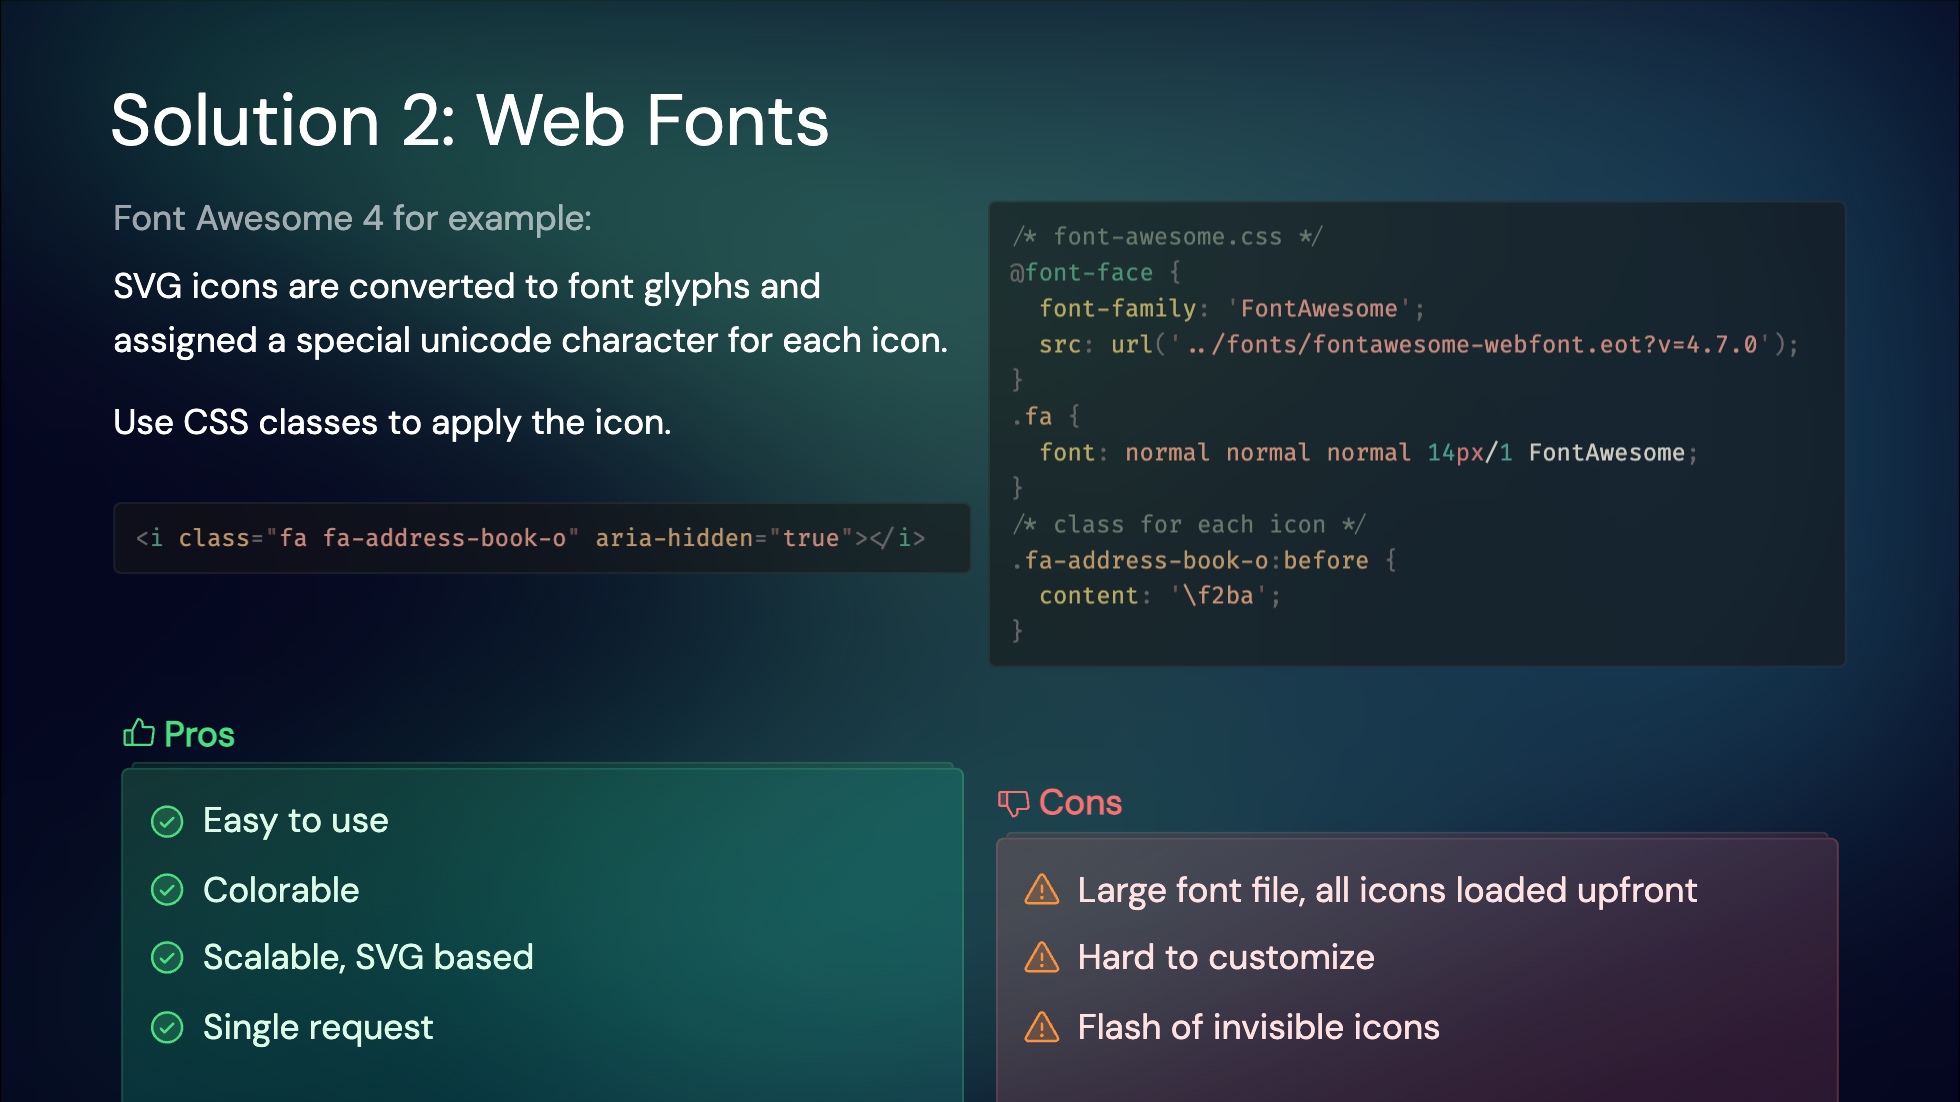{className="border,border-gray-200,dark:border-gray-700,rounded-lg"}
However, there are some downsides. Loading a large font file upfront can be slow, and customizing the icon set is challenging. Additionally, you might experience a flash of invisible icons before the font loads, as there are no fallback fonts available.
---
### 3. Inline SVGs: Component-Based Icons
With the advent of modern frontend frameworks, reusing HTML elements has become significantly easier. This led to the idea of directly inlining SVG tags as components.
To support this approach, many icon sets provide packages with wrappers tailored for each framework. For instance, MDI icons use a shared component and pass icon data as props, while Tabler icons offer a dedicated component for each icon.
Since these are SVGs, they are inherently colorable, scalable, and retain all the features of SVGs. Typically, icons are bundled into the app, eliminating additional network requests and ensuring they are SSR-friendly and visible on the first render.
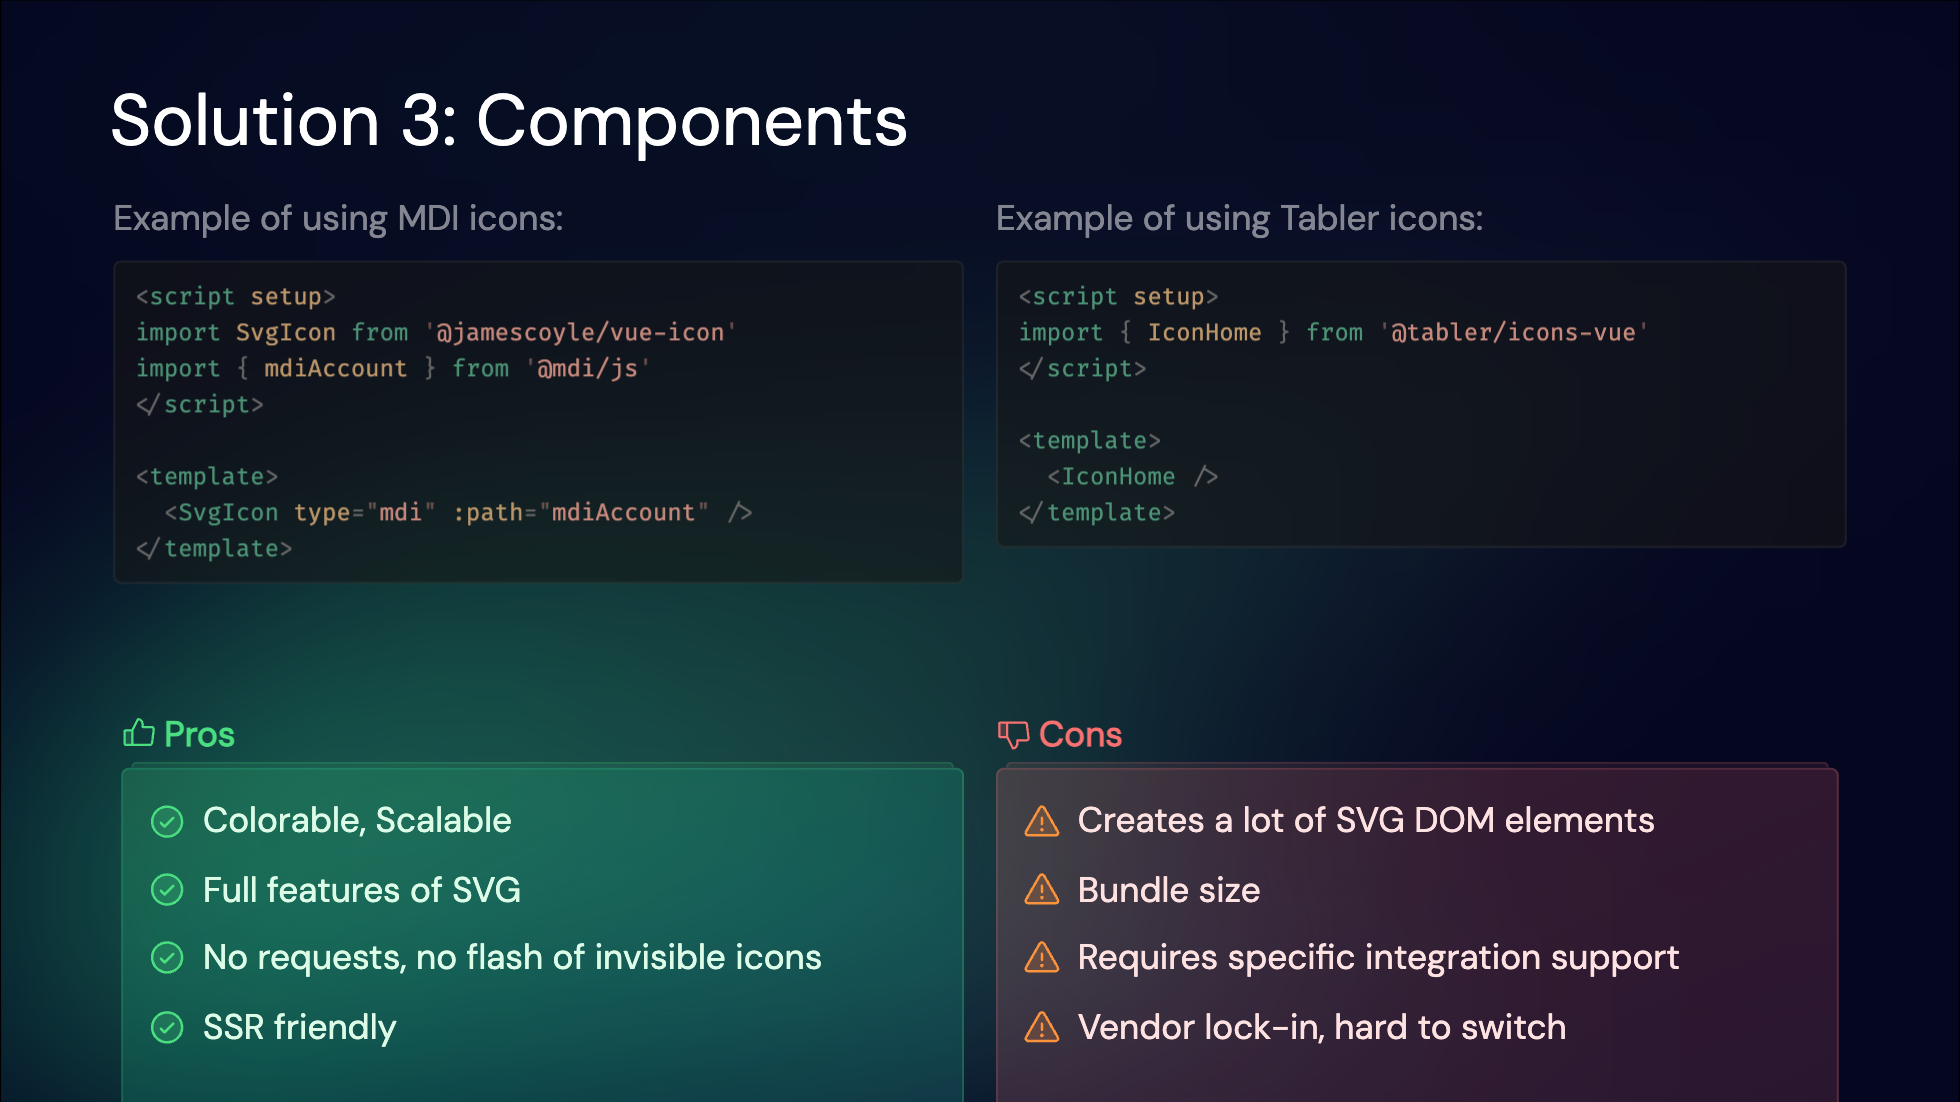{className="border,border-gray-200,dark:border-gray-700,rounded-lg"}
However, this method has its downsides. It generates numerous SVG DOM elements, which can impact performance when many icons are used. It also increases the bundle size and requires specific integration support for each icon set and framework combination, leading to a degree of vendor lock-in. This makes it challenging to switch to a different icon set or framework.
Despite these trade-offs, this approach is widely adopted today, as switching icon sets or frameworks is not a frequent necessity for most projects.
---
### 4. Iconify Runtime: Dynamic API Access
[Iconify](https://iconify.design/){rel="nofollow"} revolutionized icon usage by aggregating over 200,000 icons across 100+ collections. Its runtime solution dynamically fetched icons via an API, enabling dynamic access to any icon without pre-bundling.
This is a great fit for rendering icons from user-provided content or other dynamic content that you don't know at build time. And it's super easy to set up, as you can even use it as a CDN without any build tools.
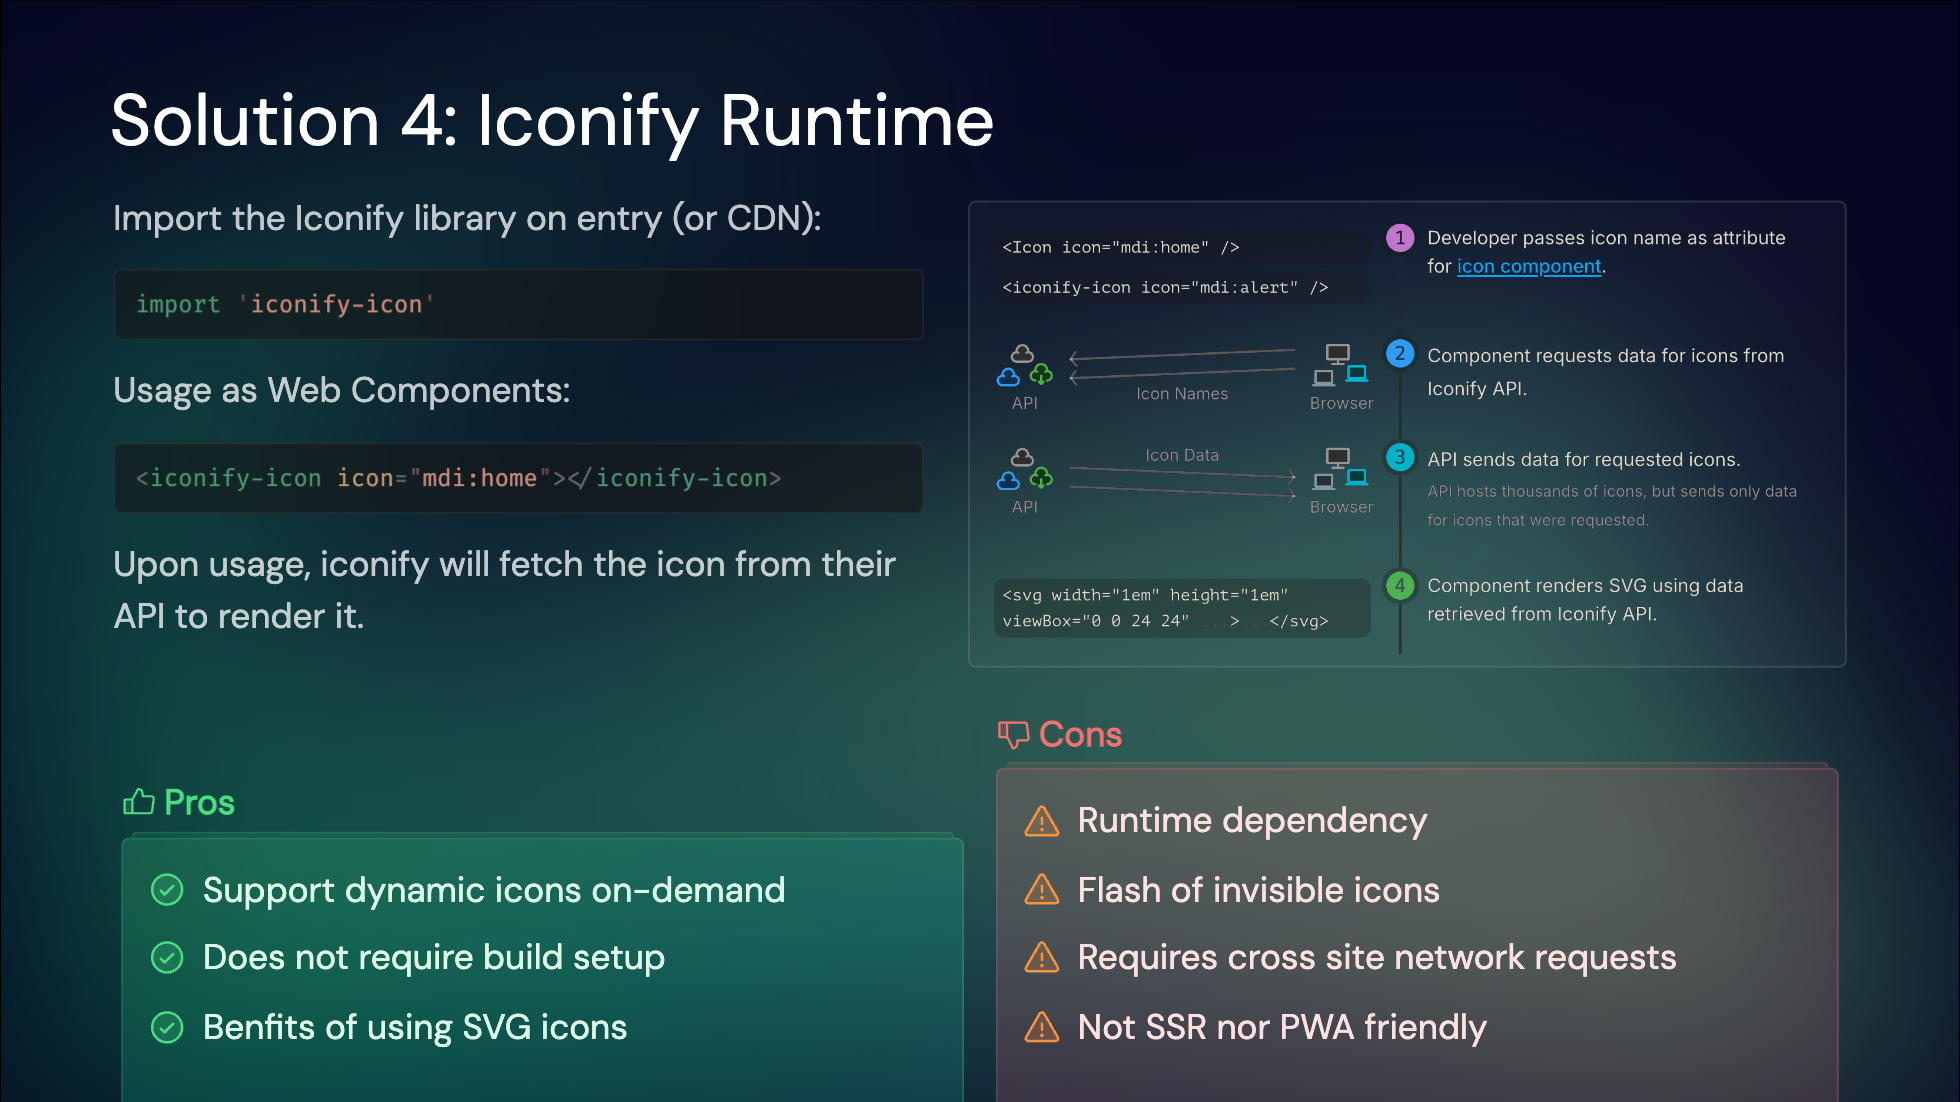{className="border,border-gray-200,dark:border-gray-700,rounded-lg"}
While this method offers great flexibility, it does come with some trade-offs. It introduces runtime dependencies, meaning icons will only render after JavaScript is loaded and the icon data is fetched. This approach also poses challenges for server-side rendering (SSR) and caching layers, such as those used in Progressive Web Apps (PWAs).
---
### 5. On-Demand Component Icons
With the unified interface from Iconify and Vite's on-demand approach, we developed [`unplugin-icons`](https://github.com/unplugin/unplugin-icons){rel="nofollow"}. This tool allows you to import any icons as components on-demand.
As an [`unplugin`](https://github.com/unjs/unplugin){rel="nofollow"}, it supports all popular build tools, including Vite, webpack, and rspack. We provide compilers for popular frameworks like Vue, React, Svelte, and Solid. With Iconify, you can use any icon across any framework, minimizing vendor lock-in.
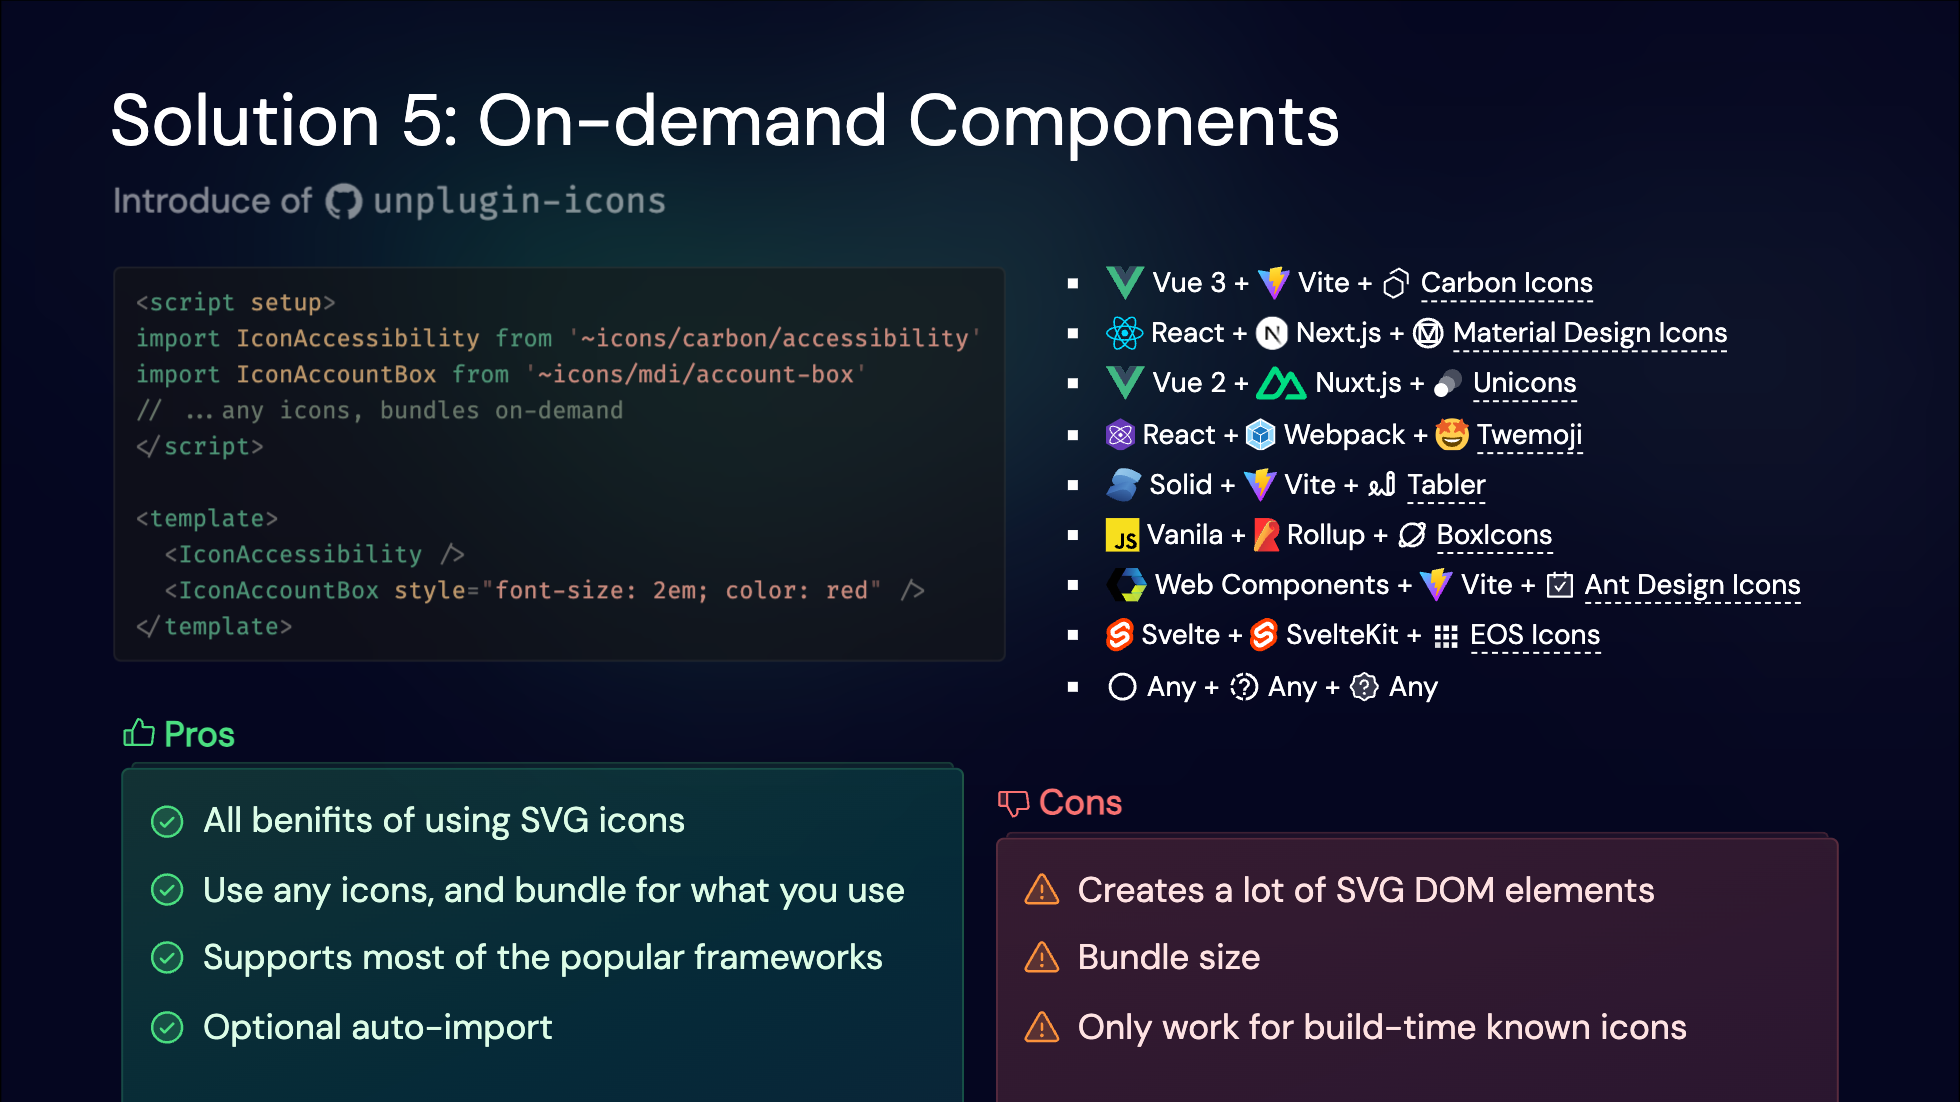{className="border,border-gray-200,dark:border-gray-700,rounded-lg"}
While this technique shares the same pros and cons as previous component icon solutions, the integration with build tools allows us to serve the full Iconify collection while only shipping the icons you actually use. However, runtime concerns like DOM element management still persist.
---
### 6. Pure CSS Icons
As a side-effect of working on [UnoCSS](https://unocss.dev/){rel="nofollow"}, we discovered the potential of embedding icons entirely in CSS, leading to the innovative solution of [Pure CSS Icons](https://antfu.me/posts/icons-in-pure-css){rel="nofollow"}.
This method involves inlining SVG icons as data URLs and providing a single class to display the icons. With some tweaks, these icons become colorable, scalable, and even capable of displaying SVG animations.
Browsers can cache the CSS rules, and each icon requires only **one DOM element** to render. This approach ships the icons in a single CSS file with no additional requests. Since it's pure CSS, the icons display along with the rest of your UI, require zero runtime, and work naturally with SSR—your server doesn't need any extra work on the server side.
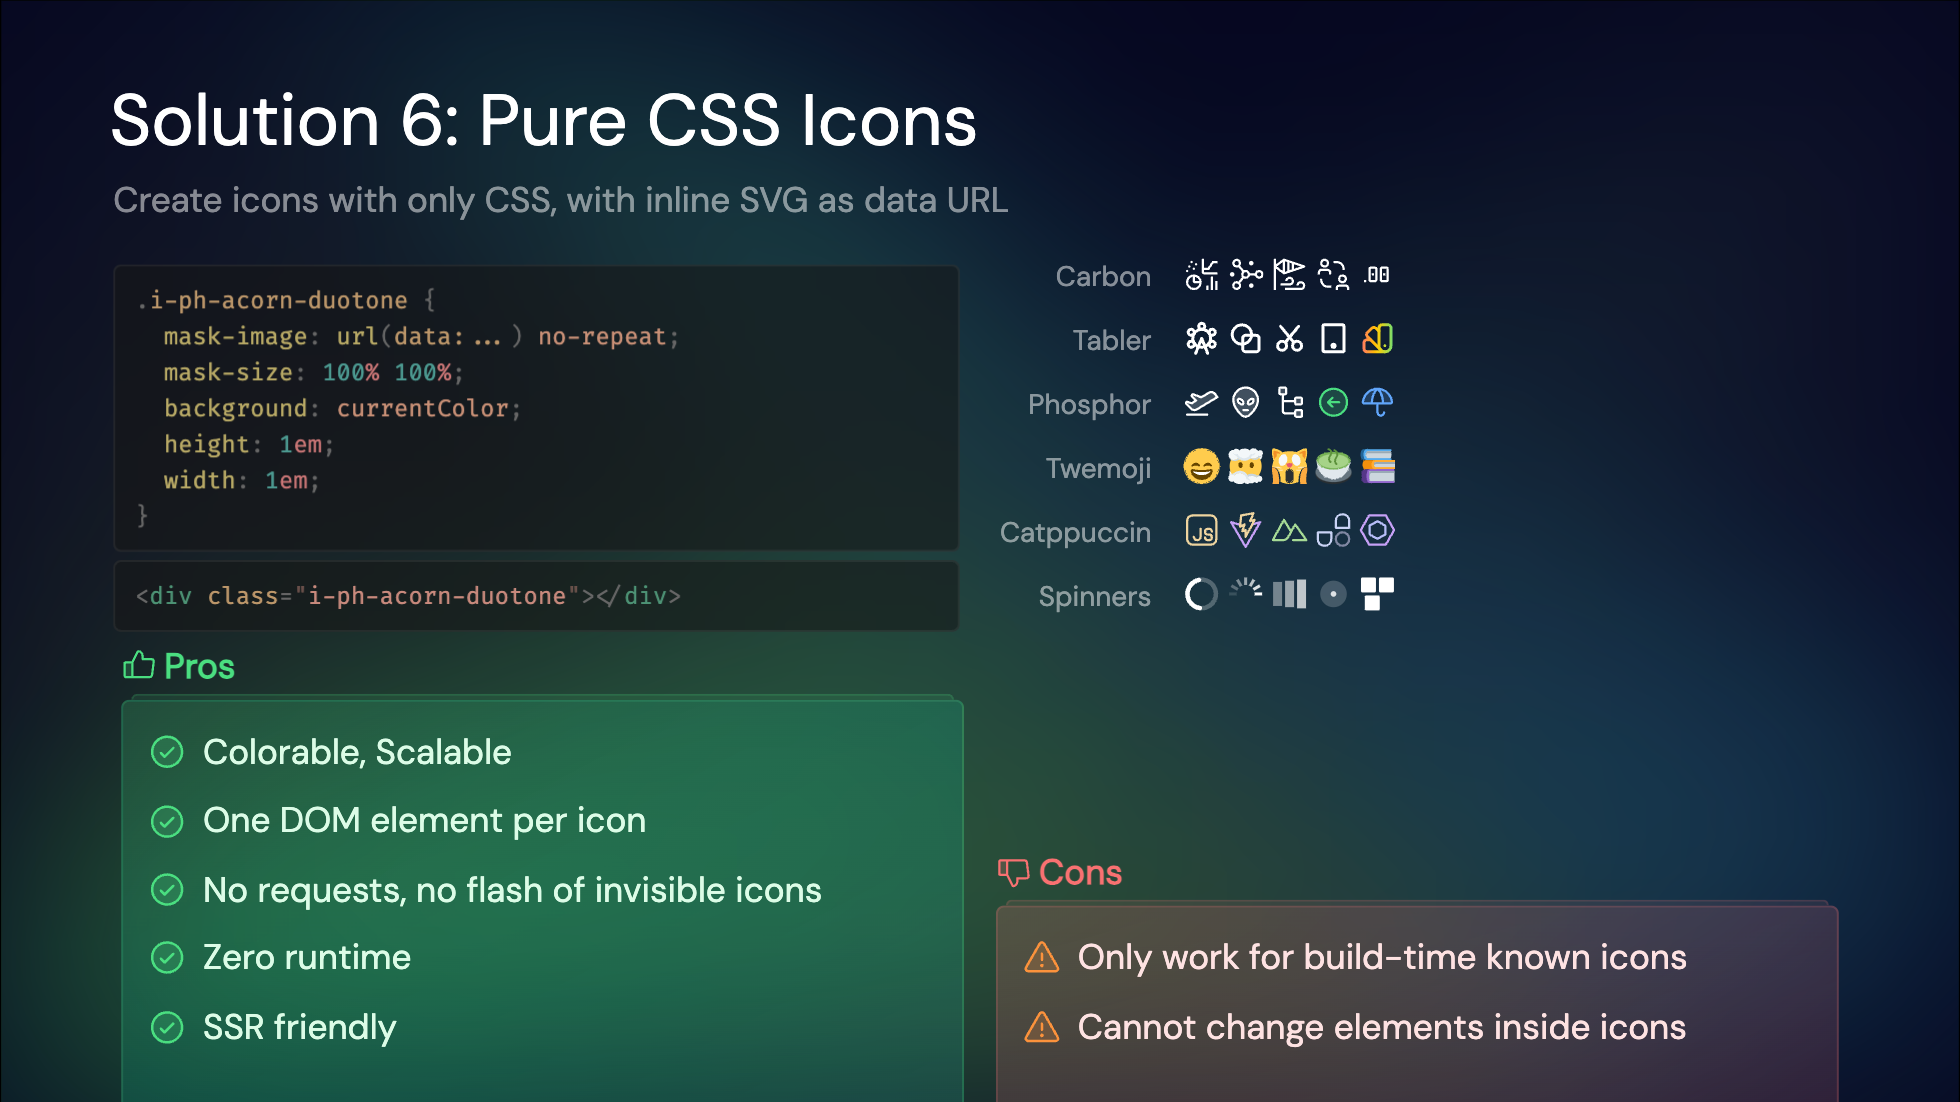{className="border,border-gray-200,dark:border-gray-700,rounded-lg"}
The only downsides are the lack of full customization for elements inside the SVG and the need to bundle icons at build-time, which isn't dynamic.
---
## The Challenges to Integrate in Nuxt
While I would say that the [Pure CSS Icons](https://nuxt.com/#_6-pure-css-icons) and [On-demand Component Icons](https://nuxt.com/#_5-on-demand-component-icons) would be pretty sufficient for most of the static usages, Nuxt as a full featured framework, has a bit more requirements to integrate icons efficiently:
- **SSR/CSR**: Nuxt works in both server-side rendering (SSR) and client-side rendering (CSR) modes. We care a lot about the end user experience, and we want to ensure that icons are rendered instantly without flickers.
- **Dynamic Icons**: In integrations like [Nuxt Content](https://content.nuxt.com/){rel="nofollow"}, the content can be provided at runtime or from external sources, which we are not aware at build time. We want to ensure we have the capability to integrate with those cases well.
- **Performance**: We want to ensure that the icons are bundled efficiently, and the loading of icons is optimized for the best performance.
- **Custom Icons**: While Iconify provides a wide range of icons for selection, we also aware it's pretty common for projects to have their own icon sets, or wanted to use paid icons that are not available in Iconify. Supporting custom icons is crucial for our users.
{className="border,border-gray-200,dark:border-gray-700,rounded-lg"}
With these requirements in mind, let's revisit the solutions we discussed earlier and see how they stack up.
For dynamic icons, the Iconify Runtime stands out as a viable option. It allows for dynamic fetching of icons, making it suitable for content that isn't known at build time. However, it has its drawbacks. The reliance on runtime dependencies means it doesn't integrate seamlessly with SSR, and it doesn't support custom icons since the requests are directed to Iconify's servers, which don't have access to our local icon setup.
Conversely, Pure CSS Icons offer excellent performance and SSR compatibility. They ensure icons are rendered instantly without flickers and are bundled efficiently. However, they fall short when it comes to dynamic icons, as they need to be bundled at build time and lack the flexibility to adapt to runtime content changes.
Balancing these trade-offs is indeed challenging. So, why not leverage the strengths of both approaches? By understanding these trade-offs, we can better appreciate the balanced solution that Nuxt Icon v1 offers.
---
## Introducing Nuxt Icon v1: The Balance of Both Worlds
With the flexibility of the Nuxt Module system, Nuxt Icon combines the best of both worlds: the instant rendering of CSS icons and the dynamic fetching of Iconify icons. This dual approach provides a versatile, modern, and customizable icon solution that seamlessly adapts to your project's needs.
### Dual Rendering Modes
To address the trade-offs in rendering approaches, Nuxt Icon introduces a versatile `<Icon>` component that supports both CSS and SVG modes, both of which are SSR-friendly. Depending on your customization needs, you can switch between these modes for each icon.
In CSS mode, icons are included in the CSS during SSR, ensuring they render instantly without any runtime cost. In SVG mode, icons are inlined as HTML during SSR, providing the same immediate rendering benefits. Both approaches ensure that icons appear on the initial screen without any delay, offering a seamless user experience.
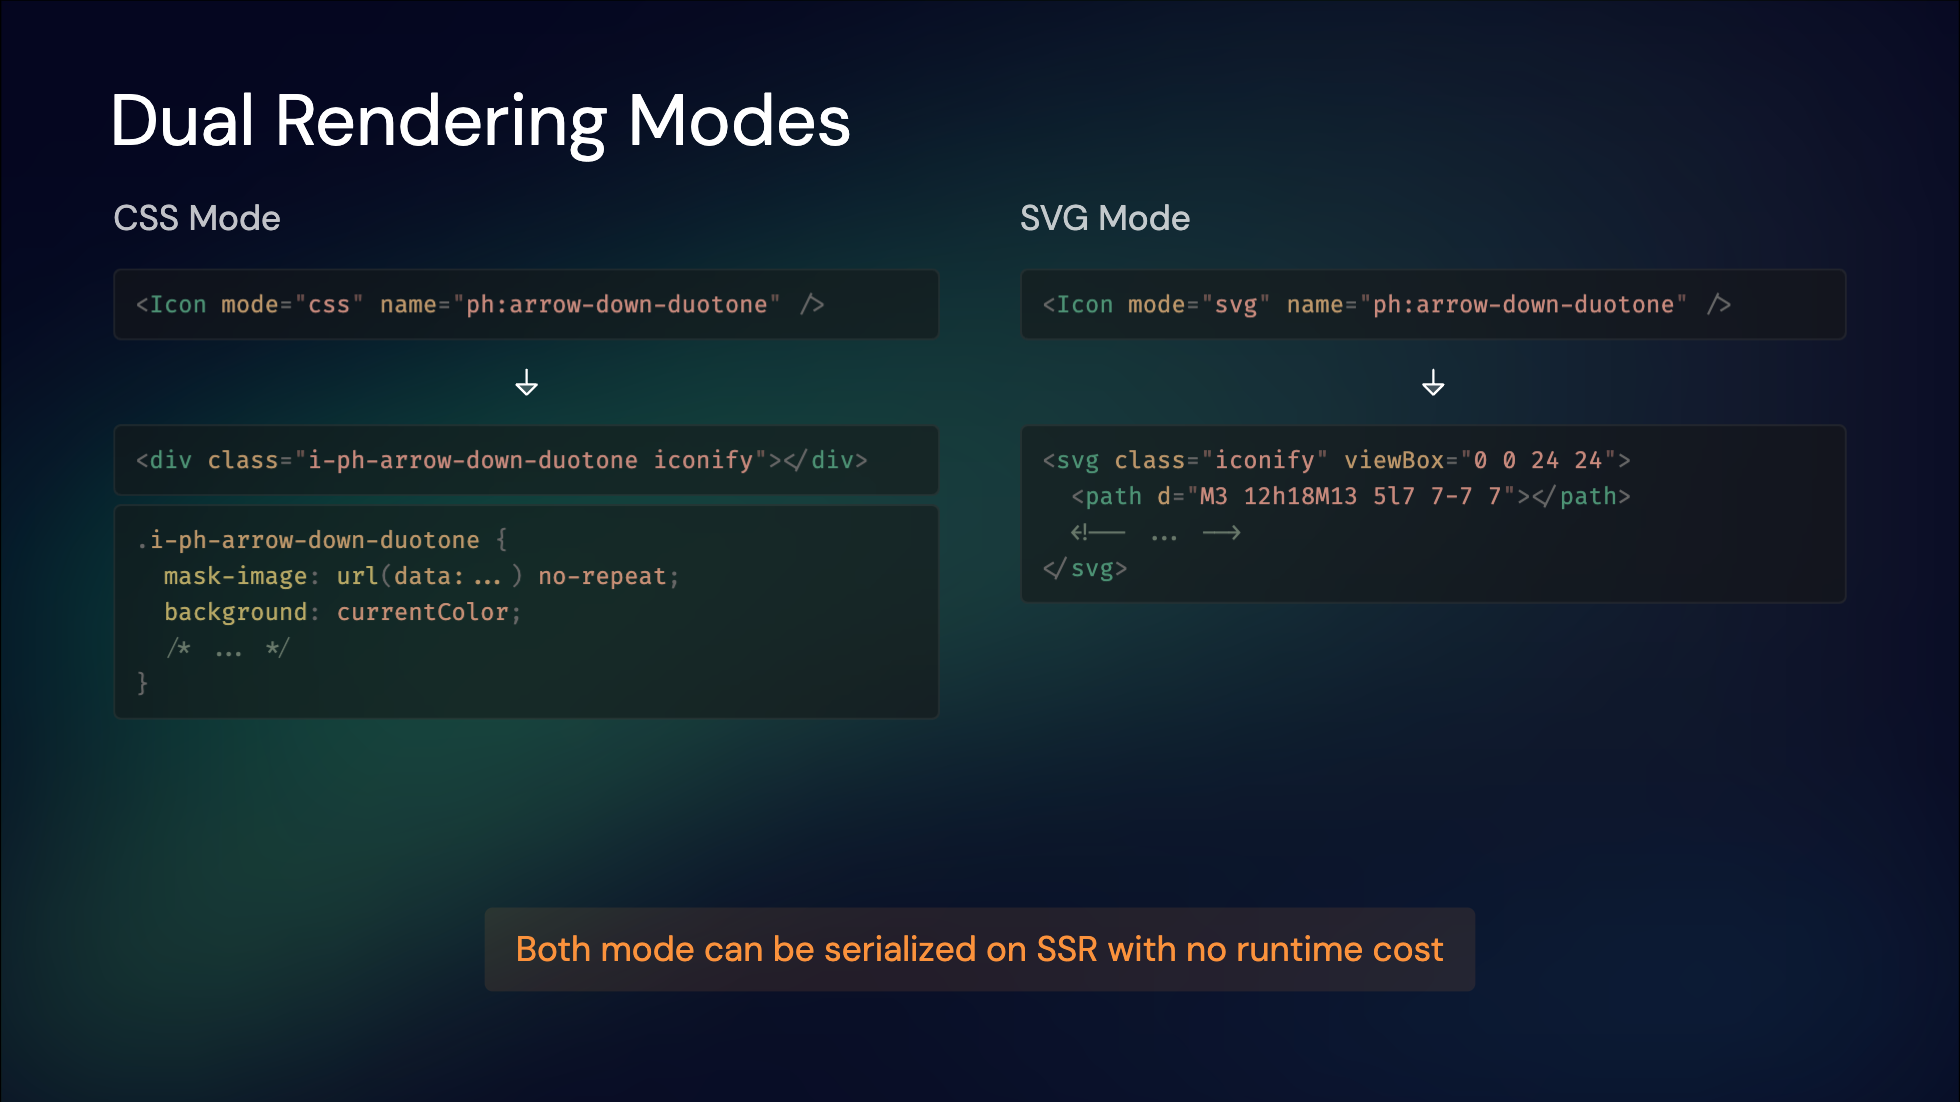{className="border,border-gray-200,dark:border-gray-700,rounded-lg"}
---
### Icon Bundles
Dynamic icons present unique challenges, especially when it comes to loading them efficiently. To address this, we leverage Iconify's API, which allows us to serve any icon on demand via network requests. However, relying solely on this API can introduce delays, especially if the servers are geographically distant from your users.
To mitigate this, we introduced the concept of Icon Bundles. We can bundle frequently used icons directly into the `Client Bundle`. This ensures that these icons render instantly without additional network requests. However, bundling all possible icons isn't feasible due to the potential increase in bundle size.
Given that Nuxt is a full-stack framework, we can strike a balance by introducing a `Server Bundle`. On the server side, bundle size is less of an issue, allowing us to include a more extensive set of icons. During SSR, these icons can be fetched quickly and sent to the client as needed. This setup ensures high performance for commonly used icons while still providing the flexibility to serve any icon from Iconify as a fallback.
By combining client-side bundling for static icons and server-side bundling for dynamic icons, we achieve an optimal balance between performance and flexibility.
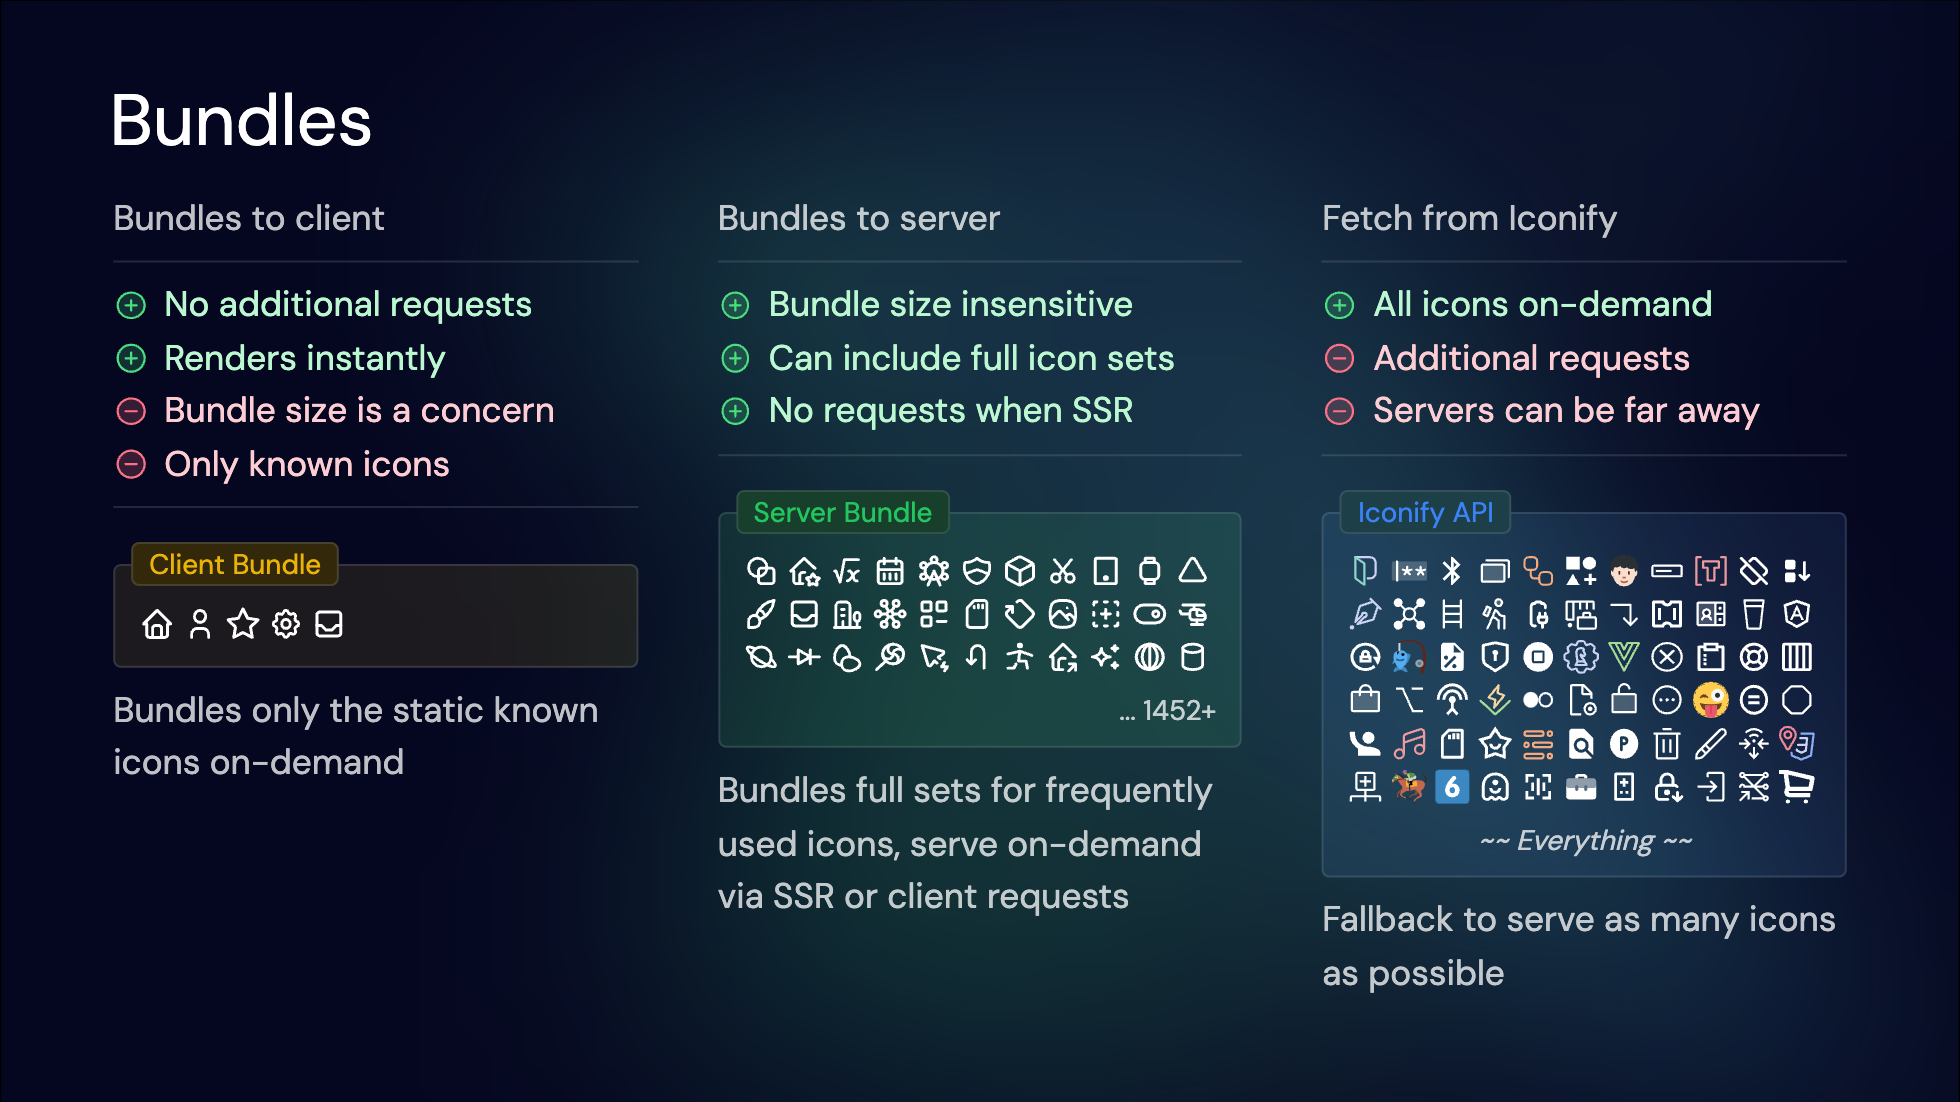{className="border,border-gray-200,dark:border-gray-700,rounded-lg"}
---
### Data Flow
Here is a data flow diagram illustrating how Nuxt Icon requests icon data:
1. You use the `<Icon>` component and provide the icon `name`.
2. Nuxt Icon will first check if the icon is available in the `Client Bundle`, or the SSR payload (icons that are known at SSR will be presented in the payload). If so, the icon will be rendered instantly.
3. If the icon is not available on the client side, Nuxt Icon will fetch the icon data from the server API shipped along with your Nuxt app. Inside the server endpoint, it will query from the `Server Bundle` to see if the icon is available.
4. Between that, there are multiple cache systems involved. Server endpoint cache, HTTP cache, and client-side cache to ensure the icon is fetched efficiently and quickly. Since icon data does not change frequently, we use hard cache strategies to ensure the best performance.
5. When the icon is unknown to both the client and server (dynamic icons), the server endpoint will fallback to the Iconify API to fetch the icon data. Since the server endpoint is cached, the Iconify API will be called only once for each unique icon regardless of how many clients are requesting it, to save resources on both sides.
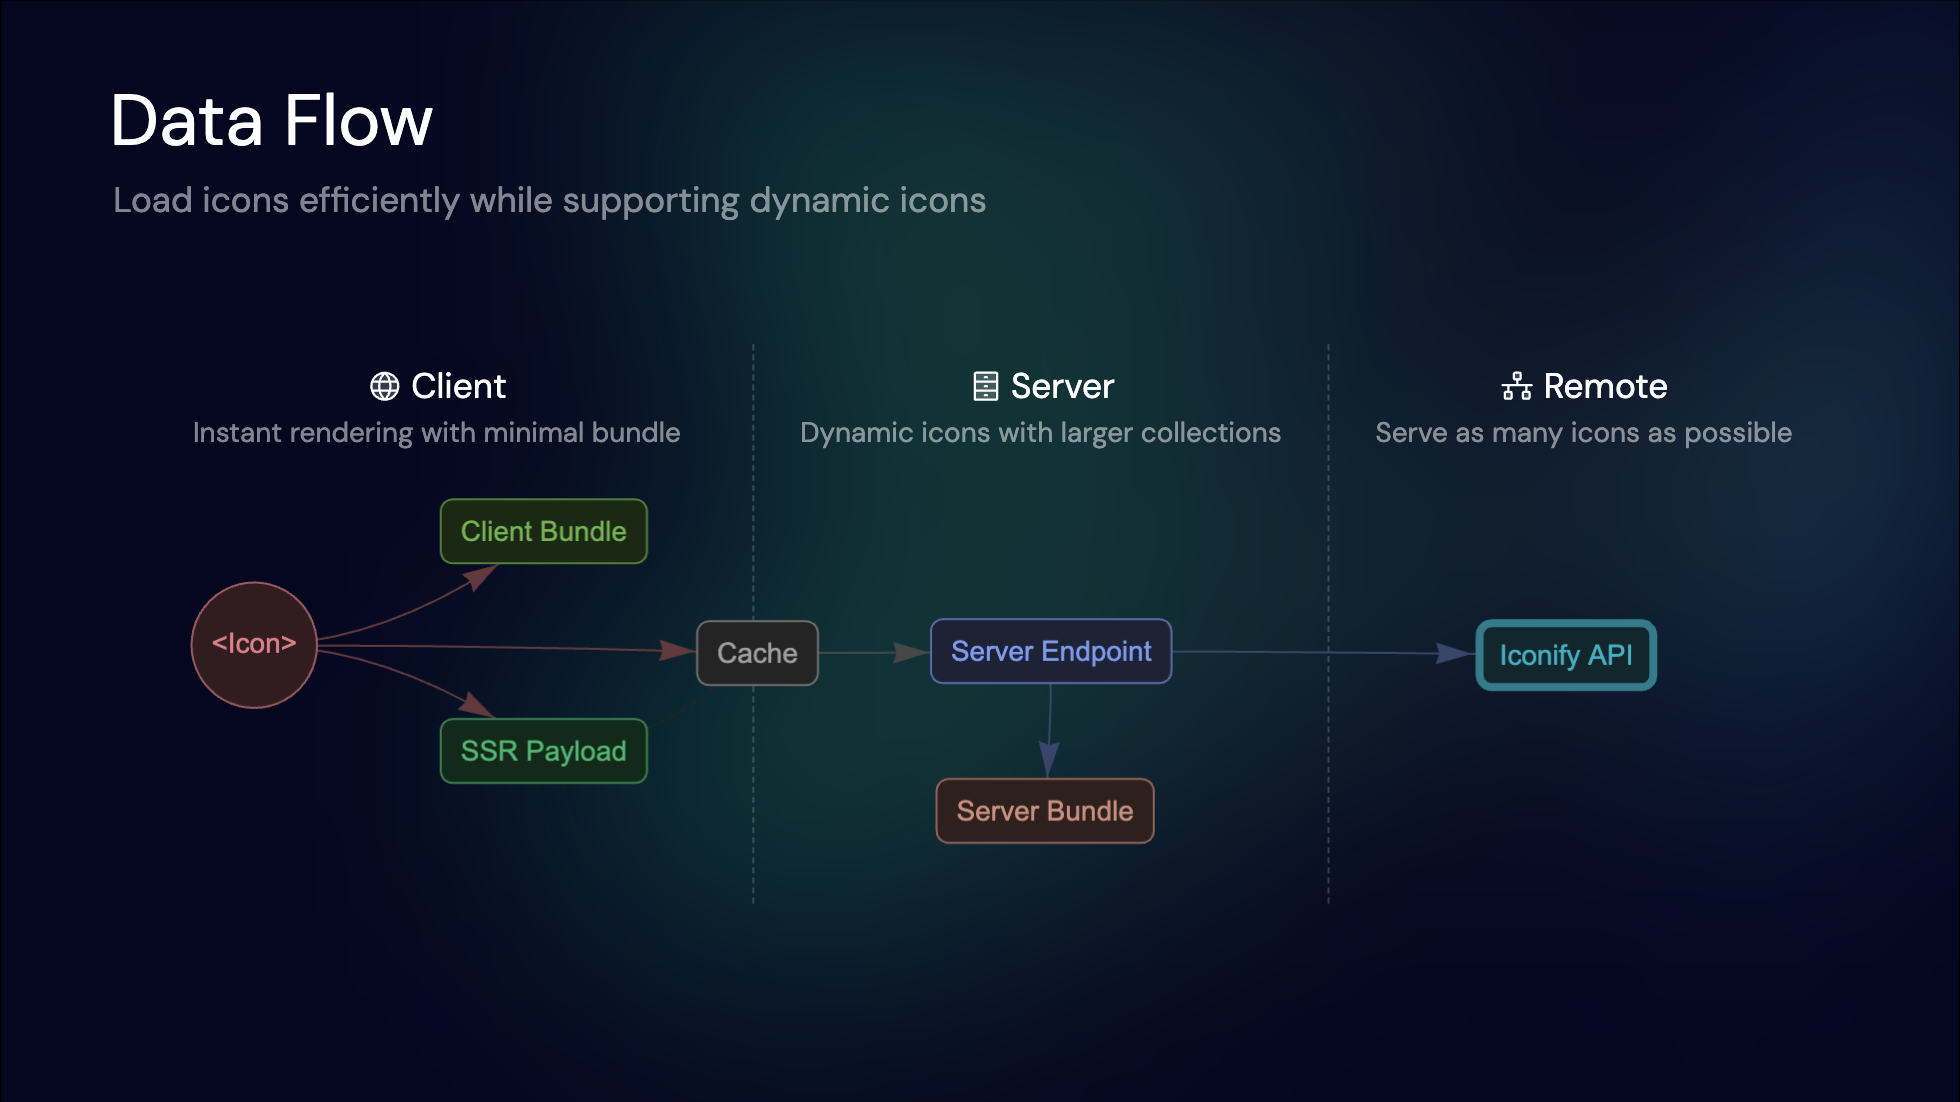{className="border,border-gray-200,dark:border-gray-700,rounded-lg"}
This layered approach ensures efficient icon delivery, balancing speed and flexibility, while being as dynamic as possible. And balance out the trade-offs between each solution.
---
## Try Nuxt Icon Today
Nuxt Icon v1 represents the culmination of years of innovation in icon rendering. Whether you’re building a dynamic app, a static website, or anything in between, Nuxt Icon adapts to your needs.
It’s easy to add Nuxt Icon to your project by running the following command:
```bash
npx nuxi module add icon
```
Then, import the `<Icon>` component in your Vue components, providing icon `name` following [Iconify's conventions](https://iconify.design/docs/icons/icon-basics.html){rel="nofollow"}:
```vue
<template>
<Icon name="i-lucide-activity" />
</template>
```
Explore more with the [documentation](https://github.com/nuxt/icon){rel="nofollow"}, experiment with its features, and let us know your thoughts. We’re excited to see how Nuxt Icon transforms your projects!
**Happy Nuxting ✨**
# Introducing Nuxt DevTools
We announced the preview of [Nuxt DevTools](https://github.com/nuxt/devtools){rel="nofollow"} on [Vue Amsterdam 2023](https://vuejs.amsterdam/){rel="nofollow"}, a new tool to help you understand your Nuxt app and improve the developer experience even further. Today we released a new minor version [`v0.3.0`](https://github.com/nuxt/devtools/releases/tag/v0.3.0){rel="nofollow"} with a bunch of updates and improvements.
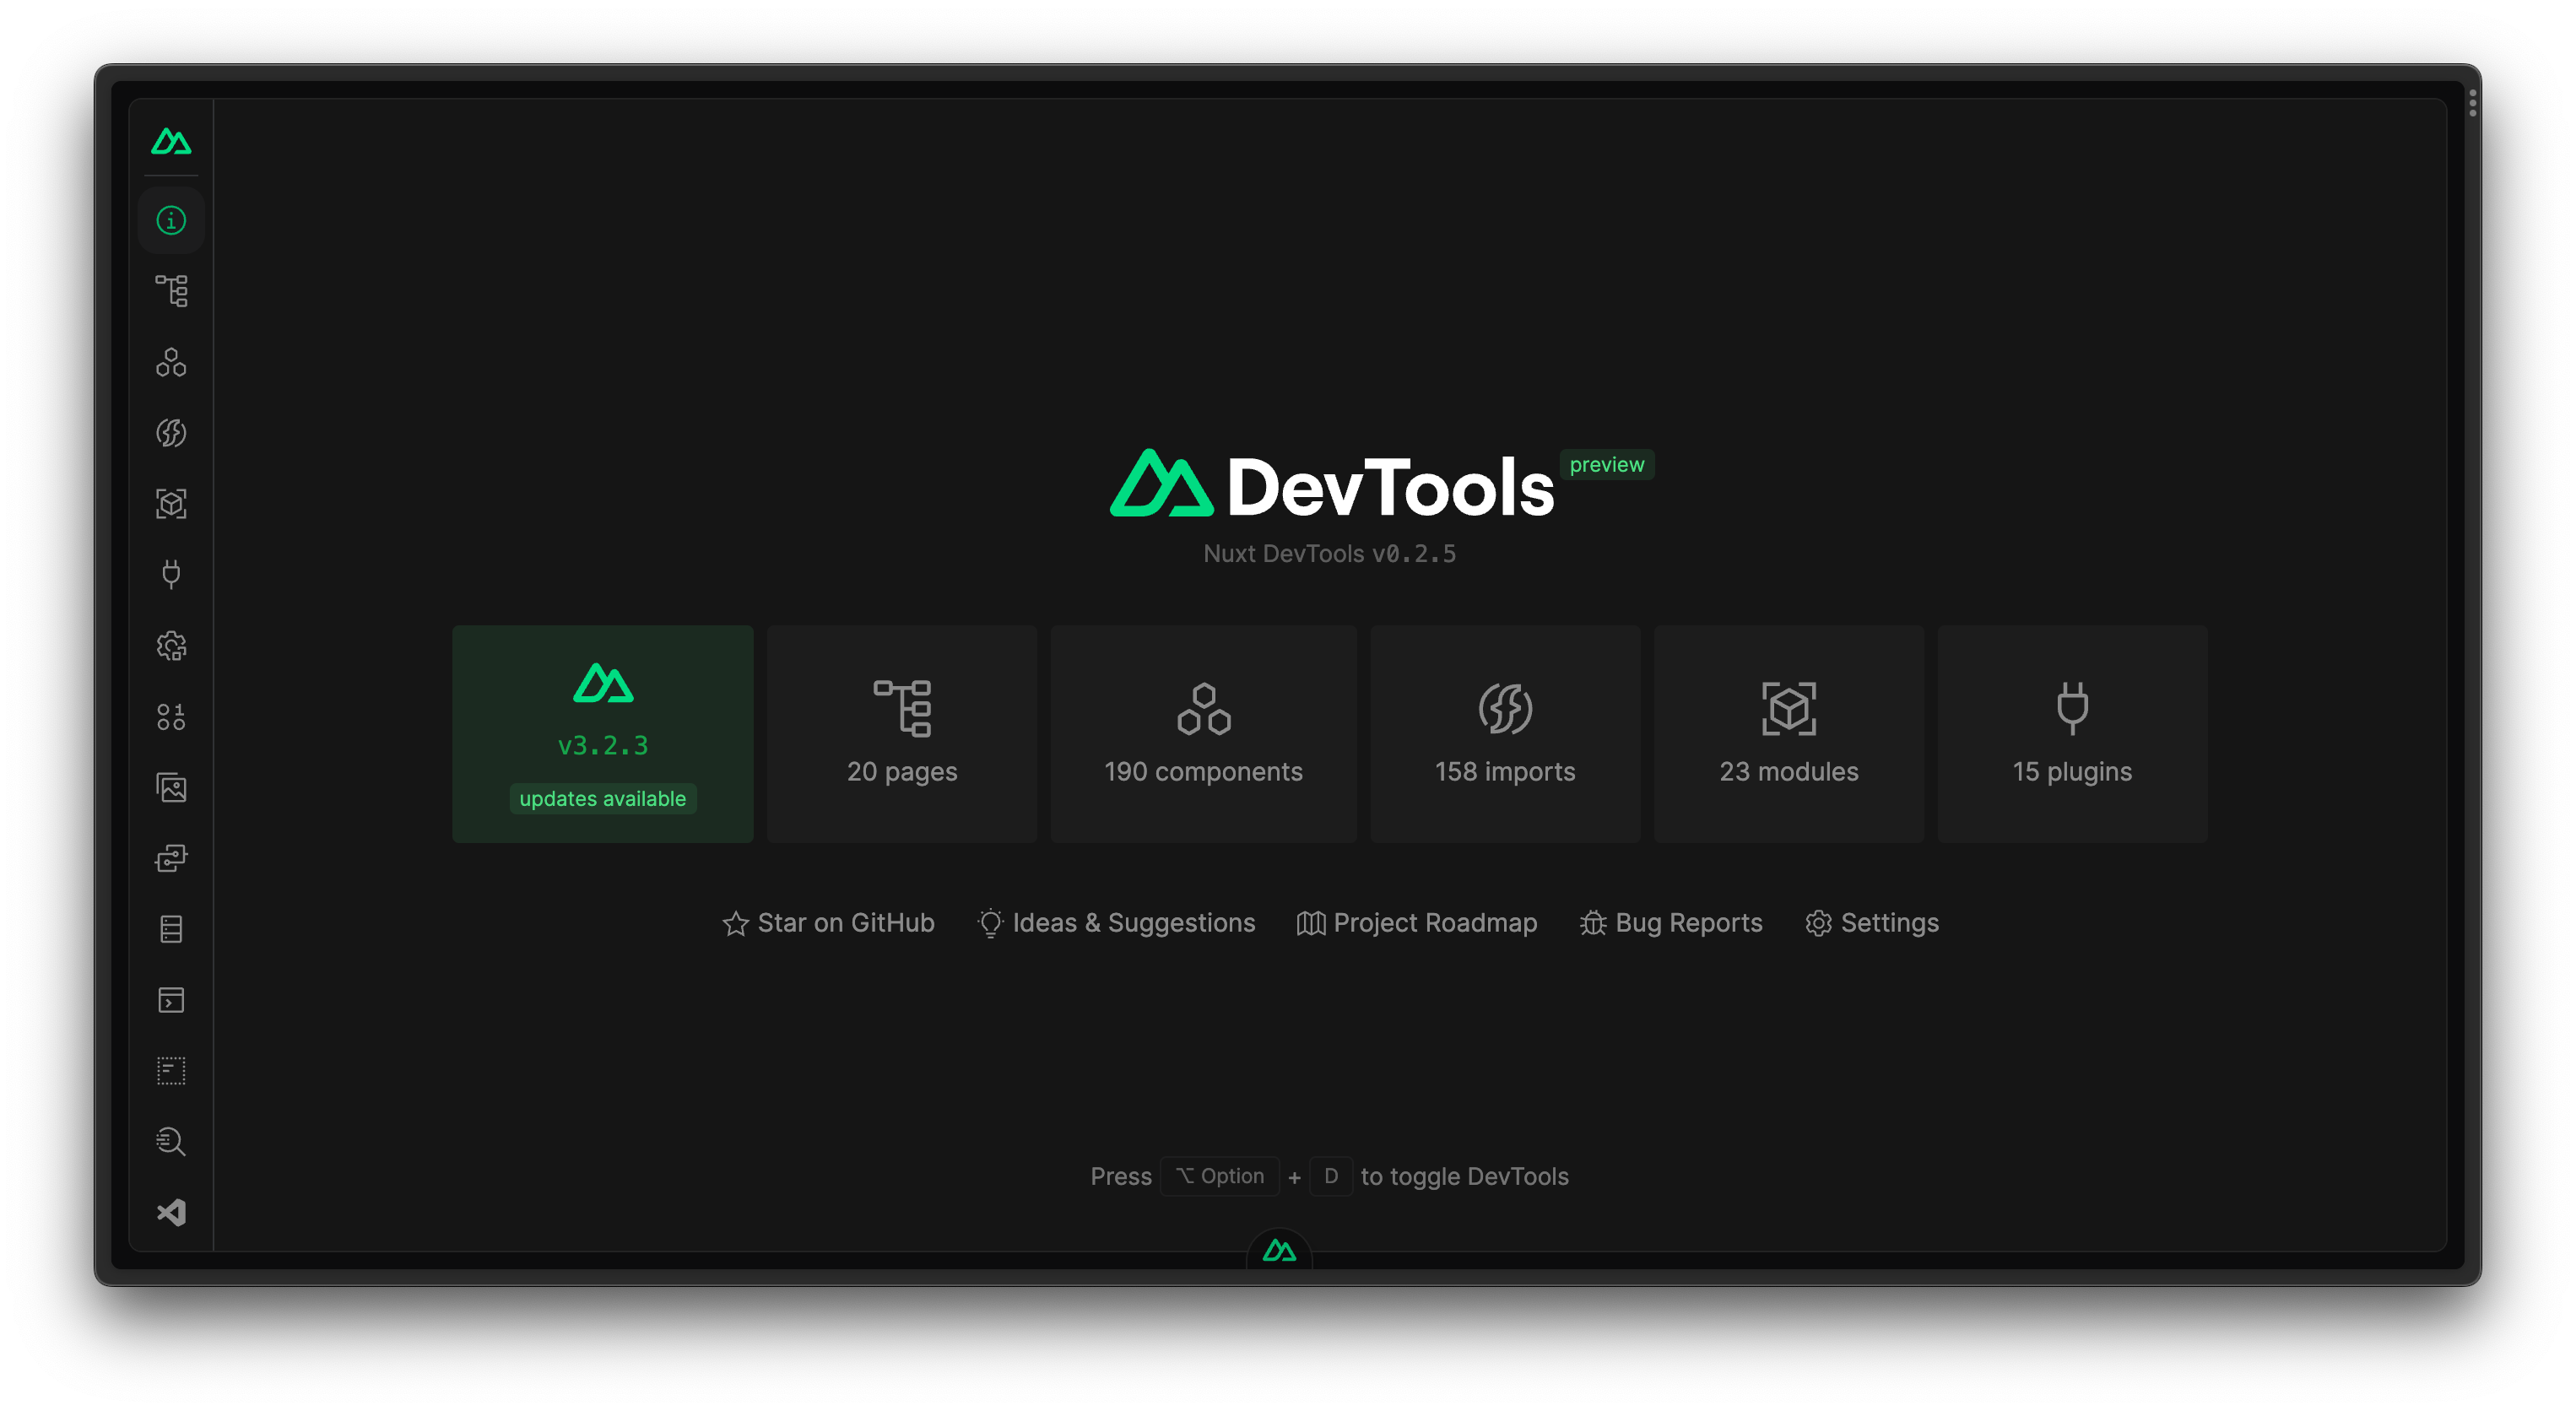
In this post, we will explore the reasons behind the creation of Nuxt DevTools, how it can enhance your development experience, and what you can expect in the future.
## Developer Experience
Over the recent years, there has been an increasing focus on Developer Experience (DX). Tools and frameworks have been striving to improve the DX. Along the way, Nuxt introduced many innovative features and conventions to make your day-to-day development easier and more efficient.
In Nuxt 3, we switched to [Vite](https://vitejs.dev/){rel="nofollow"} as the default bundler for the instant hot module replacement (HMR) during developement, creating a faster feedback loop to your workflow. Additionally, we have introduced [Nitro](https://github.com/unjs/nitro){rel="nofollow"}, a new server engine that allows you to deploy your Nuxt app to any hosting service, such as [Vercel](https://vercel.com){rel="nofollow"}, [Netlify](https://netlify.com){rel="nofollow"}, [Cloudflare](https://cloudflare.com){rel="nofollow"} and [more](https://nitro.unjs.io/deploy){rel="nofollow"} **with zero-config**.
Nuxt offers many common practices built-in:
- Write TypeScript and ESM out-of-the-box throughout your codebase.
- Build single-page applications (SPA), server-side rendering (SSR), static site generation (SSG), or [hybrid them **per routes**](https://nuxt.com/docs/guide/concepts/rendering#route-rules) - using the same codebase isomorphically without any explicit setup.
- Use several composables, like [`useState`](https://nuxt.com/docs/api/composables/use-state) and [`useAsyncData`](https://nuxt.com/docs/api/composables/use-async-data) for sharing states accessible across the server and client sides.
- Leverage SEO utilities, like [`useHead`](https://nuxt.com/docs/api/composables/use-head) and [`useSeoMeta`](https://nuxt.com/docs/getting-started/seo-meta#useseometa) to make meta-tags management a breaze.
Moreover, features such as the [layout system](https://nuxt.com/docs/guide/directory-structure/layouts), [plugins](https://nuxt.com/docs/guide/directory-structure/plugins), route [middleware](https://nuxt.com/docs/guide/directory-structure/middleware), and other tools make app creation easier and codebases more organized.
Conventions like [file-based routing](https://nuxt.com/docs/guide/directory-structure/pages) and [file-based server APIs](https://nitro.unjs.io/guide/introduction/routing){rel="nofollow"} making the routing intuitive and effortless.
[Components auto-imports](https://nuxt.com/docs/guide/directory-structure/components) makes it easy to create shared components that are directly available in any Vue file. Unlike global components, they are code-splitted. We also introduced [composables auto-import](https://nuxt.com/docs/guide/concepts/auto-imports), where all APIs from Vue are directly available. Nuxt modules can also provide their custom composables to be auto-imported, as well as your [local composables](https://nuxt.com/docs/guide/directory-structure/composables).
Recently, we introduced client and server-only components, which can be used by adding `.client` and `.server` to the filename. All these conventions are fully typed and developers can even have type autocomplete when doing route navigation or fetching data from APIs. **These conventions significantly reduce boilerplate code, avoid duplications, and improve productivity.**
When it comes to ecosystem, Nuxt has a large community of developers building modules around it, [with hundreds of high-quality modules](https://nuxt.com/modules) available. Modules allow developers to get integrations for features they want without worrying about configuration or best practices.
## The Problem
Nuxt is capable of creating a large scale application at ease, however there is one problem: **the lack of transparency**.
For every new feature and convention we introduce, we are adding a bit more abstraction to the framework.
Abstractions are great things to transfer implementation complexity and make things easier to get more focus when building. On the other hand, they can also add extra burden for users to learn and understand what's going on under the hood. Leading also to implicitness, like where a auto-imported component is from, or how many modules is using a certain component, etc. It can also make things hard to debug.
This might be considered as a trade-off of any tools, you have to learn and understand the tool to use it with efficiency. Despite improving the documentation and providing more examples, **we believe of an opportunity to improve the lack of transparency**.
## Introducing Nuxt DevTools
[Nuxt DevTools](https://github.com/nuxt/devtools){rel="nofollow"} is a visual tool to help you understand your Nuxt app and improve the developer experience even further. It's created to provide a better transparency of Nuxt and your app, find performance bottlenecks and help you manage your app and configuration.
It is shipped as an experimental module and provide the views right inside your app. Once installed, it will add a small icon on the bottom of your app. Clicking it will open the DevTools panel.
To try it, please refer to the [installation guide](https://devtools.nuxtjs.org/guide){rel="nofollow"}.
### Overview
Shows a quick overview of your app, including the Nuxt version, pages, components, modules, and plugins you are using. **It also check your Nuxt version and allow you to upgrade with a single click.**
:video{autoplay controls autoPlay="true" controls="true" poster="https://res.cloudinary.com/nuxt/video/upload/v1679922926/nuxt3/nuxt-devtools-upgrade_dnfghq.jpg"}
### Pages
The pages tab shows your current routes and provide a quick way to navigate to them. For dynamic routes, it also provide a form to fill with each params interactively. You can also use the textbox to play and test how each route is matched.
:video{autoplay controls autoPlay="true" controls="true" poster="https://res.cloudinary.com/nuxt/video/upload/v1679923373/nuxt3/nuxt-devtools-pages_csjoh0.jpg"}
### Components
Components tab show all the components you are using in your app and where they are from. You can also search for them and go to the source code.

It also provides a graph view that show the relationship between components. You can filter the components to see the dependencies of a specific component. This could help to identify unintended dependencies and improve the performance and bundle size of pages.
You can also use the "Inspector" feature to inspect the DOM tree and see which component is rendering it. Click to go to your editor of the specific line. Making it much easier to make changes, without the requirement of understanding the project structure thoroughly.
### Imports
Imports tab shows all the auto-imports registered to Nuxt. You can see which files are importing them, and where they are from. Some entries can also provide short descriptions and documentation links.
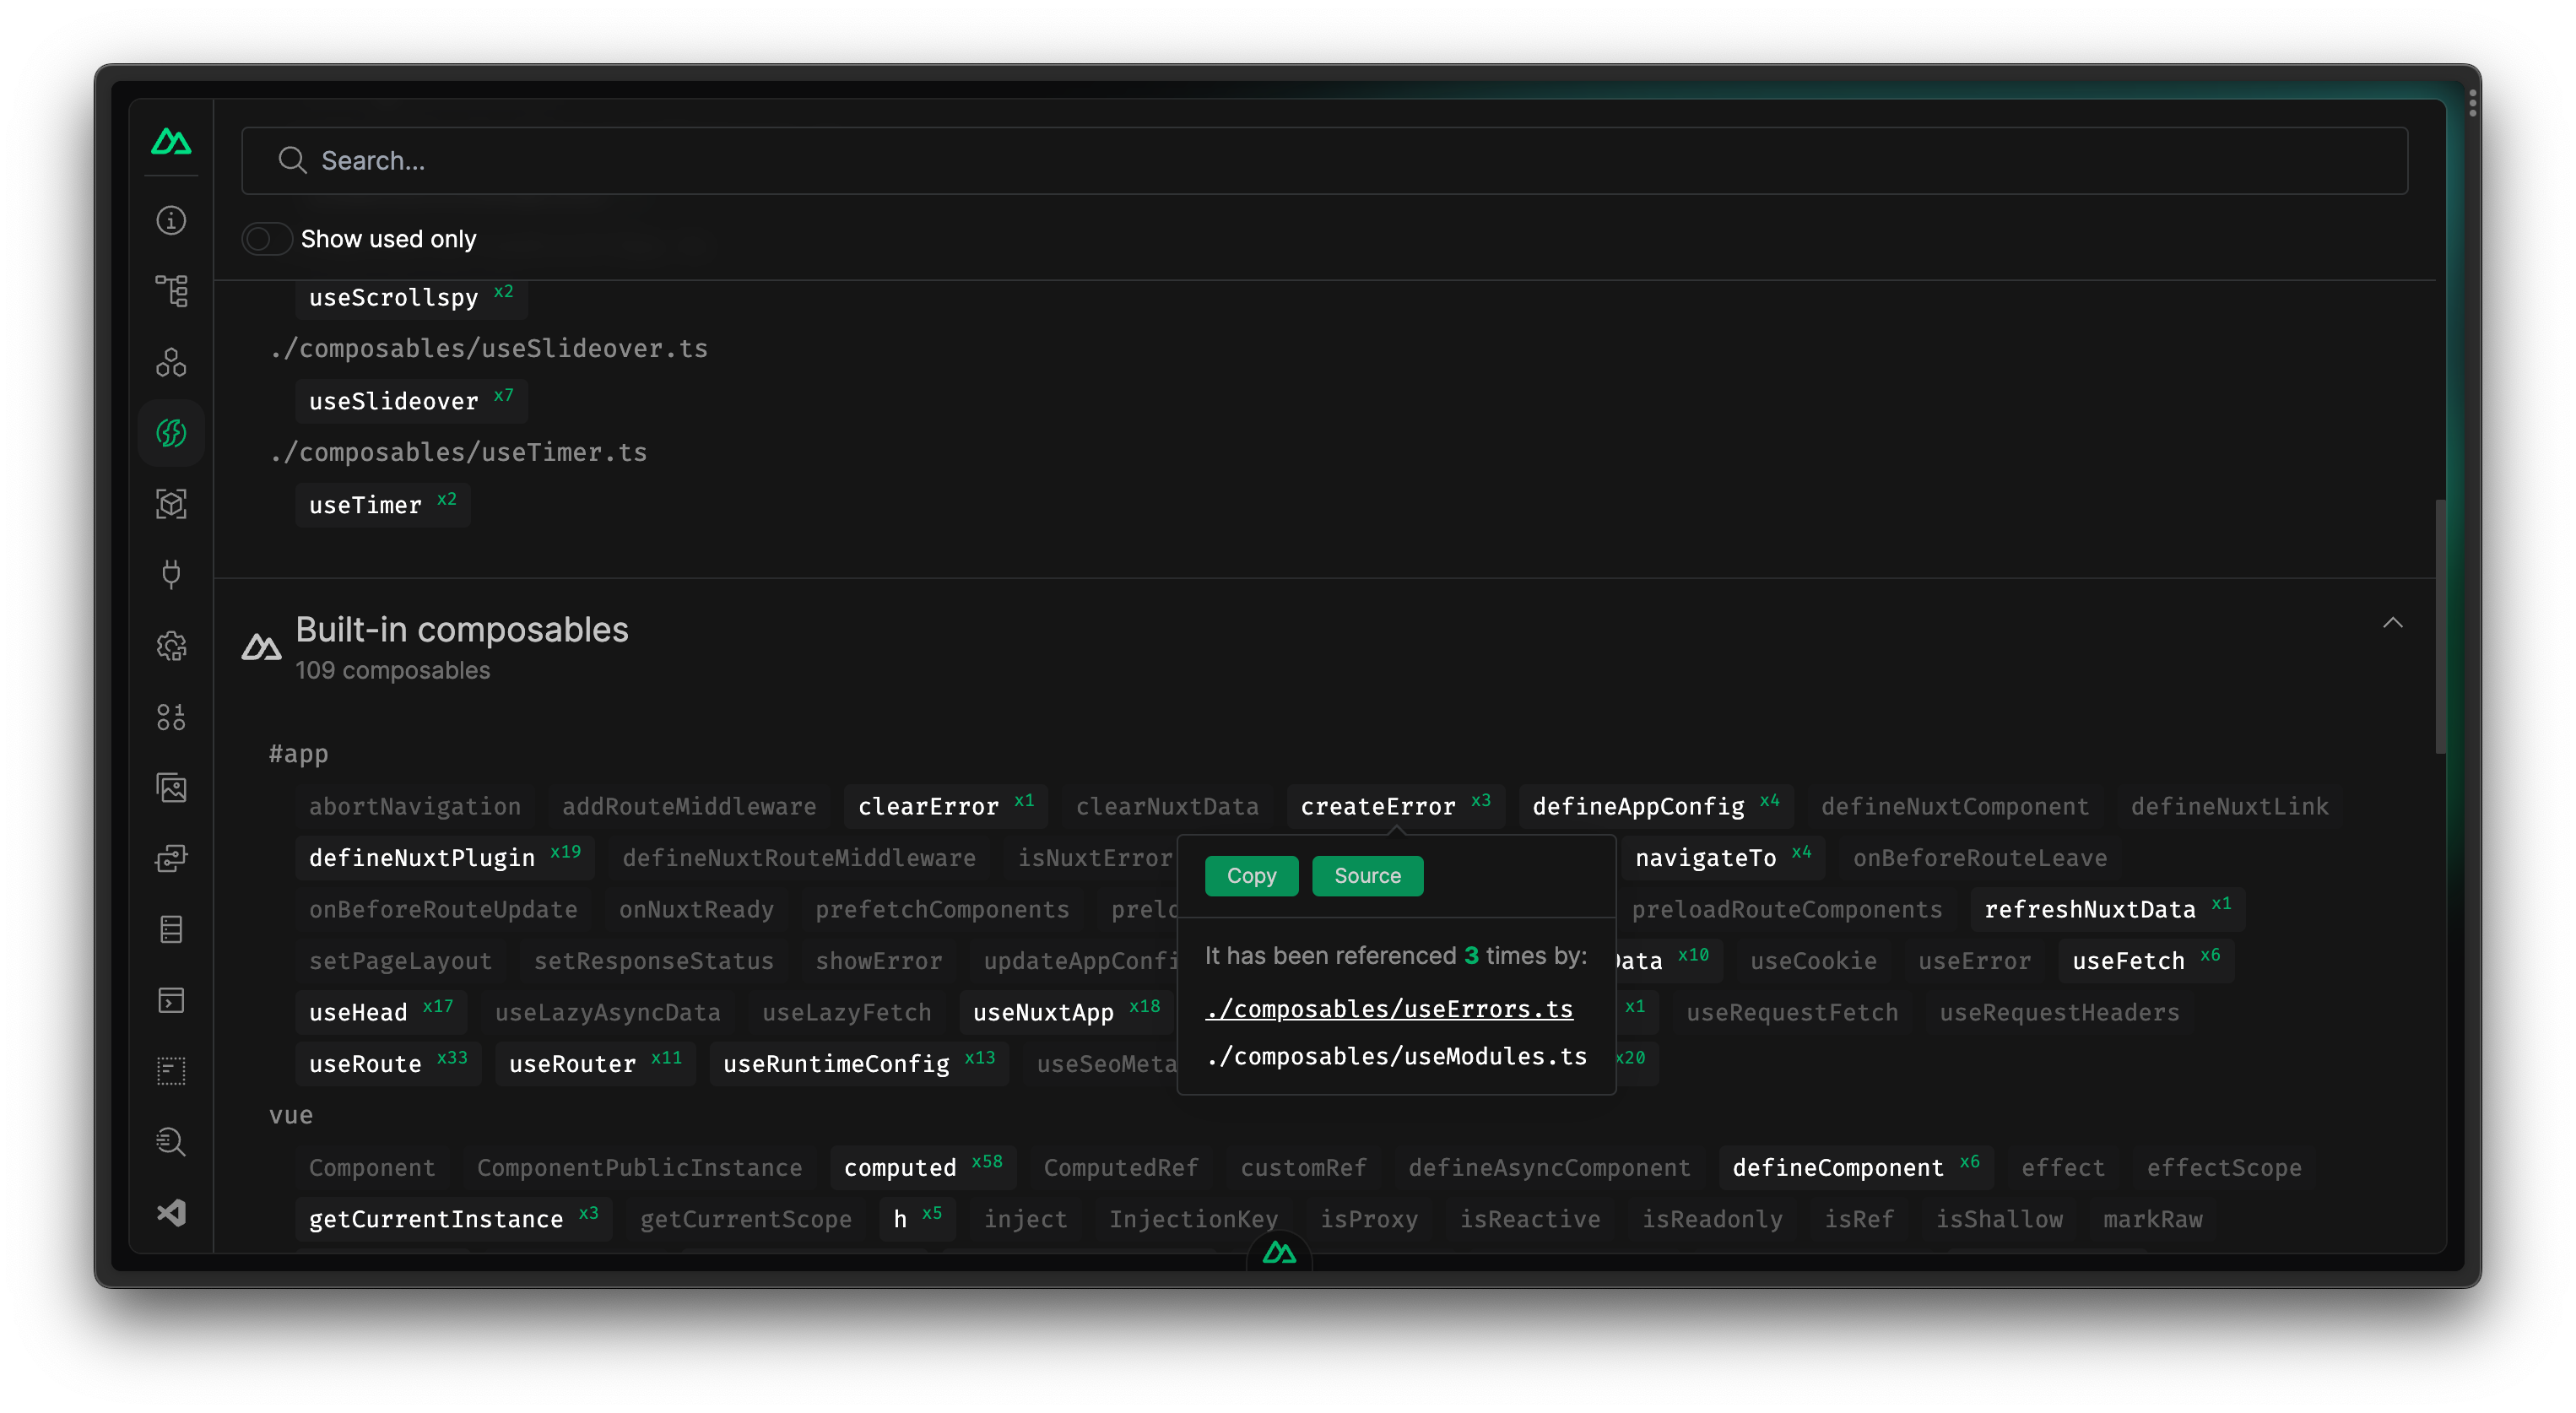
### Modules
Modules tab shows all the modules you have installed and providing the links to their documentation and source code. You can find more modules available in [Nuxt Modules](https://nuxt.com/modules).
Recently we introduce the experimental upgrade feature, which allows you to upgrade your Nuxt or modules with ease. With the [Terminal tab](https://nuxt.com/#terminals), it shows the output of the upgrade process transparently.

### Assets
The assets tab that shows all your static assets and their information. You can copy the paths of the assets, or the code snippets of using them. In the future, with the integrations of [Nuxt Image](https://image.nuxtjs.org/){rel="nofollow"}, you can even optimize images with a single click.
### Plugins
Plugins tab shows all the plugins you are using in your app. As plugins runs before the app is mounted,the time spent in each plugin should be minimal to avoid blocking the app from rendering. The time cost of each plugin provided can be helpful to find performance bottlenecks.

### Hooks
Hooks tab can help you to monitor the time spent in each hook from both client and server side. You can also see how many lisenters registed to each hook, and how many times they have been invoked. This can be helpful to find performance bottlenecks.
### App Config
You can inspect and modify the app config in DevTools, try different configurations and see the effects immediately.
### Payload & Data
This tab shows the state created by [`useState`](https://nuxt.com/docs/api/composables/use-state), [`useAsyncData`](https://nuxt.com/docs/api/composables/use-async-data) and [`useFetch`](https://nuxt.com/docs/api/composables/use-fetch). It can be helpful to understand how the data is fetched and how the state is managed, or change them reactively to see it they affects your app. For `useAsyncData` and `useFetch`, you can also manually the trigger the refetch.
### Terminals
In some integrations, they might require to have subprocesses running to do certain jobs. Before DevTools, you either hide the output of the subprocess entirely and swallow the potential warnings/errors, or pipe to stdout and pollute your terminal with multiple outputs. Now you can now have the outputs in DevTools for each process and clearly isolated.

### Virtual Files
Virtual Files tab shows the virtual files generated by Nuxt and Nitro to support the conventions. This can be helpful for advanced debugging.
### Inspect
Inspect expose the [`vite-plugin-inspect`](https://github.com/antfu/vite-plugin-inspect){rel="nofollow"} integration, allowing you to inspect transformation steps of Vite. It can be helpful to understand how each plugin is transforming your code and spot potential issues.
### VS Code
Thanks to [VS Code Server](https://code.visualstudio.com/docs/remote/vscode-server){rel="nofollow"}, we are able to integrate a **full-featured** VS Code instance into DevTools. You can install extensions and sync your settings. This allows you to get closer feedback loop where you can change the code and see the result immediately without leaving the browser.
### Module Contributed View
With the ecosystem in mind, Nuxt DevTools to designed to be flexible and extendable. Modules could contribute their own views to DevTools, to provide interactive data and playgrounds for their integrations. The following are a few examples:
[VueUse module](https://nuxt.com/modules/vueuse) provides a search page for available composables and see their documentation.
[UnoCSS module](https://nuxt.com/modules/unocss) provides an interactive inspector to see how each module contributes to the final CSS.
[Nuxt Icon module](https://nuxt.com/modules/icon) provides a search engine for all icons available.
[Nuxt Vitest module](https://nuxt.com/modules/vitest){rel="nofollow"} provides Vitest UI for tests runing with the same pipeline as your Nuxt app.
### For Module Authors
With the release of `v0.3.0`, we improved the ability for module authors to contribute to the DevTools.
It includes:
- Module contributed views
- Access to client app's context and devtools' utils
- Custom RPC functions to communicate between server and client
- Subprocesses spawning and output steaming
- [`@nuxt/devtools-kit`](https://devtools.nuxtjs.org/module/utils-kit){rel="nofollow"} - a set of utilities help you integrate your module with DevTools
- [`@nuxt/devtools-ui-kit`](https://devtools.nuxtjs.org/module/ui-kit){rel="nofollow"} - the UI components used in DevTools, to make your module's view consistent with the rest of DevTools
- Starter template to create module with DevTools integration
Please check out the [Devtools Module Authors Guide](https://devtools.nuxtjs.org/module/guide){rel="nofollow"} to learn more.
## What to Expect Next?
This is just the beginning of the journey. We are planning to add more features to DevTools, while exploring the ways to present the data in more intuitive and playful ways.
The goals of Nuxt DevTools are to:
- :icon{className="size-5" name="lucide:blend"}
Improve transparency for conventions
- :icon{className="size-5" name="lucide:gauge"}
Inspecting performance & analysis
- :icon{className="size-5" name="lucide:swatch-book"}
Interactive & playful
- :icon{className="size-5" name="lucide:file-pen-line"}
Personalized documentations
- :icon{className="size-5" name="lucide:blocks"}
Manage and scaffold apps with ease
- :icon{className="size-5" name="lucide:lightbulb"}
Provide insights and improvements
- :icon{className="size-5" name="lucide:user-check"}
Make the development experience more enjoyable
---
You can check our [Project Roadmap](https://github.com/nuxt/devtools/discussions/31){rel="nofollow"} and share your [Ideas & Suggestions](https://github.com/nuxt/devtools/discussions/29){rel="nofollow"}, helping us to make the DevTools better.
You can follow the latest updates by staring the [GitHub repository](https://github.com/nuxt/devtools){rel="nofollow"}, and following [Nuxt's official Twitter](https://x.com/nuxt_js){rel="nofollow"}.
Thank you for reading, and we are looking forward to your feedback and contributions!
# Announcing Nuxt 3 Release Candidate
We are excited to open source Nuxt 3 after more than a year of intense development. The repository is available on GitHub on [nuxt/nuxt](https://go.nuxt.com/github){rel="nofollow"} under the [MIT](https://go.nuxt.com/license){rel="nofollow"} license.
::tip
The documentation is available on <https://nuxt.com>{rel="nofollow"}.
::
## A new foundation
On top of supporting [Vue 3](https://vuejs.org){rel="nofollow"} or [Vite](https://vitejs.dev){rel="nofollow"}, Nuxt 3 contains a new [server engine](https://nuxt.com/docs/guide/concepts/server-engine){rel="nofollow"}, unlocking new full-stack capabilities to Nuxt server and beyond. It's the first JavaScript application server that is portable across a variety of modern cloud hosting providers.
In production, it builds your Vue application and server into one universal `.output` directory. This output is light: minified and without any other Node.js dependencies (except polyfills). You can deploy this output on any system supporting JavaScript, whether Node.js, Serverless, Workers, Edge-side rendering or purely static.
**Bonus:** this server engine can be used on existing Nuxt 2 projects with [Nuxt Bridge](https://nuxt.com/docs/getting-started/bridge){rel="nofollow"} 🚀
Head over the [Nuxt 3 homepage](https://nuxt.com){rel="nofollow"} to learn more about Nuxt Nitro and Nuxt Bridge.
## Important notes
Nuxt 3 is currently in beta, so expect things to break (and be fixed quickly). We have [plenty of work left](https://github.com/nuxt/nuxt/issues){rel="nofollow"} but we want to open it publicly to gather feedback and contributions from the community 💚
**Do not use it for production until we reach the first release candidate.**
During the beta, almost every commit will [trigger a new npm release](https://github.com/nuxt/nuxt/blob/main/.github/workflows/ci.yml#L111-L119){rel="nofollow"}; you may want to look at the [merged pull requests](https://github.com/nuxt/nuxt/pulls?q=is%3Apr+is%3Amerged){rel="nofollow"} until we begin generating automated changelogs in the documentation.
We are working every day to improve the documentation, explaining as much as possible all the concepts, features and usage of Nuxt 3.
Check out the community section of the Nuxt 3 website for [getting help](https://nuxt.com/docs/community/getting-help){rel="nofollow"}, [reporting bugs](https://nuxt.com/docs/community/reporting-bugs){rel="nofollow"} or [contributing to the framework](https://nuxt.com/docs/community/contribution){rel="nofollow"}.
## Timeline
Here some major milestones we've achieved on the way to Nuxt 3:
- **Jul 2, 2020**: Nuxt 3 first commit with full TypeScript rewrite
- **Aug 7, 2020**: Webpack 5 support
- **Sep 15, 2020**: [`pages/`](https://nuxt.com/docs/guide/directory-structure/pages){rel="nofollow"} support
- **Oct 29, 2020**: [Vue 3](https://vuejs.org){rel="nofollow"} support with bundle-renderer
- **Nov 2, 2020**: [Nuxt Nitro](https://nuxt.com/guide/concepts/server-engine){rel="nofollow"} initial work
- **Jan 22, 2021**: Initial [Vite](https://vitejs.dev){rel="nofollow"} support
- **Feb 4, 2021**: Nuxt can deploy on [major serverless platforms](https://nuxt.com/docs/getting-started/deployment){rel="nofollow"}
- **Mar 6, 2021**: [UnJS](https://github.com/unjs){rel="nofollow"} organisation created on GitHub
- **Mar 28, 2021**: Init Nuxt Kit and Nuxt CLI ([nuxi](https://nuxt.com/docs/api/commands/add){rel="nofollow"})
- **May 20, 2021**: [`app.vue`](https://nuxt.com/docs/guide/directory-structure/app){rel="nofollow"} support (`pages/` becomes optional)
- **Jun 30, 2021**: [`layouts/`](https://nuxt.com/docs/guide/directory-structure/layouts){rel="nofollow"} support
- **Jul 15, 2021**: Native ESM support
- **Aug 10, 2021**: Auto import of composables and components
- **Sep 5, 2021**: Init [Nuxt Bridge](https://nuxt.com/docs/bridge/overview){rel="nofollow"} for improving Nuxt 2 experience
- **Sep 7, 2021**: Support Vite build for production
- **Oct 11, 2021**: Add [`useState`](https://nuxt.com/docs/getting-started/state-management){rel="nofollow"} and [`useFetch`](https://nuxt.com/docs/api/composables/use-fetch){rel="nofollow"} composables
So far, we've merged [385 pull requests](https://github.com/nuxt/nuxt/pulls?q=is%3Apr+is%3Amerged){rel="nofollow"}, closed [229 issues](https://github.com/nuxt/nuxt/issues?q=is%3Aissue+is%3Aclosed){rel="nofollow"} and made [925+ commits](https://github.com/nuxt/nuxt/commits/main){rel="nofollow"}.
We are excited to hear your thoughts and we thank you for your patience.
Now you can go over the [Nuxt 3 documentation](https://nuxt.com){rel="nofollow"} 😊
Don't forget to follow us on [Twitter](https://x.com/nuxt_js){rel="nofollow"} to get the latest news about Nuxt!
# Nuxt 3.15
We're continuing to work on the release of Nitro v3, Nuxt v4 and more. But we're delighted to ship Nuxt v3.15 (just) in time for Christmas.
## ❄️ Snowfall!
Happy holidays! You'll notice when you start Nuxt that (if you're in the Northern Hemisphere) there's some snow on the loading screen ([#29871](https://github.com/nuxt/nuxt/pull/29871){rel="nofollow"}).
## ⚡️ Vite 6 included
Nuxt v3.15 includes [Vite 6](https://vite.dev/blog/announcing-vite6){rel="nofollow"} for the first time. Although this is a major version, we expect that this won't be a breaking change for Nuxt users (see full [migration guide](https://vite.dev/guide/migration.html){rel="nofollow"}). However, please take care if you have dependencies that rely on a particular Vite version.
One of the most significant changes with Vite 6 is the new Environment API, which we hope to use in conjunction with Nitro to improve the server dev environment. Watch this space!
You can read the full list of changes in the [Vite 6 changelog](https://github.com/vitejs/vite/blob/main/packages/vite/CHANGELOG.md#600-2024-11-26){rel="nofollow"}.
## 🪵 Chromium devtools improvements
We talk a lot about the Nuxt DevTools, but v3.15 ships with better integration in dev mode for Chromium-based browser devtools.
We now use the [Chrome DevTools extensibility API](https://developer.chrome.com/docs/devtools/performance/extension){rel="nofollow"} to add support for printing nuxt hook timings in the browser devtools performance panel.

## 🗺️ Navigation mode for `callOnce`
`callOnce` is a built-in Nuxt composable for running code only once. For example, if the code runs on the server it won't run again on the client. But sometimes you do want code to run on *every navigation* - just avoid the initial server/client double load. For this, there's a new `mode: 'navigation'` option that will run the code only once *per navigation*. (See [#30260](https://github.com/nuxt/nuxt/pull/30260){rel="nofollow"} for more info.)
```ts
await callOnce(() => counter.value++, { mode: 'navigation' })
```
## 🥵 HMR for templates, pages + page metadata
We now implement hot module reloading for Nuxt's virtual files (like routes, plugins, generated files) as well as for the content of page metadata (within a `definePageMeta` macro) ([#30113](https://github.com/nuxt/nuxt/pull/30113){rel="nofollow"}).
This should mean you have a faster experience in development, as well as not needing to reload the page when making changes to your routes.
## 📋 Page meta enhancements
We now support extracting extra page meta keys (likely used by module authors) via `experimental.extraPageMetaExtractionKeys` ([#30015](https://github.com/nuxt/nuxt/pull/30015){rel="nofollow"}). This enables module authors to use this information at build time, in the `pages:resolved` hook.
We also now support local functions in `definePageMeta` ([#30241](https://github.com/nuxt/nuxt/pull/30241){rel="nofollow"}). This means you can do something like this:
```ts
function validateIdParam(route) {
return !!(route.params.id && !isNaN(Number(route.params.id)))
}
definePageMeta({
validate: validateIdParam,
})
```
## 🔥 Performance improvements
We now preload the app manifest in the browser if it will be used when hydrating the app ([#30017](https://github.com/nuxt/nuxt/pull/30017){rel="nofollow"}).
We'll also tree shake vue-router's hash mode history out of your bundle if we can - specifically, if you haven't customised your `app/router.options.ts` ([#30297](https://github.com/nuxt/nuxt/pull/30297){rel="nofollow"}).
## 🐣 v4 updates
If A few more changes shipped for the new defaults for v4, including only inlining styles by default for Vue components ([#30305](https://github.com/nuxt/nuxt/pull/30305){rel="nofollow"}).
## ✅ Upgrading
As usual, our recommendation for upgrading is to run:
```sh
npx nuxi@latest upgrade --force
```
This will refresh your lockfile as well, and ensures that you pull in updates from other dependencies that Nuxt relies on, particularly in the unjs ecosystem.
## Full release notes
::read-more
---
color: neutral
icon: i-simple-icons-github
target: _blank
to: https://github.com/nuxt/nuxt/releases/tag/v3.15.0
---
Read the full release notes of Nuxt `v3.15.0`.
::
A huge thank you to everyone who's been a part of this release. ❤️
Don't hesitate to let us know if you have any feedback or issues! 🙏
# Nuxt 3.16
There's a lot in this one!
## ⚡️ A New New Nuxt
Say hello to `create-nuxt`, a new tool for starting Nuxt projects (big thanks to [@devgar](https://github.com/devgar){rel="nofollow"} for donating the package name)!
It's a streamlined version of `nuxi init` - just a sixth of the size and bundled as a single file with all dependencies inlined, to get you going as fast as possible.
Starting a new project is as simple as:
```bash
npm create nuxt
```
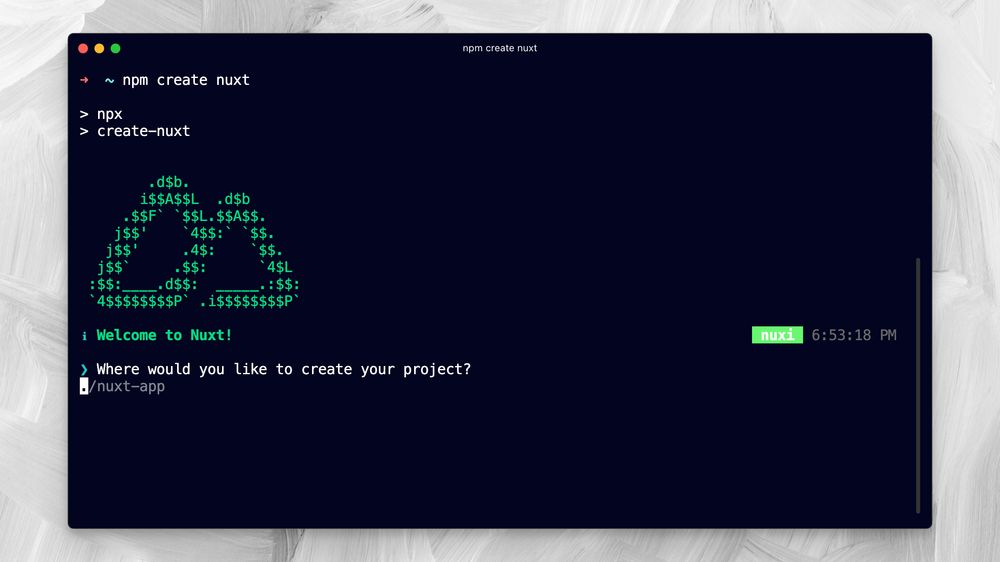{className="border,border-gray-200,dark:border-gray-700,rounded-lg"}
Special thanks to [@cmang](https://github.com/cmang){rel="nofollow"} for the [beautiful ASCII-art](https://bsky.app/profile/durdraw.org/post/3liadod3gv22a){rel="nofollow"}. ❤️
Want to learn more about where we're headed with the Nuxt CLI? Check out our roadmap [here](https://github.com/nuxt/cli/issues/648){rel="nofollow"}, including our plans for an [interactive modules selector](https://github.com/nuxt/cli/issues/754){rel="nofollow"}.
## 🚀 Unhead v2
We've upgraded to `unhead` v2, the engine behind Nuxt's `<head>` management. This major version removes deprecations and improves how context works:
- For Nuxt 3 users, we're shipping a legacy compatibility build so nothing breaks
- The context implementation is now more direct via Nuxt itself
```ts
// Nuxt now re-exports composables while properly resolving the context
export function useHead(input, options = {}) {
const unhead = injectHead(options.nuxt)
return head(input, { head: unhead, ...options })
}
```
If you're using Unhead directly in your app, keep in mind:
1. Import from Nuxt's auto-imports or `#app/composables/head` instead of `@unhead/vue`
2. Importing directly from `@unhead/vue` might lose async context
Don't worry though - we've maintained backward compatibility in Nuxt 3, so most users won't need to change anything!
If you've opted into `compatibilityVersion: 4`, check out [our upgrade guide](https://nuxt.com/docs/getting-started/upgrade#unhead-v2) for additional changes.
## 🔧 Devtools v2 Upgrade
Nuxt Devtools has leveled up to v2 ([#30889](https://github.com/nuxt/nuxt/pull/30889){rel="nofollow"})!
You'll love the new features like custom editor selection, Discovery.js for inspecting resolved configs (perfect for debugging), the return of the schema generator, and slimmer dependencies.
One of our favorite improvements is the ability to track how modules modify your Nuxt configuration - giving you X-ray vision into what's happening under the hood.
👉 Discover all the details in the [Nuxt DevTools release notes](https://github.com/nuxt/devtools/releases){rel="nofollow"}.
## ⚡️ Performance Improvements
We're continuing to make Nuxt faster, and there are a number of improvements in v3.16:
1. Using [`exsolve`](https://github.com/unjs/exsolve){rel="nofollow"} for module resolution ([#31124](https://github.com/nuxt/nuxt/pull/31124){rel="nofollow"}) along with the rest of the unjs ecosystem (nitro, c12, pkg-types, and more) - which dramatically speeds up module resolution
2. Smarter module resolution paths ([#31037](https://github.com/nuxt/nuxt/pull/31037){rel="nofollow"}) - prioritizes direct imports for better efficiency
3. Eliminated duplicated Nitro alias resolution ([#31088](https://github.com/nuxt/nuxt/pull/31088){rel="nofollow"}) - leaner file handling
4. Streamlined `loadNuxt` by skipping unnecessary resolution steps ([#31176](https://github.com/nuxt/nuxt/pull/31176){rel="nofollow"}) - faster startups
5. Adopt `oxc-parser` for parsing in Nuxt plugins ([#30066](https://github.com/nuxt/nuxt/pull/30066){rel="nofollow"})
All these speed boosts happen automatically - no configuration needed!
Shout out to [CodSpeed](https://codspeed.io/){rel="nofollow"} with [Vitest benchmarking](https://vitest.dev/guide/features.html#benchmarking){rel="nofollow"} to measure these improvements in CI - it has been really helpful.
To add some anecdotal evidence, my personal site at [roe.dev](https://github.com/danielroe/roe.dev){rel="nofollow"} loads 32% faster with v3.16, and [nuxt.com](https://github.com/nuxt/nuxt.com){rel="nofollow"} is 28% faster. I hope you see similar results! ⚡️
## 🕰️ Delayed Hydration Support
We're very pleased to bring you native delayed/lazy hydration support ([#26468](https://github.com/nuxt/nuxt/pull/26468){rel="nofollow"})! This lets you control exactly when components hydrate, which can improve initial load performance and time-to-interactive. We're leveraging Vue's built-in hydration strategies - [check them out in the Vue docs](https://vuejs.org/guide/components/async.html#lazy-hydration){rel="nofollow"}.
```vue
<template>
<!-- Hydrate when component becomes visible in viewport -->
<LazyExpensiveComponent hydrate-on-visible />
<!-- Hydrate when browser is idle -->
<LazyHeavyComponent hydrate-on-idle />
<!-- Hydrate on interaction (mouseover in this case) -->
<LazyDropdown hydrate-on-interaction="mouseover" />
<!-- Hydrate when media query matches -->
<LazyMobileMenu hydrate-on-media-query="(max-width: 768px)" />
<!-- Hydrate after a specific delay in milliseconds -->
<LazyFooter :hydrate-after="2000" />
</template>
```
You can also listen for when hydration happens with the `@hydrated` event:
```vue
<LazyComponent hydrate-on-visible @hydrated="onComponentHydrated" />
```
Learn more about lazy hydration in [our components documentation](https://nuxt.com/docs/guide/directory-structure/components#delayed-or-lazy-hydration).
## 🧩 Advanced Pages Configuration
You can now fine-tune which files Nuxt scans for pages ([#31090](https://github.com/nuxt/nuxt/pull/31090){rel="nofollow"}), giving you more control over your project structure:
```ts [nuxt.config.ts]
export default defineNuxtConfig({
pages: {
// Filter specific files or directories
pattern: ['**/*.vue'],
}
})
```
## 🔍 Enhanced Debugging
We've made debugging with the `debug` option more flexible! Now you can enable just the debug logs you need ([#30578](https://github.com/nuxt/nuxt/pull/30578){rel="nofollow"}):
```ts [nuxt.config.ts]
export default defineNuxtConfig({
debug: {
// Enable specific debugging features
templates: true,
modules: true,
watchers: true,
hooks: {
client: true,
server: true,
},
nitro: true,
router: true,
hydration: true,
}
})
```
Or keep it simple with `debug: true` to enable all these debugging features.
## 🎨 Decorators Support
For the decorator fans out there (whoever you are!), we've added experimental support ([#27672](https://github.com/nuxt/nuxt/pull/27672){rel="nofollow"}). As with all experimental features, feedback is much appreciated.
```ts [nuxt.config.ts]
export default defineNuxtConfig({
experimental: {
decorators: true
}
})
```
```ts
function something (_method: () => unknown) {
return () => 'decorated'
}
class SomeClass {
@something
public someMethod () {
return 'initial'
}
}
const value = new SomeClass().someMethod()
// returns 'decorated'
```
## 📛 Named Layer Aliases
It's been much requested, and it's here! Auto-scanned local layers (from your `~~/layers` directory) now automatically create aliases. You can access your `~~/layers/test` layer via `#layers/test` ([#30948](https://github.com/nuxt/nuxt/pull/30948){rel="nofollow"}) - no configuration needed.
If you want named aliases for other layers, you can add a name to your layer configuration:
```ts [nuxt.config.ts]
export default defineNuxtConfig({
$meta: {
name: 'example-layer',
},
})
```
This creates the alias `#layers/example-layer` pointing to your layer - making imports cleaner and more intuitive.
## 🧪 Error Handling Improvements
We've greatly improved error messages and source tracking ([#31144](https://github.com/nuxt/nuxt/pull/31144){rel="nofollow"}):
1. Better warnings for undefined `useAsyncData` calls with precise file location information
2. Error pages now appear correctly on island page errors ([#31081](https://github.com/nuxt/nuxt/pull/31081){rel="nofollow"})
Plus, we're now using Nitro's beautiful error handling (powered by [youch](https://github.com/poppinss/youch){rel="nofollow"}) to provide more helpful error messages in the terminal, complete with stacktrace support.
Nitro now also automatically applies source maps without requiring extra Node options, and we set appropriate security headers when rendering error pages.
## 📦 Module Development Improvements
For module authors, we've added the ability to augment Nitro types with `addTypeTemplate` ([#31079](https://github.com/nuxt/nuxt/pull/31079){rel="nofollow"}):
```ts
// Inside your Nuxt module
export default defineNuxtModule({
setup(options, nuxt) {
addTypeTemplate({
filename: 'types/my-module.d.ts',
getContents: () => `
declare module 'nitropack' {
interface NitroRouteConfig {
myCustomOption?: boolean
}
}
`
}, { nitro: true })
}
})
```
## ⚙️ Nitro v2.11 Upgrade
We've upgraded to Nitro v2.11. There are so many improvements - more than I can cover in these brief release notes.
👉 Check out all the details in the [Nitro v2.11.0 release notes](https://github.com/nitrojs/nitro/releases/tag/v2.11.0){rel="nofollow"}.
## 📦 New `unjs` Major Versions
This release includes several major version upgrades from the unjs ecosystem, focused on performance and smaller bundle sizes through ESM-only distributions:
- unenv upgraded to v2 (full rewrite)
- db0 upgraded to v0.3 (ESM-only, native node\:sql, improvements)
- ohash upgraded to v2 (ESM-only, native node\:crypto support, much faster)
- untyped upgraded to v2 (ESM-only, smaller install size)
- unimport upgraded to v4 (improvements)
- c12 upgraded to v3 (ESM-only)
- pathe upgraded to v2 (ESM-only)
- cookie-es upgraded to v2 (ESM-only)
- esbuild upgraded to v0.25
- chokidar upgraded to v4
## ✅ Upgrading
As usual, our recommendation for upgrading is to run:
```sh
npx nuxi@latest upgrade --dedupe
```
This refreshes your lockfile and pulls in all the latest dependencies that Nuxt relies on, especially from the unjs ecosystem.
## Full release notes
::read-more
---
icon: i-simple-icons-github
target: _blank
to: https://github.com/nuxt/nuxt/releases/tag/v3.16.0
---
Read the full release notes of Nuxt `v3.16.0`.
::
A huge thank you to everyone who's been a part of this release. ❤️
I'm aware there have been lots of very significant changes in this release - please don't hesitate to let us know if you have any feedback or issues! 🙏
# Nuxt UI v3
We are thrilled to announce the release of Nuxt UI v3, a complete redesign of our UI library that brings significant improvements in accessibility, performance, and developer experience. This major update represents over 1500 commits of hard work, collaboration, and innovation from our team and the community.
## 🚀 Reimagined from the Ground Up
Nuxt UI v3 represents a major leap forward in our journey to provide the most comprehensive UI solution for Vue and Nuxt developers. This version has been rebuilt from the ground up with modern technologies and best practices in mind.
### **From HeadlessUI to Reka UI**
With Reka UI at its core, Nuxt UI v3 delivers:
• Proper keyboard navigation across all interactive components
• ARIA attributes automatically handled for you
• Focus management that just works
• Screen reader friendly components out of the box
This means you can build applications that work for everyone without becoming an accessibility expert.
### **Tailwind CSS v4 Integration**
The integration with Tailwind CSS v4 brings huge performance improvements:
• **5x faster runtime** with optimized component rendering
• **100x faster build times** thanks to the new CSS-first engine
• Smaller bundle sizes with more efficient styling
Your applications will feel snappier, build quicker, and load faster for your users.
## 🎨 A Brand New Design System
```html
<!-- Before: Inconsistent color usage with duplicate dark mode classes -->
<div class="bg-gray-100 dark:bg-gray-800 p-4 rounded-lg">
<h2 class="text-gray-900 dark:text-white text-xl mb-2">User Profile</h2>
<p class="text-gray-600 dark:text-gray-300">Account settings and preferences</p>
<button class="bg-blue-500 text-white px-3 py-1 rounded mt-2">Edit Profile</button>
</div>
```
```html
<!-- After: Semantic design tokens with automatic dark mode support -->
<div class="bg-(--ui-background-muted) p-4 rounded-lg">
<h2 class="text-(--ui-text-highlighted) text-xl mb-2">User Profile</h2>
<p class="text-(--ui-text-muted)">Account settings and preferences</p>
<UButton color="primary" size="sm" class="mt-2">Edit Profile</UButton>
</div>
```
Our new color system includes 7 semantic color aliases:
| Color | Default | Description |
| ---------------------------------------------- | -------- | ------------------------------------------------ |
| `primary`{className="text-(--ui-primary)"} | `blue` | Primary color to represent the brand. |
| `secondary`{className="text-(--ui-secondary)"} | `blue` | Secondary color to complement the primary color. |
| `success`{className="text-(--ui-success)"} | `green` | Used for success states. |
| `info`{className="text-(--ui-info)"} | `blue` | Used for informational states. |
| `warning`{className="text-(--ui-warning)"} | `yellow` | Used for warning states. |
| `error`{className="text-(--ui-error)"} | `red` | Used for form error validation states. |
| `neutral` | `slate` | Neutral color for backgrounds, text, etc. |
This approach makes your codebase more maintainable and your UI more consistent—especially when working in teams. With these semantic tokens, light and dark mode transitions become effortless, as the system automatically handles the appropriate color values for each theme without requiring duplicate class definitions.
## 💚 Complete Vue Compatibility
We're really happy to expand the scope of Nuxt UI beyond the Nuxt framework. With v3, both Nuxt UI and Nuxt UI Pro now work seamlessly in any Vue project, this means you can:
• Use the same components across all your Vue projects
• Benefit from Nuxt UI's theming system in any Vue application
• Enjoy auto-imports and TypeScript support outside of Nuxt
• Leverage both basic components and advanced Pro components in any Vue project
```ts [vite.config.ts]
import { defineConfig } from 'vite'
import vue from '@vitejs/plugin-vue'
import ui from '@nuxt/ui/vite'
export default defineConfig({
plugins: [
vue(),
ui()
]
})
```
## 📦 Components for Every Need
With 54 core components, 50 Pro components, and 42 Prose components, Nuxt UI v3 provides solutions for virtually any UI challenge:
• **Data Display**: Tables, charts, and visualizations that adapt to your data
• **Navigation**: Menus, tabs, and breadcrumbs that guide users intuitively
• **Feedback**: Toasts, alerts, and modals that communicate clearly
• **Forms**: Inputs, selectors, and validation that simplify data collection
• **Layout**: Grids, containers, and responsive systems that organize content beautifully
Each component is designed to be both beautiful out of the box and deeply customizable when needed.
## 🔷 Improved TypeScript Integration
We've completely revamped our TypeScript integration, with features that make you more productive:
- Complete type safety with helpful autocompletion
- Generic-based components for flexible APIs
- Type-safe theming through a clear, consistent API
```ts
export default defineAppConfig({
ui: {
button: {
// Your IDE will show all available options
slots: {
base: 'font-bold rounded-lg'
},
defaultVariants: {
size: 'md',
color: 'error'
}
}
}
})
```
## ⬆️ Upgrading to v3
We've prepared a comprehensive [migration](https://ui.nuxt.com/getting-started/migration){rel="nofollow"} guide to help you upgrade from v2 to v3. While there are breaking changes due to our complete overhaul, we've worked hard to make the transition as smooth as possible.
## 🎯 Getting Started
Whether you're starting a new project or upgrading an existing one, getting started with Nuxt UI v3 is easy:
```bash
# Create a new Nuxt project with Nuxt UI
npx nuxi@latest init my-app -t ui
```
::code-group{sync="pm"}
```bash [pnpm]
pnpm add @nuxt/ui@latest
```
```bash [yarn]
yarn add @nuxt/ui@latest
```
```bash [npm]
npm install @nuxt/ui@latest
```
```bash [bun]
bun add @nuxt/ui@latest
```
::
::warning
If you're using **pnpm**, ensure that you either set [`shamefully-hoist=true`](https://pnpm.io/npmrc#shamefully-hoist){rel="nofollow"} in your `.npmrc` file or install `tailwindcss` in your project's root directory.
::
Visit our [documentation](https://ui.nuxt.com/getting-started){rel="nofollow"} to explore all the components and features available in Nuxt UI v3.
## 🙏 Thank You
This release represents thousands of hours of work from our team and the community. We'd like to thank everyone who contributed to making Nuxt UI v3 a reality.
We're excited to see what you'll build with Nuxt UI v3!
# Nuxt 2 End-of-Life (EOL)
Released in 2018, Nuxt 2.0 marked a major milestone, establishing it as a mainstream framework. Over the past six years, many developers adopted Nuxt 2, leading to the creation of numerous impressive projects across the web.
However, looking forward, maintaining Nuxt 2 is no longer sustainable. With the recent end-of-life of Vue 2 and the maturity of Nuxt 3 and its ecosystem, it's time for our team to concentrate our efforts on the latest major version and upcoming versions.
::tip
---
target: _blank
to: https://www.herodevs.com/support/nuxt-nes?utm_source=nuxt&utm_medium=nuxt-eol-article
---
Jump over HeroDevs' Nuxt Never-Ending Support (NES)
::
## What happens on June 30th, 2024?
After this date, Nuxt 2 will continue to be available on the NPM package manager, but will no longer receive updates, such as security and browser compatibility fixes. In other words, your applications will continue to work, but you may get deprecation warnings from your package manager reminding you that Nuxt 2 is no longer a supported version.
::note
Vue 2 reached its end-of-life date on December 31st, 2023.
::
## What’s Next?
Nuxt 3 has been the default version of Nuxt since November 16th, 2022.
On top of using Vue 3 and the composition API, it is shipped with features and innovations:
- Universal & Hybrid Rendering: Benefits of both SPA and SSR, with fine-grained control over route rendering
- Support for serverless environments (AWS Lambda, Deno, Cloudflare Workers) with minimal cold-start.
- First-Class TypeScript Support: Full typing across all components and configurations.
- Vite integration for a faster developer experience
- Server & API routes with end-to-end typing powered by Nitro
- Auto import of composables & utils
- Layers feature for domain driven development
When and if you can, consider migrating to Nuxt 3 to take advantage of these powerful features.
::read-more{to="https://nuxt.com/docs/getting-started/upgrade#nuxt-2-vs-nuxt-3"}
See a full comparison table between Nuxt 2 and Nuxt 3, as well as detailed upgrade guides to Nuxt 3 and Nuxt Bridge (as a part of upgrading to Nuxt 3).
::
::read-more{icon="i-lucide-life-buoy" to="https://nuxt.com/enterprise/support"}
If you need support, including upgrading to Nuxt 3, NuxtLabs provides professional support and consultancy in a wide range of areas.
::
## Still on Nuxt 2? Here Are Your Options.
Recognizing the various situations that arise during transitions, we are fully aware that users may need other options until they can migrate, or maybe migration simply isn't a feasible path. Here are some other options to consider:
### Update to the Nuxt 2 latest release
We expect to release 2.18.0 at the end of June 2024, which will include a few final fixes.
::note
We strongly encourage you to update to 2.18.0 once it's out. This will be the starting point for extended support mentioned below.
::
### Purchase Extended Support for Nuxt 2
If you have to stay on Nuxt 2 post-EOL, we have partnered with HeroDevs to offer Nuxt 2 Never-Ending Support (NES). Nuxt 2 NES provides ongoing security and compatibility patches for Nuxt 2 and all official Nuxt Modules (modules released by the Nuxt team, labeled `@nuxt/...` in the marketplace) even after EOL so that applications with strict compliance requirements remain secure and compliant. It also guarantees that Nuxt 2 applications will continue to operate effectively in modern browsers and maintain compatibility with essential libraries like Vue 2. Moreover, Nuxt 2 NES has continuous security monitoring and an enterprise level SLA with respect to support and fixes.
Nuxt 2 NES is the continuation of the flavor of security support you’ve enjoyed during the Nuxt 2 LTS period — but indefinitely.
::tip
---
target: _blank
to: https://www.herodevs.com/support/nuxt-nes?utm_source=nuxt&utm_medium=nuxt-eol-article
---
Read more about HeroDevs' Nuxt Never-Ending Support (NES)
::
### Notify Your Users of Your Nuxt 2 Post-EOL Plan
If migrating to Nuxt 3 or using Nuxt 2 NES isn't feasible right now, but you're still on Nuxt 2, it's essential to plan how you'll communicate your security strategy to your customers.
This doesn't affect all Nuxt users, but many teams face restrictions against deploying unsupported software due to SLAs, contracts, or other obligations to clients and partners. These requirements might come from customers, regulatory bodies, or internal company policies. Increasingly, regulatory bodies are setting higher standards for software accountability.
For those with such responsibilities, informing your customers, managers, CISO, or other stakeholders about your plans to handle support and manage potential CVEs is crucial. While Nuxt 2 has only had few vulnerabilities, CVEs can emerge even in well-maintained EOL projects through direct vulnerabilities or compromised dependencies. Staying updated with CVE notifications from organizations like [OpenCVE](https://www.opencve.io){rel="nofollow"}, and [Snyk](https://snyk.io){rel="nofollow"} can help you identify issues as they arise. Additionally, browsers occasionally update in ways that can affect legacy libraries—though rare, it’s a possibility to be aware of.
## Looking Forward
It is with a heavy heart that I am saying goodbye to Nuxt 2. After many years of working on it and seeing so many websites made with it, this famous loading bar at the top of each Nuxt 2 website will be something I’ll miss a lot! It is with excitement and energy that I will keep working with the core team on the future of Nuxt to keep innovating like we've been doing over these past 8 years.
# Introducing Nuxt 3 Beta
We are excited to open source Nuxt 3 after more than a year of intense development. The repository is available on GitHub on [nuxt/nuxt](https://github.com/nuxt/nuxt){rel="nofollow"} under the [MIT](https://github.com/nuxt/nuxt/blob/main/LICENSE){rel="nofollow"} license.
::tip
The documentation is available on <https://nuxt.com>{rel="nofollow"}.
::
## A new foundation
On top of supporting [Vue 3](https://vuejs.org){rel="nofollow"} or [Vite](https://vitejs.dev){rel="nofollow"}, Nuxt 3 contains a new [server engine](https://nuxt.com/docs/guide/concepts/server-engine){rel="nofollow"}, unlocking new full-stack capabilities to Nuxt server and beyond. It's the first JavaScript application server that is portable across a variety of modern cloud hosting providers.
In production, it builds your Vue application and server into one universal `.output` directory. This output is light: minified and without any other Node.js dependencies (except polyfills). You can deploy this output on any system supporting JavaScript, whether Node.js, Serverless, Workers, Edge-side rendering or purely static.
**Bonus:** this server engine can be used on existing Nuxt 2 projects with [Nuxt Bridge](https://nuxt.com/docs/getting-started/bridge){rel="nofollow"} 🚀
Head over the [Nuxt 3 homepage](https://nuxt.com){rel="nofollow"} to learn more about Nuxt Nitro and Nuxt Bridge.
## Important notes
Nuxt 3 is currently in beta, so expect things to break (and be fixed quickly). We have [plenty of work left](https://github.com/nuxt/nuxt/issues){rel="nofollow"} but we want to open it publicly to gather feedback and contributions from the community 💚
**Do not use it for production until we reach the first release candidate.**
During the beta, almost every commit will [trigger a new npm release](https://github.com/nuxt/nuxt/blob/main/.github/workflows/ci.yml#L111-L119){rel="nofollow"}; you may want to look at the [merged pull requests](https://github.com/nuxt/nuxt/pulls?q=is%3Apr+is%3Amerged){rel="nofollow"} until we begin generating automated changelogs in the documentation.
We are working every day to improve the documentation, explaining as much as possible all the concepts, features and usage of Nuxt 3.
Check out the community section of the Nuxt 3 website for [getting help](https://nuxt.com/docs/community/getting-help){rel="nofollow"}, [reporting bugs](https://nuxt.com/docs/community/reporting-bugs){rel="nofollow"} or [contributing to the framework](https://nuxt.com/docs/community/contribution){rel="nofollow"}.
## Timeline
Here some major milestones we've achieved on the way to Nuxt 3:
- **Jul 2, 2020**: Nuxt 3 first commit with full TypeScript rewrite
- **Aug 7, 2020**: Webpack 5 support
- **Sep 15, 2020**: [`pages/`](https://nuxt.com/docs/guide/directory-structure/pages){rel="nofollow"} support
- **Oct 29, 2020**: [Vue 3](https://vuejs.org){rel="nofollow"} support with bundle-renderer
- **Nov 2, 2020**: [Nuxt Nitro](https://nuxt.com/guide/concepts/server-engine){rel="nofollow"} initial work
- **Jan 22, 2021**: Initial [Vite](https://vitejs.dev){rel="nofollow"} support
- **Feb 4, 2021**: Nuxt can deploy on [major serverless platforms](https://nuxt.com/docs/getting-started/deployment){rel="nofollow"}
- **Mar 6, 2021**: [UnJS](https://github.com/unjs){rel="nofollow"} organisation created on GitHub
- **Mar 28, 2021**: Init Nuxt Kit and Nuxt CLI ([nuxi](https://nuxt.com/docs/api/commands/add){rel="nofollow"})
- **May 20, 2021**: [`app.vue`](https://nuxt.com/docs/guide/directory-structure/app){rel="nofollow"} support (`pages/` becomes optional)
- **Jun 30, 2021**: [`layouts/`](https://nuxt.com/docs/guide/directory-structure/layouts){rel="nofollow"} support
- **Jul 15, 2021**: Native ESM support
- **Aug 10, 2021**: Auto import of composables and components
- **Sep 5, 2021**: Init [Nuxt Bridge](https://nuxt.com/docs/bridge/overview){rel="nofollow"} for improving Nuxt 2 experience
- **Sep 7, 2021**: Support Vite build for production
- **Oct 11, 2021**: Add [`useState`](https://nuxt.com/docs/getting-started/state-management){rel="nofollow"} and [`useFetch`](https://nuxt.com/docs/api/composables/use-fetch){rel="nofollow"} composables
So far, we've merged [385 pull requests](https://github.com/nuxt/nuxt/pulls?q=is%3Apr+is%3Amerged){rel="nofollow"}, closed [229 issues](https://github.com/nuxt/nuxt/issues?q=is%3Aissue+is%3Aclosed){rel="nofollow"} and made [925+ commits](https://github.com/nuxt/nuxt/commits/main){rel="nofollow"}.
We are excited to hear your thoughts and we thank you for your patience.
Now you can go over the [Nuxt 3 documentation](https://nuxt.com){rel="nofollow"} 😊
Don't forget to follow us on [Twitter](https://x.com/nuxt_js){rel="nofollow"} to get the latest news about Nuxt!
# Going Full Static
## Too long to read
1. Upgrade nuxt to `2.14.0`
2. Set `target: 'static'` in your `nuxt.config.js`
3. Run `nuxt generate`
4. That's it ✨
*Bonus: you can run `nuxt start` to run a local server serving your generated static application.*
:video{autoplay controls autoPlay="true" controls="true" poster="https://res.cloudinary.com/nuxt/video/upload/v1588095794/nuxt-full-static_rnnbvm.jpg"}
Note: in this video we are using `nuxt export` which has been deprecated in favor of `nuxt generate`.
## History
Nuxt had the static generation feature with `nuxt generate` since [v0.3.2](https://github.com/nuxt/nuxt.js/releases/tag/v0.3.2){rel="nofollow"} (November 2016), since then we have improved it in multiple ways but never achieved full static generation. Today I am excited to announce that full static export is now possible with Nuxt 2.13.
## Current issues
`nuxt generate` is mostly pre-rendering, when you navigate client-side, `asyncData` and `fetch` are called, *making a request to your API*. A lot of users asked to support a "full static" mode, meaning to not call these 2 hooks on navigation, since the next page has been already pre-rendered.
Also, the developer experience is not optimal:
- You have access to `req` or `res` on SSR but not when running `nuxt generate`
- `process.static` is `true` only when running `nuxt generate`, making it slow to develop Nuxt modules or plugins for static generation
- You have to specify all your [dynamic routes](https://v2.nuxt.com/docs/features/file-system-routing#dynamic-routes){rel="nofollow"} in `generate.routes`, making it harder since you don't have access to nuxt modules there.
- You cannot test the [SPA fallback](https://v2.nuxt.com/docs/concepts/static-site-generation#spa-fallback){rel="nofollow"} in development, the fallback is a client-only version of your Nuxt application that loads when hitting a 404 page
- `nuxt generate` runs `nuxt build` by default, making it slower to generate your website if only your content changed
Note that it was possible to have full static support with [nuxt-payload-extractor](https://github.com/DreaMinder/nuxt-payload-extractor){rel="nofollow"} module but it was more verbose to use and had limitations.
## New config option: `target`
To improve the user experience as well as telling Nuxt that you want to export your application to static hosting, we are introducing a `target` option in your `nuxt.config.js`:
```vue
<script setup>
import { ref, computed } from '#imports'
const count = ref(1)
const double = computed(() => count.value * 2)
</script>
```
::important
Full static doesn't work with `ssr: 'false'` (which is the same as the deprecated `mode: 'spa'`) as this is used for client-side rendering only (Single Page Applications).
::
Running `nuxt dev` with the static target will improve the developer experience:
- Remove `req` & `res` from context
- Fallback to client-side rendering on 404, errors and redirects (see [SPA fallback](https://v2.nuxt.com/docs/concepts/static-site-generation#spa-fallback){rel="nofollow"})
- `$route.query` will always be equal to `{}` on server-side rendering
- `process.static` is `true`
We are also exposing `process.target` for modules author to add logic depending on the user target.
## Smarter `nuxt generate`
Now with `v2.14.0`, you can use `nuxt generate`, it will smartly know if it has to build or not.
### Crazy fast static applications
`nuxt generate` with `target: 'static'` will pre-render all your pages to HTML and save a payload file in order to mock `asyncData` and `fetch` on client-side navigation, this means **no** **more HTTP calls to your API on client-side navigation.** By extracting the page payload to a js file, **it also reduces the HTML size** served as well as preloading it (from the in the header) for optimal performance.
We also improved the [smart prefetching](https://nuxt.com/blog/introducing-smart-prefetching) when doing full static, it will also fetch the payloads, making navigation instant 👀
### Crawler integrated
On top of that, it also has a crawler inside, detecting every relative link and generating it:
If you want to exclude a bunch of routes, use the [generate.exclude](https://v2.nuxt.com/docs/configuration-glossary/configuration-generate#exclude){rel="nofollow"}. You can keep using [generate.routes](https://v2.nuxt.com/docs/configuration-glossary/configuration-generate#routes){rel="nofollow"} to add extra routes that the crawler could not detect.
To disable the crawler, set `generate.crawler: false` in your `nuxt.config.js`
### Faster re-deploy
By separating `nuxt build` and `nuxt export`, we are opening a new range of improvements: pre-render your pages only if you content has changed, this means: no webpack build → faster re-deployments.
## Smarter `nuxt start`
Once you statically generated your Nuxt app into `dist/`, use `nuxt start` to start a production HTTP server and serve your static app, supporting [SPA Fallback](https://v2.nuxt.com/docs/concepts/static-site-generation#spa-fallback){rel="nofollow"}.
This command is perfect to locally test your static application before pushing to your favorite static hosting provider.
## Preview mode
We do support live preview out of the box to keep calling your API:
```js [plugins/preview.client.js]
export default async function ({ query, enablePreview }) {
if (query.preview) {
enablePreview()
}
}
```
It will automatically refresh the page data (calling `nuxtServerInit`, `asyncData` and `fetch`).
When the preview mode is activated, `asyncData` and `fetch` original methods will be called.
## Commands
Depending of the `target`, you can run these commands.
- `server`
- `nuxt dev`: Start the development server
- `nuxt build`: Bundle your Nuxt application for production
- `nuxt start`: Start the production server
- `static`
- `nuxt dev`: Start the development server (static aware)
- `nuxt generate`: Bundle your Nuxt application for production if needed (static aware) and export your application to static HTML in `dist/` directory
- `nuxt start`: Serve your production application from `dist/`
### What to do next
::read-more
---
target: _blank
to: https://v2.nuxt.com/tutorials/moving-from-nuxtjs-dotenv-to-runtime-config
---
Learn more about how to move from `@nuxtjs/dotenv` to runtime config.
::
# Introducing Smart Prefetching
## Introducing Smart prefetching ⚡️
Starting from [Nuxt v2.4.0](https://github.com/nuxt/nuxt.js/releases/tag/v2.4.0){rel="nofollow"}, Nuxt will automagically prefetch the code-splitted pages linked with `<nuxt-link>` when visible in the viewport **by default**. This hugely improves the end user performances, inspired by [quicklink](https://github.com/GoogleChromeLabs/quicklink){rel="nofollow"}.
{className="rounded-lg,border,border-gray-700"}
Demos are online and we recommend you to try it out to feel the difference:
- No prefetching (v2.3): <https://nuxt-no-prefetch.surge.sh>{rel="nofollow"}
- With prefetching (v2.4): <https://nuxt-prefetch.surge.sh>{rel="nofollow"}
You can learn more about this feature in the [`<nuxt-link>`](https://v2.nuxt.com/docs/features/nuxt-components#the-nuxtlink-component){rel="nofollow"} section of the documentation.
# Understanding how fetch works in Nuxt 2.12
Nuxt introduces a new `fetch` with the latest release of version 2.12. Fetch provides a brand new way to bring data into Nuxt applications.
In this post, we will explore different features of the fetch hook and try to understand how it works.
## Fetch Hook and Nuxt Lifecycle
In terms of Nuxt lifecycle hooks, `fetch` sits within Vue lifecycle after `created` hook. As we already know that, all Vue lifecycle hooks are called with their `this` context. The same applies to `fetch` hook as well.
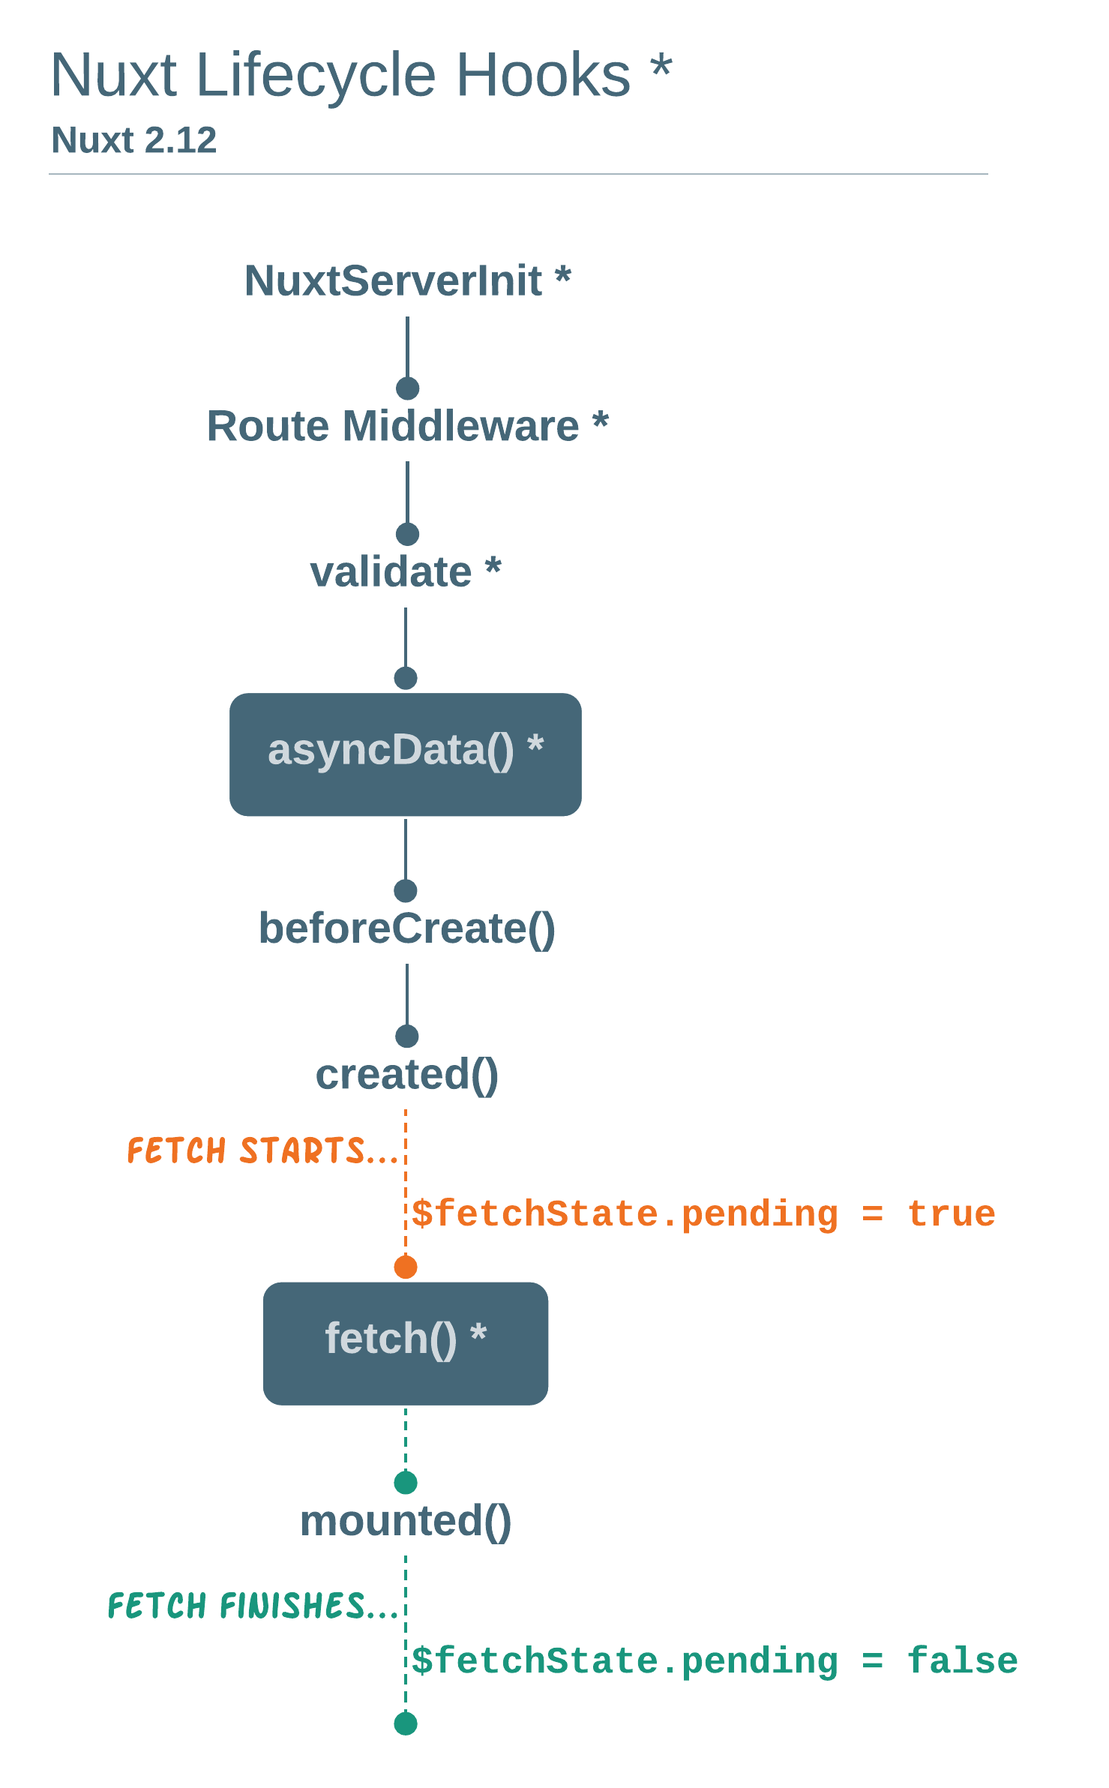
Fetch hook is called after the component instance is created on the server-side. That makes `this` context available inside the `fetch`.
```js
export default {
fetch() {
console.log(this)
}
}
```
Let’s see what this could mean for page components.
### Page Components
With the help of `this` context, fetch is able to mutate component’s data directly. It means we can set the component’s local data without having to dispatch Vuex store action or committing mutation from the page component.
As a result, Vuex becomes optional, but not impossible. We can still use `this.$store` as usual to access Vuex store if required.
## Availability of fetch hook
With `fetch`, we can prefetch the data asynchronously **in any Vue components**. It means, other than page components found in `/pages` directory, every other `.vue` components found in `/layouts` and `/components` directories can also benefit from the fetch hook.
Let's see what this could mean for layout and building-block components.
### Layout Components
Using new `fetch`, now we can make API calls directly from the layout components. This was impossible prior to the release of v2.12.
**Possible use cases**
- Fetch config data from the back-end in Nuxt layouts to generate footer and navbar dynamically
- Fetch user related data (i.e. user profile, shopping-cart item count) in the navbar
- Fetch site relevant data on `layouts/error.vue`
### Building-block (Child/Nested) Components
With `fetch` hook available in child components as well, we can off-load some of the data-fetching tasks from page-level components, and delegate them over to nested components. This was also impossible prior to the release of v2.12.
This reduces the responsibility of route-level components to a great extent.
**Possible use case -** We can still pass props to child components, but if the child components need to have their own data-fetching logic, now they can!
## Call order of multiple fetch hooks
Since each component can have its own data-fetching logic, you may ask what would be the order in which each of them are called?
Fetch hook is called on server-side once (on the first request to the Nuxt app) and then on client-side when navigating to further routes. But since we can define one fetch hook for each component, fetch hooks are called in sequence of their hierarchy.
### Disabling fetch on server-side
In addition, we can even disable fetch on the server-side if required.
```js
export default {
fetchOnServer: false
}
```
And this way, the fetch hook will only be called on client-side. When `fetchOnServer` is set to false, `$fetchState.pending` becomes `true` when the component is rendered on server-side.
## Error Handling
New `fetch` handles error at component level. Let’s see how.
Because we’re fetching data asynchronously, the new fetch() provides a `$fetchState` object to check whether the request has finished and progressed successfully.
Below is what the `$fetchState` object looks like.
```text
$fetchState = {
pending: true | false,
error: null | {},
timestamp: Integer
};
```
We have three keys,
1. **Pending -** lets you display a placeholder when fetch is being called on client-side
2. **Error -** lets you show an error message
3. **Timestamp -** shows timestamp of the last fetch which is useful for caching with `keep-alive`
These keys are then used directly in the template area of the component to show relevant placeholders during the process of fetching data from the API.
```html
<template>
<div>
<p v-if="$fetchState.pending">Fetching posts...</p>
<p v-else-if="$fetchState.error">Error while fetching posts</p>
<ul v-else>
…
</ul>
</div>
</template>
```
When error occurs at **component-level**, we can set HTTP status code on server-side by checking `process.server` in fetch hook and follow it up with `throw new Error()` statement.
```js
async fetch() {
const post = await fetch(`https://jsonplaceholder.typicode.com/posts/${this.$route.params.id}`)
.then((res) => res.json())
if (post.id === this.$route.params.id) {
this.post = post
} else {
// set status code on server and
if (process.server) {
this.$nuxt.context.res.statusCode = 404
}
// use throw new Error()
throw new Error('Post not found')
}
}
```
Setting the HTTP status code this way **is useful for correct SEO**.
## Fetch as a method
New fetch hook also acts as a method that can be invoked upon user interaction or invoked programmatically from the component methods.
```html
<!-- from template in template -->
<button @click="$fetch">Refresh Data</button>
```
```js
// from component methods in script section
export default {
methods: {
refresh() {
this.$fetch()
}
}
}
```
## Making Nuxt pages more performant
We can use `:keep-alive-props` prop and `activated` hook to make Nuxt page components more performant using a new fetch hook.
Nuxt allows **caching a certain number of pages** in the memory along with their fetched data. And also allows **adding a number of seconds** before we can re-fetch the data.
For any of the above methods to work, we have to use the `keep-alive` prop in generic `<nuxt />` and `<nuxt-child`> components.
```html [layouts/default.vue]
<template>
<div>
<nuxt keep-alive />
</div>
</template>
```
In addition, we can pass `:keep-alive-props` to `<nuxt />` component to cache a number of pages along with their fetched data.
`:keep-alive-props` prop allow us to indicate the maximum number of pages that should be kept in the memory while we navigate elsewhere within the site.
```html [layouts/default.vue]
<nuxt keep-alive :keep-alive-props="{ max: 10 }" />
```
Above is one way to boost page performance which is more high-level and generic, while the next one drills down to optimize the fetch request calls by using the `timestamp` property of `$fetchState` and comparing it against the number of seconds delay before it re-fetches the data.
Vue’s `activated` hook is used here with Nuxt's `keep-alive` prop to re-fetch the data.
```js
export default {
activated() {
// Call fetch again if last fetch more than a minute ago
if (this.$fetchState.timestamp <= Date.now() - 60000) {
this.$fetch()
}
}
}
```
## asyncData vs Fetch
As far as page components are concerned, new `fetch` seems way too similar to `asyncData()` because they both deal with the local data. But there are some key differences worth taking note of as below.
As of Nuxt 2.12, `asyncData` method is still an active feature. Let’s examine some of the key differences between `asyncData` and new `fetch`.
### asyncData
1. `asyncData` is limited to only page-level components
2. `this` context is unavailable
3. Adds payload by **returning** the data
```js
export default {
async asyncData(context) {
const data = await context.$axios.$get(
`https://jsonplaceholder.typicode.com/todos`
)
// `todos` does not have to be declared in data()
return { todos: data.Item }
// `todos` is merged with local data
}
}
```
### New Fetch
1. `fetch` is available in all Vue components
2. `this` context is available
3. Simply **mutates** the local data
```js
export default {
data() {
return {
todos: []
}
},
async fetch() {
const { data } = await axios.get(
`https://jsonplaceholder.typicode.com/todos`
)
// `todos` has to be declared in data()
this.todos = data
}
}
```
## Fetch before Nuxt 2.12
If you have been working with Nuxt for a while, then you’ll know that the previous version of `fetch` was significantly different.
> **Is this a breaking change?**
> No, it isn't. Actually, the old fetch can still be used by passing the `context` as the first argument to avoid any breaking changes in your existing Nuxt applications.
Here’s the list of notable changes in `fetch` hook compared with **before** and **after** v2.12.
### 1. Call order of `fetch` hook
**Before -** `fetch` hook was called before initiating the component, hence `this` wasn’t available inside the fetch hook.
**After -** `fetch` is called after the component instance is created on the server-side when the route is accessed.
### 2. `this` vs `context`
**Before -** We had access to the Nuxt `context` on page-level components, given that the `context` is passed as a first parameter.
```js
export default {
fetch(context) {
// …
}
}
```
**After -** We can access `this` context just like Vue client-side hooks without passing any parameters.
```js
export default {
fetch() {
console.log(this)
}
}
```
### 3. Availability of `fetch` hook
**Before -** Only page (route-level) components were allowed to fetch data on the server-side.
**After -** Now, we can prefetch the data asynchronously in any Vue components.
### 4. Call order of `fetch` hook
**Before -** `fetch` could be called server-side once (on the first request to the Nuxt app) and client-side when navigating to further routes.
**After -** New `fetch` is the same as an old fetch, but…
…since we can have one `fetch` for each component, `fetch` hooks are called in sequence of their hierarchy.
### 5. Error Handling
**Before -** We used the `context.error` function that showed a custom error page when an error occurred during API calls.
**After -** New `fetch` uses the `$fetchState` object to handle errors in the template area during API calls.
Error handling is performed at component level.
> **Does this mean we cannot show users a custom error page like we did prior to Nuxt 2.12?**
Yes we can, but only with `asyncData()` when it's about page-level component data. When using `fetch`, we can utilize `this.$nuxt.error({ statusCode: 404, message: 'Data not found' })` to show a custom error page.
## Conclusion
New fetch hook brings a lot of improvements and provides more flexibility in fetching data and organizing route-level & building-block components in a whole new way!
It will certainly make you think a little differently when you plan and design your new Nuxt project that requires multiple API calls within the same route.
I hope this article has helped you get acquainted with the new `fetch` feature. I'd love to see what you build with it.
# Nuxt 2 Static Improvements
## Introduction
With Nuxt version 2.13, the [full-static mode](https://nuxt.com/blog/going-full-static) has been introduced. In addition, a new command `nuxt export` was added to pre-render your pages without triggering a webpack build with the goal to separate the rendering and build process. The only issue was that most Nuxt users weren't able to unleash the full potential of the separation... **until now.**
## Faster Static Deployments
With v2.14, `nuxt generate` will **automagically skip webpack build step when no code has been changed** and use the previous build using cache. This will help to drastically improve static deployments time by avoiding unnecessary builds which is usually the most time-consuming part of generation process. Cache support is **platform-agnostic** and works on Netlify, Vercel, or any other CI/CD setup that is caching `node_modules`.
:video{autoplay controls autoPlay="true" controls="true" poster="https://res.cloudinary.com/nuxt/video/upload/v1595852304/nuxt-smart-generate_pjaat1.jpg"}
## Generate time: cache vs full webpack build
See the comparison in seconds between two `nuxt generate`:
- `Build` is when a webpack build is required
- `Cache` is only when the content has changed (webpack build skipped)
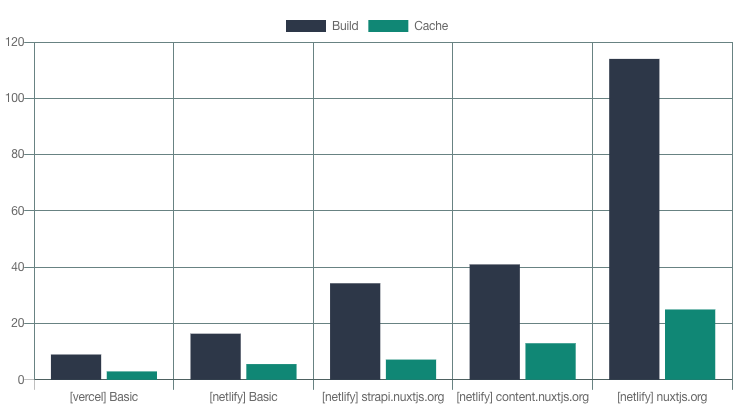
::tip
The static site generation of our projects on content changes are now **\~3.6x times** faster 🚀
::
Project links: [Basic](https://github.com/pi0/nuxt-static-demo){rel="nofollow"}, [Strapi Module Docs](https://github.com/nuxt-community/strapi-module/tree/master/docs){rel="nofollow"}, [Content Module Docs](https://github.com/nuxt/content/tree/master/docs){rel="nofollow"} and [Nuxt 2 Docs](https://github.com/nuxt/website-v2){rel="nofollow"}.
## Using in your projects
1. Update `nuxt` to the latest minor version, which is v2.14.
::code-group
```bash [npm]
npm update
```
```bash [yarn]
yarn upgrade nuxt
```
::
2. Ensure `target` is `static` inside your `nuxt.config`
```js [nuxt.config.js]
export default {
target: 'static'
// ...
}
```
`nuxt generate` will behave as before to avoid breaking changes and provide legacy compatibility if you keep `target: ‘server’` or don't specify target.
3. That’s it 🙌
Now, the `nuxt generate` command will build the project only if necessary, which is the case when files inside the project have been changed. It will always re-render your routes to static HTML files, like `nuxt export` is doing already.
Now you only have to change your build command back from `nuxt build && nuxt export` to `nuxt generate` on the platform you are using. If you are using a CI, ensure that you are properly caching `node_modules`.
### Excluding Files from Cache
By default, nuxt ignores these directories so if any change happens inside them, build will not be triggered:
- Build directory (`.nuxt/`)
- Static directory (`static/`)
- Generate dist (`dist/`)
- `node_modules`
- `README.md`
- Hidden dotfiles (like `.npmrc`)
You can add more patterns using [generate.cache.ignore](https://v2.nuxt.com/docs/configuration-glossary/configuration-generate/#cache){rel="nofollow"} option in `nuxt.config`:
```js [nuxt.config.js]
export default {
generate: {
cache: {
ignore: [
// When something changed in the docs folder, do not re-build via webpack
'docs'
]
}
}
}
```
It is also possible to use a function for `ignore` option to override default ignore entries.
### Module Authors
What if you are developing a nuxt module that is working with files that should not trigger a rebuild? The best example is for [@nuxt/content](https://content.nuxt.com){rel="nofollow"} module that reads markdown files from the repository. In this case, these files are used within a runtime module, which is the case when using `@nuxt/content`, the module itself can tell nuxt to ignore these files for you already so you don't have to do anything! Module authors can use the new `generate:cache:ignore` hook to do so:
```js
nuxt.hook('generate:cache:ignore', ignore => ignore.push('content'))
```
## How it works
When using the new `nuxt generate` with `static` target, a snapshot including checksum of non-ignored project files as well as nuxt version and some other configuration will be written `.nuxt/build.json`. In addition, we also move the build directory to `node_modules/.cache/nuxt`. Because `node_modules` is cached by all major platforms (Netlify, Vercel, ...) and common CI/CD scripts, this solution works out of the box without additional configuration.
When `nuxt generate` is called subsequently, it will again create a checksum based on your project files and then compare it to the existing one inside `node_modules/.cache/nuxt/build.json`.
If they match, it means that nothing is changed that needs rebuild so we can directly start rendering pages.
If a mismatch is detected, it means that a full rebuild would be necessary. You can also see what file caused rebuild by checking console logs. After the build, nuxt generate will save the new checksum inside `.nuxt/build.json`. You can check full implementation [here](https://github.com/nuxt/nuxt.js/pull/7712){rel="nofollow"}.
### Back to old school commands
With Nuxt v2.13, we introduced `nuxt export` and `nuxt serve` specially designed for the static target. With Nuxt v2.14, they are deprecated as `nuxt generate` and `nuxt start` is smart to detect the target and build when necessary.
Server target:
- `nuxt dev` = development server
- `nuxt build` = build your application for production
- `nuxt start` = start the production server (use it for Node.js hosting like Heroku, DigitalOcean, etc)
Static target:
- `nuxt dev` = development server
- `nuxt generate` = build if needed and statically export to `dist/`
- `nuxt start` = serve the `dist/` directory like your static hosting would do (Netlify, Vercel, Surge, etc), great for testing before deploying
## What to do next
- Upgrade your project to [nuxt@2.14.0](https://github.com/nuxt/nuxt.js/releases/tag/v2.14.0){rel="nofollow"}
- Use `nuxt generate` instead of `nuxt export`
- Use `nuxt start` instead of `nuxt serve`
- Enjoy fast deployments 🤙
# Nuxt 2: From Terminal to Browser
> Nuxt is a Vue.js framework to create different kind of web applications with the **same directory structure & conventions**: Universal, Single Page, PWA or Static Generated.
*ℹ️ These features are all available with [v2.8.0 release](https://github.com/nuxt/nuxt.js/releases/tag/v2.8.0){rel="nofollow"}.*
## Problems
1. Developing JavaScript applications with Webpack or any bundler requires to switch between your browser and terminal for debugging purpose.
2. Using `console.log` to debug when the app is server rendered requires to remember that logs will be displayed on the terminal when refreshing the page.
## Solutions
1. Forwarding Webpack build state right in the browser and display them in a fancy manner.
{className="rounded-lg,border,border-gray-700"}
2. Same for Hot Module Replacement (really useful when the project gets bigger and takes more time to re-build).
{className="rounded-lg,border,border-gray-700"}
3. Forwarding SSR logs to the browser in development mode
{className="rounded-lg,border,border-gray-700"}
## Nuxt Vision
The purpose to these changes is to use the terminal for commands only.
Now you can focus right on your code and its visual result 🙂
> Be lazy, be smart, be Nuxt.
Links:
- Nuxt 2 docs: <https://v2.nuxt.com>{rel="nofollow"}
- GitHub: <https://github.com/nuxt/nuxt.js>{rel="nofollow"}
- Loading Screen source code: <https://github.com/nuxt/loading-screen>{rel="nofollow"}
- Twitter: <https://x.com/nuxt_js>{rel="nofollow"}
# AWS Amplify
::tip
**Zero Configuration ✨**
:br
Integration with AWS Amplify is possible with zero configuration, [learn more](https://nitro.unjs.io/deploy#zero-config-providers){rel="nofollow"}.
::
## Setup
1. Login to the [AWS Amplify Hosting Console](https://console.aws.amazon.com/amplify/?trk=01c5a476-5997-4e6a-88b9-fd0a0a5bbe34\&sc_channel=el){rel="nofollow"}
2. Click on "Get Started" > Amplify Hosting (Host your web app)
3. Select and authorize access to your Git repository provider and select the main branch
4. Choose a name for your app, make sure build settings are auto-detected and optionally set requirement environment variables under the advanced section
5. Optionally, select Enable SSR logging to enable server-side logging to your Amazon CloudWatch account
6. Confirm configuration and click on "Save and Deploy"
## Learn more
::read-more{target="_blank" to="https://www.youtube.com/watch?v=CAk5_XGkOG4"}
Watch an Amplify Hosting tutorial with Nuxt
::
::read-more
---
target: _blank
to: https://nitro.unjs.io/deploy/providers/aws-amplify
---
Head over **Nitro documentation** to learn more about the aws-amplify deployment preset.
::
# Azure
## Azure Static Web Apps
::tip
**Zero Configuration ✨**
:br
Integration with Azure Static Web Apps provider is possible with zero configuration, [learn more](https://nitro.unjs.io/deploy#zero-config-providers){rel="nofollow"}.
::
Azure Static Web Apps are designed to be deployed continuously in a [GitHub Actions workflow](https://docs.microsoft.com/en-us/azure/static-web-apps/github-actions-workflow){rel="nofollow"}. By default, Nuxt will detect this deployment environment to enable the `azure` preset.
### Local preview
Install [Azure Functions Core Tools](https://docs.microsoft.com/en-us/azure/azure-functions/functions-run-local){rel="nofollow"} if you want to test locally.
You can invoke a development environment to preview before deploying.
```bash [Terminal]
npx nuxi build --preset=azure
npx @azure/static-web-apps-cli start .output/public --api-location .output/server
```
### Configuration
Azure Static Web Apps are [configured](https://learn.microsoft.com/en-us/azure/static-web-apps/configuration){rel="nofollow"} using the `staticwebapp.config.json` file.
Nuxt automatically generates this configuration file whenever the application is built with the `azure` preset.
It adds the following properties based on the following criteria:
| Property | Criteria | Default |
| --------------------------------------------------------------------------------------------------------------------------------------- | ------------------------------------------------------------------------------------------------------------------------------------------------------------------------------------------------------------------------------------------------------------- | ------------- |
| **[platform.apiRuntime](https://learn.microsoft.com/en-us/azure/static-web-apps/configuration#platform){rel="nofollow"}** | Will automatically set to `node:16` or `node:14` depending on your package configuration. | `node:16` |
| **[navigationFallback.rewrite](https://learn.microsoft.com/en-us/azure/static-web-apps/configuration#fallback-routes){rel="nofollow"}** | Is always `/api/server` | `/api/server` |
| **[routes](https://learn.microsoft.com/en-us/azure/static-web-apps/configuration#routes){rel="nofollow"}** | All prerendered routes are added. Additionally, if you do not have an `index.html` file an empty one is created for you for compatibility purposes and also requests to `/index.html` are redirected to the root directory which is handled by `/api/server`. | `[]` |
### Custom Configuration
You can alter the generated configuration using `azure.config` option. For instance, if you wanted to specify a Node runtime for your Azure Functions, edit your `nuxt.config.ts` file to the following:
```ts [nuxt.config.ts]
export default defineNuxtConfig({
// ...
nitro: {
azure: {
config: {
// ...
platform: {
apiRuntime: 'node:18'
}
}
}
}
})
```
Custom routes will be added and matched first. In the case of a conflict (determined if an object has the same route property), custom routes will override generated ones.
### Deploy from CI/CD via GitHub Actions
When you link your GitHub repository to Azure Static Web Apps, a workflow file is added to the repository.
When you are asked to select your framework, select custom and provide the following information:
| Input | Value |
| -------------------- | ---------------- |
| **app\_location** | '/' |
| **api\_location** | '.output/server' |
| **output\_location** | '.output/public' |
If you miss this step, you can always find the build configuration section in your workflow and update the build configuration:
```yaml [.github/workflows/azure-static-web-apps-<RANDOM_NAME>.yml]
###### Repository/Build Configurations ######
app_location: '/'
api_location: '.output/server'
output_location: '.output/public'
###### End of Repository/Build Configurations ######
```
::callout
That's it! Now Azure Static Web Apps will automatically deploy your Nitro-powered application on push.
::
If you are using `runtimeConfig`, you will likely want to configure the corresponding [environment variables on Azure](https://docs.microsoft.com/en-us/azure/static-web-apps/application-settings){rel="nofollow"}.
## More options
::read-more{target="_blank" to="https://nitro.unjs.io/deploy/providers/azure"}
Learn about the other Azure deployment presets on Nitro documentation.
::
# Cleavr
::tip
**Zero Configuration ✨**
:br
Integration with this provider is possible with zero configuration, [learn more](https://nitro.unjs.io/deploy#zero-config-providers){rel="nofollow"}.
::
## Setup
**In your [Cleavr.io](https://cleavr.io/){rel="nofollow"} panel:**
1. Provision a new server
2. Add a website, selecting **Nuxt 3** as the app type
3. In web app > settings > Code Repo, point to your project's code repository
4. In web app > settings > Environment variables, set `SERVER_PRESET=cleavr`
You're now all set to deploy your project!
## Learn more
::read-more{target="_blank" to="https://nitro.unjs.io/deploy/providers/cleavr"}
Head over **Nitro documentation** to learn more about the cleavr deployment preset.
::
# Clever Cloud
Nuxt supports deploying on [Clever Cloud](https://www.clever-cloud.com/){rel="nofollow"} with minimal configuration.
## Deploy Clever Cloud from the Console
To deploy your Nuxt project to Clever Cloud, you will need to create a **new application**. The application wizard will walk you through the necessary configuration steps.
1. From the lateral menubar, click **Create > An application**
2. Choose how to deploy: **Create an application from a local repository** or **Create an application from a GitHub repository**
3. Select a **Node.js** application, or a **static one**.
4. Set up the minimal size for your instance and scalability options. Nuxt app must be deployed with a minimum size of **XS** instance for **Node.js** application and **nano** instance for **static one**. The build process, however, will need to be configured later with at least an M instance size to ensure it can handle the resource requirements. Depending on your project’s specifications and dependencies, you may need to adjust further as you monitor the metrics from the **Overview** page.
5. Select a **region** to deploy your instance.
6. Skip connecting **Add-ons** to your Clever application unless you’re using a database.
7. Inject **environment variables**:
- For **Node.js**
::package-managers
```ini [npm]
CC_PRE_BUILD_HOOK="npm run build"
CC_RUN_COMMAND="node .output/server/index.mjs"
```
```ini [yarn]
CC_NODE_BUILD_TOOL="yarn"
CC_PRE_BUILD_HOOK="yarn install --frozen-lockfile && yarn build"
CC_RUN_COMMAND="node .output/server/index.mjs"
```
```ini [pnpm]
CC_CUSTOM_BUILD_TOOL="pnpm build"
CC_NODE_BUILD_TOOL="custom"
CC_PRE_BUILD_HOOK="npm i -g pnpm && pnpm install --frozen-lockfile && pnpm run build"
CC_RUN_COMMAND="node .output/server/index.mjs"
```
```ini [bun]
CC_CUSTOM_BUILD_TOOL="bun build"
CC_NODE_BUILD_TOOL="custom"
CC_PRE_BUILD_HOOK="npm i -g bun && bun install && bun run build "
CC_RUN_COMMAND="node .output/server/index.mjs"
```
::
- For a **static application**
::package-managers
```ini [npm]
CC_NODE_VERSION=20
CC_WEBROOT=/.output/public
CC_OVERRIDE_BUILDCACHE=/.output/public
CC_PRE_BUILD_HOOK=npm install
CC_POST_BUILD_HOOK=npx nuxi generate
```
```ini [yarn]
CC_NODE_VERSION=20
CC_WEBROOT=/.output/public
CC_OVERRIDE_BUILDCACHE=/.output/public
CC_PRE_BUILD_HOOK="yarn install --frozen-lockfile"
CC_POST_BUILD_HOOK=npx nuxi generate
```
```ini [pnpm]
CC_NODE_VERSION=20
CC_WEBROOT=/.output/public
CC_OVERRIDE_BUILDCACHE=/.output/public
CC_PRE_BUILD_HOOK="npm i -g pnpm && pnpm install --frozen-lockfile"
CC_POST_BUILD_HOOK=npx nuxi generate
```
```ini [bun]
CC_NODE_VERSION=20
CC_WEBROOT=/.output/public
CC_OVERRIDE_BUILDCACHE=/.output/public
CC_PRE_BUILD_HOOK="npm i -g bun && bun install"
CC_POST_BUILD_HOOK=npx nuxi generate
```
::
8. Navigate to the application **Information** menu and enable the **enable dedicated build instance** option on a minimal instance of type **M**.
9. **Deploy!** If you’re deploying from **GitHub**, your deployment should start automatically. If you’re using **Git**, show [this docs](https://www.clever-cloud.com/developers/doc/quickstart/#choose-how-to-deploy){rel="nofollow"}.
## Learn more
::read-more
---
target: _blank
to: https://developers.clever-cloud.com/guides/nuxt
---
Clever Cloud documentation for deploying Nuxt
::
# Cloudflare
## Cloudflare Pages
::tip
**Zero Configuration ✨**
:br
Integration with Cloudflare Pages is possible with zero configuration, [learn more](https://nitro.unjs.io/deploy#zero-config-providers){rel="nofollow"}.
::
::important
Checkout the [@nuxthub/core](https://nuxt.com/modules/hub) module to build full-stack Nuxt applications with Cloudflare, learn more on [hub.nuxt.com](https://hub.nuxt.com){rel="nofollow"}.
::
### Git Integration
If you use the GitHub/GitLab integration with Cloudflare Pages, **no configuration is required**. Pushing to your repository will automatically build your project and deploy it.
::note
Nuxt will detect the environment to set the correct [Server/Nitro preset](https://nitro.unjs.io/deploy/providers/cloudflare){rel="nofollow"}.
::
To leverage server-side rendering on the edge, set the build command to: `nuxt build`
To statically generate your website, set the build command to: `nuxt generate`
### Route matching
On CloudFlare Pages, if an HTML file is found with a matching path to the current route requested, it will serve it. It will also redirect HTML pages to their extension-less counterparts: for instance, `/contact.html` will be redirected to `/contact`, and `/about/index.html` will be redirected to `/about/`.
To match Cloudflare [route matching](https://developers.cloudflare.com/pages/configuration/serving-pages/#route-matching){rel="nofollow"} rules, set the nitro option `autoSubfolderIndex` to `false`.
```ts [nuxt.config.ts]
export default defineNuxtConfig({
nitro: {
prerender: {
autoSubfolderIndex: false
}
}
})
```
### Direct Upload
Alternatively, you can use [wrangler](https://github.com/cloudflare/workers-sdk){rel="nofollow"} to upload your project to Cloudflare.
In this case, you will have to set the preset manually.
1. Build your project for Cloudflare Pages:
```bash [Terminal]
npx nuxi build --preset=cloudflare_pages
```
2. Deploy, it will ask you to create a project for the first time:
```bash [Terminal]
wrangler pages deploy dist/
```
## Learn more
::read-more
---
target: _blank
to: https://nitro.unjs.io/deploy/providers/cloudflare
---
Head over **Nitro documentation** to learn more about the Cloudflare deployment preset.
::
::read-more
---
target: _blank
to: https://developers.cloudflare.com/pages/framework-guides/deploy-a-nuxt-site/#use-bindings-in-your-nuxt-application
---
Head over **CloudFlare Pages** documentation to learn more about it.
::
## Templates
::card-group
:::card
---
ui:
icon:
base: text-black dark:text-white
icon: i-simple-icons-github
target: _blank
title: Atidone
to: https://github.com/atinux/atidone
---
A todos application with user authentication, SSR and Cloudflare D1.
:::
:::card
---
ui:
icon:
base: text-black dark:text-white
icon: i-simple-icons-github
target: _blank
title: Atinotes
to: https://github.com/atinux/atinotes
---
An editable website with universal rendering based on Cloudflare KV.
:::
:::card
---
ui:
icon:
base: text-black dark:text-white
icon: i-simple-icons-github
target: _blank
title: Atidraw
to: https://github.com/atinux/atidraw
---
Web application that lets you to draw and share your drawings with the world, with Cloudflare R2 & AI.
:::
:::card
---
ui:
icon:
base: text-black dark:text-white
icon: i-simple-icons-github
target: _blank
title: Nuxt Image Gallery
to: https://github.com/flosciante/nuxt-image-gallery
---
An image gallery to upload, edit and share your images to the world, with Cloudflare R2.
:::
::
## Learn more
::read-more
---
target: _blank
to: https://nitro.unjs.io/deploy/providers/cloudflare
---
Head over **Nitro documentation** to learn more about the cloudflare deployment preset.
::
# Deno Deploy
::important
Deno deploy preset is experimental.
::
## Deploy with the CLI
You can use [deployctl](https://deno.com/deploy/docs/deployctl){rel="nofollow"} to deploy your app.
Login to [Deno Deploy](https://dash.deno.com/account#access-tokens){rel="nofollow"} to obtain a `DENO_DEPLOY_TOKEN` access token, and set it as an environment variable.
```bash
# Build with the deno_deploy preset
npm run build --preset=deno_deploy
# Make sure to run the deployctl command from the output directory
cd .output
deployctl deploy --project=my-project server/index.ts --token=<DENO_DEPLOY_TOKEN>
```
## Deploy within CI/CD using GitHub Actions
Link your GitHub repository to your Deno Deploy project and choose the "GitHub Actions" deployment mode. You can do this in your project settings on <https://dash.deno.com>{rel="nofollow"}.
Create a GitHub action file in your repository:
```yaml [.github/workflows/deno_deploy.yml]
name: deno-deploy
on:
push:
branches:
- main
pull_request:
branches:
- main
jobs:
deploy:
steps:
- uses: actions/checkout@v3
- run: corepack enable
- uses: actions/setup-node@v3
with:
node-version: 18
cache: pnpm
- run: pnpm install
- run: pnpm build
env:
NITRO_PRESET: deno_deploy
- name: Deploy to Deno Deploy
uses: denoland/deployctl@v1
with:
project: <my-project>
entrypoint: server/index.ts
root: .output
```
::important
Make sure to rename `<my-project>` with your project name.
::
## Templates
::card-group
:::card
---
ui:
icon:
base: text-black dark:text-white
icon: i-simple-icons-github
target: _blank
title: Nuxt Deno KV
to: https://github.com/Atinux/nuxt-deno-kv
---
A collaborative todo-list app built with Deno KV and Nuxt.
:::
::
## Learn more
::read-more
---
target: _blank
to: https://nitro.unjs.io/deploy/providers/deno-deploy
---
Head over **Nitro documentation** to learn more about the deno-deploy deployment preset.
::
# DigitalOcean
Nuxt supports deploying on the [DigitalOcean App Platform](https://docs.digitalocean.com/products/app-platform/){rel="nofollow"} with minimal configuration.
## Setup
1. Create a new DigitalOcean app following the [guide](https://docs.digitalocean.com/products/app-platform/how-to/create-apps/){rel="nofollow"}.
2. Next, you'll need to configure environment variables. In your app settings, ensure the following [app-level environment variables](https://docs.digitalocean.com/products/app-platform/how-to/use-environment-variables/){rel="nofollow"}:
```bash
SERVER_PRESET=digital-ocean
```
3. You will need to ensure you set an `engines.node` field in your app's `package.json` to ensure DigitalOcean uses a supported version of Node.js:
```json [package.json]
{
"engines": {
"node": "20.x"
}
}
```
4. You'll also need to add a run command so DigitalOcean knows what command to run after a build. You can do so by adding a start script to your `package.json`:
```json [package.json]
{
"scripts": {
"start": "node .output/server/index.mjs"
}
}
```
5. Finally, you'll need to add this start script to your DigitalOcean app's run command. Go to `Components > Settings > Commands`, click "Edit", then add `npm run start`
::tip
Your Nuxt app should be live at a DigitalOcean generated URL and you can now follow [the rest of the DigitalOcean deployment guide](https://docs.digitalocean.com/products/app-platform/how-to/manage-deployments/){rel="nofollow"}.
::
## Learn more
::read-more
---
target: _blank
to: https://nitro.unjs.io/deploy/providers/digitalocean
---
Head over **Nitro documentation** to learn more about the digitalocean deployment preset.
::
# Firebase
## Firebase App Hosting (recommended)
::note
You will need to be on the [**Blaze plan**](https://firebase.google.com/pricing){rel="nofollow"} (Pay as you go) to get started.
::
::read-more
---
title: Firebase App Hosting
to: https://firebase.google.com/docs/app-hosting
---
::
### Project Setup
1. Go to the Firebase [console](https://console.firebase.google.com/){rel="nofollow"} and set up a new project.
2. Select **Build > App Hosting** from the sidebar.
- You may need to upgrade your billing plan at this step.
3. Click **Get Started**.
- Choose a region.
- Import a GitHub repository (you’ll need to link your GitHub account).
- Configure deployment settings (project root directory and branch), and enable automatic rollouts.
- Choose a unique ID for your backend.
4. Click Finish & Deploy to create your first rollout.
When you deploy with Firebase App Hosting, the App Hosting preset will be run automatically at build time.
## Firebase Functions (deprecated)
::important
This deployment method is deprecated and is not recommended. Firebase App Hosting is the recommended way to deploy Nuxt apps on Firebase.
::
To use the more recent and recommended generation of Firebase functions, set the `firebase.gen` option to `2`:
```ts [nuxt.config.ts]
export default defineNuxtConfig({
nitro: {
firebase: {
gen: 2
}
}
})
```
::note
If you cannot use configuration for any reason, alternatively you can use `NITRO_FIREBASE_GEN=2` environment variable.
::
If you already have a deployed version of your website and want to upgrade to 2nd gen, [see the Migration process on Firebase docs](https://firebase.google.com/docs/functions/2nd-gen-upgrade){rel="nofollow"}. Namely, the CLI will ask you to delete your existing functions before deploying the new ones.
::tip
---
target: _blank
to: https://firebase.google.com/docs/functions/version-comparison
---
Comparison between 1st and 2nd generation functions
::
## Project Setup
You may instead prefer to set up your project with the Firebase CLI, which will fetch your project ID for you, add required dependencies (see above) and even set up automated deployments via GitHub Actions (for hosting only). [Learn about installing the firebase CLI](https://firebase.google.com/docs/cli#windows-npm){rel="nofollow"}.
1. Install the latest version of the Firebase CLI.
```bash [Terminal]
npm install -g firebase-tools@latest
```
2. Initialize your Firebase Project
```bash [Terminal]
firebase login
firebase init hosting
```
::note
When prompted, you can enter `.output/public` as the public directory. In the next step, **do not** configure your project as a single-page app.
::
Once complete, add the following to your `firebase.json` to enable server rendering in Cloud Functions:
```json [firebase.json]
{
"functions": { "source": ".output/server" },
"hosting": [
{
"site": "<your_project_id>",
"public": ".output/public",
"cleanUrls": true,
"rewrites": [{ "source": "**", "function": "server" }]
}
]
}
```
## Local Preview
You can preview a local version of your site if you need to test things out without deploying.
```bash
npm run build -- --preset=firebase
firebase emulators:start
```
## Build and Deploy
Deploy to Firebase Hosting by running a Nuxt build and then running the `firebase deploy` command.
```bash
npm run build -- --preset=firebase
firebase deploy
```
## Options
You can set options for Firebase functions in your `nuxt.config.ts` file:
```ts [nuxt.config.ts]
export default defineNuxtConfig({
nitro: {
firebase: {
gen: 2,
httpsOptions: {
region: 'europe-west1',
maxInstances: 3,
},
},
},
});
```
### Runtime Node.js Version
You can set a custom Node.js version in configuration:
```ts [nuxt.config.ts]
export default defineNuxtConfig({
nitro: {
firebase: {
nodeVersion: '18' // Can be '16' or '18' or '20'
},
},
});
```
Firebase tools use the `engines.node` version in `package.json` to determine which node version to use for your functions. Nuxt automatically writes to the `.output/server/package.json` with configured Node.js version.
You might also need to add a runtime key to your `firebase.json` file:
```json [firebase.json]
{
"functions": {
"source": ".output/server",
"runtime": "nodejs20"
}
}
```
::read-more
---
target: _blank
to: https://firebase.google.com/docs/functions/manage-functions?gen=2nd#set_nodejs_version
---
You can read more about this in **Firebase Docs**.
::
## Other Cloud Functions
You may be warned that other cloud functions will be deleted when you deploy your Nuxt project. This is because Nitro will deploy your entire project to firebase functions. If you want to deploy only your Nuxt project, you can use the `--only` flag:
```bash
firebase deploy --only functions:server,hosting
```
::read-more
---
target: _blank
to: https://nitro.unjs.io/deploy/providers/firebase
---
Head over to the **Nitro documentation** to learn more about the Firebase deployment preset.
::
## Using Cookies in Production
When using Firebase Hosting together with Cloud Functions or Cloud Run, cookies are generally stripped from incoming requests to allow for efficient CDN cache behavior. Only the specially-named `__session` cookie is permitted to pass through to your app.
::read-more
---
target: \_blank
to: https://firebase.google.com/docs/hosting/manage-cache#using_cookies
---
For more information, refer to the **Firebase documentation**.
::
## Working with Environment Variables
To set environment variables for your Firebase functions, you need to copy the `.env` file to the `.output/server` directory.
You can do this by adding a `postbuild` script to your `package.json`, that will automatically run after the build command:
```json [package.json]
{
"scripts": {
"postbuild": "cp .env .output/server/.env"
}
}
```
::read-more
---
target: \_blank
to: https://firebase.google.com/docs/functions/config-env?gen=2nd#env-variables
---
For more information, refer to the **Firebase documentation**.
::
# Flightcontrol
Nitro supports deploying to [AWS via Flightcontrol](https://flightcontrol.dev?ref=nuxt){rel="nofollow"} with minimal configuration.
::tip
**Zero Configuration ✨**
:br
Integration with Flightcontrol is possible with zero configuration.
::
## Set Up your Flightcontrol account
On a high level, the steps you will need to follow to deploy a project for the first time are:
1. Create an account at [Flightcontrol](https://app.flightcontrol.dev/signup?ref=nuxt){rel="nofollow"}
2. Create an account at [AWS](https://portal.aws.amazon.com/billing/signup){rel="nofollow"} (if you don't already have one)
3. Link your AWS account to the Flightcontrol
4. Authorize the Flightcontrol GitHub App to access your chosen repositories, public or private.
5. Create a Flightcontrol project with configuration via the Dashboard or with configuration via `flightcontrol.json`.
## Create a Project with Configuration via the Dashboard
1. Create a Flightcontrol project from the Dashboard. Select a repository for the source.
2. Select the `GUI` config type.
3. Select the Nuxt preset.
4. Select your preferred AWS server size.
5. Submit the new project form.
## Create a Project with Configuration via `flightcontrol.json`
1. Create a Flightcontrol project from your dashboard. Select a repository for the source.
2. Select the `flightcontrol.json` config type.
3. Add a new file at the root of your repository called `flightcontrol.json`. Here is an example configuration that creates an AWS fargate service for your app:
```json [flightcontrol.json]
{
"$schema": "https://app.flightcontrol.dev/schema.json",
"environments": [
{
"id": "production",
"name": "Production",
"region": "us-west-2",
"source": {
"branch": "main"
},
"services": [
{
"id": "nitro",
"buildType": "nixpacks",
"name": "My Nitro site",
"type": "fargate",
"domain": "www.yourdomain.com",
"outputDirectory": ".output",
"startCommand": "node .output/server/index.mjs",
"cpu": 0.25,
"memory": 0.5
}
]
}
]
}
```
4. Submit the new project form.
::read-more{target="_blank" to="https://www.flightcontrol.dev/docs?ref=nuxt"}
Learn more about Flightcontrol's configuration.
::
::read-more
---
target: _blank
to: https://nitro.unjs.io/deploy/providers/flightcontrol
---
Head over **Nitro documentation** to learn more about the flightcontrol deployment preset.
::
# GitHub Pages
Nuxt supports deploying to [GitHub Pages](https://pages.github.com/){rel="nofollow"} with minimal configuration.
::caution
GitHub Pages only support static sites, Nuxt will pre-render your application to static HTML files.
::
::caution
If you are **not** using a custom domain, you need to set `NUXT_APP_BASE_URL` to your repository-slug for your build step.
**Example**: `https://<user>.github.io/<repository>/`: `NUXT_APP_BASE_URL=/<repository>/ npx nuxt build --preset github_pages`
::
## Setup
Follow the steps to [create a GitHub Pages site](https://docs.github.com/en/pages/getting-started-with-github-pages/creating-a-github-pages-site){rel="nofollow"}.
## Deployment
Here is an example GitHub Actions workflow to deploy your site to GitHub Pages using the `github_pages` preset:
```yaml [.github/workflows/deploy.yml]
# https://github.com/actions/deploy-pages#usage
name: Deploy to GitHub Pages
on:
workflow_dispatch:
push:
branches:
- main
jobs:
build:
runs-on: ubuntu-latest
steps:
- uses: actions/checkout@v4
- run: corepack enable
- uses: actions/setup-node@v4
with:
node-version: "20"
# Pick your own package manager and build script
- run: npm install
- run: npx nuxt build --preset github_pages
- name: Upload artifact
uses: actions/upload-pages-artifact@v3
with:
path: ./.output/public
# Deployment job
deploy:
# Add a dependency to the build job
needs: build
# Grant GITHUB_TOKEN the permissions required to make a Pages deployment
permissions:
pages: write # to deploy to Pages
id-token: write # to verify the deployment originates from an appropriate source
# Deploy to the github_pages environment
environment:
name: github_pages
url: ${{ steps.deployment.outputs.page_url }}
# Specify runner + deployment step
runs-on: ubuntu-latest
steps:
- name: Deploy to GitHub Pages
id: deployment
uses: actions/deploy-pages@v4
```
::read-more
---
target: _blank
to: https://nitro.unjs.io/deploy/providers/github-pages
---
Head over **Nitro documentation** to learn more about the github-pages deployment preset.
::
# GitLab Pages
Nuxt supports deploying on the [GitLab Pages](https://docs.gitlab.com/ee/user/project/pages){rel="nofollow"} with minimal configuration.
::caution
GitLab Pages only support static sites, Nuxt will pre-render your application to static HTML files.
::
::caution
If you are **not** using a custom domain, you need to set `NUXT_APP_BASE_URL` to your repository-slug for your build step.
**Example**: `https://<group/user>.gitlab.io/<repository>/`: `NUXT_APP_BASE_URL=/<repository>/ npm run generate`
::
## Deployment
1. Here is an example GitLab Pages workflow to deploy your site to GitLab Pages:
```yaml [.gitlab-ci.yml]
# Job name has to be `pages`. See https://docs.gitlab.com/ee/user/project/pages/#how-it-works
pages:
image: node
before_script:
- npm ci --cache .npm --prefer-offline
script:
# Specify the steps involved to build your app here
- npm run generate
cache: # https://docs.gitlab.com/ee/ci/caching/#cache-nodejs-dependencies
key:
files:
- package-lock.json
paths:
- .npm/
artifacts:
paths:
# The directory that contains the built files to be published
- .output/public
# The directory that contains the built files to be published
publish: .output/public
rules:
# This ensures that only pushes to the default branch
# will trigger a pages deploy
- if: $CI_COMMIT_REF_NAME == $CI_DEFAULT_BRANCH
```
## Learn more
::read-more
---
target: _blank
to: https://docs.gitlab.com/ee/user/project/pages/getting_started_part_one.html#project-website-examples
---
Head over **GitLab Pages default domain names and URLs** to learn more about the GitLab Pages default domain names.
::
# Heroku
Nuxt supports deploying on [Heroku](https://heroku.com/){rel="nofollow"} with minimal configuration.
## Using the Heroku CLI
1. Create a new Heroku app.
```bash [Terminal]
heroku create myapp
```
2. Configure Heroku to use the nodejs buildpack.
```bash [Terminal]
heroku buildpacks:set heroku/nodejs
```
3. Configure your app.
```bash [Terminal]
heroku config:set SERVER_PRESET=heroku
```
4. Ensure you have `start` and `build` commands in your `package.json` file.
```json [package.json]
{
"scripts": {
"build": "nuxt build",
"start": "node .output/server/index.mjs"
}
}
```
## Learn more
::read-more{target="_blank" to="https://nitro.unjs.io/deploy/providers/heroku"}
Head over **Nitro documentation** to learn more about the Heroku deployment preset.
::
# IIS
## Using IISnode
1. Install the latest LTS version of [Node.js](https://nodejs.org/en/){rel="nofollow"} on your Windows Server.
2. Install [IISnode](https://github.com/azure/iisnode/releases){rel="nofollow"}
3. Install [IIS `URLRewrite` Module](https://www.iis.net/downloads/microsoft/url-rewrite){rel="nofollow"}.
4. In IIS, add `.mjs` as a new mime type and set its content type to `application/javascript`.
5. Build you application with the following command:
```bash [Terminal]
npx nuxi build --preset=iis_node
```
6. Deploy the contents of your `.output` folder to your website in IIS.
## More options
::read-more{target="_blank" to="https://nitro.unjs.io/deploy/providers/iis"}
Head over **Nitro documentation** to learn more about the IIS deployment presets.
::
# Koyeb
Nuxt supports deploying on the [Koyeb serverless platform](https://www.koyeb.com/docs){rel="nofollow"} with minimal configuration.
## Setup
1. Create a new Koyeb app for Nuxt following the [guide](https://www.koyeb.com/docs/deploy/nuxt){rel="nofollow"}.
2. Set the `engines.node` field in your project's `package.json` file to a [Koyeb-supported version of Node.js](https://www.koyeb.com/docs/build-and-deploy/build-from-git/nodejs#runtime){rel="nofollow"}:
```json [package.json]
{
"engines": {
"node": "20.x"
}
}
```
3. Ensure that `build` and `start` scripts are defined within the project's `package.json` file to define how to build and run the application:
```json [package.json]
{
"scripts": {
"build": "nuxt build",
"start": "node .output/server/index.mjs"
}
}
```
4. During deployment, you'll need to configure environment variables. In your service settings, set the following [environment variable](https://www.koyeb.com/docs/build-and-deploy/environment-variables){rel="nofollow"}:
```bash
SERVER_PRESET=koyeb
```
5. Click "Deploy" to build and deploy your Nuxt app.
## Learn more
::read-more{target="_blank" to="https://nitro.unjs.io/deploy/providers/koyeb"}
Head over **Nitro documentation** to learn more about the Koyeb deployment preset.
::
# Netlify
::tip
**Zero Configuration ✨**
:br
Integration with Netlify is possible with zero configuration, [learn more](https://nitro.unjs.io/deploy#zero-config-providers){rel="nofollow"}.
::
## Setup
Nuxt will auto-detect that you are in a [Netlify](https://www.netlify.com){rel="nofollow"} build environment and build an optimized version of your server.
For new sites, Netlify will detect that you are using Nuxt 3 and set the publish directory to `dist` and build command to `npm run build`.
::note
If you are upgrading an existing site from Nuxt 2 you should check these and update them if needed.
::
If you want to add custom redirects, you can do so with [`routeRules`](https://nuxt.com/docs/guide/concepts/rendering#hybrid-rendering) or by adding a [`_redirects`](https://docs.netlify.com/routing/redirects/#syntax-for-the-redirects-file){rel="nofollow"} file to your `public` directory.
::tip{color="green" icon="i-lucide-check-circle"}
For deployment, just push to your git repository [as you would normally do for Netlify](https://docs.netlify.com/configure-builds/get-started/){rel="nofollow"}.
::
## Netlify Edge Functions
::read-more
---
target: _blank
to: https://www.netlify.com/blog/announcing-serverless-compute-with-edge-functions
---
Netlify Edge Functions use Deno and the powerful V8 JavaScript runtime to let you run globally distributed functions for the fastest possible response times.
::
Set the following environment variable to run Nuxt on Edge Functions:
```bash
SERVER_PRESET=netlify_edge
```
## On-demand Builders
On-demand Builders are serverless functions used to generate web content as needed that’s automatically cached on Netlify’s Edge CDN.
They enable you to build pages for your site when a user visits them for the first time and then cache them at the edge for subsequent visits until the next deployment.
::read-more
---
target: _blank
to: https://docs.netlify.com/configure-builds/on-demand-builders/
---
Read More about Netlify on-demand builders
::
Set the following environment variable to enable on-demand builders:
```bash
SERVER_PRESET=netlify_builder
```
::read-more{target="_blank" to="https://nitro.unjs.io/deploy/providers/netlify"}
Head over **Nitro documentation** to learn more about the netlify deployment preset.
::
# NuxtHub
::tip
**Zero Configuration ✨**
:br
Integration with NuxtHub is possible with zero configuration, [learn more](https://nitro.unjs.io/deploy#zero-config-providers){rel="nofollow"}.
::
## Introduction
NuxtHub is a deployment and administration platform for Nuxt, powered by Cloudflare.
The main difference with the [Cloudflare](https://nuxt.com/deploy/cloudflare) deployment is that NuxtHub provides a zero-configuration deployment experience (provisioning, deployment, and administration).
It also provides a powerful admin interface to manage your Nuxt projects (database, blob, KV, ...) as well as [remote storage](https://hub.nuxt.com/docs/getting-started/remote-storage?utm_source=nuxt-website\&utm_medium=deploy-page){rel="nofollow"}.
Read more on [hub.nuxt.com](https://hub.nuxt.com/?utm_source=nuxt-website\&utm_medium=deploy-page){rel="nofollow"}.
## NuxtHub CLI
You can deploy your local project with a single command:
```bash [Terminal]
npx nuxthub deploy
```
The command will:
1. Ensure you are logged in on [admin.hub.nuxt.com](https://admin.hub.nuxt.com/?utm_source=nuxt-website\&utm_medium=deploy-page){rel="nofollow"}
2. Link your local project with a NuxtHub project or help you create a new one
3. Build your Nuxt project with the correct preset
4. Deploy it to your Cloudflare account with all the necessary resources
5. Provide you with a URL to access your project
See an example in video:
:video{controls className="rounded,dark:border,dark:border-gray-700,md:w-2/3" controls="true" poster="https://res.cloudinary.com/nuxt/video/upload/v1723569534/nuxthub/nuxthub-deploy_xxs5s8.jpg"}
::note
You can also install the [NuxtHub CLI](https://github.com/nuxt-hub/cli){rel="nofollow"} globally with: `npm i -g nuxthub`.
::
## Deploy using Git
1. Push your code to your git repository (GitHub)
2. Click on `New Project` then `Import a Git repository`
3. Select your repository and click on `Import repository`
4. NuxtHub will configure a GitHub Action workflow to deploy your project
5. Your application is deployed with a `.nuxt.dev` domain
After your project has been imported and deployed, all subsequent pushes to branches will generate preview deployments and all changes made to the production branch (commonly “main”) will result in a production deployment.
## Templates
::card-group
:::card
---
ui:
icon:
base: text-black dark:text-white
icon: i-simple-icons-github
target: _blank
title: Hello Edge
to: https://github.com/nuxt-hub/hello-edge
---
A minimal Nuxt starter running on the edge.
:::
:::card
---
ui:
icon:
base: text-black dark:text-white
icon: i-simple-icons-github
target: _blank
title: NuxtHub Starter
to: https://github.com/nuxt-hub/starter
---
A starter to get started with NuxtHub features (Database, Blob, KV, ...).
:::
:::card
---
ui:
icon:
base: text-black dark:text-white
icon: i-simple-icons-github
target: _blank
title: Atidone
to: https://github.com/atinux/atidone
---
A full-stack application with authentication and a database to manage your Todos.
:::
:::card
---
ui:
icon:
base: text-black dark:text-white
icon: i-simple-icons-github
target: _blank
title: Nuxt Image Gallery
to: https://github.com/flosciante/nuxt-image-gallery
---
An image gallery to upload, edit and share your images to the world.
:::
:::card
---
ui:
icon:
base: text-black dark:text-white
icon: i-simple-icons-github
target: _blank
title: Atinotes
to: https://github.com/atinux/atinotes
---
An editable website powered by Markdown & Vue components with dynamic OG image generation.
:::
:::card
---
ui:
icon:
base: text-black dark:text-white
icon: i-simple-icons-github
target: _blank
title: Atidraw
to: https://github.com/atinux/atidraw
---
Web application that lets you to draw and share your drawings with the world, with Cloudflare R2 & AI.
:::
::
::callout
See the whole list of templates on <https://hub.nuxt.com/templates>{rel="nofollow"}
::
# Render
Nuxt supports deploying on [Render](https://render.com/){rel="nofollow"} with minimal configuration.
## Set up application
1. [Create a new Web Service](https://dashboard.render.com/select-repo?type=web){rel="nofollow"} and select the repository that contains your code.
2. Ensure the 'Node' environment is selected.
3. Depending on your package manager, set the build command to `yarn && yarn build`, `npm install && npm run build`, or `pnpm i --shamefully-hoist && pnpm build`.
4. Update the start command to `node .output/server/index.mjs`
5. Click 'Advanced' and add the following environment variables
```bash
SERVER_PRESET=render_com
NODE_VERSION=20
```
6. Click on `Create Web Service`.
## More options
::read-more{target="_blank" to="https://nitro.unjs.io/deploy/providers/render"}
Head over **Nitro documentation** to learn more about the Render deployment presets.
::
# SST
Nuxt supports deploying on [SST](https://sst.dev/){rel="nofollow"} with minimal configuration.
## Quick start
1. Create a Nuxt project.
2. Init SST in your project.
```bash
npx sst@latest init
```
3. It should detect that your are using Nuxt and ask you to update your `nuxt.config.ts` file.
```ts
nitro: {
preset: 'aws-lambda'
}
```
4. Once you are ready to deploy, run.
```bash
npx sst deploy --stage production
```
You can [read the full Nuxt on SST tutorial here](https://sst.dev/docs/start/aws/nuxt){rel="nofollow"}.
## More options
You can also deploy Nuxt to a container using SST. Head over to the [SST docs to learn more](https://sst.dev/docs/start/aws/nuxt){rel="nofollow"}.
# Stormkit
::tip
**Zero Configuration ✨**
:br
Integration with [Stormkit](https://www.stormkit.io/){rel="nofollow"} is possible with zero configuration, [learn more](https://nitro.unjs.io/deploy#zero-config-providers){rel="nofollow"}.
::
## Setup
Follow the steps to [create a new app](https://app.stormkit.io/apps/new){rel="nofollow"} on Stormkit.
## Deployment
By default, Stormkit will deploy your apps automatically when you push changes to your main branch. But to trigger a manual deploy (for example, you might do this for the very first deployment), you may click `Deploy now`.
::read-more
---
target: _blank
to: https://nitro.unjs.io/deploy/providers/stormkit
---
Head over **Nitro documentation** to learn more about the stormkit deployment preset.
::
# Vercel
::tip
**Zero Configuration ✨**
:br
Integration with Vercel is possible with zero configuration, [learn more](https://nitro.unjs.io/deploy#zero-config-providers){rel="nofollow"}.
::
## Deploy using Git
1. Push your code to your git repository (GitHub, GitLab, Bitbucket).
2. [Import your project](https://vercel.com/new){rel="nofollow"} into Vercel.
3. Vercel will detect that you are using Nitro and will enable the correct settings for your deployment.
4. Your application is deployed!
After your project has been imported and deployed, all subsequent pushes to branches will generate [Preview Deployments](https://vercel.com/docs/concepts/deploy/environments#preview){rel="nofollow"}, and all changes made to the Production Branch (commonly “main”) will result in a [Production Deployment](https://vercel.com/docs/concepts/deploy/environments#production){rel="nofollow"}.
Learn more about Vercel’s [Git Integration](https://vercel.com/docs/concepts/git){rel="nofollow"}.
## Vercel Edge Functions
It is possible to deploy your Nuxt applications directly on [Vercel Edge Functions](https://vercel.com/docs/concepts/functions/edge-functions){rel="nofollow"}.
> Vercel Edge Functions allow you to deliver content to your site's visitors with speed and personalization.
> They are deployed globally by default on Vercel's Edge Network and enable you to move server-side logic to the Edge, close to your visitor's origin.
> Edge Functions use the Vercel Edge Runtime, which is built on the same high-performance V8 JavaScript and WebAssembly engine that is used by the Chrome browser.
> By taking advantage of this small runtime, Edge Functions can have faster cold boots and higher scalability than Serverless Functions.
> Edge Functions run after the cache, and can both cache and return responses. [Read More](https://vercel.com/docs/concepts/functions/edge-functions){rel="nofollow"}
In order to enable this target, set the following environment variable:
```bash
SERVER_PRESET=vercel_edge
```
Or update the build command to `nuxt build --preset=vercel_edge`.
## Vercel KV Storage
You can easily use [Vercel KV Storage](https://vercel.com/docs/storage/vercel-kv){rel="nofollow"} with [Nuxt Server Storage](https://nuxt.com/docs/guide/directory-structure/server#server-storage).
::read-more{target="_blank" to="https://unstorage.unjs.io/drivers/vercel-kv"}
Read more about the Vercel KV driver on Unstorage documentation.
::
1. Install `@vercel/kv` dependency:
```bash [Terminal]
npm i @vercel/kv
```
2. Update your `nuxt.config`:
```ts [nuxt.config.ts]
export default defineNuxtConfig({
nitro: {
storage: {
data: {
driver: 'vercelKV'
/* Vercel KV driver options */
}
}
}
})
```
::caution
You need to either set `KV_REST_API_URL` and `KV_REST_API_TOKEN` environment variables or pass `url` and `token` to driver options. Check [driver docs](https://unstorage.unjs.io/drivers/vercel-kv){rel="nofollow"} for more information about usage.
::
You can now access your data store anywhere in your `server/` directory:
```ts [server/routes/hello.ts]
export default defineEventHandler(async (event) => {
const dataStorage = useStorage('data');
await dataStorage.setItem('hello', 'world');
return {
hello: await dataStorage.getItem("hello"),
}
})
```
## Custom Build Output Configuration
You can provide additional [build output configuration](https://vercel.com/docs/build-output-api/v3){rel="nofollow"} using `nitro.vercel.config` key inside `nuxt.config`. It will be merged with built-in auto generated config.
## Templates
::card-group
:::card
---
ui:
icon:
base: text-black dark:text-white
icon: i-simple-icons-github
target: _blank
title: Nuxt Vercel ISR
to: https://github.com/danielroe/nuxt-vercel-isr
---
Example of a Nuxt application with hybrid rendering deployed on Vercel.
:::
:::card
---
ui:
icon:
base: text-black dark:text-white
icon: i-simple-icons-github
target: _blank
title: Nuxt on the Edge on Vercel
to: https://github.com/pi0/nuxt-on-the-edge
---
Example of a Nuxt application running on Vercel Edge Functions.
:::
::
## Learn More
::read-more{target="_blank" to="https://nitro.unjs.io/deploy/providers/vercel"}
Head over **Nitro documentation** to learn more about On-Demand Incremental Static Regeneration or more advanced options.
::
# Zeabur
Nuxt supports deploying on [Zeabur](https://zeabur.com){rel="nofollow"} with minimal configuration.
## Setup
1. Create a new Zeabur app for Nuxt following the [guide](https://zeabur.com/docs/guides/nodejs/nuxt){rel="nofollow"}.
2. During the deployment process, you can configure environment variables in Zeabur dashboard. In your service page, open the variables tab set the following [environment variable](https://zeabur.com/docs/deploy/variables){rel="nofollow"}:
```bash
SERVER_PRESET=zeabur
```
## Learn more
::read-more{target="_blank" to="https://nitro.unjs.io/deploy/providers/zeabur"}
Head over **Nitro documentation** to learn more about the Zeabur deployment preset.
::
# Zerops
**Nodejs Preset**: `SERVER_PRESET: zerops`**Static Preset**: `SERVER_PRESET: zerops-static`
::read-more{title="Zerops" to="https://zerops.io"}
::
::tip
**Nuxt x Zerops Quickrun ✨**
:br
Want to test running Nuxt on Zerops without installing or setting up anything? Using repositories [Zerops x Nuxt - Static](https://github.com/zeropsio/recipe-nuxt-static){rel="nofollow"} or [Zerops x Nuxt - SSR on Node.js](https://github.com/zeropsio/recipe-nuxt-nodejs){rel="nofollow"} you can deploy example Nuxt app with a single click.
::
Zerops supports deploying both static and server-side rendered apps with a simple configuration file in your project root.
## Static
Projects and services can be added either through a [Project add wizard](https://app.zerops.io/dashboard/project-add){rel="nofollow"} or imported using a YAML structure:
### Creating a Project
```yml [zerops-project-import.yml]
project:
name: recipe-nuxt
services:
- hostname: app
type: static
```
This will create a project called `recipe-nuxt` with a Zerops Static service called `app`.
### Setting up Zerops YAML
To tell Zerops how to build and run your app, add a `zerops.yml` to your root:
```yml [zerops.yml]
zerops:
- setup: app
build:
base: nodejs@20
buildCommands:
- yarn
- yarn nuxi generate
deployFiles:
- .output/public/~
run:
base: static
```
Now you can trigger the [build & deploy pipeline using the Zerops CLI](https://nuxt.com/#building-deploying-your-app) or by connecting the app service with your [GitHub](https://docs.zerops.io/references/github-integration/){rel="nofollow"} / [GitLab](https://docs.zerops.io/references/gitlab-integration){rel="nofollow"} repository from inside the service detail.
## SSR Node.js
Projects and services can be added either through a [Project add wizard](https://app.zerops.io/dashboard/project-add){rel="nofollow"} or imported using a YAML structure:
```yml [zerops-project-import.yml]
project:
name: recipe-nuxt
services:
- hostname: app
type: nodejs@20
```
This will create a project called `recipe-nuxt` with a Zerops Node.js service called `app`.
### Setting up Zerops YAML
To tell Zerops how to build and run your app, add a `zerops.yml` to your root:
```yml [zerops.yml]
zerops:
- setup: nuxt
build:
base: nodejs@20
buildCommands:
- yarn
- yarn build
deployFiles:
- .output/~
run:
base: nodejs@20
ports:
- port: 3000
httpSupport: true
start: node server/index.mjs
```
Now you can trigger the [build & deploy pipeline using the Zerops CLI](https://nuxt.com/#building-deploying-your-app) or by connecting the app service with your [GitHub](https://docs.zerops.io/references/github-integration/){rel="nofollow"} / [GitLab](https://docs.zerops.io/references/gitlab-integration){rel="nofollow"} repository from inside the service detail.
## Building & Deploying your App
- Install the [Zerops CLI](https://github.com/zeropsio/zcli){rel="nofollow"}.
```sh
npm i -g @zerops/zcli
```
- Open [Settings > Access Token Management](https://app.zerops.io/settings/token-management){rel="nofollow"} in the Zerops app and generate a new access token.
- Log in using your access token with the following command:
```sh
zcli login <token>
```
- Navigate to the root of your app (where `zerops.yml` is located) and run the following command to trigger the deploy:
```sh
zcli push
```
Your code can be deployed automatically on each commit or a new tag by connecting the service with your [GitHub](https://docs.zerops.io/references/gitlab-integration){rel="nofollow"} / [GitLab](https://docs.zerops.io/references/gitlab-integration){rel="nofollow"} repository. This connection can be set up in the service detail.
::read-more{title="Zerops Documentation" to="https://docs.zerops.io/"}
::
# DigiNeat
Welcome to DigiNeat — a modern digital agency that always stays up-to-date with the times. We are proud to have representations in Armenia and the USA, allowing us to effectively collaborate with clients worldwide.
**Our Services**
We specialize in developing:
- **Websites and mobile applications**: We create attractive and functional solutions that meet any business needs.
- **Smart TV applications**: We offer innovative solutions for television platforms to make entertainment even more accessible.
- **PC software**: We develop powerful and reliable applications for all necessary tasks.
**Why We Choose NUXT**
We have been using Nuxt as one of the leading solutions in our projects — from websites to smart TV applications. Our team is thrilled to be among the official agencies representing this company. Nuxt enables us to create high-quality and efficient applications with minimal time and resource investment. [Learn more about why we choose Nuxt.](https://digineat.com/partners/nuxt){rel="nofollow"}
**Focus on Quality**
For us, our clients' tasks and deadlines are a priority. By utilizing advanced technologies and an AI-first approach, we achieve more while spending less. Our cost-effective process optimization has saved our clients millions of dollars.
**Open to Collaboration**
We are always ready for new opportunities and open to collaboration. We welcome all interested parties to work with us on joint projects.
Contact us, and let’s create the future of digital technology together!
# Magic as a Service
### **Nuxt Development by Magic as a Servic**
With deep expertise in Nuxt and Vue, we build seamless, scalable applications that combine technical precision, elegant design, and intuitive user experiences. From lean MVPs to large-scale digital platforms, we develop ambitious products that solve real problems—with a focus on seamless performance, elegant design, and user-first experiences.
Our work with Maison Margiela, Jil Sander, and SSENSE showcases our ability to craft fast, accessible, and future-proof digital platforms. From custom UI components to SSR and ISR optimisations, we ensure every application is built for beauty, accessibility and performance.
### Our Capabilities
We design and build complete digital products—combining design, engineering, and technical strategy in one team. Whether it's a design system, an e-commerce platform, or a complex interactive experience, we create solutions that are both technically robust and visually compelling. Our process covers everything from discovery and definition to design, development, and deployment.
Using Nuxt as a stable and flexible framework, we create applications that are efficient, scalable, and easy to maintain. Learn more about how we work with Nuxt at [maas.engineering/nuxt](https://maas.engineering/nuxt){rel="nofollow"}.
# Liip AG
Liip is a Swiss digital agency with strong convictions. For more than a decade, Liip has been helping companies with their strategic digital projects – from developing innovative web applications, award-winning mobile apps and data-driven online shops, through to coaching sessions for agile ways of working. Our strategy, ideation, user experience and custom development experts create long-lasting software. Whether start-up, large company or federal authority, from retail to mobility, our projects are used by thousands of users.
Rather than just offering standard solutions, we strive for real progress: user-centred innovations with a social, environmental and economic impact for our customers. Liip works in an agile way in self-organised teams using Holacracy. This means no bosses, just lots of entrepreneurship and drive – and even more open source, creative problem solving, testing and new technologies. This is valued by not only our around 200 employees, but also customers and award panels.
# WebReinvent
WebReinvent has 12+ years of experience building software and a team of 50+ software professionals including software developers, UI/UX designers, testers, DevOps, project managers, etc. The team is well-versed in the Nuxt ecosystem and has delivered multiple high-performance web apps, dashboards, real-time apps, multi-tenant SaaS applications, etc.
We are one of the most process-driven companies and we love to follow industry standards. Some of them are managing git repo, code review/audits, deploying new releases via CI/CD, automated software testing, maintaining detailed technical documentation, application performance monitoring, etc. We have been delivering MVP to enterprise-level software products from startup to MSME.
Contact us to build your MVP fast or migrate your legacy software to Nuxt or maintain your existing software or scale your software to the enterprise level. We're here to help.
# 64 Robots
64 Robots is a software agency that specializes in custom software development using a powerful tech stack, consisting of Laravel, Vue.js, Nuxt.js, AWS, and Figma. Founded in 2016 and based in Baltimore, Maryland, our primary focus is on building highly-scalable, accessibility-focused, secure applications.
We believe that accessibility is a fundamental aspect of web application development. We prioritize accessibility in everything we do, from design to development to testing. We create accessibility-first web applications that are designed to meet the accessibility requirements of the Americans with Disabilities Act (ADA).
At 64 Robots, security is a critical aspect of web application development, and we take it seriously. We follow strict security protocols and employ a range of security testing techniques to identify and address potential vulnerabilities. We conduct a thorough risk assessment at the beginning of the development process to identify potential security risks and develop a plan to address them.
We pride ourselves on building partnerships with our clients and providing full transparency at each stage of every project lifecycle.
# Zen Architects
ZEN Architects provides Nuxt support by specialists with strengths in DevOps and OSS. Our team consists of top-notch experts in front-end technologies, with extensive experience developing with frameworks including Vue.js and Nuxt.js over years. We keep focusing on optimizing clients IT investment by providing the most efficient solution case by case.
ZEN Architects は DevOps や OSS に強みを持つスペシャリスト集団です。フロントエンド技術については、Vue.js や Nuxt.js などのフレームワークを使った開発経験が豊富で、チームには日本を代表するエキスパートも含まれています。ZEN Architects が提供する技術アドバイザリサービスでは、これまで数十社にのぼるエンタープライズ開発プロジェクトをサポートしてきました。私たちは日頃よりお客様のITへの投資を最適化することにフォーカスしており、ケースごとに最適な解決策を提供します。
# SIDESTREAM
We develop the best Nuxt 3 software for you.
Yes, truly the best.
How? You’ll work directly with a Nuxt-Insider and 25+ Nuxt3 experts who shipped 50+ Nuxt projects.
We are the creators of sidebase - The productive way to build fullstack Nuxt 3 applications.
We specialize in Nuxt 3 and Fullstack TypeScript Development.
# Passionate People
Passionate People provide you with additional technical capacity to power-up your digital transformation journeys with our teams of first-class engineers and consultants.
Full stack JavaScript Cloud Engineers ready to work with you and your teams.
# Undefined
Undefined is a london-based digital studio. We imagine, build & grow performant Websites & Digital Products. We’re a hands-on team of designers & developers that joins forces with forward-thinking startups & enterprises dedicated to their craft.
We believe in the power of collaboration, mixing your expertise in your industry with our love & knowledge for building great digital experiences.
We specialize in building custom web experiences, with our passion being building engaging & bespoke headless CMS setups. Being a partner with a range of great services (Vercel, Prismic, Storyblok, Shopify) gives us deep knowledge to pick the right fit for every project.
# Wimadev
We help you plan, develop, extend and maintain your enterprise grade Nuxt application and Node.js backend. Our customers include big international tech corporations and some of Germanys most well known brands. We have been developing almost exclusively with Nuxt since Nuxt 2 was released about 5 years ago.
# 7Span
At 7Span, we specialize in crafting innovative technology solutions for entrepreneurs and businesses committed to excellence. Since 2015, we have delivered a wide range of services, including custom web development, startup consulting, mobile app solutions, SaaS development, and UI/UX & branding, to enterprises, startups, and agencies.
With a robust team of over 230 professionals, we have consistently developed high-performance web apps, browser extensions, chat apps, real-time dashboards, and multi-tenant SaaS apps, particularly within the Nuxt ecosystem.
We pride ourselves on being one of the most process-driven companies in the industry. We adhere to stringent standards such as effective sprint management, follow strict security protocols, efficient git repo management, thorough code reviews and audits, CI/CD-based deployment, software testing, technical documentation, and comprehensive application performance monitoring.
Over the past decade, we have had the honor of developing cutting-edge solutions for globally renowned brands, high-growth startups, ambitious entrepreneurs, and Fortune 100 companies.
Our notable clients::br
Nestle, Dell, HP, Princeton University, Pfizer, Jio, ITC, T-Systems, Godrej, and Delhivery.
Let's connect to build your MVP, migrate your legacy software to Nuxt, upgrade to the latest Nuxt version, or scale your software to the enterprise level.
# Monterail
Monterail focuses on delivering innovative software to industry leaders. Since 2010, it has **leveraged the expertise of over 150 specialists** to engineer cutting-edge solutions for market leaders.
As a trusted Vue.js partner, our portfolio showcases diverse projects, highlighting our **commitment to technological excellence and innovative design**.
Our global clientele spans various industries, underscoring our versatility and the recognition we've received, including presence in the Financial Times 1000 and Deloitte's rankings.
Our remote-friendly team excels in communication and collaboration, ensuring seamless engagement across borders. We offer comprehensive tech consultations and business strategy evaluations, building enduring client relationships. Our approach values diversity and creativity, driving us to explore unique solutions that empower businesses.
# The Coding Machine
The Coding Machine has been specialized in tailor-made development around Open Source technologies for more than 15 years.
We like to work and partner with companies of all sizes, from entrepreneurs to multinationals, in all sectors. Technical expertise, challenge (and curiosity) is what drives us.
# Coditive
We are a software development company from Poland, and we specialize in providing exceptional software development services to businesses worldwide. Since 2009, we have helped over 400 clients achieve their business goals. We are your long term, trusted technology partner.
At Coditive, we're committed to bringing your vision to life with our top-notch coding skill both on frontend and backend areas. Our team blends experience and technical know-how to offer unparalleled development services.
Our aim is to help your business succeed by tackling the unique challenges you encounter. Our services encompass creating new digital products, improving existing ones, and experimenting with fresh ideas. At Coditive, we believe that communication is key to success in any project. That's why we always prioritize open and transparent communication with our clients. We value your input and feedback throughout the entire development process, from ideation to implementation.
We specialize in Vue.js, Nuxt, Node.js, and Hi-end WordPress development. Our team has a keen eye for detail, ensuring that every aspect of your project is executed with precision and care. Let us know how we can assist you in reaching your goals.
# Curotec
## Curotec Experience
Our experience extends from ground-up development using the Nuxt.js framework to side-by-side collaborations that make in-house teams more productive with Nuxt. Innovation doesn’t stop or start at a company’s size. That’s why our skilled Nuxt.js development team has helped a wide variety of businesses - from enterprises to digital-first startups - realize their vision with highly-usable, seamless, professionally-built applications.
## The Team
Our team is equipped to take your ideas from concept to launch, pairing the powerful Nuxt.js framework with complementary technologies such as Vue.js, Laravel, Node.js, WordPress, and more as well as deep software planning and design experience to transform your vision into reality. But Curotec can do more than greenfield development, drawing on the comprehensive skill set of our teams and leaders to step in at any stage of development, from planning and design to long-term support.
Rounding out the team with digital strategy, UX, and DevOps, Curotec engineers are positioned to partner with you to create beautiful, functional, and purpose-built applications.
# Geist
We are a specialized agency focused on building complex, high-performance e-commerce websites using Nuxt 3 and Shopify.
Our approach prioritizes long-term success for our clients by delivering a clean, maintainable codebase that ensures full control over their project post-delivery.
This allows our clients to easily manage and scale their e-commerce platforms without reliance on external developers, empowering them to make updates and adjustments seamlessly.
# Design Kit
## Logo History
The Nuxt logo has evolved gradually over time, but the mountain shape and wordmark have been constant elements in its design.
::div{className="hidden,lg:block"}
{className="dark:hidden,w-full"}{className="hidden,dark:block,w-full"}
::
::div{className="lg:hidden"}
{className="dark:hidden,w-full"}{className="hidden,dark:block,w-full"}
::
## Nuxt Logo
The logo is made from two elements: the triangular mountains and the wordmark. In most cases, they should appear together as the opposite master lockup shows. The triangular mountains can be used on their own as an icon, profile picture or badge, but the wordmark should never be used without this symbol on the side.
### Icon
::u-page-grid
:::design-kit-image-card{name="Green" path="icon-green"}
:::
:::design-kit-image-card{background="bg-white" name="Black" path="icon-black"}
:::
:::design-kit-image-card
---
background: bg-gray-950
name: White
path: icon-white
---
:::
::
### Logo
::u-page-grid
:::design-kit-image-card
---
full: true
background: bg-gray-950
name: Green & white
path: logo-green-white
---
:::
:::design-kit-image-card
---
full: true
background: bg-white
name: Black
path: logo-black
---
:::
:::design-kit-image-card
---
full: true
background: bg-gray-950
name: White
path: logo-white
---
:::
:::design-kit-image-card
---
full: true
background: bg-white
name: Green & black
path: logo-green-black
---
:::
::
## Color Palette
Our color palette is based on our iconic Nuxt green and colours have been carefully considered to work in harmony and consistency across various media. When creating Nuxt communications, use the colour values shown to make sure your designs stay on-brand.
::u-page-grid
:::design-kit-color-card{background="#00DC82" name="Green"}
:::
:::design-kit-color-card{background="#FFFFFF" name="White"}
:::
:::design-kit-color-card{background="#020420" name="Gray"}
:::
::